Advertisement
Available languages
Available languages
Quick Links
Model: LBT-120
User manual - Turntable with Bluetooth and USB direct encoding
Gebruikshandleiding - Platenspeler met Bluetooth en USB voor directe codering
Benutzerhandbuch – Plattenspieler mit Bluetooth und direkter USB-Aufnahme
Mode d'emploi - Tourne-disque avec Bluetooth et encodage direct en USB
Manual de usuario - Tocadiscos con Bluetooth y codificación directa USB
Manuale d'uso - Giradischi con Bluetooth e codifica diretta USB
1
Advertisement

Related Manuals for LENCO LBT-120


Summary of Contents for LENCO LBT-120
- Page 1 Model: LBT-120 User manual - Turntable with Bluetooth and USB direct encoding Gebruikshandleiding - Platenspeler met Bluetooth en USB voor directe codering Benutzerhandbuch – Plattenspieler mit Bluetooth und direkter USB-Aufnahme Mode d'emploi - Tourne-disque avec Bluetooth et encodage direct en USB Manual de usuario - Tocadiscos con Bluetooth y codificación directa USB...
-
Page 2: Table Of Contents
Index English.............................. 3 Nederlands ............................ 11 Deutsch ............................19 Français ............................28 Español ............................36 Italiano ............................44 Version 6.0... -
Page 3: English
English CAUTION: Usage of controls or adjustments or performance of procedures other than those specified herein may result in hazardous radiation exposure. PRECAUTIONS BEFORE USE KEEP THESE INSTRUCTIONS IN MIND: Do not cover or block any ventilation openings. When placing the device on a shelf, leave 5 cm (2”) free space around the whole device. - Page 4 23. Do not allow children access to plastic bags. 24. Only use attachments/accessories specified by the manufacturer. 25. Refer all servicing to qualified service personnel. Servicing is required when the device has been damaged in any way, such as the power supply cord or the plug, when liquid has been spilled or objects have fallen into the device, when the device has been exposed to rain or moisture, does not operate normally, or has been dropped.
- Page 5 * Those instruction are related only to products using power cable or AC power adaptor. Information for power adaptor Power supply adaptor - Manufacturer: Shenzhen Andsmps Electronic Technology Co., Ltd - Model number: AS013W-1201000ZC - Adaptor type: External AC adaptor - Use only the power supply listed in the user instructions Information Value and and precision...
- Page 6 Assembly Drive belt: The belt and turntable platter have been installed properly at factory, but the belt may be loose during transportation. If so, the following procedures will be taken for belt installation by yourself. A. Remove the rubber mat from the turntable platter and the E ring from the turntable shaft, then release the turntable platter from the shaft B.
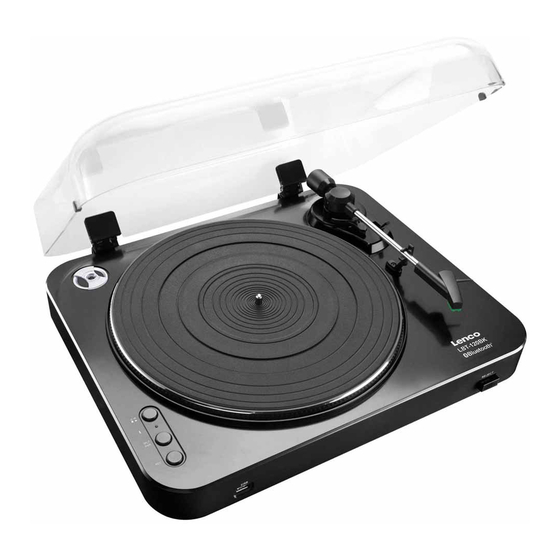
- Page 7 1. Adaptor: Use this adaptor when playing 45 RPM records. 2. Platter: Place a record here to play. 3. 33/45 RPM Switch: Switch 33 or 45 rpm for playing a record at a correct speed.
- Page 8 4. REC: Press it to enter into record mode. Remark: you can not make any recoding while the turntable is transmitting sound through Bluetooth. 5. SPLIT/PAIR (BLUETOOTH) Split function: For stopping the current recording, forming a record file manually and then going on recording the next track.
- Page 9 - Press REC button to start recording. -> LED blinks slowly. - Press SPLIT button to create new file in the recording. - Press REC button again to stop recording. -> LED is flashing for a short time, then LED light is on again.
- Page 10 (both during and after the warranty period) you should contact your local dealer. Important note: It is not possible to send products that need repairs to Lenco directly. Important note: If this unit is opened or accessed by a non-official service center in any way, the warranty expires.
-
Page 11: Nederlands
Nederlands LET OP: Het gebruik van afstandsbedieningen of aanpassingen of de uitvoering van procedures die niet in dit document zijn gespecificeerd, kan leiden tot gevaarlijke blootstelling aan straling. VOORZORGSMAATREGELEN VOOR GEBRUIK ONTHOUD DE VOLGENDE INSTRUCTIES: Bedek of blokkeer de ventilatieopeningen niet. Wanneer u het apparaat op een schap plaatst, dient u 5 cm (2”) vrije ruimte rondom het gehele apparaat te behouden. - Page 12 19. Dit product is alleen voor niet-professioneel gebruik bedoeld en niet voor commercieel of industrieel gebruik. 20. Verzeker u ervan dat het apparaat in een stabiele positie staat opgesteld. Schade die wordt veroorzaakt door het gebruik van dit product in een onstabiele positie, trillingen of schokken of het niet opvolgen van de waarschuwingen of voorzorgsmaatregelen in deze gebruikershandleiding wordt niet gedekt door de garantie.
- Page 13 ⚫ Vervanging van een batterij door een incorrect type kan leiden tot een ontploffing of de lekkage van ontvlambare vloeistoffen of gas. ⚫ Het weggooien van een batterij in het vuur of een hete oven, of het mechanisch verpletteren of insnijden van een batterij, kan leiden tot een explosie.
- Page 14 Montage Aandrijfriem: De riem en het draaiplateau zijn in de fabriek juist geïnstalleerd, maar de riem kan tijdens het transport losraken. In dat geval moet u de volgende procedures volgen voor de installatie van de riem. A. Verwijder de rubberen mat van het draaiplateau en de E-ring van de as van het draaiplateau en haal vervolgens het draaiplateau los van de as B.
- Page 15 1. Adapter: Gebruik deze adapter voor het afspelen van 45-toerenplaten. 2. Plateau: Plaats hier een plaat om af te spelen. 3. 33/45 TPM-schakelaar: Schakel naar 33 of 45-toeren voor het afspelen van een plaat met de juiste snelheid. 4. OPNAME/MP3 codering:...
- Page 16 Druk erop om naar de opnamemodus te gaan. Opmerking: u kunt geen opnamen maken terwijl de platenspeler geluid via bluetooth uitzendt. 5. SPLITSEN/KOPPELEN (BLUETOOTH) Splits-functie: Voor het stoppen van de huidige opname, het handmatig vormen van een opnamebestand en vervolgens doorgaan met het opnemen van de volgende track. Koppel-functie: Druk op deze knop tot dat de LED-indicator blauw begint te knipperen en zet vervolgens uw Bluetooth-luidspreker of -hoofdtelefoon in de koppelmodus.
- Page 17 - Druk op de knop REC om de opname te starten. -> LED knippert langzaam. - Druk op de knop SPLIT om een nieuw bestand te maken in de opname. - Druk nogmaals op de knop REC om het opnemen te stoppen. -> LED knippert korte tijd en vervolgens brandt het LED-lampje weer.
- Page 18 Garantie Lenco biedt service en garantie aan overeenkomstig met de Europese wetgeving. Dit houdt in dat u, in het geval van reparaties (zowel tijdens als na de garantieperiode), uw lokale handelaar moet contacteren. Belangrijke opmerking: Het is niet mogelijk om producten die gerepareerd moeten worden direct naar Lenco te sturen.
-
Page 19: Deutsch
Deutsch ACHTUNG: Eine andere als die hier beschriebene Bedienung, Einstellung oder Verwendung der Funktionen kann zu gefährlicher Strahlenbelastung führen. VORSICHTSMASSNAHMEN VOR DER BENUTZUNG BEFOLGEN SIE IMMER FOLGENDE ANWEISUNGEN: Blockieren oder bedecken Sie keine Lüftungsöffnungen. Wenn Sie das Gerät auf ein Regal stellen, lassen Sie um das gesamte Gerät 5 cm (2”) freien Platz. - Page 20 vorgesehen, es sei denn, sie werden durch eine verantwortliche Person beaufsichtigt oder wurden in die ordnungsgemäße Bedienung des Gerätes durch eine für ihre Sicherheit verantwortliche Person eingewiesen. 19. Dieses Produkt ist nur für den nicht-professionellen Gebrauch und nicht für gewerbliche oder industrielle Zwecke bestimmt.
- Page 21 ⚫ Die Batterie darf während der Benutzung, Aufbewahrung oder des Transports weder sehr hohen oder sehr niedrigen Temperaturen noch niedrigem Luftdruck in großen Höhenlagen ausgesetzt werden. ⚫ Die Ersetzung der Batterie mit einem falschen Batterietyp kann zum Explodieren der Batterie oder dem Auslaufen von entflammbarem Gas oder entflammbarer Flüssigkeit aus der Batterie führen.
- Page 22 Zusammenbau Antriebsriemen: Der Riemen und der Plattenteller wurden werksseitig ordnungsgemäß installiert, aber der Riemen kann sich beim Transport lockern. Falls dies der Fall ist, führen Sie mit folgenden Verfahren die Installation des Riemens selbst durch. A. Entfernen Sie die Gummimatte vom Plattenteller und den E-Ring von der Plattentellerwelle. Ziehen Sie anschließend den Plattenteller von der Welle.
- Page 23 1. Legen Sie eine Schallplatte auf den Plattenteller und geben Sie sie wieder. 2. Heben Sie den Tonarm mit dem Tonarmlift manuell an und senken Sie im leeren Bereich am Ende der Schallplatte ab. 3. Der Mechanismus der automatischen Rückkehrfunktion wird ordnungsgemäß eingestellt und der Tonarm kehrt automatisch zur Tonarmstütze zurück.
- Page 24 1. Adapter: Verwenden Sie diesen Adapter zum Abspielen von Schallplatten mit einer Drehzahl von 45 U/min. 2. Plattenteller: Platzieren Sie hier eine Schallplatte zum Abspielen. 3. 33/45-U/min-Umschalter: Stellen Sie für die Wiedergabe einer Schallplatte mit der richtigen Geschwindigkeit 33 oder 45 U/min ein.
- Page 25 externes Netzteil. 14. Abbrechen Lässt den Tonarm direkt zur Tonarmstütze zurückkehren. 15. LED - USB-Aufnahmevorgang und LED-Statusanzeige. - USB-Speichergerät wurde nicht angeschlossen. -> die LED leuchtet nicht. - USB-Speichergerät wurde angeschlossen -> die LED blinkt. - Das System ist aufnahmebereit. -> die LED leuchtet. - Starten Sie die Aufnahme mit der REC-Taste.
- Page 26 * WICHTIGE EMPFEHLUNGEN Wir empfehlen Ihnen, dass Sie für ein dauerhaftes und maximales Musikerlebnis Ihre Schallplatten mit einem Tuch reinigen, das mit einem antistatischen Produkt imprägniert wurde. Wir möchten Sie aus selben Grund darauf hinweisen, dass Ihre Tonabnehmernadel regelmäßig (ungefähr alle 250 Stunden) gewechselt werden sollten. Entfernen Sie von Zeit zu Zeit mit einem sehr weichen Pinsel, der in Alkohol getaucht wurde, den Staub von der Tonabnehmernadel (vom hinteren Teil des Tonabnehmers zum vorderen Teil des Tonabnehmers streichen).
- Page 27 Reparaturen (sowohl während als auch nach Ablauf der Garantiezeit) sollten Sie deshalb Ihren Einzelhändler kontaktieren. Wichtiger Hinweis: Es ist nicht möglich, Geräte für Reparaturen direkt an Lenco zu schicken. Wichtiger Hinweis: Falls dieses Gerät von einem nicht autorisierten Kundendienst geöffnet oder darauf zugegriffen wird, erlischt die Garantie.
-
Page 28: Français
Français ATTENTION : L’utilisation de commandes ou d’ajustements ou l’exécution de procédures autres que celles spécifiées dans le présent document peuvent entraîner une exposition dangereuse aux radiations. PRÉCAUTIONS AVANT UTILISATION GARDEZ CES INSTRUCTIONS À L’ESPRIT : Ne couvrez pas et n’obturez pas les ouvertures de ventilation. Lorsque vous placez l’appareil sur une étagère, laissez 5 cm (2”) d’espace libre tout autour de l’appareil. - Page 29 connaissances, à moins qu’elles n’aient été supervisées ou qu’une personne responsable de leur sécurité ne leur ait donné des instructions sur l’utilisation correcte de l’appareil. 19. Ce produit est réservé à un usage non professionnel, et non pas à un usage commercial ni industriel.
- Page 30 ⚫ L’introduction d’une pile dans le feu ou dans un four chaud, l’écrasement ou le découpage mécanique peut entraîner une explosion. ⚫ L’exposition d’une pile dans un environnement à température extrêmement élevée peut entraîner une explosion ou une fuite de liquide ou de gaz inflammable. ⚫...
- Page 31 Montage Courroie d'entrainement : La courroie et le plateau du tourne-disque ont été correctement installés en usine, mais la courroie peut s'être détendue pendant le transport. Si c'est le cas, suivre les procédures pour installer la courroie vous-même. A. Retirer le tapis en caoutchouc du plateau du tourne-disque et l'anneau E de l'arbre du tourne- disque, puis dégager le plateau de l'arbre.
- Page 32 1. Placer un disque sur le plateau et le lire. 2. Lever manuellement le bras et le placer sur la partie lisse à la fin du disque. 3. le mécanisme de retour automatique s'ajustera correctement et le bras retournera automatiquement sur le support de bras. Description...
- Page 33 1. Adaptateur : Utiliser cet adaptateur pour lire des disque 45 tours. 2. Plateau : Placer un disque et lire. 3. Commutateur 33 / 45 tours : Commuter sur 33 ou 45 tours pour lire le disque à la vitesse correcte. 4.
- Page 34 Appuyer dessus pour forcer le bras à revenir directement sur son support. 15. Voyant lumineux - Enregistrement USB et signal de LED. - L'appareil de stockage USB n'est pas branché. -> La LED est éteinte - L'appareil de stockage USB est branché -> La LED clignote - Quand le système est prêt à...
- Page 35 électriques et électroniques). 4. Marquage CE Par la présente, Lenco Benelux B.V., Thermiekstraat 1a, 6361 HB Nuth, Pays-Bas, déclare que ce produit est conforme aux exigences principales des directives européennes. La déclaration de conformité peut être consultée au lien : techdoc@commaxxgroup.com...
-
Page 36: Español
Español PRECAUCIÓN: El uso de controles o ajustes o rendimiento de procedimientos excepto aquellos que los aquí especificados puede provocar una exposición peligrosa a la radiación. PRECAUCIONES PREVIAS AL USO TENGA ESTAS INSTRUCCIONES EN MENTE: No cubra o bloquee ninguna apertura de ventilación. Cuando coloque el dispositivo en una estantería, deje 5 cm (2”) de espacio libre alrededor de todo el dispositivo. - Page 37 les haya dado supervisión o instrucciones acerca del uso correcto del dispositivo por parte de una persona responsable de su seguridad. 19. Este producto está diseñado para un uso no profesional únicamente y no para un uso comercial o industrial. 20.
- Page 38 ⚫ Si arroja la pila al fuego o a un horno caliente, o aplasta o cortar mecánicamente una pila, podría provocar una explosión. ⚫ Si deja una pila en un lugar con temperaturas extremadamente altas, se puede producir una explosión o una fuga de líquido o gas inflamable. ⚫...
- Page 39 Montaje Correa: La correa y el plato se han instalado debidamente en fábrica, pero la correa puede aflojarse durante el transporte. En tal caso, se deben seguir los siguientes procedimientos para que usted mismo instale la correa. A. Retire la cubierta de goma del plato del tocadiscos y el anillo en E del eje del tocadiscos, y posteriormente, suelte el plato del tocadiscos del eje B.
- Page 40 1. Coloque un disco en el plato y reprodúzcalo. 2. Baje manualmente el brazo y colóquelo sobre la parte vacía del final del disco. 3. El mecanismo de la función de vuelta automática se ajustará debidamente y el brazo volverá automáticamente a su soporte.
- Page 41 1. Adaptador: Use este adaptador cuando reproduzca discos de 45 RPM. 2. Plato: Coloque aquí el disco para reproducirlo. 3. Interruptor de 33/45 rpm: Cambia a 33 o 45 rpm para reproducir un disco a la velocidad correcta. 4. Grabacion en MP3: Púlselo para entrar en el modo de grabación.
- Page 42 15. LED - Funcionamiento de la grabación USB e indicación de señal LED - El dispositivo de almacenamiento USB no está conectado. -> La luz LED está apagada - El dispositivo de almacenamiento USB está conectado -> La luz LED parpadea - Cuando el sistema está...
- Page 43 (cepillando de atrás hacia delante del cartucho). 1. Garantía Lenco ofrece servicio y garantía en cumplimiento con las leyes de la Unión Europea, lo cual implica que, en caso de que su producto precise ser reparado (tanto durante como después del periodo de garantía), deberá...
-
Page 44: Italiano
Italiano ATTENZIONE: L'utilizzo di controlli o regolazioni o l'esecuzione di procedure diverse da quelle specificate può causare l'esposizione a radiazioni pericolose. PRECAUZIONI PRIMA DELL'USO CONSERVARE QUESTE ISTRUZIONI: Non coprire o bloccare le aperture di ventilazione. Quando si posiziona il dispositivo su uno scaffale, lasciare uno spazio libero di 5 cm (2") attorno all'intero perimetro. - Page 45 19. Questo prodotto è destinato esclusivamente all'uso non professionale e non commerciale o industriale. 20. Assicurarsi che l'unità sia collocata in una posizione stabile. I danni causati dall'uso di questo prodotto in una posizione instabile, vibrazioni o urti o la mancata osservanza di qualsiasi altro avvertimento o precauzione indicati in questo manuale utente non saranno coperti da garanzia.
- Page 46 ⚫ Una batteria soggetta a una pressione dell'aria estremamente bassa può provocare un'esplosione o una perdita di liquidi o gas infiammabili. ⚫ È necessario prestare attenzione agli aspetti ambientali legati allo smaltimento delle batterie. INSTALLAZIONE • Disimballare tutte le parti e rimuovere il materiale protettivo. •...
- Page 47 Montaggio Trasmissione a cinghia: La cinghia e il piatto del giradischi sono stati installati correttamente in fabbrica, ma la cinghia potrebbe essere allentata durante il trasporto. In tal caso, per l'installazione della cinghia verranno adottate le seguenti procedure. Rimuovere il tappetino di gomma dal piatto del giradischi e l'anello E dall'albero del giradischi, quindi rilasciare il piatto del giradischi dall'albero Mettere la cinghia di trasmissione sul bordo interno del piatto del giradischi e tirarla attraverso il foro...
- Page 48 Descrizione 1. Adattatore: Utilizzare questo adattatore quando si riproducono dischi 45 giri. 2. Piatto: Porre qui un disco da riprodurre. 3. Selettore 33/45 giri: Selezionare 33 o 45 giri per riprodurre un disco alla velocità corretta.
- Page 49 4. REC: Premerlo per accedere alla modalità di registrazione. 5. SPLIT/ACCOPPIAMENTO (BLUETOOTH) Funzione Split: Per interrompere la registrazione corrente, formare manualmente un file di registrazione e quindi continuare a registrare la traccia successiva. Funzione Accoppiamento: Premere questo pulsante finché l'indicatore LED non inizia a lampeggiare in blu, quindi mettere l'altoparlante o le cuffie Bluetooth in modalità...
- Page 50 - Premere il pulsante SPLIT per creare un nuovo file nella registrazione. - Premere nuovamente il pulsante REC per arrestare la registrazione. -> Il LED lampeggia per un breve tempo, la spia LED è ancora accesa. Nota: non rimuovere il dispositivo di archiviazione USB se il LED sta lampeggiando. Collegamento alla rete Assicurarsi che la tensione di rete della casa corrisponda alla tensione di esercizio dell'unità.
- Page 51 1. Garanzia Lenco offre assistenza e garanzia in conformità con la legge europea, il che significa che in caso di riparazioni (sia durante che dopo il periodo di garanzia) è necessario contattare il rivenditore locale. Nota importante: Non è possibile inviare direttamente a Lenco i prodotti da riparare.
Need help?
Do you have a question about the LBT-120 and is the answer not in the manual?
Questions and answers