Table of Contents
Advertisement
Advertisement
Table of Contents

Related Manuals for Meraki MR76-HW


Summary of Contents for Meraki MR76-HW
- Page 1 Meraki MR76-HW Hardware Installation Guide...
- Page 2 Cisco Systems does not assume any liability that may occur due to the use or application of the product(s) or circuit layout(s) described herein. Warranty Meraki, Inc. provides a lifetime warranty on this product. Warranty details may be found at www.meraki.com/legal.
-
Page 3: Table Of Contents
4.2.1.3Electrical Junction Box Mount Using Mount Plate 4.2.2 Power the MR76-HW 4.2.2.1 Powering the MR76-HW with Meraki AC Adapter 4.2.2.2 Powering the MR76-HW with Meraki 802.3at Power over Ethernet Injector 4.2.2.3 Powering the MR76-HW with an 802.3at Power over Ethernet Switch 4.2.3 Mount the MR76-HW 4.2.3.1 Assemble Security Hasp to the MR76-HW... -
Page 4: Scope Of Document And Related Publications
Scope of Document and Related Publications The MR76-HW Hardware Installation Guide describes the installation procedure for the MR76-HW Outdoor access point. Additional reference documents are available online at www.meraki.com/library/product. -
Page 5: Mr76-Hw Overview
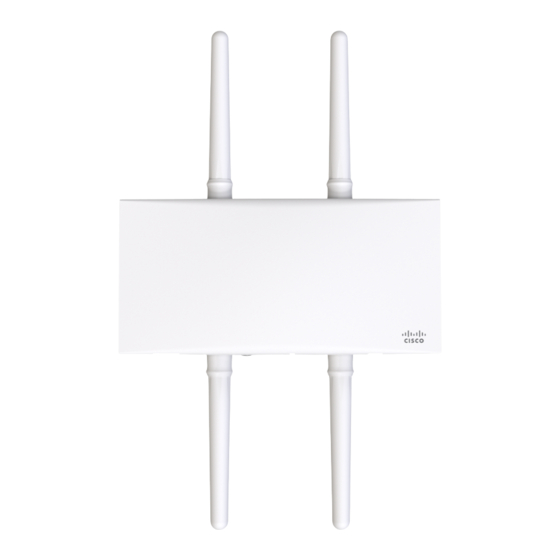
The Meraki MR76-HW is an enterprise-class, dual-concurrent 2x2 MIMO 802.11ax outdoor access point designed for high-density deployments in offices, schools, hospitals and hotels. When connected to the Meraki Cloud Controller, the MR76-HW enables the creation of ultra-high speed, reliable outdoor wireless networks quickly, easily and cost- effectively. - Page 6 Access point mounting posts (2x) Various mounting holes...
-
Page 7: Security Features
Injector (both sold separately) or a third-party 802.3at PoE switch. 2.6 Factory Reset Button If the button is pressed and held for at least five seconds and then released, the MR76-HW will reboot and be restored to its original factory settings by deleting all configuration information stored on... -
Page 8: Pre-Install Preparation
You should complete the following steps before going on-site to perform an installation. 3.1 Configure Your Network in Dashboard The following is a brief overview only of the steps required to add an MR76-HW to your network. For detailed instructions about creating, configuring and managing Meraki wireless networks, refer to the Meraki Cloud Controller Manual (meraki.com/library/product). -
Page 9: Assigning Ip Addresses To Mr76-Hws
PoE switch. Then connect the client machine over Ethernet cable to the PoE switch. If using a Meraki PoE Injector, connect the MR76-HW to the “PoE” port of the Injector, and the client machine to the “LAN” port. -
Page 10: Collect Tools
You will need the following tools to perform an installation: Phillips Hammer Drill with screwdrive 1/4” (6.3mm) bits 3.6 Collect Additional Hardware for Installation 802.3at PoE power source (either AC Adapter PoE switch or Meraki 802.3at PoE Injector) Network cables with RJ45 connectors long enough for your particular mounting... - Page 11 location...
-
Page 12: Installation Instructions
2. Power over Ethernet supports a maximum cable length of 300 ft (100 m). 3. If being used in a mesh deployment, the MR76-HW should have line of sight to at least two other Meraki devices. For more detailed instructions regarding access point location selection, reference the Meraki Network Design Guide (meraki.com/library/product). -
Page 13: Wall Or Solid
4.2.1.1 Wall or Solid Ceiling Mount Using Mount Plate Using included screws, attach the mount plate to your mounting wall or ceiling. It is recommended that the MR76-HW be mounted to a wall or solid ceiling using the mount plate for physical security reasons. -
Page 14: Mount Using Mount Plate
4.2.1.2 Drop Ceiling Mount Using Mount Plate To mount your MR76-HW on a drop ceiling T-rail, use the included drop ceiling mounting accessory kit. The accessory kit can be used to mount to most 9/16”, 15/16” or 1 ½” T- rails. - Page 16 2. Using the dashed lines on the mount plate template as a guide, set the proper spacing of the T-rail clips on the T-rail 3. Tighten the set screws on the T-rail clips to secure the clips using a 5/64”(2 mm) hex key.
- Page 17 4. Attach the mount plate to the T-rail clips using the mount plate holes (marked with a “T“). Flush T-rail Ceiling tiles T-rail flush with tiles T-rail recessed from tiles...
-
Page 18: 3Electrical Junction Box Mount Using Mount Plate
4.2.1.3 Electrical Junction Box Mount Using Mount Plate The MR76-HW can be mounted to a 4” square cable junction box, a 3.5 or 4” round cable junction box, or various U.S. and European outlet boxes (mounting screws are not included). -
Page 19: Powering The Mr76-Hw With Meraki Ac Adapter
4.2.2.1 Powering the MR76-HW with the Meraki AC Adapter (sold separately) 1. Plug the power cord into the MR76-HW and the other end into a wall outlet. 2. Plug an Ethernet cable that is connected to an active Ethernet connection into the Eth0 port on the MR76-HW. -
Page 20: Powering The Mr76-Hw With An 802.3At Power Over Ethernet Switch
4.2.2.3 Powering the MR76-HW with an 802.3at Power over Ethernet Switch Route Ethernet cable from a port on an active 802.3at PoE switch to the Eth0 port in the bay of the MR76-HW. The MR76-HW is Gigabit Ethernet-capable. To maximize device performance, a Gigabit- capable switch should be used. - Page 21 4.2.3.2 Assemble MR76-HW to the Mount Plate (This section applies to wall and/or solid ceiling, drop ceiling or electrical junction box mount where you have already installed the mount plate.) Insert the top latch on the mount plate into the top mount plate attachment slots on the back of the device.
-
Page 22: Desk Or Shelf Mount
4.2.3.3 Desk or Shelf Mount The MR76-HW can be placed on a desk or shelf resting on the non-scratch rubber feet. The mount plate is not necessary for a desk or shelf mounting. -
Page 23: Secure The Mr76-Hw
Depending on your mounting environment, you may want to secure the MR76-HW to its mount location. Your MR76-HW can be secured in several ways. If the MR76-HW has been installed using the mount plate, it can be secured via security screw (Torx and Philips head security screws are included; choose one), and/or Kensington lock. -
Page 24: Verify Device Functionality And Test Network Coverage
LED should turn green when the upgrade is completed (normally in under thirty minutes). Note: Your MR76-HW must have an active route to the Internet to check and upgrade its firmware. 2. Verify access point connectivity Use any 802.11 client device to connect to the MR76-HW and verify proper connectivity using the client’s web browser. - Page 25 This equipment complies with FCC radiation exposure limits set forth for an uncontrolled environment. This equipment should be installed and operated with minimum distance cm between the radiator and your body. This transmitter must not be co-located or operating in conjunction with any other antenna or transmitter.
- Page 26 Antenna types not included in this list that have a gain greater than the maximum gain indicated for any type listed are strictly prohibited for use with this device. Group Ant. No. Brand Model Name Antenna Type Connector Meraki MA-ANT-20 Omni N-Type Meraki MA-ANT-20 Omni N-Type Meraki...
- Page 27 Gain (dBi) Elevation angle Group Ant. No. above 30 degrees Remark 2.4G Gain (dBi) Radio 1 Radio 1 Radio 2 Radio 2 Radio 1 Radio 1 21+23 11.2 Radio 2 11.2 Radio 2 Radio 1 Radio 1 Radio 2 Radio 2 Radio 1 Radio 1 11.3...
- Page 28 Professional installation instruction Installation personnel This product is designed for specific application and needs to be installed by a qualified personal who has RF and related rule knowledge. The general user shall not attempt to install or change the setting. Professional Installation Requirements The following requirements for installation and operation of outdoor systems must be addressed: Operation in the 5600-5650-MHz band is not authorized for 5-GHz WLAN systems, whether...
- Page 29 21 dBm above 30 degrees over the horizon. This is maintained through the Cisco Meraki Software Defined Radio implementation, limiting the power output at a given band, limiting the maximum EIRP for 5150-5250 MHz to 21 dBm when implemented outdoors.
- Page 30 Please refer to user’s manual for the detail. Warning Please carefully select the installation position and make sure that the final output power does not exceed the limit set force in relevant rules. The violation of the rule could lead to serious federal penalty. Instructions d'installation professionnelle Installation Ce produit est destine a un usage specifique et doit etre installe par un personnel qualifie maitrisant les...
Need help?
Do you have a question about the MR76-HW and is the answer not in the manual?
Questions and answers