Advertisement
Quick Links
Velocity 10" Touch Panel
AT-VTPG-1000VL-BL and AT-VTPG-1000VL-WH
The Atlona AT-VTPG-1000VL is a Velocity System 10" touch panel with integrated Velocity gate-
way. This all-in-one touch panel solution simplifies configuration and deployment for installations
that only require control of a single room or AV system. Setup of the VTPG-1000VL is easy. The
intuitive, browser-based configuration guides you through adding AV equipment to the room,
creating user interfaces, and specifying control macros.
The large 10" touch panel features contemporary, refined styling with 1280×800 native resolution,
and a capacitive glass surface. Bright LED lighting surrounding the edge of the panel is ideal for
providing a visual representation of room status or for adding emphasis to AV control functions.
Package Contents
1 x AT-VTPG-1000VL
1 x Wall/Glass mount
4 x Mounting screws
2 x Safety screws
Operating Notes
•
The AT-VTPG-1000VL is PoE capable, to power the unit, simply plug it into a 802.3at
compatible network switch. If the network switch is not PoE capable, a PoE injector
(purchased separately)
can be used.
AT-VTPG-1000VL-BL and AT-VTPG-1000VL-WH
1 x Glass mount cover sticker
2 x Glass mount adhesive strips
1 x Installation Guide
1
Installation Guide
Advertisement

Related Manuals for Panduit Atlona Velocity AT-VTPG-1000VL-BL


Summary of Contents for Panduit Atlona Velocity AT-VTPG-1000VL-BL
- Page 1 Installation Guide AT-VTPG-1000VL-BL and AT-VTPG-1000VL-WH Velocity 10” Touch Panel AT-VTPG-1000VL-BL and AT-VTPG-1000VL-WH The Atlona AT-VTPG-1000VL is a Velocity System 10” touch panel with integrated Velocity gate- way. This all-in-one touch panel solution simplifies configuration and deployment for installations that only require control of a single room or AV system. Setup of the VTPG-1000VL is easy. The intuitive, browser-based configuration guides you through adding AV equipment to the room, creating user interfaces, and specifying control macros.
-
Page 2: Mounting Instructions
Installation Guide AT-VTPG-1000VL-BL and AT-VTPG-1000VL-WH Mounting Instructions The AT-VTPG-1000VL has two mounting options. In-wall or an optional stand (available through atlona.com). In-wall Connect the included mounting screws into the back of the wall plate. Do not over-tighten the screws, as they should stick out a few mm from the wall plate for affixing to the wall/ glass mount. - Page 3 Installation Guide AT-VTPG-1000VL-BL and AT-VTPG-1000VL-WH Affix the wall/glass mount to the back box. This will differ per region.
- Page 4 Installation Guide AT-VTPG-1000VL-BL and AT-VTPG-1000VL-WH...
- Page 5 Installation Guide AT-VTPG-1000VL-BL and AT-VTPG-1000VL-WH Align the screws on the back of the wall plate with the four large holes and slide them onto the mounting plate.
- Page 6 Installation Guide AT-VTPG-1000VL-BL and AT-VTPG-1000VL-WH Insert the included safety screws into the top of the mounting plate, this will lock the mounting screws into places. NOTE: Tighten the screws by hand. To avoid damage to the touch panel, do not overtighten.
- Page 7 Installation Guide AT-VTPG-1000VL-BL and AT-VTPG-1000VL-WH Glass Mounting Connect the included mounting screws into the back of the wall plate. Do not over-tighten the screws, as they should stick out a few mm from the wall plate for affixing to the wall/ glass mount.
- Page 8 Installation Guide AT-VTPG-1000VL-BL and AT-VTPG-1000VL-WH Insert the included safety screws into the top of the mounting plate, this will lock the mounting screws into places. Table Mount (AT-VTP-VTM purchased separately through atlona.com) Place the stand on the table/desk Align the screw holes on the back of the wall plate with the holes on the adjustable stand. Use the mounting screws included with the VTP-VTM and thread them through the back of the stand into the wall plate.
-
Page 9: Installation And Setup
Installation Guide AT-VTPG-1000VL-BL and AT-VTPG-1000VL-WH Installation and Set Up Connect the Ethernet cable into the back of the unit. If the Ethernet cable is connected to a non PoE switch, use a PoE injector using 802.3at (purchased separately). Secure the unit in either the wall or optional stand, as explained in the mounting instructions. The Velocity logo will display during the booting process and then go to an IP screen. - Page 10 Installation Guide AT-VTPG-1000VL-BL and AT-VTPG-1000VL-WH NOTE: Passwords must be at least 8 characters and include: 1 number, 1 uppercase letter, 1 lowercase letter, and 1 special character. The text will appear all green when the password meets all criteria. Select the “I agree to the...” check box. The submit button will appear. Select the SUBMIT button once all information is filled.
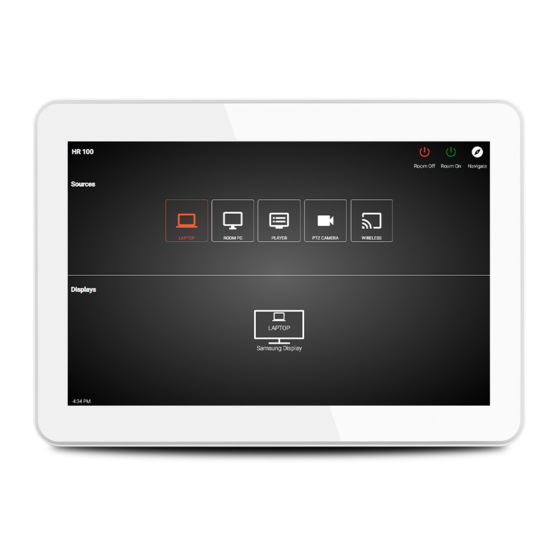
- Page 11 Installation Guide AT-VTPG-1000VL-BL and AT-VTPG-1000VL-WH Select the edit (pencil) icon to open the panel configuration. From the edit screen, set up the basic user interface options and control page setting. This will allow the background color, control icons, and more to be customized. If more customization is needed, view the Velocity manual.
-
Page 12: Firmware Updating
Installation Guide AT-VTPG-1000VL-BL and AT-VTPG-1000VL-WH Firmware Updating The AT-VTPG uses the same firmware as the Velocity gateway. Locate the ≡ in the top left corner of the home page and left click to open the menu. Select Settings from the menu. New options will appear. Select Gateway. - Page 13 Installation Guide AT-VTPG-1000VL-BL and AT-VTPG-1000VL-WH Atlona, Inc. (“Atlona”) Limited Product Warranty Coverage Atlona warrants its products will substantially perform to their published specifications and will be free from defects in materials and workmanship under normal use, conditions and service. Under its Limited Product Warranty, Atlona, at its sole discretion, will either: •...
- Page 14 Installation Guide AT-VTPG-1000VL-BL and AT-VTPG-1000VL-WH Atlona, Inc. (“Atlona”) Limited Product Warranty Cont. Remedy Atlona recommends that end-purchasers contact their authorized Atlona dealer or reseller from whom they purchased their products. Atlona can also be contacted directly. Visit www.atlona. com for Atlona’s contact information and hours of operation. Atlona requires that a dated sales or delivery receipt from an authorized dealer, reseller or end-purchaser is provided before Atlona extends its warranty services.
- Page 15 Installation Guide AT-VTPG-1000VL-BL and AT-VTPG-1000VL-WH Atlona, Inc. (“Atlona”) Limited Product Warranty Cont. Exclusive Remedy To the maximum extent permitted by law, this limited product warranty and the remedies set forth above are exclusive and in lieu of all other warranties, remedies and conditions, whether oral or written, express or implied.
- Page 16 Installation Guide AT-VTPG-1000VL-BL and AT-VTPG-1000VL-WH English Declaration of Conformity The English version can be found under the resources tab at: https://atlona.com/product/at-vtpg-1000vl/. Chinese Declaration of Conformity 中国RoHS合格声明 由SKU列出於: https://atlona.com/about-us/china-rohs/. Toll free US International atlona.com 877.536.3976 41.43.508.4321 • • © 2021 Atlona Inc. All rights reserved. “Atlona” and the Atlona logo are registered trademarks of Atlona Inc. All other brand names and trademarks or registered trademarks are the property of their respective owners.
Need help?
Do you have a question about the Atlona Velocity AT-VTPG-1000VL-BL and is the answer not in the manual?
Questions and answers