Applied Instruments XR-3 Operation Manual
Modular test instrument base unit
Hide thumbs
Also See for XR-3:
- Operation manual (66 pages) ,
- Manual (21 pages) ,
- Application note (2 pages)

Related Manuals for Applied Instruments XR-3


Summary of Contents for Applied Instruments XR-3
- Page 1 XR-3 Modular Test Instrument Base Unit Operation Manual Revision 1.01 Date 01/04/2016 Purchase the MODEL XR-3™ MODULAR TEST INSTRUMENT BASE UNIT TESCOMUSA.COM TesCom USA...
-
Page 2: Table Of Contents
SPECIFICATIONS ..........................28 This manual covers basic operations and functions of the XR-3. For more detailed instructions on how to use the instrument for different applications, see the Application Notes available on our website, http://www.appliedin.com Page 2 of 29 TESCOMUSA.COM... -
Page 3: Introduction To Xr-3 Modular Test Instrument
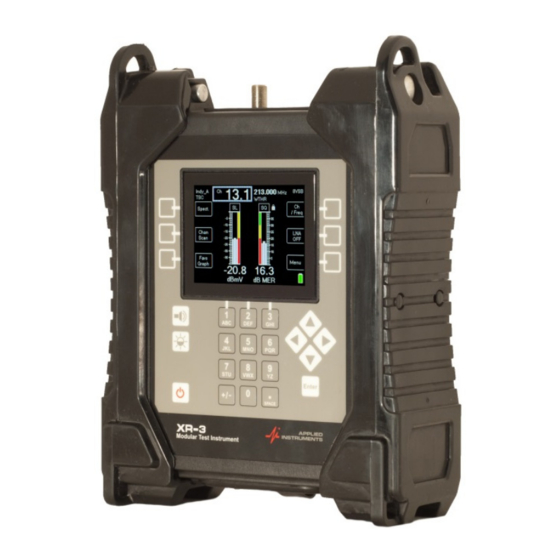
XR-3 1. Introduction to XR-3 Modular Test Instrument The XR-3 is a revolutionary test instrument platform. The base unit is a rugged chassis, display, and portable power supply that accepts easily swappable modules for testing a variety of signals used in the telecommunications industry. - Page 4 XR-3 Base Instrument Operation Manual XR-3 Symbols Used The following symbols may be used in this manual and/or marked on the instrument. Hazardous areas on the instrument are marked with this symbol. Consult this manual to learn the nature of the hazard and proper actions for safe operation.
-
Page 5: Standard Accessories
Signal splitter / combiner • Desktop kickstand that props up meter for bench height use Optional Accessories Optional Accessories for the XR-3 include: • Various snap-in modules for test signal applications • Hard shell protective carrying case with foam padding molded for base instrument, modules, and accessories •... -
Page 6: Connections
XR-3 Base Instrument Operation Manual XR-3 Connections FRONT BACK BOTTOM 1) Charge cord port for battery charger AC charging via wall outlet (100-240VAC, 50-60 Hz Input and 15VDC output) DC charging from 12VDC (at least 1 amp) vehicle outlet (cigarette adapter) -
Page 7: Dc Charge Port
XR-3 also connects to a 12VDC adapter in a vehicle only for battery charging. PC Connection The XR-3 connects to a USB port of a PC via the supplied cable. PC software is available for download from our website (www.appliedin.com). The FlashUpdate program is used for updating the instrument with the latest firmware and the MeterMaid program is used for transferring saved scan files from the XR-3 to the PC. - Page 8 XR-3 Base Instrument Operation Manual XR-3 XR-3 Construction Parts of the XR-3: 1) Cordura protective flap 2) Flap axle 3) XR-3 instrument base 4) Module (swappable) 5) Thumb screw (tuner lock down screw) to secure module (x2) 6) Threaded cross dowel pin to secure module (x2)
- Page 9 XR-3 Base Instrument Operation Manual XR-3 Battery Replacement The XR-3 includes a replaceable Li-Ion rechargeable battery. When the battery wears out in the future, battery replacement is simple. Required Tools: 1x #2 Phillips screwdriver 1x Safety glasses Estimated completion time: 5 +/- minutes, depending on mechanical aptitude and proficiency...
- Page 10 XR-3 Base Instrument Operation Manual XR-3 9) Use Phillips screwdriver to remove (6) screws from battery compartment lid 10) Pick lid upwards to remove it, taking care not to damage the gasket underneath 11) Pull up on foil tab of battery to lift battery out of compartment...
- Page 11 Installing a module is as easy as sliding the module down until it clicks into place. How to insert module: 1) With your fingers, loosen thumb screws on top of XR-3 base and rotate them upwards. 2) Guide module down between rubber shock guards on top rear area of unit, pulling module towards the rear as you push it down gently.
- Page 12 XR-3 Base Instrument Operation Manual XR-3 Module Availability XR-3 modules available now include DBS Satellite, VSAT Satellite, and Cable TV / Off-Air broadcast. Other modules will follow. Module Part Number Description Application Satellite Meter DISH, DIRECTV, Bell North American DBS /...
-
Page 13: Software Updates
3) Go to the Applied Instruments website www.appliedin.com. With your mouse, move your cursor over Service and Support and click on it, then click Software Updates, then click on ‘XR-3 Modular Test Instrument’. Then click on “Click Here to Download FlashUpdate Zip Software” or use the following link directly: www.appliedin.com/downloads/flashupdatezip.exe... - Page 14 XR-3 Base Instrument Operation Manual XR-3 You may receive a warning message. Press Run to continue to open the file. 5) When you open this self-extracting archive file, the WinZip Self-Extractor program will appear. It is recommended that you press the Unzip button to unzip the files to the default location (c:\FlashUpdate\).
- Page 15 XR-3 Base Instrument Operation Manual XR-3 6) It will unzip several files onto your PC to the location you indicated. Press OK. 7) A Command Prompt screen will appear. Using your computer’s keyboard, type the number that corresponds to your computer’s operating system. If you aren’t sure of which Operating System you are running, please proceed to Step 8.
- Page 16 XR-3 Base Instrument Operation Manual XR-3 If your PC is running Windows 8: Click on this link to obtain Windows 8 driver signature instructions: http://www.appliedin.com/www/assets/products/Force_Driver_W8/Force_Driver_W8.pdf Click on this link to obtain Windows 8.1 driver signature instructions: http://www.appliedin.com/www/assets/products/Force_Driver_W8/Force_Driver_W81.pdf 8) To find out which Operating System you’re running on your PC, using your mouse, right click on the My Computer icon.
- Page 17 XR-3 Base Instrument Operation Manual XR-3 9) Another Command Prompt screen appears to let you know that USB drivers are being installed. After the USB driver installation is complete, you will receive a message advising you to press Enter. Pressing Enter will complete the software application installation process and the “DOS looking”...
-
Page 18: Updating
1) Ensure you have an active internet connection. 2) Plug your XR-3 into an AC outlet to prevent any potential problems due to a low battery. 3) Connect the XR-3 to your PC using the supplied USB data transfer cable and turn the instrument on. - Page 19 XR-3 Base Instrument Operation Manual XR-3 5) If connection is established, a picture of the XR-3 will appear in the top left corner of the FlashUpdate program and the top center portion of the program will be filled in with data obtained from the instrument (i.e.
- Page 20 XR-3 Base Instrument Operation Manual XR-3 Page 20 of 29 TESCOMUSA.COM TesCom USA...
- Page 21 XR-3 Base Instrument Operation Manual XR-3 If you see that your Communications Port is set to something other than COM ports 1 through 12, you will need to reassign the COM port. To reassign the COM port, right click with your mouse on the desired COM port and select Properties.
- Page 22 XR-3 Base Instrument Operation Manual XR-3 7) As soon as the connection is established, the application will access the website and obtain the latest available versions for the various software components. These will be compared with the versions installed on your instrument. Any component with a newer version available will be checked.
- Page 23 Standby while the instrument is updated. Do NOT press any buttons on the XR-3 meter while the update is in progress. Do NOT bump or unplug the USB data transfer cable from the meter while the update is in progress.
-
Page 24: Channel Plans (Applies To Catv / Off-Air Module Only)
XR-3 10) When finished, the program will display “Update Complete. Reconnecting”, click “Exit”. You may now disconnect the XR-3 instrument from the computer and it is ready to use. Channel Plans (applies to CATV / Off-Air module only) Standard Channel Plans for the CATV / Off-Air module are available. These may be revised or added to in the future. -
Page 25: Limit Values (Currently Applies To Satellite Modules Only)
Dish Corporate, select ‘Dish Corp’. If you work in an area that is served by a Dish RSP, select ‘Dish RSP’. If you won’t be using the XR-3 for Dish Network applications, select ‘No Limits’. You can select the Limit Values you need using the pull down list. -
Page 26: Ac Power
My serial number is missing off the back of my XR-3 instrument. How can I obtain my serial number to check with the factory if it’s still under warranty? Connect your XR-3 meter to the PC, power it on, and open the FlashUpdate or MeterMaid program. -
Page 27: Replacement Parts & Accessories
If your company has a strict policy and the firewall blocks any executable files, then please contact your IT department and ask for assistance. Applied Instruments is more than happy to speak to the IT department about a work-around solution. -
Page 28: Specifications
After the repair is completed, we will contact you for payment. If payment is not received within 60 days after contact is made, then the repaired equipment will become the property of Applied Instruments. Version Updating As our product lines are refined and features and performance are enhanced, we will upgrade older units at a nominal cost when possible. - Page 29 Any application recommendation made by Applied Instruments for the use of its products is based upon tests believed to be reliable, but Applied Instruments makes no guarantee of the results to be obtained. This warranty is in lieu of all other warranties, expressed or implied, and no representative or person is authorized to represent or assume for Applied Instruments any liability in connection with the sale of our products other than that set forth herein.
Need help?
Do you have a question about the XR-3 and is the answer not in the manual?
Questions and answers