Table of Contents
Advertisement
Available languages
Available languages
Quick Links
Advertisement
Chapters
Table of Contents

Related Manuals for Zanussi ZOB141


Summary of Contents for Zanussi ZOB141
- Page 1 Gebruiksaanwijzing User manual Notice d'utilisation Benutzerinformation Manual de instruções Manual de instrucciones Inbouwoven Built-in oven Four encastrable Elektro-Einbaubackofen Forno encastrável Horno empotrado ZOB141...
- Page 2 Inhoud Veiligheidsinformatie _ _ _ _ _ _ _ _ _ _ _ _ _ _ _ _ 2 Onderhoud en reiniging _ _ _ _ _ _ _ _ _ _ _ _ _ _ 10 Beschrijving van het product _ _ _ _ _ _ _ _ _ _ _ _ _ 5 Problemen oplossen _ _ _ _ _ _ _ _ _ _ _ _ _ _ _ _ 11 Voor het eerste gebruik _ _ _ _ _ _ _ _ _ _ _ _ _ _ _ 5 Technische gegevens _ _ _ _ _ _ _ _ _ _ _ _ _ _ _...
- Page 3 • De schokbeschermingsonderdelen moeten zo worden Gebruik bevestigd dat zij niet kunnen worden verwijderd zonder • Dit apparaat is uitsluitend bestemd voor huishoudelijk gereedschap. gebruik. Gebruik het apparaat niet voor commerciële of • Zorg dat de keukenkast de benodigde afmetingen heeft industriële doeleinden.
- Page 4 • Houd het apparaat altijd schoon. Opeenhopingen van • Houd vonken of open vlammen uit de buurt van het ap- vetten of andere voedselresten kunnen brand veroorza- paraat bij het openen van de deur. ken. • Plaats geen ontvlambare producten of items die voch- •...
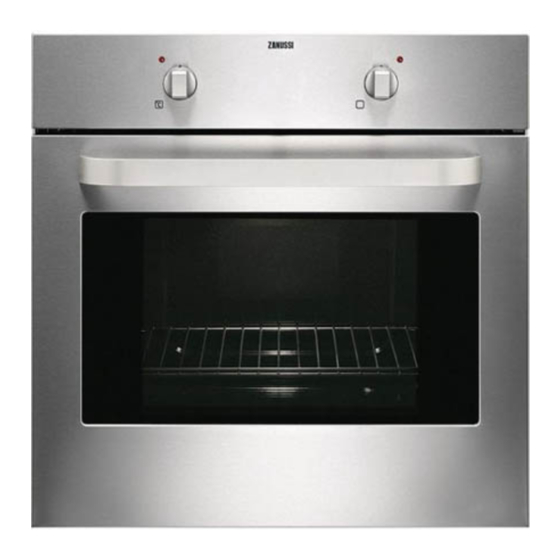
- Page 5 Beschrijving van het product Algemeen overzicht Bedieningspaneel Temperatuurlampje Knop voor de temperatuur Knop voor de ovenfuncties Stroomindicatielampje Ventilatie-openingen Grill Ovenlampje Typeplaatje Ovenaccessoires • Braadpan Om te bakken en te braden of om vet op te vangen. • Bakrooster Voor kookgerei, bak- en braadvormen. Voor het eerste gebruik Laat de lege oven ongeveer 45 minuten werken.
- Page 6 Draai om het apparaat uit te schakelen, de knop voor de ovenfuncties en de knop voor de temperatuur in de uit-stand. Ovenfuncties Ovenfunctie Toepassing Uitstand Het apparaat staat UIT. Verwarmt de oven met zowel het bovenste als het onderste verwarmingselement. Boven- en onderwarmte Voor bakken en braden op één ovenniveau.
- Page 7 Vlees en vis bereiden • Giet een beetje water in de lekbak om te veel rookvor- ming in de oven te voorkomen tijdens roosteren. Om • Bereid geen vlees met een gewicht van minder dan 1 rookcondensatie te voorkomen dient u telkens een kg.
- Page 8 Boven- en onderwarmte Bereidingstijd SOORT GERECHT Notities [min] Temp [°C] Niveau Victoriataart 1 of 2 40-55 Links + rechts in cakevorm van 20 cm 1) Verwarm de oven 10 minuten voor. BROOD EN PIZZA Boven- en onderwarmte Bereidingstijd SOORT GERECHT Notities [min] Temp [°C]...
- Page 9 Boven- en onderwarmte Bereidingstijd SOORT GERECHT Notities [min] Temp [°C] Niveau Schouderkarbonade 120-150 Op een diepe braadpan Varkensschenkel 100-120 2 stukken op een diepe braadpan Lamsvlees 110-130 Bout 70-85 Geheel op een diepe braadpan Kalkoen 210-240 Geheel op een diepe braadpan Eend 120-150 Geheel op een diepe braadpan...
- Page 10 Hoeveelheid Grillen Bereidingstijd (minuten) GERECHT Stuks Temp. (°C) 1e kant 2e kant niveau Geroosterd brood vormen tengevolge van acrylamides. Om die reden Informatie over acrylamides adviseren wij levensmiddelen zoveel mogelijk bij lage temperaturen gaar te laten worden en de gerechten niet te Belangrijk! Volgens recente wetenschappelijke informatie veel te bruinen.
- Page 11 Reinig de ovendeur met een sopje. Ga bij het drogen van de ovendeur zorgvuldig te werk. Installeer de ovendeur als het schoonmaken voltooid is. Voer de bovenstaande stappen uit in omgekeerde volgor- de om de ovendeur te installeren. Open de deur volledig Til de hendels op de en houd de twee deur- twee scharnieren omhoog...
- Page 12 Als u niet zelf het probleem kunt verhelpen, neem dan De contactgegevens van het servicecentrum staan op het contact op met uw verkoper of de klantenservice. typeplaatje. Het typeplaatje bevindt zich aan de voorkant van de binnenkant van de oven. Wij adviseren u om de gegevens hier te noteren: Model (MOD.) .........
- Page 13 Totaal vermogen Deel van de kabel Totaal vermogen Deel van de kabel maximaal 2300 W 3 x 1 mm² maximaal 3680 W 3 x 1,5 mm² De massakabel (groene/gele kabel) moet 2 cm langer zijn dan de fase- en neutrale kabels (blauwe en bruine kabels). Milieubescherming product, kunt u contact opnemen met de gemeente, de Het symbool...
-
Page 14: Table Of Contents
Contents Safety information _ _ _ _ _ _ _ _ _ _ _ _ _ _ _ _ _ 14 Care and cleaning _ _ _ _ _ _ _ _ _ _ _ _ _ _ _ _ _ 21 Product description _ _ _ _ _ _ _ _ _ _ _ _ _ _ _ _ 16 What to do if…... - Page 15 • Keep the minimum distances to the other appliances ments in the appliance. Use gloves when you insert or and units. remove the accessories or pots. • Install the appliance with its back and one side close to • Be careful when you remove or install the accessories the higher appliance.
-
Page 16: Product Description
• When the door glass panels are damaged they become • If it becomes necessary to replace the lamp, use one of weak and can break. You must replace them. Contact the same power and specifically designed for house- the service centre. hold appliances only. -
Page 17: Before First Use
Before first use Run an empty oven for 45 minutes. Warning! Refer to "Safety information" chapter. Set function and maximum temperature. Initial Cleaning Run an empty oven for 15 minutes. • Remove all parts from the appliance. This is to burn off any residue from the cavity surface. Ac- •... -
Page 18: Helpful Hints And Tips
Helpful hints and tips • The appliance has four shelf levels. Count the shelf • If you use two baking trays at the same time, keep one levels from the bottom of the appliance floor. level empty between them. • The appliance has a special system which circulates Cooking meat and fish the air and constantly recycles the steam. - Page 19 Conventional cooking Cooking time TYPE OF DISH Notes [min] Temp [°C] Level Christmas cake/Rich 50-60 In cake mould 20 cm fruit cake Plum cake 50-60 In bread tin Small cakes 20-30 On flat baking tray Biscuits 20-30 On flat baking tray Meringues 90-120 On flat baking tray...
- Page 20 MEAT Conventional cooking Cooking time TYPE OF DISH Notes [min] Temp [°C] Level Beef 50-70 On wire shelf and deep roasting pan Pork 90-120 On wire shelf and deep roasting pan Veal 90-120 On wire shelf and deep roasting pan English roast beef rare 44-50 On wire shelf and deep roasting pan...
-
Page 21: Care And Cleaning
Quantity Grilling Cooking time in minutes TYPE OF DISH Pieces Temp. (°C) 1st side 2nd side level Sausages 12-15 10-12 Pork chops 12-16 12-14 Chicken (cut in 2) 1000 30-35 25-30 Kebabs 10-15 10-12 Breast of chicken 12-15 12-14 Hamburger 20-30 Fish Fillet 12-14... -
Page 22: What To Do If
Clean the oven door with water and soap. Dry the oven door carefully. When the cleaning is completed, install the oven door. To install the oven door, do the above steps in the opposite sequence. Open the door fully Lift and turn the levers and hold the two door on the two hinges. -
Page 23: Technical Data
We recommend that you write the data here: Model (MOD.) ......... Product number (PNC) ......... Serial number (S.N.) ......... Technical data Voltage 230 V Frequency 50 Hz Installation Electrical installation Warning! Refer to "Safety information" chapter. Warning! Only a qualified and competent person Building In must do the electrical installation. -
Page 24: Environment Concerns
Environment concerns information about recycling of this product, please contact The symbol on the product or on its packaging your local council, your household waste disposal service indicates that this product may not be treated as or the shop where you purchased the product. household waste. -
Page 25: Consignes De Sécurité
Sommaire Consignes de sécurité _ _ _ _ _ _ _ _ _ _ _ _ _ _ _ 25 Entretien et nettoyage _ _ _ _ _ _ _ _ _ _ _ _ _ _ _ Description de l'appareil _ _ _ _ _ _ _ _ _ _ _ _ _ _ 28 En cas d'anomalie de fonctionnement _ _ _ _ _ _ _ _ 34 Avant la première utilisation _ _ _ _ _ _ _ _ _ _ _ _ 28 Caractéristiques techniques _ _ _ _ _ _ _ _ _ _ _ _... - Page 26 • Vous devez disposer de dispositifs d'isolement appro- • Ne tirez pas sur le câble d'alimentation électrique pour priés : des coupe-circuits, des fusibles (les fusibles à débrancher l'appareil. Retirez, pour ce faire, la fiche de visser doivent être retirés du support), des disjoncteurs la prise secteur (si tel est le cas).
- Page 27 • Toutes les cuissons, même au gril, doivent être effec- • Ne nettoyez jamais l'émail catalytique (le cas échéant). tuées porte fermée. Risque d'incendie. Entretien et nettoyage • Faites attention en ouvrant la porte. Si vous utilisez des • Avant toute opération de nettoyage ou intervention ingrédients contenant de l'alcool lors d'une cuisson, technique, assurez-vous que l'appareil soit débranché...
-
Page 28: Description De L'appareil
Description de l'appareil Description de l'appareil Bandeau de commande Indicateur de température Manette du thermostat Manette de sélection des fonctions du four Voyant de mise sous tension Orifices d'aération Gril Éclairage du four Plaque signalétique Accessoires du four • Lèchefrite Elle est utilisée pour cuire et rôtir ou recueillir le jus •... -
Page 29: Fonctions Supplémentaires
Le voyant de mise sous tension s'allume pendant le Pour désactiver l'appareil, tournez la manette des fonctionnement de l'appareil. fonctions du four et le thermostat sur la position Ar- rêt (« OFF »). Tournez la manette de thermostat pour sélectionner la température désirée. - Page 30 Cuisson de gâteaux • Utilisez une lèchefrite pour éviter que les sucs et les graisses des aliments qui s'égouttent laissent des ta- • Pour cuire les gâteaux, réglez la température entre 150 ches indélébiles. et 200 °C. • Laissez reposer la viande pendant environ 15 minutes •...
- Page 31 Cuisson traditionnelle Temps de cuis- TYPE DE PLAT Remarques son [min] Temp [°C] Gradin Meringues 90-120 Sur plateau multi-usages Petits pains 15-20 Sur plateau multi-usages Choux 25-35 Sur plateau multi-usages Tourtes 45-70 Dans un moule à gâteaux de 20 cm Sandwich Victoria 1 ou 2 40-55...
- Page 32 VIANDES Cuisson traditionnelle Temps de cuis- TYPE DE PLAT Remarques son [min] Temp [°C] Gradin Bœuf 50-70 Sur la grille de four et au-dessus de la lèchefrite Porc 90-120 Sur la grille de four et au-dessus de la lèchefrite Viande de veau 90-120 Sur la grille de four et au-dessus de la lèchefrite...
-
Page 33: Consignes De Sécurité
Quantité Cuisson au gril Temps de cuisson en minutes TYPE DE PLAT Pièces Niveau de gra- Temp. (°C) 1er côté 2ème côté Steaks dans le filet 12-15 12-14 Biftecks 10-12 Saucisses 12-15 10-12 Côtelettes de porc 12-16 12-14 Poulet (coupé en deux) 1000 30-35 25-30... -
Page 34: En Cas D'anomalie De Fonctionnement
Placez un chiffon sur la sole du four afin de protéger l'ampoule du four et le cache en verre. Retirez le diffuseur en verre en le tournant dans le sens inverse des aiguilles d'une montre. Nettoyez-le. remplacez l'ampoule du four par une ampoule résis- tant à... -
Page 35: Caractéristiques Techniques
Les informations nécessaires au service après-vente figu- rent sur la plaque signalétique. La plaque signalétique se trouve sur l'encadrement avant de la cavité du four. Nous vous recommandons de noter ces informations ici : Modèle (MOD.) ......... Numéro du produit (PNC) ......... -
Page 36: En Matière De Protection De L'environnement
Le fil de masse (fil jaune/vert) doit faire 2 cm de plus que Puissance totale Section du câble les fils de phase et le neutre (fils bleu et marron). maximum 3 680 W 3 x 1,5 mm² En matière de protection de l'environnement Pour obtenir plus de détails sur le recyclage de ce produit, Le symbole sur le produit ou son emballage indique... -
Page 37: Sicherheitshinweise
Inhalt Sicherheitshinweise _ _ _ _ _ _ _ _ _ _ _ _ _ _ _ _ 37 Reinigung und Pflege _ _ _ _ _ _ _ _ _ _ _ _ _ _ _ 45 Gerätebeschreibung _ _ _ _ _ _ _ _ _ _ _ _ _ _ _ _ 40 Was tun, wenn …... - Page 38 sen aus dem Halter entfernt werden können), Fehler- • Ziehen Sie nicht am Netzkabel, wenn Sie das Gerät stromschutzschalter und Schütze. vom Stromnetz trennen möchten, sondern immer am Netzstecker (sofern zutreffend). • Gemäß den bestehenden Vorschriften müssen alle Tei- le, die den Berührungsschutz gewährleisten, so befes- Gebrauch tigt sein, dass sie nicht ohne Werkzeug abgenommen •...
- Page 39 Reinigung und Pflege • Achten Sie beim Öffnen der Tür darauf, dass keine Funken oder offenen Flammen in die Nähe des Geräts • Schalten Sie vor Wartungsarbeiten immer das Gerät gelangen. aus und trennen Sie es von der Stromversorgung. • Keine entflammbaren Produkte oder Gegenstände, die •...
-
Page 40: Gerätebeschreibung
Gerätebeschreibung Gesamtansicht Bedienfeld Temperatur-Kontrolllampe Temperaturwahlknopf Backofen-Einstellknopf Betriebs-Kontrolllampe Lüftungsöffnungen Rost Backofenlampe Typenschild Backofenzubehör • Fettpfanne Zum Backen und Braten oder zum Auffangen von aus- • Kombirost tretendem Fett. Für Geschirr, Kuchenformen, Braten Vor der ersten Inbetriebnahme Heizen Sie den leeren Backofen 45 Minuten lang auf. Warnung! Siehe Kapitel „Sicherheitshinweise“. -
Page 41: Zusatzfunktionen
Backofenfunktionen Backofenfunktion Anwendung Position AUS Das Gerät ist ausgeschaltet. Die Hitze kommt von den Heizelementen oben und unten im Backofen. Zum Ba- Ober-/Unterhitze cken und Braten auf einer Ebene. Unterhitze Die Hitze kommt nur von unten. Zum Backen von Kuchen mit knusprigen Böden. Oberhitze Die Hitze kommt nur von oben. - Page 42 • Helles Fleisch, Geflügel, und Fisch erfordern dagegen meiden. Um die Rauchbildung zu vermindern, emp- eine Temperatur zwischen 150°C und 175°C. fiehlt es sich, immer wieder ein wenig Wasser dazuzu- geben. • Verwenden Sie bitte zum Garen von sehr fetten Speisen die Fettpfanne, um den Backofen vor Spritzern zu Garzeiten schützen, die dauerhaft einbrennen könnten.
- Page 43 BROT UND PIZZA Ober-/Unterhitze GERICHT Garzeit [Min.] Anmerkungen Temperatur Ebene [°C] Weißbrot 60-70 1-2 Stück, 500 g pro Stück Roggenbrot 30-45 Brotform Brötchen 25-40 6-8 Brötchen auf dem Backblech Pizza 20-30 Fettpfanne Mürbeteigplätzchen 10-20 Backblech 1) 10 Minuten vorheizen. AUFLÄUFE Ober-/Unterhitze GERICHT Garzeit [Min.]...
- Page 44 Ober-/Unterhitze GERICHT Garzeit [Min.] Anmerkungen Temperatur Ebene [°C] Schweinshaxe 100-120 2 Stück in Fettpfanne Lammfleisch 110-130 Keule Hähnchen 70-85 ganz, Fettpfanne Truthahn/Pute 210-240 ganz, Fettpfanne Ente 120-150 ganz, Fettpfanne Gans 150-200 ganz, Fettpfanne Kaninchen 60-80 zerlegt Hase 150-200 zerlegt Fasan 90-120 ganz, Fettpfanne FISCH...
-
Page 45: Reinigung Und Pflege
Menge Grillen Garzeit in Minuten GERICHT Stück Einsatzebene Temp. (°C) 1. Seite 2. Seite Belegte Toastbrote Toast stärkehaltigen Produkten, eine gesundheitliche Informationen zu Acrylamiden Gefährdung durch Acrylamid verursachen. Daher empfehlen wir, bei möglichst niedrigen Temperaturen zu Wichtig! Nach neuesten wissenschaftlichen Erkenntnissen garen und die Speisen nicht zu stark zu bräunen. -
Page 46: Was Tun, Wenn
Reinigen Sie die Backofentür mit Seifenlauge. Trocknen Sie die Backofentür sorgfältig ab. Nach der Reinigung muss die Backofentür wieder einge- baut werden. Um die Backofentür wieder einzusetzen, füh- ren Sie die obigen Schritte in umgekehrter Reihenfolge durch. Klappen Sie die Back- Heben Sie die Hebel ofentür ganz auf und grei- an den beiden Scharnieren... -
Page 47: Technische Daten
Problem Mögliche Ursache Abhilfe Dampf und Kondenswasser schlagen Die Speisen standen zu lange im Lassen Sie die Speisen nach Beendi- sich auf Speisen und im Backofen Backofen. gung des Gar- oder Backvorgangs nieder. nicht länger als 15-20 Minuten im Backofen stehen. Wenn Sie das Problem nicht selbst lösen können, wenden Die vom Kundendienst benötigten Daten finden Sie auf Sie sich an Ihren Fachhändler oder Kundendienst. -
Page 48: Umwelttipps
Näheres zum Kabelquerschnitt siehe Gesamtleistung (auf Gesamtleistung Kabelquerschnitt dem Typenschild) und in der Tabelle: maximal 3680 W 3 x 1,5 mm² Gesamtleistung Kabelquerschnitt Die Erdleitung (gelb/grünes Kabel) muss ca. 2 cm länger maximal 1380 W 3 x 0,75 mm² als die Phasenleitung und der Nullleiter (blaues und brau- maximal 2300 W 3 x 1 mm²... -
Page 49: Informações De Segurança
Índice Informações de segurança _ _ _ _ _ _ _ _ _ _ _ _ _ 49 Manutenção e limpeza _ _ _ _ _ _ _ _ _ _ _ _ _ _ _ 57 Descrição do produto _ _ _ _ _ _ _ _ _ _ _ _ _ _ _ 52 O que fazer se…... - Page 50 • As peças de protecção contra choques eléctricos de- • Utilize o aparelho exclusivamente para tarefas de coze- vem estar fixas de modo a que não possam ser retira- dura domésticas. Deste modo, evitará ferimentos pes- das sem ferramentas. soais ou danos materiais. •...
- Page 51 • Utilize uma forma funda para bolos muito húmidos pa- • Não coloque produtos inflamáveis ou objectos molha- ra evitar que os sumos de fruta provoquem nódoas dos com produtos inflamáveis e/ou objectos fundíveis permanentes. (em plástico ou alumínio) no, ao lado ou em cima do aparelho.
-
Page 52: Descrição Do Produto
Descrição do produto Apresentação geral Painel de comandos Indicador de temperatura Botão da temperatura Botão das funções do forno Indicador de alimentação Aberturas de ventilação Grelhador Lâmpada do forno Placa de características Acessórios do forno • Tabuleiro de assar Para cozer e assar ou para recolher a gordura. •... -
Page 53: Funções Adicionais
Para desactivar o aparelho, rode o botão das funções do forno e o botão da temperatura para a posição de desligado. Funções do forno Função do forno Aplicação Posição OFF O aparelho está desligado. Aquece a partir da resistência superior e inferior. Para cozer e assar num nível do Cozedura convencional forno. - Page 54 • Para carne branca, aves e peixe, defina a temperatura evitar a condensação de fumo, acrescente água sempre entre 150°C-175°C. que secar. • Utilize um tabuleiro de recolha para todos os alimentos Tempos de cozedura gordurosos para evitar que o forno ganhe manchas Os tempos de cozedura dependem do tipo de alimento, da permanentes, consistência e do volume.
- Page 55 PÃO E PIZZA Cozedura convencional Tempo de coze- TIPO DE PRATO Notas dura (min.) Temp. (°C) Nível Pão branco 60-70 1-2 fatias, 500 gr cada fatia Pão de centeio 30-45 Em forma rectangular Pãezinhos 25-40 6-8 pãezinhos no tabuleiro plano Pizza 20-30 No tabuleiro de assar...
- Page 56 Cozedura convencional Tempo de coze- TIPO DE PRATO Notas dura (min.) Temp. (°C) Nível Pá de porco 120-150 No tabuleiro de assar Joelho de porco 100-120 2 pedaços no tabuleiro de assar Borrego 110-130 Perna Frango 70-85 Inteiro no tabuleiro de assar Peru 210-240 Inteiro no tabuleiro de assar...
-
Page 57: Manutenção E Limpeza
Quantidade Grelhar Tempos de cozedura em minu- TIPO DE PRATO Peças Temp. (°C) 1.º lado 2.º lado nível Tostas alimentos que contenham amido), a acrilamida pode Informação relativa à acrilamida representar um risco para a saúde. Assim, aconselhamos que cozinhe a baixa temperaturas e não deixe tostar Importante De acordo com os conhecimentos científicos demais os alimentos. -
Page 58: O Que Fazer Se
Limpe a porta do forno com água e detergente. Seque a porta do forno cuidadosamente. Quando terminar a limpeza, instale a porta do forno. Para instalar a porta do forno, execute os passos indicados aci- ma em sequência inversa. Feche a porta do forno até... -
Page 59: Dados Técnicos
Dados técnicos Voltagem 230 V Frequência 50 Hz Instalação Instalação eléctrica Advertência Consulte o capítulo "Informações de segurança". Advertência A instalação eléctrica só deve ser efectuada por uma pessoa qualificada e competente. Instalação O fabricante não é responsável pelo não cumpri- mento das precauções de segurança do capítulo "Informações de segurança". - Page 60 marcadas com as abreviaturas internacionais, como por recolha selectiva da sua área de residência ou o ex., PE, PS etc. Coloque o material da embalagem nos estabelecimento onde adquiriu o produto. contentores para o efeito disponibilizados pelos serviços Materiais da embalagem camarários.
- Page 61 Índice de materias Información sobre seguridad _ _ _ _ _ _ _ _ _ _ _ _ 61 Mantenimiento y limpieza _ _ _ _ _ _ _ _ _ _ _ _ _ 69 Descripción del producto _ _ _ _ _ _ _ _ _ _ _ _ _ _ 64 Qué...
- Page 62 del soporte), dispositivos de fuga a tierra y contacto- res. • Este aparato está diseñado exclusivamente para su uso • Los componentes de protección contra las descargas doméstico. No utilice el aparato con fines comerciales eléctricas tienen que fijarse de forma que no puedan o industriales.
- Page 63 • Antes del mantenimiento, asegúrese de que está total- • Procure que no haya chispas ni fuego encendido cerca mente frío. Existe riesgo de quemaduras. Los paneles cuando se abra la puerta del aparato. de cristal pueden romperse. • No coloque productos inflamables ni objetos mojados •...
- Page 64 Descripción del producto Descripción general Panel de control Indicador de temperatura Mando de temperatura Mando de las funciones del horno Indicador de suministro eléctrico Aberturas de ventilación Grill Bombilla del horno Placa de características Accesorios del horno • Bandeja honda para asar Para hornear y asar y como recoge grasas.
- Page 65 Para apagar el horno, gire el mando de funciones y el mando de temperatura hasta la posición de apaga- do (Off). Funciones del horno Función del horno Aplicación Posición de apagado El aparato está apagado. Calienta desde las resistencias superior e inferior. Para hornear y asar en un nivel Calor superior + inferior del horno.
- Page 66 • No abra la puerta del horno antes de que hayan trans- • Deje reposar la carne durante unos 15 minutos antes currido las ¾ partes del tiempo de cocción programa- de trincharla para que el jugo no gotee. • Para evitar que se forme mucho vapor en el horno •...
- Page 67 Cocción convencional Tiempo de coc- (sup + inf) TIPO DE ALIMENTO Notas ción (min) Temp. (°C) Nivel Bollos 15-20 En bandeja de horno plana Masa de relleno 25-35 En bandeja de horno plana Tartaletas 45-70 En molde de repostería (20 cm) Tarta Victoria 1 ó...
- Page 68 CARNES Cocción convencional (sup Tiempo de coc- + inf) TIPO DE ALIMENTO Notas ción (min) Temp. (°C) Nivel Carne de vacuno 50-70 En bandeja de horno y fuente de horno honda Lomo de cerdo 90-120 En bandeja de horno y fuente de horno honda Ternera 90-120...
- Page 69 Cantidad Gratinado Tiempo de cocción (minutos) TIPO DE ALIMENTO Piezas Temp. (°C) 1ª cara 2ª cara nivel Filetes de ternera 12-15 12-14 Filetes de ternera 10-12 Salchichas 12-15 10-12 Chuleta de cerdo 12-16 12-14 Pollo (cortado en dos) 1000 30-35 25-30 Brochetas 10-15...
- Page 70 • Retire los fusibles o desconecte la instalación eléctrica doméstica. Coloque un paño en el fondo del horno para prote- ger la bombilla y la tapa de cristal. Gire la tapa de cristal hacia la izquierda y quítela. Limpie la tapa de cristal. Cambie la bombilla del horno por otra preparada pa- ra soportar temperaturas de hasta 300°C.
- Page 71 Los datos necesarios para el servicio técnico están en la placa de datos técnicos. La placa de régimen se encuentra en el marco delantero de la cavidad del horno. Es conveniente que los anote aquí: Modelo (Mod.) ......... Número de producto (PNC) .........
- Page 72 Potencia total Sección del cable Potencia total Sección del cable máximo de 2.300 W 3 x 1 mm² máximo de 3.680 W 3 x 1,5 mm² El cable de tierra (cable verde/amarillo) tiene que tener 2 cm más que los cables del neutro y de fase (cables azul y marrón).
- Page 76 www.zanussi.com/shop...
Need help?
Do you have a question about the ZOB141 and is the answer not in the manual?
Questions and answers