Table of Contents
Advertisement
Quick Links
Advertisement
Table of Contents

Related Manuals for Eastwood 14142


Summary of Contents for Eastwood 14142
- Page 1 Part #14142 PLASMA CUTTING TABLE INSTRUCTIONS...
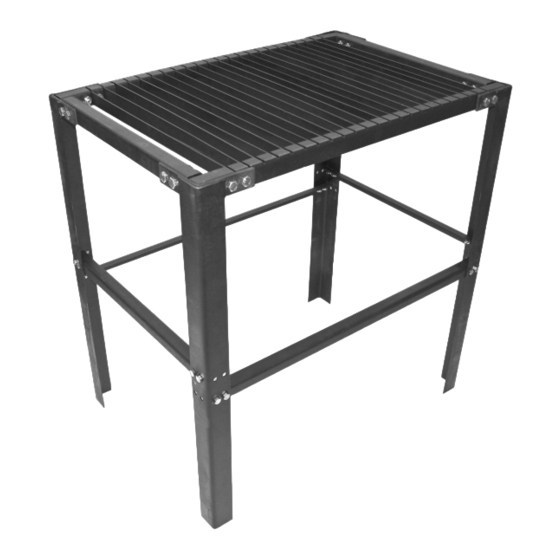
- Page 2 Your Eastwood Plasma Cutting Table offers you an industrial solution to a problem most hobbyist face when trying to cut material with their plasma cutter or gas torch. Using this table you can lay your work piece over the support slats and make cuts with your plasma cutter or gas torch and not worry about what to use to support the back side of the material.
- Page 3 Assemble the entire table with the nuts only fi nger tight and after assembly wrench tighten each of the nuts securely (Figs 2, 3). Fig. 2 Fig. 2 Fig. 3 Fig. 3 To order parts and supplies: 800.345.1178 >> eastwood.com...
- Page 4 3. Install each of the Long Leg Braces (C) to the Legs (A) in Step 2 (Figs 4, 5, 6). Fig. 4 Fig. 4 Fig. 5 Fig. 5 Fig. 6 Fig. 6 Eastwood Technical Assistance: 800.544.5118 >> techelp@eastwood.com...
- Page 5 4. Install two Legs (A) on the opposite side and connect them with a Short Leg Brace (B) using the small 8mm bolts and nuts (Fig 7). Fig. 7 Fig. 7 To order parts and supplies: 800.345.1178 >> eastwood.com...
- Page 6 5 . Using the large 10mm nuts and bolts, install the four table edges (D, E) with the cut grooves in the up and inner position (Fig 8). Insert the bolts through the legs and into the table edges (Fig 9). Fig. 8 Fig. 8 Fig. 9 Fig. 9 Grooves on long piece Grooves on long piece Eastwood Technical Assistance: 800.544.5118 >> techelp@eastwood.com...
- Page 7 These slats are a wear item and over time they can be fl ipped over to achieve a fl at surface and eventually will need to be replaced (Fig 11). Fig. 11 Fig. 11 To order parts and supplies: 800.345.1178 >> eastwood.com...
- Page 8 8. After installing the slats the assembly of the Eastwood Plasma Cutting Table in complete. You can now begin using your plasma cutter to cut out pieces of material without the worry of cutting through your support surface (Fig 12).
Need help?
Do you have a question about the 14142 and is the answer not in the manual?
Questions and answers