Advertisement
Advertisement
Table of Contents

Related Manuals for Akai MPD218


Summary of Contents for Akai MPD218
- Page 1 Bitwig Studio Program Documentation English Manual Version 1.0...
-
Page 2: Table Of Contents
Table of Contents Introduction..........................3 System Requirements & Product Support................3 Installation & Setup ........................4 Operation ............................ 5 MPD218 ..........................6 MPD226 ..........................7 MPD232 ..........................10 MPK225 ..........................13 MPK249 & MPK261 ......................15 Trademarks & Licenses ......................19... -
Page 3: Introduction
To get started, see the Installation & Setup chapter install the files you just downloaded. System Requirements & Product Support For complete system requirements, compatibility information, and product registration, visit the Akai Professional website: akaipro.com. For additional support, visit akaipro.com/support. -
Page 4: Installation & Setup
Installation & Setup In order for Bitwig Studio to recognize your controller, you need to install the “script” file you just downloaded and select your controller in the Preferences. To do this: 1. Move the script file you just downloaded to the location for your operating system: •... -
Page 5: Operation
Operation This chapter describes how you can use following controllers in Bitwig Studio: MPD218 MPK225 MPD226 MPK249 MPD232 MPK261 Important: Each time you use your controller with Bitwig Studio, select the Bitwig Studio program by doing the following: 1. Press Preset. The display will show the current program name (flashing). -
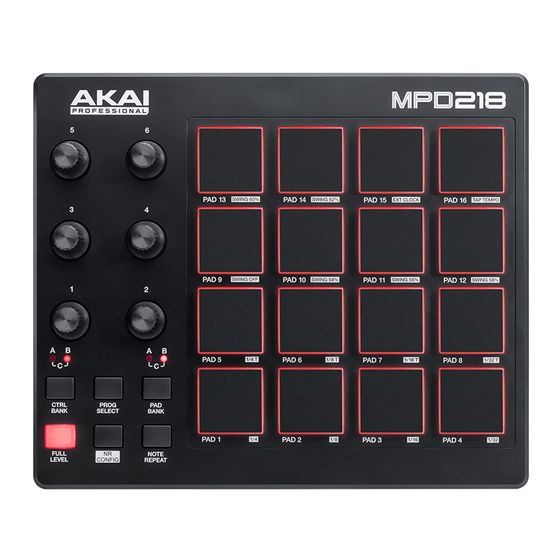
Page 6: Mpd218
Pads: Press the pads to play the active instrument track. Press Pad Bank to change the current pad bank. Knobs: Turn the knobs to control macros or parameters of the active track, depending on your MPD218’s current control bank: • Control Bank A: Turn the knobs to control Macros 1–6 of the current device. -
Page 7: Mpd226
MPD226 Important: Remember to select and load the Bitwig program each time you use your MPD226 with Bitwig Studio. Transport Buttons (Stop, Play, Record): Press these buttons to stop playback or recording (Stop), start playback or recording (Play), or record-arm the active track(s) (Record). Pads: Press the pads to play MIDI notes or to launch clips or scenes, depending on the current mode: •... - Page 8 Knobs: Turn the knobs to control certain parameters, depending on MPD226’s current control bank: • Control Bank A: Turn the knobs to control Macros 1–4 of the primary device. • Control Bank B: Turn the knobs to control the Pan knobs of the tracks. Each knob corresponds to the track with the same number (e.g., Knob 1 controls the panning of Track 1, Knob 2 controls the panning of Track 2, etc.).
- Page 9 Switches: Press the switches to select modes or enable/disable certain track parameters, depending on MPD226’s current control bank: • Control Bank A: Press a switch to select the mode for the pads: Switch 1: Press Switch 1 to select Instrument Mode (described above). Switch 2: Press Switch 2 to select Clip Mode (described above).
-
Page 10: Mpd232
MPD232 Important: Remember to select and load the Bitwig program each time you use your MPD232 with Bitwig Studio. Transport Buttons (Stop, Play, Record): Press these buttons to stop playback or recording (Stop), start playback or recording (Play), or record-arm the active track(s) (Record). Pads: Press the pads to play MIDI notes or to launch clips or scenes, depending on the current mode: •... - Page 11 Knobs: Turn the knobs to control certain parameters, depending on MPD232’s current control bank: • Control Bank A: Turn the knobs to control Macros 1–8 of the primary device. • Control Bank B: Turn the knobs to control the Pan knobs of the tracks. Each knob corresponds to the track with the same number (e.g., Knob 1 controls the panning of Track 1, Knob 2 controls the panning of Track 2, etc.).
- Page 12 Switches: Press the switches to select modes or enable/disable certain track parameters, depending on MPD232’s current control bank: • Control Bank A: Press a switch to select the mode for the pads: Switch 1: Press Switch 1 to select Instrument Mode (described above). Switch 2: Press Switch 2 to select Clip Mode (described above).
-
Page 13: Mpk225
MPK225 Important: Remember to select and load the Bitwig program each time you use your MPK225 with Bitwig Studio. Transport Buttons (Stop, Play, Record): Press these buttons to stop playback or recording (Stop), start playback or recording (Play), or record-arm the active track(s) (Record). Pads: Press the pads to play MIDI notes or to launch clips or scenes, depending on the current mode: •... - Page 14 Knobs: Turn the knobs to control certain parameters, depending on MPK225’s current control bank: • Control Bank A: Turn the knobs to control Macros 1–8 of the primary device. • Control Bank B: Turn the knobs to control the Pan knobs of the tracks. Each knob corresponds to the track with the same number (e.g., Knob 1 controls the panning of Track 1, Knob 2 controls the panning of Track 2, etc.).
-
Page 15: Mpk249 & Mpk261
MPK249 & MPK261 Important: Remember to select and load the Bitwig program each time you use your MPK249/MPK261 with Bitwig Studio. Transport Buttons (Stop, Play, Record): Press these buttons to stop playback or recording (Stop), start playback or recording (Play), or record-arm the active track(s) (Record). Pads: Press the pads to play MIDI notes or to launch clips or scenes, depending on the current mode: •... - Page 16 Knobs: Turn the knobs to control certain parameters, depending on MPK249’s/MPK261’s current control bank: • Control Bank A: Turn the knobs to control Macros 1–8 of the primary device. • Control Bank B: Turn the knobs to control the Pan knobs of the tracks. Each knob corresponds to the track with the same number (e.g., Knob 1 controls the panning of Track 1, Knob 2 controls the panning of Track 2, etc.).
- Page 17 Switches: Press the switches to select modes or enable/disable certain track parameters, depending on MPK249’s/MPK261’s current control bank: • Control Bank A: Press a switch to select the mode for the pads: Switch 1: Press Switch 1 to select Instrument Mode (described above). Switch 2: Press Switch 2 to select Clip Mode (described above), allowing you to launch clips for Tracks 1–4.
- Page 18 DAW Control: Press these buttons to perform the following functions: • Up (∧): Press this button to shift the “clip window” up by one scene. (The clip window is the 4x4 area of clips you can launch with the pads in Clip Mode.) •...
-
Page 19: Trademarks & Licenses
Trademarks & Licenses Akai Professional is a trademark of inMusic Brands, Inc., registered in the U.S. and other countries. Bitwig Studio is a registered trademark of Bitwig GmbH, registered in the U.S. and other countries. Mac and OS X are trademarks of Apple Inc., registered in the U.S. and other countries.
Need help?
Do you have a question about the MPD218 and is the answer not in the manual?
Questions and answers