
Subscribe to Our Youtube Channel
Related Manuals for LXNAV S8 Series


Summary of Contents for LXNAV S8 Series
- Page 1 USER MANUAL S10x Digital speed-to-fly variometer, final glide calculator and navigational system with simple moving map Version 8.0 April 2021 www.lxnav.com...
-
Page 3: Table Of Contents
S80 (80mm) Variometer Unit S8 (57mm) Variometer Unit S10 (57mm) Variometer Unit S100 (80mm) Variometer Unit S10D and S8D Repeater Unit S100D and 80D Repeater Unit Basics LXNAV S8x/S10x at a Glance LXNAV S8x/S10x Features 3.2.1 Interfaces 3.2.2 Options 3.2.3 S8/S80 Club 3.2.4... - Page 4 Rev #37 Version 8.0 April 2021 Info Mode 5.2.1 Quick Access Menu FLARM Mode 5.3.1 Quick Access Menu 5.3.1.1 Edit Target 5.3.1.2 FLARM Traffic 5.3.2 FLARM Warnings Thermal Assistant Mode 5.4.1 Quick Access Menu Waypoint Mode 5.5.1 Quick Access Menu 5.5.2 Numerical page 5.5.3...
- Page 5 Rev #37 Version 8.0 April 2021 5.7.3.17 HAWK Vertical wind average 5.7.4 Display 5.7.4.1 Automatic Brightness 5.7.4.2 Minimum Brightness 5.7.4.3 Maximum Brightness 5.7.4.4 Get Brighter In 5.7.4.5 Get Darker In 5.7.4.6 Brightness 5.7.4.7 Night Mode Darkness 5.7.5 Files 5.7.5.1 Profiles 5.7.5.2 Waypoints and Tasks 5.7.5.3...
- Page 6 7.6.1 Netto Vario 7.6.2 Relative Vario 7.6.3 HAWK Parameters 7.6.4 Graphical display 7.6.5 Audio source Flying with the LXNAV S8x/S10x On the Ground 8.1.1 Power on Procedure 8.1.2 Set Elevation and QNH 8.1.3 Pre-Flight Check Airborne 8.2.1 Final Glide Calculation...
- Page 7 10.1 Updating LXNAV S10x and S8x Firmware Using a Micro SD Card 10.2 Updating LXNAV S8x Firmware Using a Micro SD Card (up to fw. 5.43) 117 10.3 Updating LXNAV S8x Firmware Using a Micro SD Card (OLD Method) 117 10.4 Incomplete Update Message (OLD version)
-
Page 8: Important Notices
LXNAV retains the exclusive right to repair or replace the unit or software, or to offer a full refund of the purchase price, at its sole discretion. SUCH REMEDY SHALL BE YOUR SOLE AND EXCLUSIVE REMEDY FOR ANY BREACH OF WARRANTY. -
Page 9: Packing Lists
Rev #37 Version 8.0 April 2021 2 Packing Lists LXNAV S8x or S10x main unit • Main power cable for S8x/S10x + CAN terminator • Speaker • GPS cable (S7-GPS-IGC included, other types optional, this cable is included only with •... -
Page 10: S80 (80Mm) Variometer Unit
Rev #37 Version 8.0 April 2021 2.1 S80 (80mm) Variometer Unit P Total PDA Port P Static GPS/Flarm Main Power Audio Jack Page 10 of 121... -
Page 11: S8 (57Mm) Variometer Unit
Rev #37 Version 8.0 April 2021 2.2 S8 (57mm) Variometer Unit P Static Audio Jack P Total Main Power GPS/Flarm Port PDA Port NOT IN USE Page 11 of 121... -
Page 12: S10 (57Mm) Variometer Unit
Rev #37 Version 8.0 April 2021 2.3 S10 (57mm) Variometer Unit GPS Antenna Audio Jack NOT IN USE GPS/Flarm Port Bluetooth Antenna Main Power P Total PDA Port P Static Page 12 of 121... -
Page 13: S100 (80Mm) Variometer Unit
Rev #37 Version 8.0 April 2021 2.4 S100 (80mm) Variometer Unit Bluetooth antenna NOT IN USE P Total GPS Antenna P Static GPS/Flarm Port PDA Port Main Power Audio Jack Page 13 of 121... -
Page 14: S10D And S8D Repeater Unit
Rev #37 Version 8.0 April 2021 2.5 S10D and S8D Repeater Unit PDA (on S10D) The S10D has also a PDA port, however the S8D does not. Page 14 of 121... -
Page 15: S100D And 80D Repeater Unit
Rev #37 Version 8.0 April 2021 2.6 S100D and 80D Repeater Unit PDA (on S100D) The S100D has also a PDA port, however the S80D does not. Page 15 of 121... -
Page 16: Basics
4 variable numeric fields displayed on a QVGA 320x240 pixel, 3.5-inch (S80/S100) or 2.5-inch (S8/S10), high brightness (1200 nits) colour display. To adjust values and settings the LXNAV S8x/S10x has two rotary push button knobs and three additional push buttons. -
Page 17: Lxnav S8X/S10X Features
The following features are optional on this device: Task mode (see Chapter 5.6), Digital inputs (see Chapter 5.7.13.1), Pilot profiles (see Chapter 5.7.15) and Airspaces (see Chapter 5.7.8.3). Every option can be upgraded separately at any time. To purchase additional options please contact LXNAV. Device: S8 Club... -
Page 18: Technical Data
Rev #37 Version 8.0 April 2021 3.2.4 Technical Data Power input 10-16 V DC. 3.2.4.1 Power Consumption Device Min. Brightness (mA) Max. Brightness (mA) Max charge current (mA) 140 at (12V) 190 at (12V) S8D / S10D 90 at (12V) 140 at (12V) 140 at (12V) 190 at (12V) -
Page 19: System Description
4 System Description 4.1 Push Button – Rotary Switches The two Rotary switches also have a push button function. The LXNAV S8x/S10x detects short or long presses of the push button. A short press means just a click, a long press means pushing the button for more than one second. -
Page 20: Buttons (Three)
4.4 Switching on the Unit Pressing any of the buttons or rotary knobs will turn on the S8x/S10x. The first LXNAV welcome screen will appear with the system information (Device name, Version, Serial number...) The S8xD rear seat unit cannot be powered up before the S8x/S10x has been powered up. -
Page 21: User Input
Version 8.0 April 2021 4.5 User Input The LXNAV S8x/S10x user interface consists of dialogues which have various input controls. They are designed to make the input of names, parameters, etc., as easy as possible. Input controls can be summarized as: Text editor •... -
Page 22: Spin" Control
Rev #37 Version 8.0 April 2021 4.5.2 “Spin” Control “Spin” controls are designed for numeric parameters. Rotate the knob to increase/decrease the selected value. To increase a value in larger steps, spin the lower rotary knob faster. 4.5.3 Selection Control Selection boxes, also known as combo boxes, are used to select a value from a list of predefined values. -
Page 23: Slider Selector
Rev #37 Version 8.0 April 2021 4.5.5 Slider Selector Some values, such as volume and brightness, are displayed as a slider icon. With a push of the lower rotary button you can activate the slide control and then by rotating the knob you can select the preferred value and confirm it via the push button. 4.6 Switching Off You will lose your settings if you power down the S8x via the panel master-power switch. -
Page 24: Operating Modes
The LXNAV S8x/S10x has five operating modes. The middle (Menu) push button toggles through the 5 display modes in a circular way. The diagram below shows the mode structure of the LXNAV S8x. With the upper and lower buttons, it is also possible to move between subpages. Info Mode... -
Page 25: Quick Access Menus
Rev #37 Version 8.0 April 2021 5.1 Quick Access Menus For each mode a quick access menu is available, which varies from mode to mode. Items available in quick access menus are: MC/BAL • Reset G • Layout • Edit target (only FLARM page) •... -
Page 26: Layout In The Numerical Page
Rev #37 Version 8.0 April 2021 5.1.3.1 Layout in the Numerical Page In the numerical page the number of navboxes and sidebar can be set. Every navbox can be defined separately. 5.1.3.1.1 Sidebar The user can select between the different sidebar options that can be displayed on the page (classic Speed to Fly-push/pull bar, Flaps tape, Speed tape and combined Speed &... -
Page 27: Layout In The Graphical Page
Rev #37 Version 8.0 April 2021 5.1.3.2 Layout in the Graphical Page In the graphical page navboxes can be vertical or horizontal (2 types). The sidebar cannot be set in this page. Every navbox can be defined separately. 5.1.3.2.1 Editing Navboxes You can select the required data for the highlighted navbox. - Page 28 Rev #37 Version 8.0 April 2021 True airspeed True airspeed Indicated airspeed Indicated airspeed Last 60’ speed Sp60’ Average speed for last hour Ground speed Speed over ground, taken from GPS Speed to fly Calculated speed to fly from MC setting (McSpeed) Ground Track Track over ground taken from GPS Magnetic Heading...
-
Page 29: Select / Select Near (Only In Wpt Mode)
Rev #37 Version 8.0 April 2021 5.1.4 Select / Select Near (Only in WPT mode) To select a waypoint, rotate the lower rotary knob to highlight the select option and then press once. This will open the Waypoint list. A waypoint can be selected from the alphabetical list of waypoints (see uploading files in Chapter 5.7.5.1). -
Page 30: Edit Task (Only In Task Mode)
Rev #37 Version 8.0 April 2021 5.1.10 Edit Task (Only in Task Mode) Selecting the edit task via a short press of the lower rotary knob will enter the task editing screen. The first time you edit a task it will be blank. A short press of the lower rotary knob will open another menu with the option to: Edit, •... -
Page 31: Send Wpt
Rev #37 Version 8.0 April 2021 5.1.14 Send WPT With pressing that option, selected waypoint will be sent to SxxxD unit. 5.1.15 Load/Save In the Load menu you can create files to load into the instrument or you can upload them to the instrument via the SD card. -
Page 32: Info Mode
Rev #37 Version 8.0 April 2021 5.2 Info Mode The Info Mode gives you a snapshot of the GPS position, date and time along with the Flight level, altitude, Battery status and FLARM status. The Flight Level equivalent is also available in meters or feet as is the Altitude navbox. -
Page 33: Flarm Mode
Rev #37 Version 8.0 April 2021 5.3 FLARM Mode If the S8x/S10x is connected to a FLARM source via the GPS port (in the S10x called the FLARM port) then the FLARM Mode will display a map of the relative positions of FLARM targets that are within range. -
Page 34: Quick Access Menu
Rev #37 Version 8.0 April 2021 5.3.1 Quick Access Menu A short press of the lower rotary button activates the Quick Access menu. 5.3.1.1 Edit Target The user can edit the following FLARM objects data: FLARM ID • Competition sign •... -
Page 35: Thermal Assistant Mode
Rev #37 Version 8.0 April 2021 5.4 Thermal Assistant Mode The Thermal Assistant mode displays a graphical representation of your location within the thermal. If you are thermaling to the left, there will be an aircraft symbol on the right of the ring of bubbles and the bubbles will appear to rotate clockwise (towards the symbol of the glider). -
Page 36: Waypoint Mode
Rev #37 Version 8.0 April 2021 5.5 Waypoint Mode The Waypoint Mode is a quick access screen to provide simple navigation to a Waypoint or Airport. By rotating the bottom rotary knob, you can vary the range of the display from 0.5 km to 100 km. -
Page 37: Numerical Page
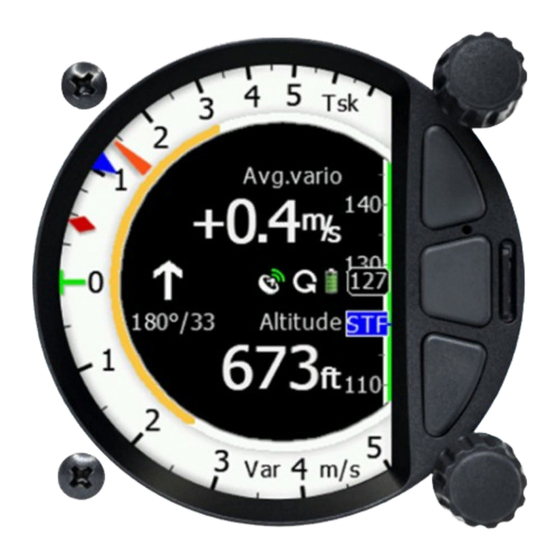
Rev #37 Version 8.0 April 2021 5.5.2 Numerical page The Waypoint mode has a second page which contains numerical data. Default are 4 navboxes: Average Vario, Netto, Altitude and True Airspeed. In addition, the central line shows the status of the FLARM, GPS, Cruise/Climb and battery status. This second page can be selected by pressing the lower push button once. -
Page 38: Wind Page
Rev #37 Version 8.0 April 2021 The Green T symbol represents last thermal average value. • The Yellow Bar can show Max and Min values of vario over defined time (average • vario) or G meter (over whole flight). The FLARM Status symbol indicates the presence of a FLARM unit (grey), if the FLARM •... -
Page 39: Ahrs Page
Rev #37 Version 8.0 April 2021 5.5.4 AHRS Page The Waypoint mode has a fourth page which displays the AHRS (To enable this feature refer to chapter 9.5.5). The Pitch offset can be adjusted via the lower rotary knob. competitions artificial horizon disabled... -
Page 40: Task Mode
Rev #37 Version 8.0 April 2021 5.6 Task Mode The task mode can display a navigation page including airspace and a task. By rotating the lower rotary knob, you can change the range of the display from 0.2 km to 100 km. Task mode is not enabled on the S8/S80 Club version. -
Page 41: Ahrs Page
Rev #37 Version 8.0 April 2021 When using HAWK option, default average time for wind is set to 30 seconds. User can modify it in Vario parameters. If HAWK option is not used, averaging time is fixed to three minutes. To learn more about HAWK see chapter 7 5.6.3 AHRS Page... -
Page 42: Editing Navboxes
Rev #37 Version 8.0 April 2021 Night • Changing the Start, Edit task, MC/BAL is the same as Page 1 of the Task mode. 5.6.4.1 Editing navboxes Selecting the navboxes option and then pressing the bottom rotary knob will allow you to select one of the three boxes by rotating the lower rotary knob followed by a short press. -
Page 43: Setup Mode
Rev #37 Version 8.0 April 2021 5.7 Setup Mode The setup mode allows you to change the configuration and base settings for the S8x/S10x vario. Following items are listed in the setup menu: QNH &RES • Flight recorder • Vario parameters •... -
Page 44: Qnh & Res
Rev #37 Version 8.0 April 2021 5.7.1 QNH & RES Turn the lower rotary knob to select the required entry field. Press the lower rotary knob to select it and start editing the value. A further short press will enter the value. 5.7.1.1 This feature may be used to offset the altitude datum as the result of pressure changes during the flight. -
Page 45: Auto Finish
Rev #37 Version 8.0 April 2021 5.7.2.2 Auto Finish If this functionality is enabled, the flight recorder will automatically finish the flight under the following conditions: GPS status OK • Groundspeed lower than 20 km/h • True airspeed lower than 40km/h •... -
Page 46: Vario Parameters
Rev #37 Version 8.0 April 2021 5.7.3 Vario Parameters 5.7.3.1 Vario Needle Filter Vario needle filter sets a time constant of the Vario needle. The value can be adjusted between 0.1 and 5 s with step 1.0s or 0.1s. Default value is 2.0 s. A lower number (0.1s compared to 5.0 s) means very sensitive (fast vario). -
Page 47: Needle Range
When glider starts circling the S8x/S10x will automatically switch from cruise to climb mode. The external switch wired to the LXNAV S8x/S10x has absolute priority and will override all other switching methods. VP (Vario priority) input can also override a hard-wired SC switch. -
Page 48: Vario Average Time
Rev #37 Version 8.0 April 2021 If the TE pitot tube has been connected, TE compensation should be set to 0%. No further adjustment of the TE compensation is possible. Quality of the TE tube is the one and only factor. electronic static TE compensation, connect the TE port to... -
Page 49: Temperature Offset
Version 8.0 April 2021 5.7.3.12 Temperature Offset The LXNAV S8x/S10x is supplied with an external outside air temperature (OAT) sensor. With the offset setting it will correct static errors of temperature measurement. 5.7.3.13 Airspeed Offset The user has the possibility to make an airspeed offset if the measurement is not correct. -
Page 50: Get Brighter In
Rev #37 Version 8.0 April 2021 5.7.4.4 Get Brighter In The user can specify in which time period the brightness can reach the required brightness. 5.7.4.5 Get Darker In The user can specify in which time period the brightness can reach the required brightness. 5.7.4.6 Brightness With the Automatic Brightness unchecked you can set the brightness manually with this... -
Page 51: Files
Rev #37 Version 8.0 April 2021 5.7.5 Files The Files menu allows you to upload or select Waypoint, Airspace and FlarmNet files. 5.7.5.1 Profiles Saved profiles on the SD card can be loaded into the device via this menu. 5.7.5.2 Waypoints and Tasks Selecting the Waypoints and Tasks menu opens a list of .cup files available in the internal memory. -
Page 52: Airspace File
Pressing add new lists the files present on the SD card. Selected files are automatically loaded into internal memory. Selecting a file loads this file for use. The LXNAV ASAPT database file format is also supported and can be loaded into the system. Page 52 of 121... -
Page 53: Logbook
Rev #37 Version 8.0 April 2021 5.7.5.4 Logbook The logbook page lists all the flights sorted by date. If GPS data is present the logbook will show the date and time of departure. Manual navigation (without GPS) will show the duration and will be marked with "—" marks. The user can download a flight by a short press on the lower rotary button. -
Page 54: Logbook
Rev #37 Version 8.0 April 2021 5.7.6 Logbook The logbook page lists all the flights sorted by date. If GPS data is present the logbook will show the date and time of departure. Manual navigation (without GPS) will show the duration and will be marked with "—" marks. The user can download a flight by a short press on the lower rotary button. -
Page 55: Graphics
Rev #37 Version 8.0 April 2021 5.7.8 Graphics The Graphics option has sub menus for Map, Airspace, Waypoints, Glider and Track, Tasks, FLARM, Theme setup and Modes. 5.7.8.1 Indicator Setup Vario indicator graphics and preferences can be adjusted in this menu. 5.7.8.1.1 Needles When... -
Page 56: Map
Rev #37 Version 8.0 April 2021 5.7.8.1.6 MacCready The blue triangle can be enabled or disabled. 5.7.8.1.7 Thermal The green T can be enabled or disabled. 5.7.8.1.8 Red Cursor Style It is possible to pick between thin / middle or thick cursor style. 5.7.8.1.9 Needle Range Type Non-linear needle means that positive climb numbers are not in the linear scale, but they are... -
Page 57: Airspace
Rev #37 Version 8.0 April 2021 5.7.8.3 Airspace Airspaces are not enabled on S8/S80 Club version. To purchase this option please refer to Chapter 3.2.3. In this dialogue you can define the airspace map presentation. Check the Show airspace item to enable airspace displays in navigational modes. If this item is unchecked no airspace will be displayed. -
Page 58: Waypoints
Rev #37 Version 8.0 April 2021 5.7.8.4 Waypoints In this dialogue you can define whether waypoints are displayed or not, how many characters are displayed and the size and colour of the label. 5.7.8.4.1 Show Waypoint Check the dialogue box to enable waypoint labels for the Waypoint and Task Modes. 5.7.8.4.2 Max Visible This defines for how long waypoints and detailed symbols are displayed. -
Page 59: Thermal Assistant
Rev #37 Version 8.0 April 2021 In this dialogue you can choose to show a line to the target and your track line together with the colour from the pallet of 15 colours. 5.7.8.5.1 Show line to target Check the dialogue box to display a line to the target. 5.7.8.5.2 Line to target You can choose the colour of the target line from the pallet of 15 colours. -
Page 60: Task
Rev #37 Version 8.0 April 2021 The S8x will only detect turning if a GPS or FLARM device is attached. The S8x uses a combination of change of speed, angle of bank and direction change to indicate circling. The S10x has an internal GPS module. 5.7.8.6.3 Use Active Navigation Data If this item is checked, all the data relating to navigation will be calculated to either Wpt or... - Page 61 Rev #37 Version 8.0 April 2021 5.7.8.7.2 Task Colour You can choose the colour of the task line from a pallet of 15 colours. 5.7.8.7.3 Zone Colour You can choose the colour of the task line from a pallet of 15 colours. 5.7.8.7.4 Zone Transparency With this dialogue you can choose the level of the zone transparency from 0 to 100%.
-
Page 62: Flarm
Rev #37 Version 8.0 April 2021 5.7.8.8 FLARM In this menu you can choose to show FLARM traffic on the map, select target on map only, change glider colours and adjust the FLARM object timeout and graphical settings. 5.7.8.8.1 Traffic on Map Check the dialogue box to display FLARM objects on the screen. -
Page 63: Modes
Rev #37 Version 8.0 April 2021 5.7.8.9 Modes Task, Thermal and FLARM modes can be disabled via this menu. Additionally the AHRS page can be disabled here. For competitions the artificial horizon can be disabled in this menu. When the artificial horizon page is active a BFION event is written to the recorded flight for verification purposes. -
Page 64: Vario Sounds
Rev #37 Version 8.0 April 2021 5.7.9.2 Vario Sounds In this menu the user can change all the parameters for vario sounds. The volume for Vario, FLARM and Speech can also be adjusted directly via the upper rotary knob whilst in the FLARM, Waypoint and Task Modes. 5.7.9.2.1 Vario Volume The user can set the default vario volume. -
Page 65: Flarm Sounds
5.7.9.2.9 Equalization Pre-Sets We have three options: default LXNAV speaker, flat setting or user defined. The volume for Vario, FLARM and Speech can also be adjusted directly via the upper rotary knob whilst in the FLARM, Waypoint and Task Modes. -
Page 66: Obs. Zones
Rev #37 Version 8.0 April 2021 5.7.9.3.4 FLARM Urgent Alarm: For very close FLARM targets the S8x/S10x gives a short or long message, just a beep or be turned off (6-8 seconds before possible collision). The volume for Vario, FLARM and Speech can also be adjusted directly via the upper rotary knob whilst in the FLARM, Waypoint and Task Modes. -
Page 67: Warnings
Rev #37 Version 8.0 April 2021 To Near: if this is checked it will navigate to nearest point of the zone. • 5.7.11 Warnings There are FLARM, Altitude and Airspace warnings. 5.7.11.1 FLARM Warnings 5.7.11.1.1 Enable FLARM Warnings Warnings can be enabled or disabled in this section. The warning dismiss time can be set from 0 to 120 seconds. -
Page 68: Airspace Warnings
Rev #37 Version 8.0 April 2021 5.7.11.2.2 Warn me before This is related to the Altitude alarm; it can be set from 10 to 500 seconds. The predicted time to reach alarm altitude is calculated from the average vario. 5.7.11.3 Airspace Warnings 5.7.11.3.1 Minutes Off Once a warning appears, you can disable it for a specific time in minutes. -
Page 69: Visual Messages/Warnings
Rev #37 Version 8.0 April 2021 5.7.11.4 Visual Messages/Warnings The S8x/S10x will provide the following visual messages/warnings: Digital signature failed (it will appear immediately after initial setup) • Freezing temperature (it is related to the OAT measurement) • Task started •... -
Page 70: Voice Warnings
Rev #37 Version 8.0 April 2021 5.7.11.5 Voice Warnings The S8x/S10x will trigger the following voice warnings: Gear Warnings CHECK GEAR: this warning is triggered 5 minutes after take-off if the landing gear is not wired to any of the inputs of the S8x/S10x. CHECK LANDING GEAR: during the flight, gear up*, airbrakes opened*. -
Page 71: Hardware
– it must be wired by the customer. 5.7.13.1.2 SC Switch The LXNAV S8x/S10x has an input for an external speed command switch. Using the external switch, it is possible to manually switch between SC and Vario. Setting the SC switch to ON mean that closing the switch will cause the instrument to enter SC mode. -
Page 72: Communication Setup
Version 8.0 April 2021 5.7.13.1.3 Digital Inputs 1,2,3,4 The LXNAV S8x/S10x has 4 external digital inputs which can be set to indicate the state of the landing gear, airbrakes and water open or closed. The wiring is described in Chapter 9.6.2. - Page 73 The baud rate on PDA must not be lower than the setting on GPS port. 5.7.13.2.4 GPS (S10x-FLARM port) Baud Rate Set the baud rate of the GPS/FLARM port. To obtain best performance from the LXNAV S8x/S10x it is recommended that both baud rates are set as high as possible. 5.7.13.2.5 Bluetooth Toggle this setting to switch ON/OFF the internal Bluetooth module.
-
Page 74: Battery Setup
Rev #37 Version 8.0 April 2021 5.7.13.2.9 External Target If this item is checked the unit will accept target information received by the PDA, BT or GPS ports. The user will see information on the screen that a new target has been received. The user can accept or ignore the target. - Page 75 Rev #37 Version 8.0 April 2021 Alternatively, you can manually change the Full Voltage, Low Battery Voltage and Empty Voltage if your battery type is not listed. Those settings will influence the battery level icon and low battery warning. 5.7.13.3.2 Internal Battery S10x units have also a built-in internal battery where you can check the health and settings of this battery.
-
Page 76: Remote Stick (New)
Rev #37 Version 8.0 April 2021 5.7.13.3.4 Settings of the Internal Battery The following values can be set: Preserve battery = charger will not be activated until the battery drains below 75%. • Charge to full = if it is not checked, the battery will be charged up to 90%. •... -
Page 77: Compass Module
Rev #37 Version 8.0 April 2021 The remote stick is only recognized if the system is under external 12V power. It will not work if the S10/S100 is running on the internal battery only. 5.7.13.5 Compass Module TO BE DONE – the compass module is not yet supported. 5.7.13.6 Flaps When a flap sensor is installed, use this menu to set the flaps position. -
Page 78: Can Bridge
Rev #37 Version 8.0 April 2021 Reset gyros will set back to factory defaults all user gyro alignments. During flight user pitch offset can be adjusted via the lower rotary knob. In this menu AHRS can also be Locked by Password. The AHRS locked option may be used by contest organizers. - Page 79 Identity in the XPDR Setup menu which is opened by clicking Config XPDR. It can also show target warnings from the transponder. For the list of supported devices please refer to CAN Bridge installation manual found on www.lxnav.com. Page 79 of 121...
-
Page 80: Flarm
Rev #37 Version 8.0 April 2021 5.7.13.9 FLARM If a FLARM or PowerFLARM is connected to the system its information, configuration and aircraft configuration can be seen or configured in this menu. 5.7.13.9.1 Info Here you can see all information about the external FLARM/PowerFLARM device. Available information is: Hardware •... -
Page 81: Polar And Glider
The program requires three sink points entered at selected speeds (e.g.: 100 km/h, 130 km/h, and 150 km/h). The program will calculate the values of a, b and c, which should be noted and entered into the LXNAV S8x/S10x. Class: Options for Touring, Ultralight, World, Twin-seater, Club, 18-meter, 15-meter, •... -
Page 82: Speeds
Rev #37 Version 8.0 April 2021 Maximum take-off weight is the maximum take-off weight allowed for the glider. It • is not used in the calculation; it is just a reminder to the pilot of the maximum take-off weight. Empty weight is weight of the glider without the pilot and ballast. Pilot weight is the weight of the pilot with parachute and baggage. -
Page 83: Profiles
Rev #37 Version 8.0 April 2021 5.7.15 Profiles In this menu, the pilot can save his own settings in a profile. Different profiles are useful if more than one pilot is flying the same glider, or if the glider has a variable wing configuration (15m, 18m). -
Page 84: Password
Rev #37 Version 8.0 April 2021 5.7.16 Password There are several system passwords which run specific procedures as listed below: 5.7.16.1 List of Password Functions DELETE WHOLE LOGBOOK 99999 RESET TO FACTORY DEFAULT 00666 AHRS LICENSE ACTIVATION / DEACTIVATION 30000 AHRS REACTIVATE 23519 AUTO ZERO... -
Page 85: Admin Mode
Rev #37 Version 8.0 April 2021 5.7.17 Admin Mode In this menu a pilot can lock the unit and protect the settings with a password. If admin mode is selected and a password applied, the settings on the unit will be locked and are not able to be changed. -
Page 86: Variometer And Altimeter
Electronic TE Compensation Compensation with TE probe 6.1 Altimeter The altimeter of the LXNAV S8x/S10X is temperature compensated from -20ºC up to + 60ºC. The altimeter is calibrated up to 20000 m. 6.2 Speed Command Speed command flying based on the MacCready theory is a very useful tool to optimize cross-country speed. -
Page 87: Hawk
HAWK system was developed by prof. Heinrich Meyr* and Peng Huang† in cooperation with LXNAV. It features a completely new approach towards measuring three-dimensional wind vector which is essential for glider pilots to understand movement of the air in the vicinity of glider. - Page 88 Rev #37 Version 8.0 April 2021 We assume that the wind vector comprises two elements: a slowly varying component and a rapidly varying random disturbance. Next figure shows that the more turbulent the air mass, the greater the random increment is. The three wind components are assumed to be independent of each other.
- Page 89 Rev #37 Version 8.0 April 2021 changes are in an interval of 1 m/s. The value σ = 0.1 corresponds to a very quiet air mass. Most changes will be at an interval of 0.1 m/s. The true model parameter σ is of course unknown to the instrument.
-
Page 90: The Aerodynamic Model
Rev #37 Version 8.0 April 2021 7.3 The Aerodynamic Model The EKF uses the polar diagram of the glider and a sideslip coefficient to compute error signals. The sideslip coefficient is calculated from the aerodynamic properties of the glider. These parameters are internal variables of the EKF and cannot be modified by the user. The sideslip angle has a strong impact on the performance of the glider. - Page 91 Rev #37 Version 8.0 April 2021 Segment A: Sideslip angle and Netto difference. In a nutshell: The agreement between TEK and EKF vario during stationary circling of the glider is particularly good. This changes completely when we analyse segment B and C. Picture below shows two segments B and C of the same flight of the ASG 32.
-
Page 92: Summary And Recommendation
HAWK system, a HAWK option must be purchased. Please contact your local dealer or LXNAV directly to get your HAWK option. Once you receive option file from us refer to Chapter 9.5.5 for installation procedure. HAWK system can also be tested free of charge for a period of 31days. Please visit www.lxnav.com... -
Page 93: Relative Vario
Rev #37 Version 8.0 April 2021 7.6.2 Relative Vario As explained, the EKF estimates all state variables (position, velocity and attitude) jointly. For this reason, the estimated roll angle is used for the calculation of the circle polar in a post processing step. -
Page 94: Flying With The Lxnav S8X/S10X
April 2021 8 Flying with the LXNAV S8x/S10x To get the best out of the LXNAV S8x/S10x it is important that some preparation is made prior to take-off. Trying to configure the instrument or set a task while flying is very hazardous especially in a competition. -
Page 95: Pre-Flight Check
Version 8.0 April 2021 8.1.3 Pre-Flight Check After elevation setup the LXNAV S8x/S10x will switch to the Info screen for normal operation mode. Use the middle (Menu) button to scroll to the FLARM, Waypoint or Task Screen to verify that the MacCready, Ballast and Bugs settings are set to the expected values for the current flight. -
Page 96: Installation
Rev #37 Version 8.0 April 2021 9 Installation The LXNAV S8x/10x requires a standard 57 or 80mm cut-out. Three pressure connectors are fitted to the back of the S8x/S10x. A label shows their functions: means static pressure connector. • static means pitot or total pressure connector. -
Page 97: Installing The Lxnav S8X/S10X
9.2 Connecting the LXNAV S8x/S10x The LXNAV S8x/S10x is connected to the 12V DC power supply. The red wire goes to + positive and blue wire goes to – ground. If you don’t use the S8xD (second seat unit) the Can connector should be left terminated with a CAN terminator. -
Page 98: Cutouts
Rev #37 Version 8.0 April 2021 9.3 Cutouts 9.3.1 Cut-Out for S8 and S10 9.3.2 Cut-Out for S80 and S100 4,5mm 6,3mm The length of the screw is limited to max 4mm! Page 98 of 121... -
Page 99: Available Cables For Gps/Flarm And Pda Ports
The PDA and GPS ports are not designed in accordance with the IGC standard. They can be used only with a dedicated cable. Do not plug an unknown cable into them as it may damage the LXNAV S8x/S10x unit. Page 99 of 121... -
Page 100: Installation Of Options
Terminator 9.5.1 S8xD Option (Repeater) In two-seat gliders it is possible to install the LXNAV S8xD rear seat device. The S8xD looks almost identical to the S8x; in fact it runs the same software as the first seat device. The basic idea of the two-seat configuration is that both devices work independently from each other with the possibility of automatically exchanging various items of data (volume, Mc, polar…). -
Page 101: Magnetic Compass (Compass - Can)
Rev #37 Version 8.0 April 2021 9.5.2 Magnetic Compass (Compass – CAN) UNDER DEVELOPMENT When simply connected to CAN bus the main unit will recognize it. This option is not released yet but is planned for a future software release. The CAN bus is always under power hence the compass module is also under power. -
Page 102: Ahrs Option And Hawk Option
To activate AHRS or HAWK option an activation code must be purchased. Please contact LXNAV or local dealer to purchase a code. Once the activation code has been purchased, this option is permanently active on the selected device. Option cannot be deactivated or transferred to another device. - Page 103 Rev #37 Version 8.0 April 2021 Page 103 of 121...
-
Page 104: Ports And Wiring
(input) Receive to LXNAV S8XRS232 (e.g. Computer, IPAQ38/39xx) (output) Transmit from LXNAV S8XLV-TTL (3.3V) (e.g. Oudie, HP302, HP31x) (input) Receive to LXNAV S8XLV-TTL (3.3V) (e.g. Oudie, HP302, HP31x) 5V OUTPUT (maximum 1A) The RJ45 plug is NOT designed in accordance with the IGC standard. It can be used only with a dedicated cable. -
Page 105: Main Port
Pin numbers Pin Number Description (output) 12V DC, to supply GPS (Maximum 2A) N.C. (input) Receive to LXNAV S8XRS232 (e.g. NANO power 232) (output) Transmit from LXNAV S8XRS232 (e.g. NANO power 232) Ground 9.6.1.3 Main Port The main port is used to connect the S8X to the main wiring loom. -
Page 106: Wirings
Newer versions of wirings can have the power supply cable shielded with black and white colour. White is +12V DC (positive pole) and black is GND (negative pole) If a CAN BUS cable is not connected to an LXNAV S8xD, the CAN connector must be terminated with a CAN TERMINATOR! -
Page 107: Lxnav S10X Wiring
Rev #37 Version 8.0 April 2021 9.6.2.2 LXNAV S10x Wiring 9.6.2.3 LXNAV S8xD Wiring 350 cm LABEL: CAN BUS LABEL: CAN BUS CAN L Reserved for CAN BUS Reserved for CAN BUS CAN H SUBD9 / female SUBD9 / male... -
Page 108: S8X/S10X Configurations
Rev #37 Version 8.0 April 2021 9.7 S8x/S10x Configurations 9.7.1 Symbols Female Male 9.7.2 Nano/Nano3 – Sxxx - MiniMap Remote stick S8x/S10x Nano1/3/4 MiniMap USB cable CC-NP-LX Remote CAN cable CC-NP-LX Terminator CAN Y cable 9.7.3 Nano3 - Sxxx - Oudie Oudie Remote stick S8x/S10x... -
Page 109: Colibri Ii - Sxxx - Oudie
Rev #37 Version 8.0 April 2021 9.7.4 Colibri II – Sxxx - Oudie Remote stick Oudie S8x/S10x Colibri II USB cable Colibri 2 Remote CAN V7-GPS-IGC / Power and FlarmView data cable CC-NP-OUDIE Terminator CAN Y cable 9.7.5 Colibri/Volkslogger - Sxxx - Oudie Oudie Remote stick S8x/S10x... -
Page 110: Flarm - Sxxx - Flarmviewx - Oudie
Rev #37 Version 8.0 April 2021 9.7.6 FLARM – Sxxx - FlarmViewX - Oudie Remote stick Oudie S8x/S10x FlarmView Flarm Red box FlarmMouse S7-GPS-IGC / Remote CAN Flarm FlarmView FlarmView cable Splitter cable CC-NP-OUDIE Terminator CAN Y cable 9.7.7 FlarmMouse - ADSB – Sxxx - FlarmView - Oudie Oudie Remote stick Flarm... -
Page 111: Flarmmouse - Sxxx - Oudie
Rev #37 Version 8.0 April 2021 9.7.8 FlarmMouse – Sxxx - Oudie Oudie Remote stick S8x/S10x Flarm Red box FlarmMouse PowerMouse Remote CAN cable CC-NP-OUDIE Terminator CAN Y cable 9.7.9 FlarmMouse – Sxxx – Oudie – Flaps Sensor Oudie S8x/S10x Flap Sensor Flarm Red box... -
Page 112: Flarmmouse - Nano3 - Sxxx - Oudie
Rev #37 Version 8.0 April 2021 9.7.10 FlarmMouse - Nano3 - Sxxx - Oudie Remote stick Oudie S8x/S10x Flarm Nano3 Red box FlarmMouse PowerMouse S7-GPS-IGC / Flarm Remote CAN FlarmView Nano Power PF Splitter *gets 12V from S8x/S10x cable CC-NP-OUDIE Terminator CAN Y cable PowerMouse + (Nano3) - Sxxx - Oudie... -
Page 113: S8X/S10X- S8Xd
Rev #37 Version 8.0 April 2021 9.7.11 S8x/S10x– S8xD S8xD S8x/S10x Flarmview2 Flarm S7-GPS-IGC / PDA CAN Flarm Flarm FlarmView Splitter CAN Y cable Splitter FlarmView cable CAN Y cable CAN cable Remote CAN Terminator Remote CAN Remote Remote stick stick Oudie Oudie... -
Page 114: Sxx Vario Connection To A Lxxxxx
April 2021 9.7.12 Sxx Vario Connection to a LXxxxx All LXNAV standalone varios with a PDA port can be connected to a LXxxxx system. The biggest advantage of connecting them is the ability to declare tasks from the LXxxxx to the stand-alone vario. - Page 115 Rev #37 Version 8.0 April 2021 This configuration is used for example when using your Sxx vario together with Oudie and LXxxxx. LX5-SVAR is connected to GPS port and CC-NP-OUDIE cable to PDA port. LXxxxx Oudie CC-NP-OUDIE LX5-SVAR Option 3: From Sxx PDA to LXxxxx on 5pin connector LXxxxx LX5-PDA This configuration is used for example when using your Sxx vario together with LXxxxx and...
-
Page 116: Data Transfer
Rev #37 Version 8.0 April 2021 Task declaration is performed automatically after editing the task and after pressing the button OK when in Task Edit mode. Please enable LXWP1, LXWP2 NMEA sentences McCready, Ballast and Bugs settings are also exchanged, but only in the direction LXxxxx ->... -
Page 117: Firmware Update
You can also subscribe to a newsletter to automatically receive news about the system. 10.1 Updating LXNAV S10x and S8x Firmware Using a Micro SD Card Copy the firmware ZFW file type to the SD card and insert into the device. The S10x will ask you to update. -
Page 118: Incomplete Update Message (Old Version)
Rev #37 Version 8.0 April 2021 If automatic detection will not start, please follow the procedure below: Go to the Setup screen and select the password option. • Enter the password 89891 - this will bring you to the firmware update menu. •... -
Page 119: Faq
Rev #37 Version 8.0 April 2021 11 FAQ 1. How can I save the IGC file? Go to the logbook page, select the flight of interest, short press on the lower rotary button and download the flight to the micro SD card. 2. -
Page 120: Revision History
Rev #37 Version 8.0 April 2021 12 Revision History Date Comments October 2014 Initial release version 4.9 November 2014 Updated Sections 9.5.2, 9.5.3 December 2014 Updated Sections 5.3.2, 5.5.1.2, 7.2.1 January 2015 Updated Section 5.7.13.2 January 2015 Typos, release 4.97a January 2015 New cables for PDA and GPS port ch.9.4 March 2015... - Page 121 Rev #37 Version 8.0 April 2021 Page 121 of 121...
Need help?
Do you have a question about the S8 Series and is the answer not in the manual?
Questions and answers