Table of Contents
Advertisement
Quick Links
Advertisement
Table of Contents

Subscribe to Our Youtube Channel
Related Manuals for LXNAV S80


Summary of Contents for LXNAV S80
- Page 1 November 2014 Digital speed to fly variometer, final glide calculator and navigation system with simple moving map. Version 4.92 LXNAV d.o.o. • Kidričeva 24a, 3000 Celje, Slovenia • tel +386 592 33 400 fax +386 599 33 522 info@lxnav.com • www.lxnav.com...
-
Page 2: Table Of Contents
S80 Version 4.92 November 2014 Important Notices Limited Warranty Packing Lists Basics LXNAV S80 at a Glance 3.1.1 LXNAV S80 Features 3.1.2 Interfaces 3.1.3 Options 3.1.3.1 External Options 3.1.4 Technical Data System Description 4.1.1 Push Button 4.1.1.1 Power Button Rotary Switches... - Page 3 5.5.15 Password 5.5.15.1 List of Password functions 5.5.16 About Variometer and Altimeter Altimeter Speed Command Flying with the LXNAV S80 On the Ground 7.1.1 Power on Procedure 7.1.2 Set Elevation and QNH 7.1.3 Pre-flight Check Airborne Page 3 of 61...
- Page 4 COLIBRI2 – S80 – OUDIE 8.7.5 COLIBRI,VOLKSLOGGER– S80 – OUDIE 8.7.6 Flarm/RedBox– S80 – OUDIE 8.7.7 FlarmMouse - FlarmView -S80 - OUDIE 8.7.8 FlarmMouse – S80 – OUDIE Firmware Update Updating LXNAV S80 firmware using micro SD card Revision History Page 4 of 61...
-
Page 5: Important Notices
November 2014 Important Notices The LXNAV S80 system is designed for VFR use only as an aid to prudent navigation. All information is presented for reference only. Terrain, airports and airspace data are provided only as an aid to situation awareness. -
Page 6: Packing Lists
S80 Version 4.92 November 2014 Packing Lists LXNAV S80 • Main power cable for S80 + CAN terminator • Speaker • GPS cable - S80-GPS-IGC • Page 6 of 61... -
Page 7: Basics
4 variable number fields displayed on QVGA 320x240 pixel, 3.5 inch, high brightness (1200 nits) colour display. To adjust values and settings, the LXNAV S80 has two rotary push button knobs and three additional push buttons. -
Page 8: Interfaces
Consumption of LXNAV S80D at 12 V: 90 mA - minimum brightness without audio. 140 mA - maximum brightness without audio. 80 mm (3.15") standard aircraft cut-out for the LXNAV S80 indicator unit; 80x80x45mm • Sensor box: 65x45x85mm (not including connector). Weight 460g (290g for S80D) -
Page 9: System Description
4.1.1 Push Button The two Rotary switches have a push button function. LXNAV S80 can detect short or long press of the push button. A short press means just a click, a long press means pushing the button for more than one second. -
Page 10: Switching On The Unit
(Selector) 4.3 Switching on the Unit A short press of any of the buttons or rotary knobs will turn on the S80. The first LXNAV welcome screen will appear with the system information (Device name, Version, Serial number...) S80D rear seat unit cannot be powered up if the S80 is not already powered up. -
Page 11: User Input
S80 Version 4.92 November 2014 4.4 User Input The LXNAV S80 user interface consists of dialogues which have different input controls. They are designed to make the input of names, parameters, etc., as easy as possible. Input controls can be summarised as: Text editor •... -
Page 12: Selection Control
S80 Version 4.92 November 2014 4.4.3 Selection Control Selection boxes, also known as combo boxes are used to select a value from a list of predefined values. Use the bottom rotary knob to scroll through the list. 4.4.4 Checkbox and Checkbox List A checkbox enables or disables a particular parameter. -
Page 13: Slider Selector
S80 Version 4.92 November 2014 4.4.5 Slider selector Some values, like volume and brightness are displayed as a slider With a push of the rotary button you can activate the slide control, then with rotation of the knob you can select the preferred value and confirm it with the push button. -
Page 14: Operating Modes
S80 Version 4.92 November 2014 Operating Modes LXNAV S80 has five operating modes. A pilot has access to all of them using the middle menu push button. The diagram below shows the mode structure of the LXNAV S80. Info Flarm... -
Page 15: Info Screen
3 seconds, the screen will close. 5.2 Flarm Screen If the S80 is connected to a Flarm source through the GPS port then the Flarm screen will display a map of relative positions of Flarm targets in range. By rotating the... -
Page 16: Quick Access Menu
S80 Version 4.92 November 2014 5.2.1 Quick access menu A short press of the push button activates the quick access menu. Three options, Mc, Bugs and Bal are available 5.2.2 Flarm warnings Regardless of which screen you are on, if a Flarm target triggers an urgent or... -
Page 17: Waypoint Screen
S80 Version 4.92 November 2014 The central number and chevrons indicate if the Flarm target is bellow or above and by how many meters/feet. The number in the bottom left indicates the range in meters/feet. 5.3 Waypoint Screen The Wpt screen is a quick access screen to provide simple navigation to a Waypoint or Airport. -
Page 18: Navboxes Option
S80 Version 4.92 November 2014 To Select a waypoint, use the bottom rotary knob to highlight the select option and then press once. This will open the Waypoint list The Waypoint can be selected from the alphabetical list of waypoints. (See uploading files section Error! Reference source not found.). -
Page 19: Editing Navboxes
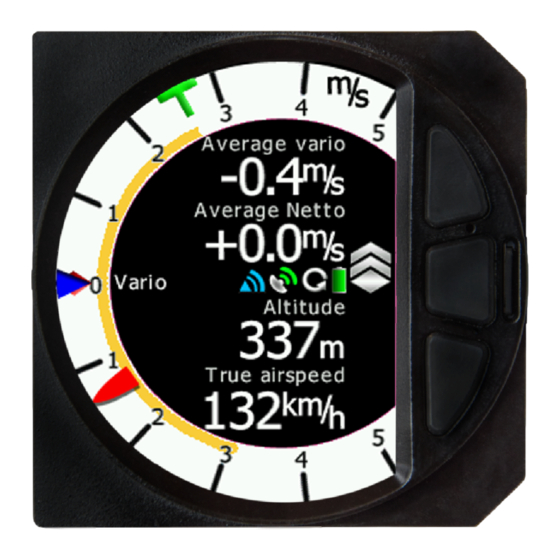
S80 Version 4.92 November 2014 Pressing the Enter button salves the position setting and scrolls down a page. 5.3.1.2 Editing Navboxes Selecting the Navboxes option and then pressing the bottom rotary Knob will allow you to select one of the three boxes by rotating the bottom rotary knob and a short press. - Page 20 S80 Version 4.92 November 2014 Upper numbers MacCredy setting Flarm status Wind vector Climb/cruise symbol Vario indicator needle Speed to fly bar Last thermal average Battery Needle type GPS status Last thermal average or G force Lower numbers Range/units Yellow Bar (Min/Max...
-
Page 21: Third Waypoint Page (Ahrs)
S80 Version 4.92 November 2014 Select the required Navbox and then save this with a short press of the bottom rotary knob. Repeat the process for any other Navbox that needs to be changed. 5.3.3 Third Waypoint Page (AHRS) The Waypoint screen has a third page which displays the AHRS (if this feature has been enabled See more in Ch.8.5.4) -
Page 22: Quick Access Menu
S80 Version 4.92 November 2014 5.4.1 Quick access menu A short press of the bottom rotary knob activates the quick access menu. In addition to MacCready, Ballast and Bugs you can Start, or Edit a task. If the Task is started you can restart or go to the next waypoint. -
Page 23: Second Task Page (Numerical Data)
S80 Version 4.92 November 2014 click to display the second turn point. Edit the second turn point as above. Repeat for all the points in the task. When you have completed editing the task, press the page (middle) button to save the task and return to the Task navigation page. -
Page 24: Third Task Page (Ahrs)
The Waypoint screen has a third page which displays the AHRS (if this feature has been enabled) 5.5 Setup Screen The setup screen allows you to change the configuration and base settings for the S80 Vario. Page 24 of 61... -
Page 25: Qnh & Res
S80 Version 4.92 November 2014 Following items are listed in the setup menu: QNH &RES • Vario Param. • Display • Graphics • Sounds • Warnings • Obs. Zones • Units • Hardware • Files • Polar & Glider •... -
Page 26: Safety Altitude
S80 Version 4.92 November 2014 5.5.1.1 QNH This feature may be used to offset the altitude datum as the result of pressure changes during the flight. Since changing the QNH influences the indicated altitude, care should be taken when changing the value as an incorrect setting could upset the final glide calculation. -
Page 27: Vario Param
S80 Version 4.92 November 2014 5.5.2 Vario Param. 5.5.2.1 Vario needle filter Sets a time constant of the vario needle. The value can be adjusted between 0.1 and 5 s with step 1.0 s or 0.1 s. Default value is 1.5 s. -
Page 28: Needle Range
5.5.2.13 Inertial assisted vario With the LXNAV S80, it is possible to adjust the influence of g-force on the vario. This influence is very small and can be set to Off or between 0 and 4. Page 28 of 61... -
Page 29: Display
S80 Version 4.92 November 2014 5.5.3 Display 5.5.3.1 Automatic Brightness If the Automatic Brightness is checked then the brightmess will be automaticaly adjusted between the minimum and maximum parameters set. If the Automatic Brightness is Unchecked then the brightness is controled by the brightness setting 5.5.3.2 Minimum Brightness... -
Page 30: Graphics – Flarm
S80 Version 4.92 November 2014 5.5.4.1 Graphics – Flarm 5.5.4.1.1 Colours can be set for the following: Glider Above Colour Glider Below Colour Glider Near Colour Selected target Colour 5.5.4.1.2 Label Text This option can be set to None, Flarm ID, Climb rate, Relative vertical... -
Page 31: Active Timeout
S80 Version 4.92 November 2014 5.5.4.1.3 Active Timeout Adjusts the time a glider symbol remains on the map after it has last been seen by the Flarm. 5.5.4.1.4 Inactive Timeout Adjusts the time of inactive gliders on the Flarm target list. Inactive gliders are gliders, where the Flarm signal has been lost after Active timeout. -
Page 32: Sounds
S80 Version 4.92 November 2014 For the task settings, you can turn on the display of waypoints with the check box and change the colour of the task, the line to the next waypoint and the zone colour. In addition, you can change the transparency of the Observation zone, user messages and the Navboxes. -
Page 33: Vario Sounds
S80 Version 4.92 November 2014 5.5.5.2 Vario Sounds Vario Volume default setting can be set with this slider. The volume for Vario, Flarm and Speech can also be adjusted directly with the top rotary knob whilst in the Flarm, Waypoint and Task screens... -
Page 34: Flarm Sounds
We have three options: default LXNAV speaker, flat setting or user defined. Beeps requested from PDA If a PDA is connectedc to the S80 the PDA is able to send a beep command to the S80, if that feature is enabled, S80 will beep on PDA request. -
Page 35: Warnings
Flarm Important Alarm: For close Flarm targets the S80 can give a short or long message, just a beep or be turned off. Flarm Urgent Alarm: For very close Flarm targets the S80 can give a short or long message, just a beep or be turned off. -
Page 36: Units
AAT Check Box: when checked, the S80 considers the area created within the zone as an Assigned area Auto Next: Typically used in racing tasks, will set the navigation of the S80 to the next turn point when a single point is made within the Turn Point Zone. -
Page 37: Hardware
S80 Version 4.92 November 2014 Language: Available in later versions Distance: Units available; Miles, Nautical Miles, Kilometres, Altitude: Units available Feet, meters Temperature: Units available; Degrease Centigrade or degrease Fahrenheit Pressure: Units available; Inches of Mercury, mm of mercury, mbar, Speed: Units available;... -
Page 38: Te Compensation
S80 Version 4.92 November 2014 5.5.9.1 TE compensation The LXNAV S80 offers two methods of vario Electronic Total Energy Compensation: TE Pitot tube • Electronic TE compensation • It is important to note that the method of TE compensation is set up when the instrument is installed by virtue of the pneumatic connections made to the TE and static ports. -
Page 39: Sc Switch
Prandtl tube might help. 5.5.9.2 SC switch The LXNAV S80 has an input for an external speed command switch. Using the external switch it is possible to switch between SC and Vario manually. Setting the SC switch to ON means that closing the switch will cause the instrument to enter SC mode and setting SC switch to OFF means that closing the switch will select Vario mode. -
Page 40: Comms. Setup
Flarm: Can be enabled or disabled for warnings on the Vario Indicator 5.5.11 Comms. Setup Used to configure the two ports on the back of the S80 for connection to a GPS/Flarm source and to a PDA Each port can be configured separately. If your PDA device does not support automatic switch to DIRECT LINK between GPS and PDA port, here is manual GPS-PDA link menu. -
Page 41: Files
S80 Version 4.92 November 2014 Select Battery from List gives you a drop down list with the suggested battery settings for Full Voltage, Low Battery Voltage and Empty Voltage as pre-sets. Selecting one of these will set the values in the following boxes. -
Page 42: Waypoints File
S80 Version 4.92 November 2014 5.5.13.1 Waypoints File Selecting the Waypoints option opens a list of .cup files available on the SD card or in the internal memory. Selecting a file loads this file for use. Please note that only one Turn Point file can be loaded at any one time. -
Page 43: Flarmnet File
S80 Version 4.92 November 2014 Selecting a file loads this file for use. Please note that only one Airspace file can be loaded at any one time. 5.5.13.3 Flarmnet File Selecting the Flarmnet option opens a list of .fln files available on the SD card or in the internal memory. -
Page 44: Polar And Glider
S80 Version 4.92 November 2014 Please note that only one Flarmnet file can be loaded at any one time. 5.5.14 Polar and Glider The Polar and Glider section allows you to load and edit a set of parameters for your gliders Polar. -
Page 45: Password
The program requires three sink points entered at selected speeds (e.g.: 100 km/h, 130 km/h, and 150 km/h). The program will calculate the values of a, b and c, which should be noted and entered into the LXNAV S80. -
Page 46: List Of Password Functions
S80 Version 4.92 November 2014 5.5.15.1 List of Password functions DEBUG_INFORMATION_PASSWORD 90000 RESET_TO_FACTORY_DEFAULT_PASSWORD 00666 UPDATE_DEVICES_PASSWORD 89891 ENTER_NEW_LICENSE 30000 5.5.16 About In the about page, information about the display platform and the vario platform can be found: Display platform: Application version, serial No, Hardware version,... -
Page 47: Variometer And Altimeter
Electronic TE compenstaion Compensation with TEprobe 6.1 Altimeter The altimeter of the LXNAV S80 is temperature compensated from -20ºC up to + 60ºC. The altimeter is calibrated up to 20000 m. 6.2 Speed Command Speed command flying based on the MacCready theory is a very useful tool to optimise cross-country speed. -
Page 48: Flying With The Lxnav S80
November 2014 Flying with the LXNAV S80 To get the best out of the LXNAV S80 it is important that some preparation is done prior to take-off. Trying to configure the instrument or set a task while flying is very hazardous especially in a competition. -
Page 49: Pre-Flight Check
November 2014 7.1.3 Pre-flight Check After elevation setup the LXNAV S80 will switch to the Info screen for normal operation mode. It is recommended that you scroll to the Flarm, Waypoint or Task Screen and set the MacCready, ballast and bugs settings to match the current glider configuration. -
Page 50: Installation
S80 Version 4.92 November 2014 Installation The LXNAV S80 requires a standard 80 mm cut-out. Three pressure connectors are fitted to the back of the S80. A label shows their functions. means static pressure connector. • static means pitot or total pressure connector. -
Page 51: Installing The Lxnav S80
8.2 Connecting LXNAV S80 LXNAV S80 is connected to 12V DC power supply. Red wire goes to + positive and blue wire goes to – ground. If you don’t use S80D (second seat unit) The Can connector should be left terminated with a CAN terminator. -
Page 52: Available Cables For Gps And Pda Ports
Do not plug unknown cable to it as it may damage LXNAV S80 unit. 8.5 Installation of options The LXNAV S80 can be optionally connected to a 2 seat repeater unit LXNAV S80D, remote stick, magnetic compass and AHRS option. -
Page 53: S80D Option (S80 Repeater)
CAN-PDA In two-seat gliders it is possible to install the LXNAV S80D rear seat device. The S80D looks almost identical to the S80. In fact it runs on exactly the same software as on first seat device. The basic idea of the two-seat configuration is that both devices work independently from each other with the possibility of automatically exchanging various pieces of data (volume, Mc, polar…). -
Page 54: Ahrs Option
S80 Version 4.92 November 2014 8.5.4 AHRS option To activate AHRS, an activation code must be purchased. AHRS option can be activated by the following procedure: - Enter password 30000 - Enter 13-digit license key and confirm If the code is correct, you will see an AHRS on AHRS page. - Page 55 (input) Receive to LXNAV S80 LV-TTL (3.3V) (e.g. Oudie, HP302, HP31x) 5V OUTPUT (maximum 1A) RJ45 plug is NOT designed in accordance with IGC standard. It can be used only with dedicated cable. Do not plug unknown cable to it as it may damage LXNAV S80 unit. GPS port (RJ11)
-
Page 56: Lxnav S80 Wiring
CAN GND LM335Z 1 2 3 1.5m LABEL:OAT GND SHIELD If a CAN BUS cable is not connected to an LXNAV S80D, the CAN connector must be terminated with a CAN TERMINATOR! 8.7 Configurations 8.7.1 NANO – S80 – OUDIE OUDIE... -
Page 57: Nano – S80 – Minimap
S80 Version 4.92 November 2014 8.7.2 NANO – S80 – MINIMAP NANO CC-NP-LX cable CC-NP-LX cable MINIMAP USB cable Nano Power 8.7.3 Nano3– S80 – OUDIE OUDIE CC-NP-OUDIE cable CC-NP-LX cable USB cable 8.7.4 COLIBRI2 – S80 – OUDIE OUDIE... -
Page 58: Colibri,Volkslogger– S80 – Oudie
VolksLogger 8.7.6 Flarm/RedBox– S80 – OUDIE OUDIE FlarmView Flarm/RedBox CC-NP-OUDIE cable V7 Flarm Splitter FlarmView cable V7-GPS-IGC cable 8.7.7 FlarmMouse - FlarmView -S80 - OUDIE OUDIE FlarmView CC-NP-OUDIE cable V7 Flarm Splitter FlarmView cable V7-GPS-IGC cable Page 58 of 61... -
Page 59: Flarmmouse – S80 – Oudie
S80 Version 4.92 November 2014 8.7.8 FlarmMouse – S80 – OUDIE OUDIE Flarm Mouse CC-NP-OUDIE cable Page 59 of 61... -
Page 60: Firmware Update
You can also subscribe to a newsletter to receive news about the system automatically. 9.1 Updating LXNAV S80 firmware using micro SD card Transfer the Firmware update files to the micro SD card and insert it into the S80. You should receive a message that the SD card has been loaded. -
Page 61: Revision History
S80 Version 4.92 November 2014 10 Revision History October 2014 Initial release ver 4.9 November 2014 Updated chapters 8.5.1,8.5.2,8.5.3 Page 61 of 61...
Need help?
Do you have a question about the S80 and is the answer not in the manual?
Questions and answers