Table of Contents
Advertisement
LAUNCH
Trademark Information
LAUNCH is a registered trademark of LAUNCH TECH.
CO., LTD. (LAUNCH for short) in China and other
countries. All other LAUNCH trademarks, service marks,
domain names, logos, and company names referred to in
this manual are either trademarks, registered trademarks,
service marks, domain names, logos, company names of
or are otherwise the property of LAUNCH or its affiliates. In
countries where any of the LAUNCH trademarks, service
marks, domain names, logos and company names are not
registered, LAUNCH claims other rights associated with
unregistered trademarks, service marks, domain names,
logos, and company names. Other products or company
names referred to in this manual may be trademarks of
their respective owners. You may not use any trademark,
service mark, domain name, logo, or company name of
LAUNCH or any third party without permission from the
owner of the applicable trademark, service mark, domain
name, logo, or company name. You may contact LAUNCH
by visiting Launch at http://www.cnlaunch.com, or writing to
LAUNCH
Industrial
Banxuegang Industrial Park, Longgang Dist., Shenzhen,
P.R. China, to request written permission to use Materials
on this manual for purposes or for all other questions
relating to this manual.
Copyright Information
Copyright © 2000 by LAUNCH TECH. CO., LTD. All rights
reserved. No part of this publication may be reproduced,
stored in a retrieval system, or transmitted in any form or
by any means, electronic, mechanical, photocopying,
recording or otherwise, without the prior written permission
of LAUNCH. The information contained herein is designed
only for the use of this unit. LAUNCH is not responsible for
any use of this information as applied to other units.
Neither LAUNCH nor its affiliates shall be liable to the
purchaser of this unit or third parties for damages, losses,
costs, or expenses incurred by purchaser or third parties
as a result of: accident, misuse, or abuse of this unit, or
unauthorized modifications, repairs, or alterations to this
unit, or failure to strictly comply with LAUNCH operating
and maintenance instructions.
LAUNCH shall not be liable for any damages or problems
arising from the use of any options or any consumable
products other than those designated as Original LAUNCH
Products or LAUNCH Approved Products by LAUNCH.
General Notice
Park,
North
Wuhe
Other product names used herein are for identification
purposes only and may be trademarks of their respective
owners. LAUNCH disclaims any and all rights in those
marks.
Disclaimer
To take full advantage of the unit, you should be
familiar with the engine.
All information, illustrations, and specifications
contained in this manual are based on the latest
information available at the time of publication. The
manufacturer resume the right of modify this manual
and the machine itself with no prior notice.
This unit is made for the purpose of persons who have
special techniques and certifications.
Safety Precautions
Read all service procedures and precautions, installation
Avenue,
instructions and equipment operating manuals thoroughly.
Failure to observe these precautions, or the improper use
of equipment, could result in property damage, serious
injury or death. Never allow improperly trained personnel
to perform these procedures or operate the equipment.
Read the operating instructions before attempting to
operate the unit. Keep this manual with the unit at
all times.
Care must be taken as burns can occur from
touching hot parts of the equipment or in the
engine.
Do not operate equipment with a damaged cord or if
the equipment has been dropped or damaged until
it has been examined by qualified service
personnel.
Do not hang cords over the edge of the table, bench
or counter, or come in contact with hot manifolds or
moving fan blades.
If an extension cord is needed, a cord with a rated
current equal to or greater than that of the
equipment should be used. Cords rated for lower
current than that of the equipment may overheat.
Always unplug equipment from electrical outlet
when the machine is not in use. Never pull the cord
when unplugging from the outlet.
Make sure the equipment cools down completely
before putting it away. Loop cord loosely around the
equipment when storing.
To protect against risk of fire, do not operate the
equipment in the vicinity of open container
containing flammable liquid (gasoline).
Make sure that the unit is in the well-ventilation area
when operating the fuel engine.
Keep lighted cigarettes, sparks, flames or other
ignition sources away from fuel systems at all times.
i
Injector Cleaner & Tester User's Manual
Advertisement
Table of Contents

Related Manuals for Launch CNC-602A


Summary of Contents for Launch CNC-602A
- Page 1 LAUNCH. The information contained herein is designed personnel. only for the use of this unit. LAUNCH is not responsible for Do not hang cords over the edge of the table, bench any use of this information as applied to other units.
- Page 2 LAUNCH Injector Cleaner & Tester User’s Manual Keep hair, clothes, fingers or the other body parts away from the running parts of the unit. In order to avoid electric shock, keep away from the damp part of a working unit and avoid exposing it to the rain.
-
Page 3: Table Of Contents
Introduction ...............2 Functions.................2 Features ................2 Specifications ..............2 Structure................3 Overview................3 Control Panel..............3 Installation & Connection..........4 1. CNC-602A Installation ..........4 2. CNC-601A/801A Installation........4 3 Ordinary Connection.............4 Operating Procedures ...........4 Preparation..............4 Cleaning & testing sequences .........5 Tidy up after operating.............5 Operation................5 Ultrasonic Cleaning ............5 Uniformity/Sprayability Test ..........5... -
Page 4: Introduction
Special note: This user’s manual is an introduction to Specifications the structure, functions, operations, cautions, maintenance and troubleshooting for the proper use of the equipment, LAUNCH Company retain the right of Working conditions: Temperature: -10~+40℃; changing product design and specifications, The actual configuration according to the packing list. -
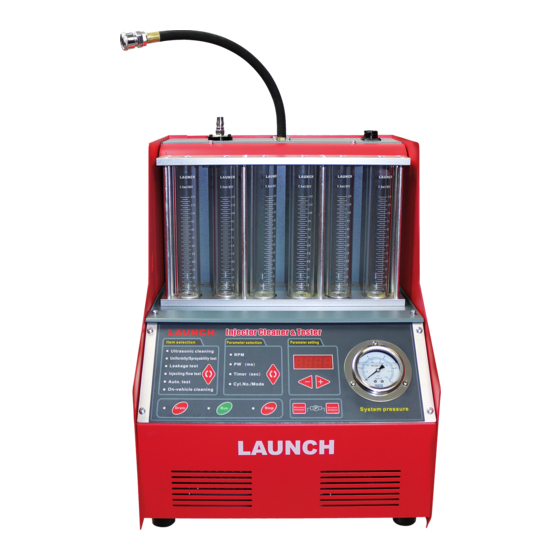
Page 5: Structure
Note: The illustrations in this manual may be slightly different from the actual product! Control Panel The control panel is shown in Fig.02 (Apart from mode ls signs, the CNC-601A & CNC-602A & CNC-801A control panel is identical.). Fig.02 The control panel can be divided into five areas as shown in the following table:... -
Page 6: Installation & Connection
LAUNCH Injector Cleaner & Tester User’s Manual Installation & Connection 1. CNC-602A Installation Move the machine onto the workbench after unpacking and loosen the strips on the outlet hoses. Mount the pulse signal cables onto the socket on the right top side of the machine. -
Page 7: Cleaning & Testing Sequences
LAUNCH Injector Cleaner & Tester User’s Manual to start cleaning. Cleaning & testing sequences 6) When the time is up, Injector Cleaner & Tester will A complete cleaning and testing sequence shown below stop automatically as the beeper rings. should be followed: 7) Turn off the power of the ultrasonic cleaner, take the Ultrasonic cleaning;... - Page 8 LAUNCH Injector Cleaner & Tester User’s Manual cylinder can be selected by setting the number of the cylinder. ♦ The system pressure can be adjusted by pressing [decrease pressure] / [increase pressure] key when testing. ♦ Keep the fluid level to at least 30 ml while testing.
-
Page 9: Leakage Test
LAUNCH Injector Cleaner & Tester User’s Manual the system pressure will come back to the default Injecting Flow Test pressure value When the function of item section is Injecting flow test is to check if the injecting flow in 15 working). - Page 10 LAUNCH Injector Cleaner & Tester User’s Manual Mode I for Automatic Test Start the pump and adjust system pressure to appropriate value. RPM: 4500 Pulse width: 5 ms Observe the medium Observe the injecting angle and Injecting for 15sec Times: 1700...
- Page 11 LAUNCH Injector Cleaner & Tester User’s Manual Mode II for Automatic Test Set pressure value and start the pump to the desired pressure Various speed test (3 cycles). Accelerate from 350rpm to 6000rpm (step: 50rpm). Decelerate from 6000rpm to 350rpm (step: 50rpm). The...
-
Page 12: On-Vehicle Cleaning
LAUNCH Injector Cleaner & Tester User’s Manual Connecting On-Vehicle Cleaning The hose line connection of the engine with return hose is shown as in Fig.09. After the engine has been in operation for a period of time, 1) Disconnect the connections of fuel supply hoses (C、... -
Page 13: Maintenance
199010019 1PCS liquid 2) Be sure that all hose lines are well connected and 199010035 Detergent MFE-101 325 ml 2PCS there is no leakage on the hose lines before CNC-602A Fast performing cleaning. 103100090 connector SH20 CNC-601A/801A: (female) Maintenance 103260003... -
Page 14: Connection Diagram Of Driving Board
LAUNCH Injector Cleaner & Tester User’s Manual replacement. I Replacing fuel pump filter I Replacing filter The fuel pump filter has been fixed in the The equipment filter has been fixed behind the pump bottom, if you want exchange it you... - Page 15 LAUNCH Injector Cleaner & Tester User’s Manual necessary to rerun the fuel pump and injectors. 5. Draining the test liquid in glass tube thoroughly requires pressing the [Drain] key more times. The solenoid valves will stop automatically after 15 seconds and it is necessary to drain more times if there is more liquid.
-
Page 16: Installation And Adjustment
Coarse thread adaptor for 103250016 103260003 Gasoline filter fuel top-supply injector 103250003 6-cylinder upper plate 103240284 T-type blocker for CNC-602A 103250030 8-cylinder upper plate 103200705 T-type blocker for CNC-601A/801A 103250004 6-cylinder lower seat plate 202010019 Quickly connect hose... -
Page 17: Parts List And Structure Diagram Of Fuel Distributor
LAUNCH Injector Cleaner & Tester User’s Manual 2. Parts List and Structure Diagram of Fuel Distributor Fig.15 Parts list of fuel distributor: Item Part No. Part name Part No. Part name Item 103250002 6-cylinder fuel distributor 103240015 Tower connector 202010019... -
Page 18: Main Components And Parts
LAUNCH Injector Cleaner & Tester User’s Manual 4. Main Components and Parts Item Parts No. Parts Name Number Specifications Remarks 6-cylinder f uel distributor 201020068 1 set package For the Installation and fixation of injector 8-cylinder f uel distributor 201021493... - Page 19 199010019 Test liquid 1bottle 307030024 Detergent 2 bottles MFE-101, 325mL Including: a set of adaptor 206010154 On-vehicle cleaning kit 1set and 2 fuel hoses; Optional Parts to CNC-602A 104130022 O-ring Φ32.5×2.65 104130033 O-ring Φ23.6×1.8 104130032 O-ring Φ15×2.65 104130024 O-ring Φ23.6×2.65...
-
Page 20: Appendix 1: List Of Optional Parts
LAUNCH Injector Cleaner & Tester User’s Manual Appendix 1: List of Optional Parts Part No. Part Name Number Specifications Remarks Aux. Support 103250137 assembly for side-supply injector Inner bore: Φ16.2, Adaptor B for 103250133 6(8) Specification of the reverse flush matched o-ring:15×2.65... - Page 21 LAUNCH Injector Cleaner & Tester User’s Manual Part No. Part Name Number Specifications Remarks Bore: Φ14 Hexagonal underlay 103250010 6(8) Reverse flush for fuel for reverse flush side-supply injectors. Stopper for GM fuel 103230060 distributor Bore of GM fuel distributor 103230059 o-ring:Φ30×2.65,...
-
Page 22: Appendix 2: Electrical Diagram
LAUNCH Injector Cleaner & Tester User’s Manual Appendix 2: Electrical Diagram T2 T 1 J 11 1-Pump; 2-Drive board; 3-Control panel; 4-Level switch; 5-Solenoid valve; 6-Injector; 7-Switching type power supply;8-Backlight; 9-Power switch; 10-Fuse; 11-Socket for power supply; 12-Operating panel. Appendix 3: Fuel Path Diagram 1-Fuel distributor;... -
Page 23: Appendix 4: Pressure Gauge Of Injection System
LAUNCH Injector Cleaner & Tester User’s Manual Appendix 4: Pressure Gauge of Injection System COMPANY MODEL SYSTEM PRESSURE (MPa) TOYOTA 3.0 0.284 PREVIA 0.27—0.33 LEXUS 300 400 0.265—0.304 TOYOTA CAMRY 3.0 0.265—0.304 LAND CRUISER 0.30 COROLLA 0.27—0.31 ACCORD 2.0 2.2 0.285... - Page 24 The exclusive remedy for any automotive meter found to be defective is repair or replacement, and LAUNCH shall not be liable for consequential incidental damages.
Need help?
Do you have a question about the CNC-602A and is the answer not in the manual?
Questions and answers