SEFAM DreamStar Series Product Manual
Hide thumbs
Also See for DreamStar Series:
- Patient manual (40 pages) ,
- Clinician and home care provider user manual (50 pages)
Table of Contents

Related Manuals for SEFAM DreamStar Series


Summary of Contents for SEFAM DreamStar Series
- Page 1 Patient Manual DreamStar™ Product Range Upgradeable Humidifier Option DreamStar™ Intro DreamStar™ Intro Evolve DreamStar™ Info DreamStar™ Info Evolve DreamStar™ Auto DreamStar™ Auto Evolve DreamStar™ is a brand registered by Healthc’Air.
-
Page 2: Table Of Contents
ABLE OF CONTENTS BEFORE YOU START ................................ 4 .................................. 4 AFETY PRECAUTIONS .................................. 5 ECOMMENDED USE ‐ .................................. 5 ONTRA INDICATIONS .................................. 5 DVERSE EFFECTS .......................... 5 ERIFICATION OF THE ELEMENTS OF THE SYSTEM DEVICE DESCRIPTION ................................ 6 .................................. 6 IEWS OF THE DEVICE ................................ 7 YMBOLS ON THE DEVICE INSTALLATION .................................. 8 ............................ 8 TANDARD INSTALLATION OF THE DEVICE ... - Page 3 ............................ 28 TARTING AND STOPPING THE TREATMENT CLEANING AND MAINTENANCE ............................ 29 ...................................... 29 AILY ..................................... 30 EEKLY .................................... 30 ONTHLY TROUBLESHOOTING ................................ 32 ................................... 32 ELPFUL HINTS .................................. 34 EVICE MESSAGES TECHNICAL CHARACTERISTICS ............................ 35 ............................... 35 ERFORMANCE OF THE DEVICE ............................ 35 NTEGRATED ...
-
Page 4: Before You Start
BEFORE YOU START DreamStar™ Please read this manual carefully before using your device so that you fully understand the limitations of this device. Safety precautions This indicates in this manual a risk of injury or accident to WARNING you or to others. •... -
Page 5: Recommended Use
This indicates in this manual that there is a possibility of CAUTION material damage to this device or any other device. • If your device is equipped with a cover where the water chamber should be, the heated humidification feature must be disabled. Otherwise, the heating element of the device could continue to provide heat to the device, although it would not reach dangerous temperatures. -
Page 6: Device Description
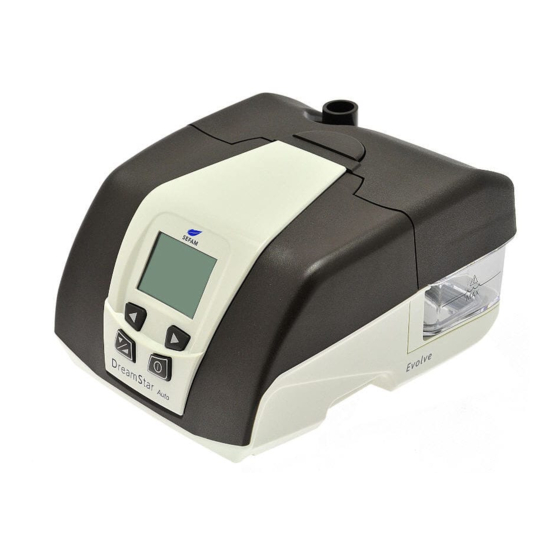
EVICE ESCRIPTION This DreamStar™ product range device is equipped with custom accessories and includes an integrated electrical power supply. Views of the device Figure 1 – Front view Allows viewing the information. 1 Screen 2 Left control button This allows the selection of the symbol displayed at the lower left of the screen. This allows the selection of the symbol displayed at the lower right of the screen. 3 Right control button 4 Ramp and selection button Provides access to ramp functions. It is also used to select the next parameter in the displayed menu during the device‐settings. ... - Page 7 igure 4 - Rear view of a devi ice with cover Figure 5 - Rear view of a a device with w water chambe Outle et connector r Air outlet t to which the e tubing will b e connected. 12 (indic cated by ) 13 Wate er chamber ( (if included) ...
-
Page 8: Installation
NSTALLATION Standard installation of the device The device is delivered with either a cover (configuration A) or with a water chamber (configuration 1. Installation of the cover or the water chamber A. Device with cover B. Device with water chamber Snap the cover onto the base at the rear of Attach the water chamber base to the the device and tilt the cover forward to... -
Page 9: Installation For Use With Battery Power Or (Optional) Cigarette- Lighter Cable
5. At the first power-on, the screen lights up and displays the language setting screen: Press the right control button or the left control button as many times as necessary to display the desired language. After the language is selected, press the on/off button return to the page header, then press this button a second time to exit the menu. -
Page 10: Operation
PERATION Filling the water chamber (if included) "Push" marking Switch off the device and remove the patient tubing. Press with your fingers at the "Push" marking on the top of the unit to separate the water chamber from the device. Tip the tank back and remove the tank from the device. -
Page 11: Stopping Treatment
Stopping Treatment 1. Remove the mask. 2. Turn off the DreamStar™ product range device by pressing the on/off button for several seconds. Accessing the device menu The four buttons on the front of the device allow you to access the device settings menu, scroll through different pages, or possibly modify the value of certain parameters within these pages. - Page 12 Descript ion of sy ymbols d displayed d on the e screen Symbol Descript mbol Description Access to o device info ormation. Access to dev vice settings Provides access to th he next page Provides acce ess to the pr receding pag available e for display...
-
Page 13: Available Features
Available features The DreamStar™ Intro and DreamStar™ Info devices (and equivalent in Evolve configuration) operate in continuous mode (CPAP), i.e. the device delivers a constant pressure level throughout the night. The DreamStar™ Auto or DreamStar™ Auto Evolve device operates in either constant mode (CPAP) or in automatic mode (Auto-CPAP), the device monitors your breathing while you sleep and adjusts the pressure to suit your needs. -
Page 14: Using A Memory Card
Using a memory card An external storage medium can be used either to store the most recent compliance data stored in the device, or to update your device's setting parameters. Refer to the instructions given by your home care provider to use this card. If the device is running, turn it off before you insert the memory card into the memory card connector: the symbol appears to the right of the display header. -
Page 15: Settings
™ ™ I OW TO O SET T REAM RO OR ™ ™ I REAM OLVE D DEVICE To access the devic e settings , press the e right con ntrol butto o select the e symbol displayed o on the scre en. -
Page 16: Set Parameters Display
DreamStar™ Intro or DreamStar™ Intro Evolve The page displays: Press The page changes: Increase or decrease parameter value with the right or as many times left parameter settings button. as necessary to access the Then press to access the next desired menu parameter. parameter setting. Press at the bottom of the page or to return to the page header. -
Page 17: Setting The Clock
DreamStar™ Intro or DreamStar™ Intro Evolve 5) Setting the clock The time can be set when the device is in standby only. The page displays: Press The page changes: Increase or decrease parameter value with the right or as many times left parameter settings button. as necessary to access the Then press... -
Page 18: Settings
™ ™ I ™ ™ OW TO O SET T REAM O OR REAM VOLVE DEVICE To access the device e settings, , press the e right con ntrol butto select the e symbol displayed o on the scree en. In the S Settings pag ge display: •... -
Page 19: Set Parameters Display
DreamStar™ Info or DreamStar™ Info Evolve device The page displays: Press The page changes: If the Comfort Calibration (C.C.+) is disabled (OFF), you can enable it (ON) by pressing the left or right as many times parameter settings button. as necessary to access the Then press to access the next desired menu parameter. -
Page 20: Setting The Clock
DreamStar™ Info or DreamStar™ Info Evolve device 5) Setting the clock The time can be set when the device is in standby only. The page displays: Press The page changes: Increase or decrease the parameter value with the right as many times or left parameter settings button. as necessary to access the Then press... - Page 21 ™ ™ A OW TO O SET T REAM TO OR ™ ™ A REAM OLVE D DEVICE To access the devic ce settings s, press the e right con ntrol butto o select the e symbol displayed o on the scre en.
-
Page 22: Settings
DreamStar™ Auto or DreamStar™ Auto Evolve 2) Settings In CPAP mode This page displays only if the ramp feature and (or) the Pressure Alter feature and (or) the Comfort Calibration + feature were activated by the home care provider. The page displays: Press The page changes: If the Comfort Calibration (C.C.+) is disabled (OFF), you can enable it (ON).by pressing the left or right... -
Page 23: Set Parameters Display
DreamStar™ Auto or DreamStar™ Auto Evolve C.C. +: Comfort Calibration +. Comfort pressure: Level of pressure produced by the device when the ramp feature starts up or when the device detects that there has been no respiratory cycle for more than 2 minutes. Latency time: Time the device takes to reach the comfort pressure upon which Auto-CPAP mode is activated. -
Page 24: Set Patient Reminders Display
DreamStar™ Auto or DreamStar™ Auto Evolve 4) Set Patient Reminders display This page displays only if the home care provider has activated a reminder to remind you for example to replace the filter or the mask. The page displays: The reminder activation date is shown opposite the corresponding reminder. -
Page 25: Miscellaneous Settings
DreamStar™ Auto or DreamStar™ Auto Evolve 7) Miscellaneous Settings The page displays: Press The page changes: The language can be selected by successive presses on the left or right parameters settings button. as many times as necessary to Then press to access the access the contrast. -
Page 26: Other Information
THER NFORM MATIO eneral I nforma ation On the D DreamSta ar™ Intro o or Drea amStar™ ™ Intro Ev volve dev vice When the d device is in n standby, press the l parameters settings b utton to se elect the symbol on t the screen:... - Page 27 The last session is Date e: Date and d start hour r of the last t on/off ses ssion. displ layed: Usag ge duratio on: duratio on during which th he patient was actu ually breat thing in th e mask. Aver rage pressu ure: Averag...
-
Page 28: How To Use When Adding Oxygen ( Optional )
OW TO USE WHEN ADDING OXYGEN OPTIONAL WARNINGS • When using oxygen, always follow the instructions of the medical team or home care provider. • Do not smoke in the presence of oxygen. • Do not inject oxygen into the device’s air intake. •... -
Page 29: Cleaning And Maintenance
LEANING AND AINTENANCE Please refer to the user instructions for your mask and tubing for details on their maintenance. Daily WARNING Unplug the device from the power source and always detach the breathing circuit and the water chamber from the device before cleaning them. CAUTION •... -
Page 30: Weekly
Notes: • The different parts of the water chamber may also be washed in a dishwasher (at 60°C maximum during 2 hours). • To prevent micro-organisms growth, do not allow water in the chamber to stagnate. Weekly • Unplug the device from the power source. •... - Page 31 WARNINGS • Do not use spray detergent. Harmful product residue could enter the air outlet, the air intake filter, or the device interior, causing airway irritation. • Never use bleach at a concentration higher than 0.1%. For example: pour 200 ml of 2,6 % bleach into 5 liters of cold water.
-
Page 32: Troubleshooting
TROUBLESHOOTING Helpful hints Problem Possible cause Suggestion Your nose is cold. The room temperature is Raise the room temperature. too low. The delivered air is too Place patient circuit under a cover and run next to your cold. body to reduce heat loss. Runny nose. - Page 33 Problem Possible cause Suggestion Symptoms of sleep The device is not set to Ask your home care provider to check the device apnea syndrome the correct pressure or is operation. recur. not operating properly. Your physical condition Contact your attending physician. or pressure needs may have changed.
-
Page 34: Device Messages
Device messages Code Description Corrective action MASK UNPLUGGED is The mask is Check the connections between the mask, the patient displayed on the screen. disconnected. circuit, and the device. This message disappears when any of the four buttons on the front of the device is pressed or when you breathe in your mask well reconnected. -
Page 35: Technical Characteristics
ECHNICAL CHARACTERISTICS Performance of the device Device pressure range: 4 cmH O to 20 cmH O Device adjustable in increments of 0.5 cmH O Maximum steady limiting pressure at the patient connection port under single fault condition: 30 cmH O Maximum pressure that can be set: 20 cmH O Ramp duration: 0 to 45 minutes ± 1 minute Device adjustable in increments of 5 minutes. Sound pressure level measured in accordance with NF EN ISO 17510‐1 : 2002: < 30 dBA without humidifier Sound pressure level measured in accordance with NF EN ISO 17510‐1:2007: 33 dBA without humidifier 34 dBA with humidifier Patient‐side connection aperture: Tubing with diameter of 22 mm. Air intake filter efficiency: Optional high‐efficiency filter. Disposable fabric HEPA paper, which is 90% effective for particles > 3 microns. High Density Foam (reusable) and is 90% effective with particles > 20 microns. ... -
Page 36: Operating Conditions For The Device And Humidifier
Operating conditions for the device and humidifier Pressure range: 730 hPa to 1060 hPa Temperature: +5 °C to + 40 °C (41 ºF to 104 ºF) without humidifier +5° C to + 35 °C (41 ºF to 95 ºF) with humidifier Relative humidity: between 10% and 95% without condensation Altitude range: 0 − 2 700 m (0−9,000 ft) approximately Physical characteristics Dimensions (D x W x H): 200 x 230 x 120 mm (7.8 x 9.0 x 4.7 in) approximately with water chamber Carrying case Dimensions (D x W x H): 260 x 350 x 150 mm (10.2 x 13.7 x 5.9 in) approximately Weight: 1,5 kg (3.3 lbs) approximately with water chamber 1,4 kg (3.1 lbs) approximately with cover Operational volume (minimal gas volume in water chamber): 811 ml Useful volume of water chamber: 300 ml Maximum liquid fill level: Indicated on water chamber Standards compliance Risks pertaining to this medical equipment were assessed in accordance with the ISO 14971:2007 standard, specifically with reference to global residual risk. - Page 38 Homecare Provider Information Manufacturer: Manufacturing plant: HEALTHC'AIR HEALTHC'AIR 144 AV CHARLES DE GAULLE 10 ALLÉE PELLETIER DOISY 0459 92200 NEUILLY SUR SEINE 54600 VILLERS-LES-NANCY FRANCE FRANCE : M-155DFU00-20 Revision A 2011-09...
Need help?
Do you have a question about the DreamStar Series and is the answer not in the manual?
Questions and answers