SEFAM DreamStar Series Patient Manual
Upgradeable humidifier option
Hide thumbs
Also See for DreamStar Series:
- Clinician and home care provider user manual (50 pages) ,
- Product manual (38 pages)

Related Manuals for SEFAM DreamStar Series


Summary of Contents for SEFAM DreamStar Series
- Page 1 DreamStar™ Product Range DreamStar™ Duo DreamStar™ Duo Evolve DreamStar™ DuoST DreamStar™ DuoST Evolve DreamStar™ is a brand registered by SEFAM.
-
Page 2: Table Of Contents
ABLE OF CONTENTS Before you start ............3 Cleaning and Maintenance ........29 Safety precautions ..........3 Daily ..............29 Intended use ............4 Weekly ............... 29 Contra-indications ..........4 Monthly ............. 31 Adverse effects ..........5 Troubleshooting ............ 32 Verification of the elements of the system .. -
Page 3: Before You Start
Before you start Please read this manual carefully before using your DreamStar™ device so that you fully understand the limitations of this device. Safety precautions Means in this manual that there is a risk of danger of injury or accident to WARNING: yourself or others. -
Page 4: Intended Use
If your device is equipped with a water chamber: When using the water chamber, take precautions to eliminate the risk of introducing water into the device since this can cause irreversible damage. The device must be placed on a stable horizontal surface and must not be tilted. -
Page 5: Adverse Effects
Adverse effects Please contact your health care professional if while using the DreamStar™ product range device, the following symptoms appear: dry airways or nose, skin sensitivity, runny or bleeding nose, ear pain, discomfort sinus, daytime sleepiness, mood changes, disorientation, irritability or memory loss. Verification of the elements of the system The DreamStar™... -
Page 6: Device Description
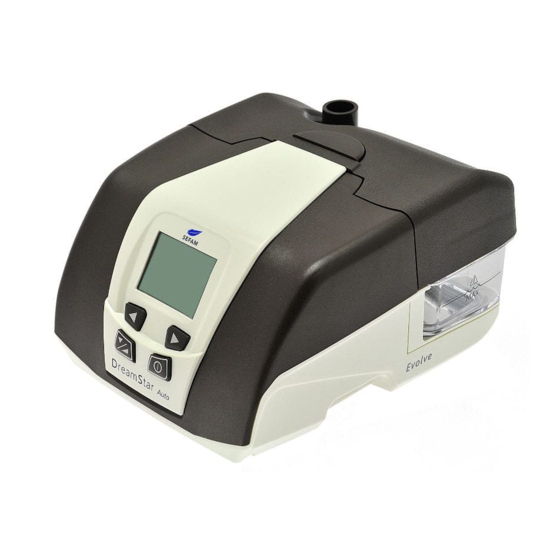
Device Description This DreamStar™ product range device is equipped with custom accessories and includes an integrated electrical power supply. Views of the device Figure 1 – Front view Screen Allows viewing the information. This allows the selection of the symbol displayed at the Left control button lower left of the screen. -
Page 7: Symbols On The Device
Memory card connector Connector into which you can slide the memory card. Connector into which you can slide the memory card. Figure 4 - Rear view of a device with cover Rear view of a device with cover Figure 5 - Rear view of a device with water chamber Rear view of a device with water chamber Outlet connector (indicated by Outlet connector (indicated by... -
Page 8: Installation
Installation Standard installation of the device The device is delivered with either a cover (configuration A) or with a water chamber (configuration B). 1. Installation of the cover or the water chamber Device with cover Device with water chamber Snap the cover onto the base at the rear of Attach the water chamber base to the heating the device and tilt the cover forward to lock. -
Page 9: Installation For Use With Battery Power Or (Optional) Cigarette-Lighter Cable
5. At the first power-on, the screen lights up and displays the language setting screen: Press the right control button or the left control button many times as necessary to display the desired language. After the language is selected, press the On/Off button return to the page header, then press this button a second time to exit the menu. -
Page 10: Operation
Operation Filling the water chamber (if included) "Push" marking Switch off the device and remove the patient tubing. Press with your fingers at the "Push" marking on the top of the unit to separate the water chamber from the device. Tip the tank back and remove the tank from the device. -
Page 11: Stopping Treatment
6. If your device includes a water chamber and if the humidification function has been activated, the heated humidifier turns on automatically. You can increase or decrease the heat level by moving the arrow at the bargraph using the right or left parameter settings button, as shown hereafter. - Page 12 Description of symbols displayed on the screen Symbol Description Symbol Description Access to device information. Access to device settings. Provides access to the next page Provides access to the preceding available for display on the screen. page displayed on the screen. Allows the value of the parameter Allows the value of the parameter displayed on the screen to be...
-
Page 13: Available Features
Available features The device operates either in constant mode (CPAP), or in Bilevel mode, which delivers two levels of pressure (one inspiratory and one expiratory). Additionally, the ST model allows a backup frequency to be set. The device includes an integrated power supply and can be equipped with a humidification function (Evolve configuration), which can be enabled or disabled by the home care provider. -
Page 14: Using A Memory Card
Using a memory card An external storage medium can be used either to store the most recent compliance data stored in the device, or to update your device's setting parameters. Refer to the instructions given by your home care provider to use this card. If the device is running, turn it off before you insert the memory card into the memory card connector: the symbol appears to the right of the display header. -
Page 15: How To Set The Dreamstar™ Duo / Duo Evolve Device
How to set the DreamStar™ Duo / Duo Evolve device Accessing the settings menu To access the device settings, press the right control button to select the symbol displayed on the screen when the device is in standby only. In the Settings page display: The symbol at the bottom of the screen indicates that it is impossible to change the ... -
Page 16: Step 2: Settings
DreamStar™ Duo or DreamStar™ Duo Evolve Step 2: Settings In CPAP mode This page displays only if the ramp feature and (or) the Pressure Alter feature were activated by the home care provider. The page displays: Press The page changes: Increase... -
Page 17: Step 3: Set Parameters Display
DreamStar™ Duo or DreamStar™ Duo Evolve Step 3: Set Parameters Display In CPAP mode The page displays: Prescribed P.: Level of pressure prescribed by your physician. Pressure Alter: The symbol shows that the feature has been enabled by the home care provider. Max ramp time: Maximum ramp time set by the home care provider. -
Page 18: Step 4: Set Patient Reminders Display
DreamStar™ Duo or DreamStar™ Duo Evolve Step 4: Set Patient Reminders display This page displays only if the home care provider has activated a reminder to remind you for example to replace the filter or the mask. The page displays: The reminder activation date is shown opposite the corresponding reminder. - Page 19 DreamStar™ Duo or DreamStar™ Duo Evolve Auto ON : functionality allowing to automatically start the treatment without pressing the On/Off button. Press at the bottom of the page or to return to the page header. to exit the menu. Press DreamStar Duo, DuoST How to set the DreamStar™...
-
Page 20: How To Set The Dreamstar™ Duost / Duost Evolve Device
How to set the DreamStar™ DuoST / DuoST Evolve device Accessing the settings menu To access the device settings, press the right control button to select the symbol displayed on the screen when the device is in standby only. In the Settings page display: The symbol at the bottom of the screen indicates that it is impossible to change the ... -
Page 21: Step 2: Settings
DreamStar™ DuoST or DreamStar™ DuoST Evolve Step 2: Settings In CPAP mode This page displays only if the ramp feature and (or) the Pressure Alter feature were activated by the home care provider. The page displays: Press The page changes: Increase... -
Page 22: Step 3: Set Parameters Display
DreamStar™ DuoST or DreamStar™ DuoST Evolve Step 3: Set Parameters Display In CPAP mode The page displays: Prescribed P.: Level of pressure prescribed by your physician. Pressure Alter: The symbol shows that the feature has been enabled by the home care provider. Max ramp time: Maximum ramp time set by the home care provider. -
Page 23: Step 4: Set Patient Reminders Display
DreamStar™ DuoST or DreamStar™ DuoST Evolve Step 4: Set Patient Reminders display This page displays only if the home care provider has activated a reminder to remind you for example to replace the filter or the mask. The page displays: The reminder activation date is shown opposite the corresponding reminder. - Page 24 DreamStar™ DuoST or DreamStar™ DuoST Evolve Auto ON : functionality allowing to automatically start the treatment without pressing the On/Off button. Press at the bottom of the page or to return to the page header. Press to exit the menu. 24 ...
-
Page 25: Other Information
Other Information General Information When the device is in standby or in operation, press the left parameters settings button to select the symbol on the screen: the General Information menu appears. The page displays: Hour counter: device operating time. Total use: total duration during which the patient was actually breathing in the mask. - Page 26 Press The page displays: Press The page changes: Answer YES with the right as many times left parameter as necessary to settings button. access the Press to access desired reminder. the next reminder. Press at the bottom of the page or to return to the page header.
-
Page 27: How To Use When Adding Oxygen (Optional)
How to use when adding oxygen (optional) WARNINGS When using oxygen, always follow the instructions of the medical team or home care provider. The source of oxygen should be placed at over one meter of the device. Do not smoke in the presence of oxygen. ... -
Page 28: Use Of The Swivel Outlet Elbow (Optional)
Use of the swivel outlet elbow (optional) The swivel outlet elbow, 70° 22 mm diameter, is an accessory of the DreamStar™ devices, designed to improve the comfort of use of the device to which it is connected. It consists of a bent tube fitted on a base, and it can swivel around a vertical axis (). Installation CAUTION The swivel outlet elbow must be cleaned before the first use by following the instructions of the paragraph... -
Page 29: Cleaning And Maintenance
Cleaning and Maintenance Please refer to the user instructions for your mask and tubing for details on their maintenance. WARNING Unplug the device from the power source and always detach the breathing circuit and the water chamber from the device before cleaning them. CAUTION ... - Page 30 Clean the various parts of the water chamber with warm water and mild detergent (for example 3 drops of dishwashing liquid diluted in water). Rinse well with water to eliminate any trace of detergent. Allow to dry naturally. ...
-
Page 31: Monthly
Monthly Device Clean the outside of the unit using a damp tissue (cloth, paper towel) with a little water and one drop of mild detergent. Eliminate any trace of detergent in repeating this operation with a new tissue (cloth, paper towel) ... -
Page 32: Troubleshooting
Troubleshooting Helpful hints Problem Possible cause Suggestion Your nose is cold. The room temperature Raise the room temperature. is too low. The delivered air is too Place patient circuit under a cover and run next cold. to your body to reduce heat loss. Runny nose. - Page 33 Problem Possible cause Suggestion The device does not The ramp is enabled. Confirm that the ramp indicator is displayed. display the correct Disable the ramp feature referring to the pressures. setting procedure for the device concerned. Disable the Pressure Alter feature referring to The Pressure Alter setting procedure...
-
Page 34: Device Messages
Problem Possible cause Suggestion White, powdery Traces of scale from Rub the traces with a sponge and liquid dish deposits appear in the the tap water. detergent. Soak the water chamber in a water chamber. solution of 1 part white vinegar to 9 parts water as described under "Cleaning and Maintenance", on page 29. -
Page 35: Technical Characteristics
Technical characteristics Performance of the device Device pressure range: 4 cmH O to 20 cmH O in CPAP mode 3 cmH O to 25 cmH O in Bilevel mode Accuracy: ± 0.5 cmH Increment: 0.5 cmH Maximum steady limiting pressure at the patient- = 30 cmH side connection aperture in single fault condition: Minimum steady limiting pressure at the patient-... -
Page 36: Operating Conditions For The Device And Humidifier
Operating conditions for the device and humidifier Pressure range: 730 hPa to 1060 hPa Temperature: +5 °C to + 40 °C (41 ºF to 104 ºF) without humidifier +5° C to + 35 °C (41 ºF to 95 ºF) with humidifier Relative humidity: between 10% and 95% without condensation 0 ... -
Page 37: Standards Compliance
Standards compliance Risks pertaining to this medical equipment were assessed in accordance with the ISO 14971:2007 standard, specifically with reference to global residual risk. The DreamStar™ product range device complies with the following standards. CEI 60601-1:2005 + AC1:2006 + AC2:2007 + Amd1:2012: Medical electrical equipment. Part 1: ... - Page 38 38 Technical characteristics DreamStar Duo, DuoST...
- Page 40 Your home care provider contact information Manufacturer: Manufacturing plant: SEFAM SEFAM 144 AV CHARLES DE GAULLE 10 ALLEE PELLETIER DOISY 92200 NEUILLY SUR SEINE 54600 VILLERS-LES-NANCY FRANCE FRANCE : M-155DFU00-30 Version 10 2019-11...
Need help?
Do you have a question about the DreamStar Series and is the answer not in the manual?
Questions and answers