Advertisement
Quick Links
Advertisement

Subscribe to Our Youtube Channel
Related Manuals for Karma BLAZER


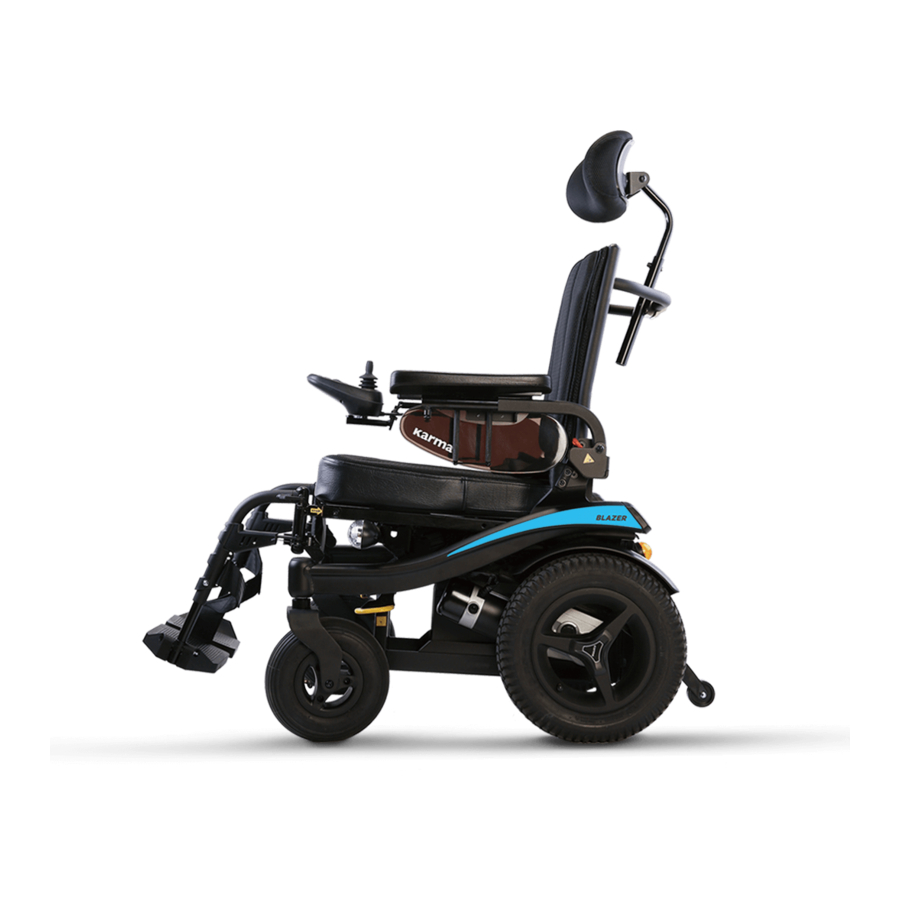
Summary of Contents for Karma BLAZER
- Page 1 BLAZER User manual...
- Page 3 1. Index Index ......................3 How to contact Karma ................7 Declaration of conformity ................8 Introduction ....................9 Chassis number ................9 Used symbols for warning, caution and note .......... 11 Warranty ....................12 Intended use / intended user ..............13 Intended environment ................
- Page 4 10.3 Control ..................... 23 10.3.1 Side steering control..............23 10.4 Other optional accessories .............. 24 11. First setup ....................25 11.1 Seat adjustments................25 11.1.1 Seat depth ................25 11.1.2 Backrest (seat-to-back) angle ..........27 11.1.3 Armrest width ................27 11.1.4 Armrest height .................
- Page 5 12.3.8 Hazard warning button ............38 12.3.9 Lights button ................38 12.3.10 Left/ Right Indicator button ..........39 12.3.11 Wheelchair lock ..............39 13. Electric system ..................40 13.1 Batteries ..................40 14. Using the wheelchair ................41 14.1 General warnings and advices ............41 14.2 Use in combination with other products ..........
- Page 6 18.2 Charging socket ................57 18.3 Disposal of broken or worn out batteries ........58 19. Transport of the wheelchair ..............59 19.1 4-point tie down restraint system ............ 59 19.1.1 Transportation guideline ............61 19.1.2 Safety belt ................62 19.2 Transportation on an airplane ............
- Page 7 If you are the wheelchair user, you should first contact your local supplier in case of a problem or question about your wheelchair. When the local supplier is not able to help you, please contact the distributor: Head office Karma European representative Karma Medical Karma Mobility S.L.
- Page 8 3. Declaration of conformity...
- Page 9 Karma runs the policy of continuously product improvement. Therefore, pictures of products or options as shown in this manual might be different from what you see in this manual. Karma reserves the right to make changes to the product without prior notice.
- Page 10 The used symbols on the chassis plate are explained below: describes the model and type of the product. stands for indoor- and outdoor use (Class B). stands for the date of production. this icon stands for the maximum driving speed. this icon stands for the maximum slope to drive on.
- Page 11 5. Used symbols for warning, caution and note General warnings are indicated by a symbol. There are three levels of warnings: 1. Warning If you see this sign, please use extreme caution where this symbol appears. Neglecting these warnings can lead to personal or material damage.
- Page 12 For batteries and battery charger you receive one-year warranty from manufacture date. For a warranty claim you get in contact with our local authorized Karma reseller or directly with Karma Mobility S.L. Make sure you also provide the chassis serial number of your product.
- Page 13 7. Intended use / intended user The Blazer powered wheelchair is meant to provide mobility to persons who are not able to walk, stand or use a manual wheelchair, but who are very well able to control and use the interface of a powered wheelchair. The wheelchair is designed for a maximum user weight of 136 kg.
- Page 14 10. Wheelchair 10.1 Chassis The chassis is the base of the wheelchair. It contains wheels, drive motors, batteries, and electronics. The steel parts of the chassis are electrolytic anodized and powder coated to ensure a long life without corrosion. Each of the rear wheels is propelled by a powerful drive motor. These motors also take care for the steering of the wheelchair.
- Page 15 10.1.3 Transport fixation loops Fixation loops in the front Fixation loops in the rear The fixation loops are marked with this sign: Further information about transportation of the wheelchair you will find in chapter "transportation". 10.1.4 Lights and reflectors (Optional) The chassis has very strong and bright LED lights to make sure you can have a safe drive in the dark.
- Page 16 The compartment can hold maintenance-free batteries up to 50Ah. For the specification of the batteries see the chapter technical specifications. The maintenance-free batteries can be reached from the back. To reach the batteries, untighten 2 knobs (A) to take off the top-back cover. Then, untighten these 4 knobs (B) to take off back-rear cover.
- Page 17 10.2 Seat There are two different seating system used in Blazer Series, Sling Seat and Captain Seat. The choice is made by the user during the ordering of the wheelchair. Please identify firstly which one is mounted on your Blazer.
- Page 18 Sling Seat The Sling Seat can be adjusted in seat depth, footrest hanger position, and seat-to-back angle. It can be up-graded into manual recline or power tilt. The seat pan is flat so other seating cushion can be fitted on to the seat as well. Captain Seat The Captain Seat offers manual recline function and can be adjusted in footrest hanger position.
- Page 19 The Captain Seat surface is made with PU material. 10.2.2 Seat tilt (Sling Seat only) The seat tilt in Blazer model can be used to release pressure. The tilting angle is from 8 to 28°. The tilt can also be used when driving down a slope for compensating the negative seat angle.
- Page 20 The Captain Seat surface is made with PU material. 10.2.4 Angle adjustable/ Manual recline backrest (Optional) There are two different seating system used in Blazer Series, Sling Seat and Captain Seat. Please identify firstly which one is mounted on your Blazer.
- Page 21 When reclining always check if there are no obstructions close to the wheelchair. Especially in the rear of the wheelchair. When reclining, the wheelchair will get longer. This has influence on the driving characteristics of the wheelchair. Make sure there is enough space to drive.
- Page 22 10.2.7 Headrest On the sling seat, the headrest is adjustable in height, depth and angle. On the captain seat, the headrest is adjustable in height. If the wheelchair user is transported in a taxi van we strongly advice to use the headrest. This is in order to provide you optimal stability whilst driving in the taxi.
- Page 23 10.3 Control 10.3.1 Side steering control Side steering control Side steering, swing-away The product has a side steering control unit, which is either mounted on the left- or right armrest. The joystick module can be mounted on a fixed bracket or on an (optional) swing-away mechanism.
- Page 24 10.4 Other optional accessories Item Figure Introduction The handle bar is to help user to Handle stabilize upper body. It can be adapted after-sales. The push brake parks the wheelchair Push when it is in the freewheel mode. It Brake can be adapted after-sales.
- Page 25 11. First setup Before using, the wheelchair needs to be adjusted and set up for the user. In this chapter we will explain all the setup which needs to be done before the first drive. Before using the wheelchair, it is vital to make the right set up for the user.
- Page 26 step 3. Untighten these 2 knob to take off the top-back cover. step 4. Use 5mm Allen key to unscrew the bolts connecting the frame. step5. Push the backrest frame to the preferred position. If the frame is tight, use rubber mallet to help. step6.
- Page 27 The setting of the seat depth requires some expertise. Therefore we strongly advise you to have it done by your local authorized Karma dealer. Now the backrest is set in to a different depth position. 11.1.2 Backrest (seat-to-back) angle To change the backrest angle on Sling Seat, simply pull the strap at the back of the wheelchair and push/ pull the backrest.
- Page 28 The armrest height can be adjusted up and down independently. To set the right armrest height, follow the next steps: step 1: Use 5mm Allen Key from KARMA Tool Kit to loosen the height adjustment bolts under the armrest pad.
- Page 29 step 2: Adjust the armrest to the proper height and re-tighten the bolts. Now the armrests are set in to a different height position. 11.1.5 Armrest depth The armrest can be adjusted in depth. To set the right armrest depth follow the next steps: step 1: Use 3mm Allen key to remove two screws shown above.
- Page 30 Now the armrests are set in to a different depth position. 11.1.6 Footrest longitudinal position Step1: use 5mm Allen Key included in your KARMA Tool Kit to remove the screws under the seat.
- Page 31 The footrest length should be adjusted according to the user's calf length. Use 10mm open wrench and 5mm Allen Key from KARMA Tool Kit to loosen the bolt at the side of the footplate and adjust the footplate height and re- tighten the bolt.
- Page 32 11.1.8 Headrest setting for Sling Seat step 1: Use 4mm Allen key to adjust the horizontal position from the bracket connecting the headrest to the frame. step 2: Use 4mm Allen key to adjust the height from the headrest frame. Step3: Use 5 mm Allen key to adjust the angle of the headrest.
- Page 33 11.1.9 Headrest setting for Captain Seat Adjust the height of the headrest from this button under the headrest. If you loosen up the bolts too much, the headrest will fall down. This might cause a little shock reaction on the user in the wheelchair. It is better to loosen the bolts bit by bit and every time try to move the headrest.
- Page 34 11.3 Control settings The side control joystick module is adjustable in depth and height. To set the depth take the following steps: 11.3.1 Height adjustment side control To set the height adjustment of the side control follow the next steps: step 1: Use 3mm Allen key and 8mm open wrench to loosen up this bolt.
- Page 35 12. Controller All functions of the wheelchair can be controlled with this joystick module. This joystick module can be mounted on the left or right armrest. Joystick module contains a few major components which will be explained separately. 12.1 Charging socket The charging socket is used to charge the batteries.
- Page 36 Several different shapes of joystick knobs are available as options to optimize the control of the joystick. 12.3 Control panel Control Panel with No Tilt...
- Page 37 Control Panel with Tilt 12.3.1 Battery indicator Battery indicator displays the charge available in the battery and can be used to alert the user to the status of the battery. If all lights are on, the batteries are fully cteed. If the capacity is lowered one by one, a light will erase. The bar is divided into three color zones: Green, orange and red.
- Page 38 12.3.3 Horn button The horn will sound while this button is pressed. 12.3.4 Speed Indicator The speed indicator suggests how fast your wheelchair will be going when you move the joystick. The maximum speed is divided into 5 increment. The more lights that are on indicates the faster that you are driving.
- Page 39 12.3.10 Left/ Right Indicator button This button activates and de-activates the wheelchair’s left/ right indicator. Press the button to turn the indicator on and Press the button again to turn it off. When activated the left indicator LED will flash in sync with the wheelchair’s indicator(s).
- Page 40 12.3.12 Joystick deflected error If the wheelchair is started up and the joystick is not in its zero position, you will see 7 lights twinkling on the battery indicator session. Keep the joystick at its neutral (central) position and restart the on/off button. The system will start up normally and the error disappears.
- Page 41 14. Using the wheelchair 14.1 General warnings and advices Please read this section of the manual very carefully as it contains issues related to safety and possible hazards. ● When the user is driving the wheelchair for the first time, the supplier has to make sure that the maximum driving speed and curving speed are set in a slow mode.
- Page 42 This has to be checked by watching these parts when tilting the chair. Changes which are made by third parties are not covered by the warranty and responsibility of Karma Medical. 14.3 Hot and cold surfaces Some parts of the wheelchair can reach high temperatures when exposed to direct sun.
- Page 43 14.4 Danger of pinching User Special care has been taken to make sure that the chance that the user pinches him or herself while seated in the wheelchair is minimal. However, there are few situations that might lead to injury. Special caution has to be taken under the following circumstances;...
- Page 44 ⚫ When using the electrical tilt adjustment, make sure that no persons or animals are in the near surrounding, because it is possible to get pinched by the moving mechanism, although the moving parts are designed to be as safe as possible. 14.6 Precautions to prevent dangerous situations In order to prevent dangerous situations please take note of the following...
- Page 45 14.7 Use on slopes: driving on downhill slopes Driving on downhill slopes must always be done at a low speed and with great care. Avoid sudden braking, abrupt avoidance maneuvers and never maintain a speed higher than that at which you can maneuver the wheelchair in a safe and secure manner.
- Page 46 14.8 Use on slopes: driving on uphill slopes Driving on uphill slopes must always be performed with great care and attention. Avoid sudden avoidance maneuvers and never drive at a speed higher than needed to maneuver the wheelchair in a safe and secure way. Avoid holes and bumps as much as possible.
- Page 47 14.9 Driving on sideways slopes Driving on a sideways slope must always be performed with great care. Avoid sudden avoidance maneuvers and never drive at a speed higher than needed to maneuver the wheelchair in a safe and secure way. Avoid holes and bumps as much as possible.
- Page 48 14.10 Obstacle climbing Do not drive the wheelchair over obstacles of a height bigger than 50mm. driving over tall edges increases the risk of tipping over as well as the risk of damage to the wheelchair. Always be aware when climbing obstacles of the stability of your wheelchair.
- Page 49 14.11 Use in presence of electromagnetic fields Use your cell phone only when the wheelchair is switched off. Although the wheelchair is tested and approved for electromagnetic interference, there is a very small change that strong electromagnetic fields from cell phones or some other electrical products lead to unexpected and unpredictable electrical reactions from the wheelchair.
- Page 50 15. Driving the wheelchair The wheelchair is designed for indoor and outdoor use. When driving indoors, you must be careful when driving in, for example, narrow passageways, when passing through doors and entryways as well as when using elevators, ramps, etc.
- Page 51 3. Set an appropriate maximum speed by pressing the decrease or increase button until the desired indicator lamp lights up for your type of driving. It is preferable to begin with a low speed. 4. Carefully move the joystick forward to drive forward, and backward to drive backward.
- Page 52 15.3 Stopping the wheelchair If you would like to stop, simply move the joystick slowly towards the center and release the joystick. The wheelchair will come to a gentle stop. If you want to stop more quickly, simply let go of the joystick. It will put itself back into neutral position, which makes the wheelchair stop.
- Page 53 Now pull the joystick towards the user and the seat tilt will start to tilt backwards. As long as you pull the joystick backwards, the seat tilt will tilt backwards. Release the joystick and the seat tilt movement will stop. Push the joystick forward and the seat will tilt into forward position.
- Page 54 To recline the Captain Seat, simply pull the lever on the right side of the seat and lean back. The backrest angle can be changed step-less from 90° to 155°. Pull the recline lever on Captain Seat 17. Handling the mechanical brakes The drive motors of the wheelchair have electro mechanical brakes.
- Page 55 If the parking brake is released (free-wheel mode), the wheelchair cannot be driven by the electronics. Therefore, the release of the brakes should only be done in emergency cases and or for servicing. If the user is on board, the parking brakes should always be attached. Always make sure that, when positioned on slopes, the brakes are attached (no Freewheel).
- Page 56 If the maintenance free batteries are fully charged, all ten LED's on the top bar light up. The more energy is used the more LED extinguish, starting on the right side. If only the red LED are still on, it indicates that recharging of the maintenance free batteries is required.
- Page 57 Some local dealers supply the wheelchair with their own brand of batteries and battery charger. For information about these batteries and charger, you should ask your local authorized supplier. 18.2 Charging socket The charger socket can be found on the front side of the joystick module. If the wheelchair has an integrated desktop control, the charger socket will be on the side of the joystick module.
- Page 58 Be sure that the charger plug is pushed fully in position. You will not be able to drive the wheelchair when the charger is connected. If the wheelchair does drive with the charger plugged in, contact your local authorized supplier. In some occasions it might be the case that your local supplier will deliver the wheelchair with a different brand charger.
- Page 59 19. Transport of the wheelchair 19.1 4-point tie down restraint system The wheelchair must only be transported in a vehicle that is approved or adapted for such purposes. It is safest if the wheelchair is separated from the driver’s compartment. Transportation in a trailer is also an optional recommendation.
- Page 60 Karma Medical Taiwan would always recommend transferring to a car seat within a vehicle; however, should this not be possible, the following is the safest method: a. The wheelchair must be positioned in a forward-facing position. b. An Unwin restraint system like model Gemini 3 or a different brand with equivalent specification must be used.
- Page 61 19.1.1 Transportation guideline The wheelchair has a 4-point heavy duty webbing restraint. Using two brackets on the front end and two brackets on each rear side of the chassis. The brackets are indicated with a sticker. These securing points and its location have been designed according to ISO7176-19:2008 The angle of the straps should be around 45°...
- Page 62 19.1.2 Safety belt If the user is transported in his wheelchair, it is necessary to use a car safety belt to secure the wheelchair user. Positioning of the car safety belts for wheelchair users. It is very important to use the safety belt in the right angles according to the wheelchair user.
- Page 63 The shoulder part (1) of the safety belt should be positioned according to the figure below. Shoulder safety belt positioning Please obtain the following points for an optimal personal safety of the wheelchair user: - the pelvic belt should be worn low across the front of the pelvis, so that the angle of the pelvic belt is within the preferred zone of 30°...
- Page 64 Picture of improper belt fit Picture of proper belt fit Please, make sure the following conditions are fulfilled to obtain a safe transportation: - Whenever possible the occupied wheelchair shall be located in a forward-facing configuration and secured by the tie downs in accordance with the WTORS (wheelchair tie down and occupant- restraint system) manufacturer’s instructions.
- Page 65 - Alterations or substitutions should not be made to the wheelchair securement points or to structural and frame parts or components without consulting the manufacturer. - Only use "gelled electrolyte" batteries on powered wheelchairs when used in a car. 19.2 Transportation on an airplane When transporting your wheelchair by air, you should primarily pay attention to the following three things:...
- Page 66 20. Maintenance and repairs The user and attendant must take care of some maintenance, service and occasionally fault-finding activities. Other activities as described in this paragraph should be carried out under supervision of your authorized dealer. 20.1 Battery charging This wheelchair is provided with two maintenance free batteries. During normal use, the batteries must be charged every day.
- Page 67 When the wheelchair is to be stored for a long term, we advise you to disconnect the batteries from the wheelchair. This way the batteries will hold their energy for a longer period. When re-using the wheelchair, the batteries will be installed and fully charged.
- Page 68 20.4 Tools The wheelchair comes with a tool kit to be able to adjust most settings. Some repairs may require tools other than those supplied with the wheelchair. Any unauthorized alterations to the wheelchair and its systems may lead to an increased risk of accident.
- Page 69 20.5.1 Puncture repair Since the wheelchair is rather heavy, it is recommended to let your authorized supplier repair eventual tire punctures. First jack up the wheelchair so that the punctured tire is free from the ground. Both caster wheels and driving wheels tires can be taken off by loosening the bolts which hold the wheels on to the wheelchair.
- Page 70 Cleaning Regular care and maintenance will prevent unnecessary wear and damage to your wheelchair. The following is general advice recommended by Karma. For severe soiling of the upholstery or damage to the surface finish, contact Karma or your local authorized supplier for information.
- Page 71 20.6.2 Metal surfaces For normal cleaning it is best to use a soft cloth/sponge, hand warm water and a mild detergent. Wipe down carefully with a cloth and water, and dry off. Remove scuff marks from semi-matt surfaces with soft wax (follow manufacturer’s instructions).
- Page 72 20.7 Brake release, freewheel mode Check regularly, approximately once a month, that the brake release and the brake release lever is working properly. When the brakes are released, it should not be possible to drive the wheelchair by joystick. Testing the brake release 20.8 Battery replacement step 1: Place the wheelchair on a level surface.
- Page 73 step 5. Untighten these 2 knob to take off the top-back cover. step 6. After the top-back cover is off, you will see two power connector. One is red and one is black. Disconnect the power cables. step 7. Untighten these 4 knobs on the both sides to take off back-rear cover.
- Page 74 step 8. Disconnect the two light cables step 9. Use the rear and front strap to pull out the battery plate step10. Use 8mm open wrench to loosen up this bolt.
- Page 75 step 11. Now, you can disconnect the battery and change it. step12. The mounting battery assemble will take place in reverse order. If you are not capable of replacing the batteries by yourself or you don't feel comfortable doing it, please contact your local authorized supplier for help.
- Page 76 The wheelchair will be refurbished according to a refurbishment guideline of Karma. This includes the replacement of all upholstery parts, a total disinfection of the product and a complete technical check of the wheelchair and its accessories.
-
Page 77: Troubleshooting
Note that this guide cannot describe all the problems may occur and you should always contact your local authorized supplier or Karma when doubt. 23.1 Diagnostics VR2 When an error or a fault occurs in the wheelchair’s electronics, the battery indicator will blink on and off for technicians to diagnose where the error/fault occurred and its cause. - Page 79 24. Technical specifications Transportation size...
- Page 80 DATA General product name Blazer-SLN, Blazer Series wheelchair class Class B (indoor/outdoor use) expected service life > 7 years Sizes min. max. length, mm 1090 width, mm height, mm weight, kg 101.5 incl. batteries Smallest size for transportation length, mm...
- Page 81 DATA General product name Blazer-CPT, Blazer Series wheelchair class Class B (indoor/outdoor use) expected service life > 7 years Sizes min. max. length, mm 1060 width, mm height, mm 1210 1305 weight, kg 77.5 108 incl. batteries Smallest size for transportation...
- Page 82 Every day we design new accessories to improve the flexibility of our products. Contact your local authorized Karma supplier for more information on the accessories which are available for your wheelchair. Should you have a good suggestion for a new accessory, do not hesitate to contact us.
- Page 84 Distributed by Life & Mobility: www.life-mobility.com...
Need help?
Do you have a question about the BLAZER and is the answer not in the manual?
Questions and answers