Sony DPF-WA700 Handbook
Digital photo frame, 7" lcd
Hide thumbs
Also See for DPF-WA700:
- Operating instructions (3 pages) ,
- Important information manual (2 pages) ,
- Specifications (2 pages)
Table of Contents
Advertisement
Advertisement
Table of Contents
Troubleshooting

Related Manuals for Sony DPF-WA700


Summary of Contents for Sony DPF-WA700
-
Page 1: Digital Photo Frame
4-400-694-13(1) Digital Photo Frame Handbook DPF-WA700/W700... -
Page 2: Read This Before Using
Recorded content not guaranteed Sony shall assume no responsibility for any accidental or consequential damages or loss of recorded content which may be caused by use or malfunction of the digital photo frame or memory card. -
Page 3: Table Of Contents
Table of Contents Let’s Use Identifying the parts ························································ 4 Compatible Memory Card/USB flash drive····················· 6 Preparation: 1 Checking included items ·························8 Preparation: 2 Attaching the stand (DPF-W700 only)·····9 Preparation: 3 Turning on the photo frame ···················11 Preparation: 4 Setting up the photo frame ····················14 Enjoying a slideshow····················································... -
Page 4: Let's Use
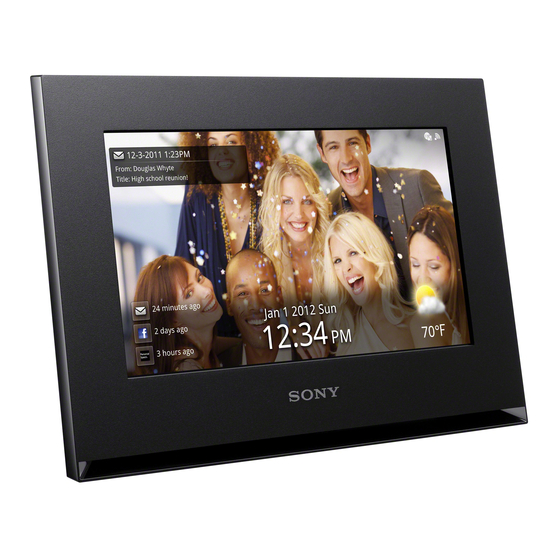
Let’s Use Identifying the parts DPF-WA700 Front A LCD screen/Touch screen B Sony logo Rear A MENU button B VOL (Volume) +/– buttons (page 29, C Standby indicator (page 13) D 1 (on/standby) button (page 13) E Memory card slot (page 19) - Page 5 DPF-W700 Front A LCD screen/Touch screen B Sony logo Rear A MENU button B 1 (on/standby) button (page 13) C Standby indicator (page 13) USB A connector (page 19) USB Mini-B connector (page 61) F Memory card slot (page 19)
-
Page 6: Compatible Memory Card/Usb Flash Drive
Compatible Memory Card/USB flash drive You can view images only by inserting a memory card (“Memory Stick Duo” or SD memory card) or USB flash drive removed from a digital camera or equivalent, into the photo frame. Memory cards/USB flash drive supported by the photo frame •... - Page 7 • The photo frame has been demonstrated to be operable with “Memory Stick Duo” with a capacity of 32 GB or less manufactured by Sony Corporation. • “M2” is an abbreviation for “Memory Stick Micro”. In this section, “M2” is used to describe a “Memory Stick Micro”.
-
Page 8: Preparation: 1 Checking Included Items
Preparation: 1 Checking included items Make sure that the following items are included: • Digital photo frame (1) • AC adaptor (1) • Stand (DPF-W700 only) (1) • Operating Instructions (1) • CD-ROM (Digital Photo Frame Handbook) (1) • Warranty (1) (In some regions, the warranty is not packaged together.) -
Page 9: Preparation: 2 Attaching The Stand (Dpf-W700 Only)
Preparation: 2 Attaching the stand (DPF-W700 only) Align the claw of the stand with the bottom of the unit then insert it firmly until it clicks, as illustrated. • Do not place the photo frame on an unstable or tilted surface. •... - Page 10 • Connect the DC cable of the AC adaptor to the photo frame and hang the photo frame on the wall. Then plug the AC adaptor into the wall outlet. • Sony takes no responsibility for any accidents or damage caused by defects of attachment, misuse, natural disasters, etc.
-
Page 11: Preparation: 3 Turning On The Photo Frame
Preparation: 3 Turning on the photo frame Connecting the AC adaptor (DPF-WA700) Connect the AC adaptor as illustrated below. The photo frame is automatically turned on. To wall outlet When using it for the first time c Proceed to “Preparation: 4 Setting up the photo frame” (page 14). If the initial settings have already been made c Proceed to “Enjoying a slideshow”... - Page 12 Connecting the AC adaptor (DPF-W700) Connect the AC adaptor as illustrated below. The photo frame is automatically turned on. To wall outlet When using it for the first time c Proceed to “Preparation: 4 Setting up the photo frame” (page 14). If the initial settings have already been made c Proceed to “Enjoying a slideshow”...
- Page 13 Turning on/off the power To turn on the power Press 1 (on/standby). The standby indicator changes from red to green. To turn off the power Hold 1 (on/standby) pressed. A message appears to confirm that you want to turn the photo frmae off.
-
Page 14: Preparation: 4 Setting Up The Photo Frame
Preparation: 4 Setting up the photo frame Follow the on-screen instructions. Calibrate the touch screen. 1 Tap on the screen once. A circle is displayed. 2 Tap the circles displayed one after another. After you tap the circles several times, the calibration display is closed. - Page 15 Select the time zone. 1 Drag with your finger to scroll through the list and tap to select the time zone. 2 Tap [Next]. A message for Wi-Fi settings appears. 3 Tap [Next] when you wish to set up the initial settings for Wi-Fi connection.
- Page 16 A WPS Push-Button Configuration method 1 Tap [WPS Push-Button Configuration method]. 2 Press the WPS button for your access point. Operation of the button depends on the access point. 3 Tap [Next] on the display of the photo frame. Connection with the access point starts, and the network setting will be made automatically.
- Page 17 4 Confirm the displayed content and tap [Complete]. The slideshow display appears. If no image data are stored in the unit, displayed. CSearch Wi-Fi Networks If the access point does not support WPS, the photo frame can be connected to the Wi-Fi network by searching the connectable access points.
- Page 18 5 Confirm the displayed content and tap [Complete]. The slideshow display appears. If no image data are stored in the unit, displayed. • After a specified time has passed without any operation of the photo frame, the demonstration display appears. During demonstration, press a button other than 1 (on/standby) to close the demonstration display.
-
Page 19: Enjoying A Slideshow
Enjoying a slideshow Insert a memory card or USB flash drive. Insert the memory card or USB flash drive firmly into the corresponding slot with its front facing away from the screen. Playback automatically begins, and images in the memory card or USB flash drive are displayed one after another as a slideshow. -
Page 20: To Remove The Memory Card
To remove the memory card Remove the memory card from its slot in the opposite direction from which it was inserted. Do not remove the memory card while an image is displayed on the screen. Doing so may damage the recorded data in the memory card. It is better to press MENU on the rear of the unit to display the menu before removing a memory card. - Page 21 Overview of the slideshow display Displayed item Displays an entire image enlarged without cropping. (Some 1Image images may be displayed with black margins at top, bottom, left, and right.) • If any of the following icons are displayed, check the image data to solve the problem: 2Image Information Shows information regarding the image that is received with...
- Page 22 Displayed item 4Wi-Fi radio signal Shows the Wi-Fi radio signal strength in four levels. strength Weak • When the indication is 5New arrivals Shows the recent arrival time of each network service. information Network service icons be displayed by tapping the icon shown above. •...
- Page 23 Setting the city for which to display weather information Set the name of the city nearest your area. The weather information for that city can be displayed. Press MENU on the rear of the photo frame. The menu appears. [Settings]. [Weather Settings].
- Page 24 Tap a proper city. The confirmation display appears, then it returns to the previous Weather Settings display. If there is no proper city, return to step 5. Repeat the procedure. After setting of the city, tap The slideshow display is restored. To change the temperature display You can change the temperature display Celsius/Fahrenheit of the Weather Settings display.
- Page 25 Changing the slideshow display Press MENU on the rear of the photo frame. The menu appears. [Slideshow Styles]. Tap the desired Slideshow. Slideshow 1 Shows all standard items. See page 21 for its content. Slideshow 2 Unlike [Slideshow 1], it does not display the “Weather”. Slideshow 3 Unlike [Slideshow 1], it does not display the “Weather”...
- Page 26 Slideshow 4 Like [Slideshow 1], it displays “Weather” and “Date/ Time” in larger fonts, with the image in smaller size. In addition, “Weekly Weathercast” is displayed. Slideshow 5 In addition to [Slideshow 1], it displays “Weekly Weathercast.”...
-
Page 27: Displaying The Desired Images
Displaying the desired images Selecting the playback device Press MENU on the rear of the photo frame. The menu appears. [Photo/Videos] (DPF-WA700) / [Photo] (DPF-W700). Tap the icon to select the device you want to play. • A memory card which is not inserted in is indicated in gray. You cannot select it. •... - Page 28 Specifying the playback image (Single view) Operate steps 1 to 3 of “Selecting the playback device” (page 27). Tap [Go to Index]. A list of images in the selected device is displayed. Select an image you want to display and tap its listing.
- Page 29 Playing videos (DPF-WA700 only) Operate steps 1 and 2 of “Specifying the playback image (Single view)” (page 28). Tap the index of the video you want to play. The selected video is displayed full-screen. on the display. The selected video starts playback. Functions available in video playback (DPF-WA700 only) Function To adjust the volume...
-
Page 30: Enjoying Music Or Internet Radio (Dpf-Wa700 Only)
Enjoying Music or Internet Radio (DPF-WA700 only) Press MENU on the rear of the photo frame. The menu appears. [Music]. Tap the icon to select the device that contains the music you want to play. • A memory card that is not inserted in is indicated in gray. You cannot select it. •... - Page 31 Functions available in music playback (DPF-WA700 only) Function To adjust the volume Press VOL +/– on the rear of the photo frame. To pause playback Tap X on the display. To resume playback, tap N. To skip a track To view a desired image while listening to music (DPF-WA700 only) On the music file operation display, tap Saving music files...
- Page 32 Listening to Internet Radio Connection to a Wi-Fi network must be established before operation. When listening to vTuner internet radio Press MENU on the rear of the photo frame. The menu appears. [Music]. [vTuner internet radio]. The Internet Radio display appears, then the display for selecting a station appears.
-
Page 33: Saving Images In Your Photo Frame (Import)
Saving images in your photo frame (Import) It is possible to save image data, such as files from a memory card, USB flash drive, network service, or home network, to the internal memory of the photo frame. Press MENU on the rear of the photo frame. The menu appears. - Page 34 Select images to be imported from the index. To import all images: Tap [Select All]. To import a desired image: Tap the listing of the desired image. The “✔” mark will appear next to it. To cancel your selection: Tap the listing of the image you want to cancel.
-
Page 35: Enjoying More
Enjoying More Deleting an image It is possible to delete image data from a memory card or USB flash drive, or to delete network content. Press MENU on the rear of the photo frame. The menu appears. [Photo/Videos] (DPF-WA700) / [Photo] (DPF-W700). - Page 36 Select images to be deleted from the index. To delete all images: Tap [Select All]. To delete a desired image: Tap the listing of the ✔ desired image. The “ ” mark appears next to it. To cancel your selection: Tap the listing of the image you want to cancel.
- Page 37 To format the internal memory [Settings]. Tap [Initialize]. Tap [Format Internal Memory].
-
Page 38: Exporting An Image From Internal Memory
Exporting an image from internal memory You can export images in internal memory to a memory card. Press MENU on the rear of the photo frame. The menu appears. [Photo/Videos] (DPF-WA700) / [Photo] (DPF-W700). Tap [Internal Memory]. Tap [Go to Index]. A list of images in the selected device is displayed. - Page 39 Select images to be exported from the index. To export all images: Tap [Select All]. To export a desired image: Tap the listing of the ✔ desired image. The “ ” mark appears next to it. To cancel selection: Tap the listing of the image you ✔...
- Page 40 • If you select [No] in step 10, the image selection display is restored. • If you tap [Cancel] during export, export is interrupted and the index display is restored. • When any image is exported, it is saved in a new folder, with the export date stamp created automatically.
-
Page 41: Using The Auto Power On/Off Timer
Using the auto power ON/OFF timer You can use the timer function to turn the photo frame ON or OFF automatically. Press MENU on the rear of the photo frame. The menu appears. [Settings]. Tap [Auto Power ON/OFF]. • If you cannot find [Auto Power ON/OFF] on the display, scroll with your finger up or down on the display. -
Page 42: Setting The Time
Setting the time Perform the setting according to the Setup Method selected in step 4 of “Using the auto power ON/OFF timer” (page 41). When [Advanced] is selected: Tap and highlight in blue the time zone(s) during which you wish to keep the photo frame on for each day of the week. - Page 43 Tap to select [Auto ON day] or [Auto OFF day] and select the day of the week on which you want the timer activated . The selected day of the week is checked. Tap [OK]. When [Auto off] is selected: Tap to select [2 Hour] or [4 Hour].
-
Page 44: Enjoying Network Services
[Email] on the display. Tap [Email Address] to display the keyboard then enter the e-mail address you want to use on the photo frame. e.g.) S-Frame@sony.co.jp * Input in a case-sensitive manner. Network Services display Continued r... - Page 45 When you finish, tap [Next]. The display for entering your password appears. Enter your password, using the displayed keyboard, then tap [Complete]. Confirm the entered e-mail address and password. When you tap the [Show password] button so that the password you entered is displayed. * Input in a case-sensitive manner.
- Page 46 To display images sent via e-mail (Email) on the slideshow display. When more than 100 images attached to e-mail have been received, the latest 100 images are displayed. To set whether to show the photo information sent via e-mail or Tap the [Show photo information] button on the Network Services display in step 3.
- Page 47 Setting Facebook • The available area of Facebook service is limited. • Before setting, prepare the e-mail address and password of the Facebook service you use. Press MENU on the rear of the photo frame. The menu appears. [Network Services]. The Network Services display appears.
- Page 48 Select the friend then tap [OK]. Tap [OK] on the completion display. • When there are a large number of images to be downloaded (such as upon initial access), it may take a long time to display the first image. To display images sent via Facebook (Facebook) on the slideshow display.
- Page 49 • If the Like button does not function, repeat the Facebook login process. For details on the login process, see “Setting Facebook” (page 47). • Up to 100 comments can be displayed. • When the number of “likes” is more than 100, “100+” is displayed.
- Page 50 Setting PlayMemories Online • The available area of PlayMemories Online service is limited. • Before setting, prepare the sign in ID and password of the PlayMemories Online service you use. Press MENU on the rear of the photo frame. The menu appears. [Network Services].
- Page 51 To display images sent via PlayMemories Online (PlayMemories Online) on the slideshow display. When more than 100 images have been received, the latest 100 images are displayed. To suspend the PlayMemories Online service you have set You can disable your PlayMemories Online settings and discontinue having the photo frame receive files via PlayMemories Online.
-
Page 52: Enjoying The Home Network
Enjoying the Home Network Connecting to the Home Network (device_home_network) enables you to enjoy images (still pictures only, saved with DLNA-conforming devices or computers) or music (DPF- WA700 only). Confirm that the source device is DNLA-certified or the operating requirement of the source computer is met. For a DLNA-certified product The DLNA logo is attached on it or indicated on the Web site of its manufacturer. - Page 53 • The above procedure is an example of setting. Perform the required setup according to your network environment.
-
Page 54: Displaying Images
Displaying images Images saved in network equipment can be displayed on the photo frame. Press MENU on the rear of the photo frame. The menu appears. [Photo/Videos] (DPF-WA700) / [Photo] (DPF-W700). [Home Network]. Tap the item that you want to access on the list of equipment shown on the display. - Page 55 Playing music (DPF-WA700 only) Music files saved in network equipment can be played on the photo frame. Press MENU on the rear of the photo frame. The menu appears. [Music]. [Home Network]. Tap the equipment that you want to access on the list of equipment shown on the display.
-
Page 56: Changing The Settings
Changing the Settings Press MENU on the rear of the photo frame. The menu appears. [Settings]. Tap to select the setting you want to change. If you do not see the desired setting item on the display, scroll it up or down with your finger and tap the listing for the display containing the desired item. -
Page 57: General Settings
Overview of the available settings : Items with asterisks are the factory default settings. (Some default settings vary by region.) Wi-Fi Settings Setting Wi-Fi Selects [ON] or [OFF]. Set up Wi-Fi Starts the Wi-Fi Settings wizard. You can make settings by following the on-screen instructions. -
Page 58: Language Setting
Date/Time Settings Setting Set Time and Date Activated* if “ from Internet Date Sets date. Time Sets time. Time Zone Selects time zone. Use 24-hour Format Changes the time format. 24-hour format: A “ hour Format]. AM/PM format*: A “ 24-hour Format]. -
Page 59: System Information Setting
Initialize Setting Format Internal Formats the internal memory (page 37). Memory Initialize Settings Returns all settings to their factory defaults except for the current date and time settings of “Date/Time Settings” (page 58). System Information Setting Version Displays the version of the firmware of the photo frame. Memory Capacity Displays the maximum amount of space available in internal memory in the initial state. -
Page 60: Copying Images And Music Files From A Computer
Copying images and music files from a computer Connecting to a computer Connecting to a computer allows you to view images in the internal memory of the photo frame with a computer and copy them to a computer or copy images from a computer to the photo frame. -
Page 61: System Requirements Windows
DPF-W700 To USB Mini-B connector To USB connector System requirements Windows Recommended OS: Microsoft Windows 7 SP1/ Windows Vista SP2 /Windows XP SP3 Port: USB port Macintosh Recommended OS: Mac OS X (v. 10.4 or later) Port: USB port Computer Continued r... - Page 62 To disconnect from a computer Unplug the USB cable or turn the photo frame off after disconnecting the photo frame from your computer as follows: How to disconnect when using Windows 7 SP1 1 Click on (Safely Remove Hardware) on the Task Tray. 2 Click on Eject DPF-WA700 (or Eject DPF-W700).
- Page 63 Move the cursor in this window and right- click then click on [New] t [Folder]. Name this new folder. In this manual, the folder name “sony” is used as an example. Double-click to open this “sony” folder. Open the folder that contains the image files you want to copy then copy the image files to the new folder, using drag and drop.
- Page 64 3 Move the cursor in this window then select [ New Folder Name this new folder. In this manual, the folder name “sony” is used as an example. Open this “sony” folder. Open the folder that contains the image files you want to copy then copy the image files to the new folder, using drag and drop.
- Page 65 • When saving images from a computer to internal memory, make a folder in internal memory using the computer and save the images in this folder. If you do not make a folder, you can only save up to 512 images. In addition, the number of images may be reduced, depending on the filename length or character type.
-
Page 66: Troubleshooting
Troubleshooting If an error icon appears If an error occurs, one of the following icons may be displayed on the LCD screen of the photo frame. Follow the corresponding solution below to solve the problem. Icon This is a JPEG file created on a computer or the file in a format that is not supported by the photo frame. -
Page 67: Troubleshooting
Troubleshooting Before submitting the photo frame for repair, try using the following guidance to solve the problem. If the problem persists, consult with your Sony dealer or Sony service facilities. Power supply The power is not turned on. • Is the AC power plug inserted correctly? c Insert the power plug properly. - Page 68 Playing a video file (DPF-WA700 only) A video file is not played. • Does the mark appear in index or single view mode? c The video file is not supported by the photo frame. Check if it is a video file that is possible to play in this photo frame (page 74).
-
Page 69: Photo Frame
An image cannot be deleted. • Is the memory card write-protected? c Use the device you are using to cancel write-protection and try deleting again. • Is the write-protect switch of the memory card in the LOCK position? c Slide the write-protect switch to the enable position. •... - Page 70 A memory card cannot be ejected. c If a miniSD card, microSD card, or “Memory Stick Micro” is inserted improperly, it may be possible to take it out using a fine-tipped tool such as tweezers or needle-nose pliers. In this case, be careful that this does not damage the memory card and/or photo frame.
- Page 71 Wireless Network It cannot be connected to the access point of wireless LAN. c Check if the access point of the wireless LAN is turned on. c Move this photo frame to another position or bring it closer to the access point. Communication distance may be made shorter by surroundings such as an obstacle between the photo frame and the access point of the wireless LAN, signal conditions, or materials of a wall.
-
Page 72: Precautions
“Memory Stick Duo” • For the latest information on the “Memory Stick Duo” types supported by the photo frame, see the “Memory Stick” compatibility information on the Sony Web site. • The photo frame supports FAT32. However, we do not guarantee the operations of all the “Memory Stick... -
Page 73: Sd Memory Card
• When you initialize a “Memory Stick Duo”, use the initialization function of your digital camera. If you initialize it with your computer, images may not be displayed properly. • When you perform initialization, all the protected images are erased. Take care to avoid accidental erasure of important data. -
Page 74: Specifications
Specifications Photo frame Model name LCD screen LCD panel Total number of dots Effective display area Display aspect ratio Actual viewable size Total number of dots LCD backlight life USB connector (Type Mini-B, Hi-Speed USB) Input/Output connectors USB connector (Type A, Hi-Speed USB) “Memory Stick PRO”... - Page 75 Model name MP3: Extension: mp3 Bit rate: 32 kbps to 320 kbps, Supports variable bit rate (VBR) Sampling frequency: 32 kHz, 44.1 kHz, 48 kHz AAC: Extension: m4a Bit rate: 32 kbps to 320 kbps, Supports variable bit rate (VBR) Sampling frequency: 8 kHz, 11.025 kHz, 12 kHz, 16 kHz, 22.05 kHz, 24 kHz, 32 kHz,...
- Page 76 AC adaptor Power requirements Rated output voltage DC 12 V, 1.5 A Dimensions (width/ height/depth) Approx. 64 mm × 50 mm × 30 mm (excluding the protruding inches × 2 inches × 1 parts) Mass Approx. 110g (3 See the label of AC adaptor for more details. Design and specifications are subject to change without notice.
- Page 77 • Windows Media is either a registered trademark or a trademark of Microsoft Corporation in the United States and/or other countries. , PlayMemories Online, “Memory Stick”, , “MagicGate Memory Stick”, , “Memory Stick PRO Duo”, , “Memory Stick-ROM”, are trademarks or registered trademarks of Sony Continued r...
-
Page 78: Notes On The License
GPL or LGPL supplied. The source code for the above-listed software is available on the Web. To download, please access the following URL then select the model name “DPF-WA700/W700”. URL: http://www.sony.net/Products/Linux/ Please note that Sony cannot answer or respond to any inquiries regarding the content of the source code. Continued r... - Page 79 DPF-WA700 • Dolby is trademark of Dolby Laboratories. • MPEG Layer-3 audio coding technology and patents licensed from Fraunhofer IIS and Thomson. • “vTuner” logo is trademark of Nothing Else Matters Software, Ltd., Inc. Notes on the License • THIS PRODUCT IS LICENSED UNDER THE MPEG-4 VISUAL PATENT PORTFOLIO LICENSE FOR THE PERSONAL AND NONCOMMERCIAL USE OF A CONSUMER FOR (i) ENCODING VIDEO IN COMPLIANCE WITH THE MPEG-4 VISUAL...
- Page 80 All other companies and product names mentioned herein may be the trademarks or registered trademarks of their respective companies. Furthermore, “™” and “®” are not mentioned in each case in this manual.
-
Page 81: Index
Index Index Symbols (Email)... 21 (Facebook)... 21 (Home Network)... 21 (Internal Memory) ...21 (Memory Card)...21 (Music) ... 30 (Network Service) ...21 (Network Services) ... 44 (Photo) ... 27 (Photo/Videos)... 27 (PlayMemories Online) ... 21 (Settings) ... 23 (Slideshow Styles) ...25 (Weather Settings)...23 Attaching the stand ...9 Auto power ON/OFF timer ...41... - Page 82 Images ...27 Deleting an image...35 Exporting...38 Go to Index...28 Saving images ...33 Start Slideshow...27 Included items ...8 Initialize ...59 Format Internal Memory ... 37 Initialize Settings... 56 Internet Radio...30 Language Setting ...58 Listening to Internet Radio ...32 Memory card “Memory Stick Duo” ... 6 Adaptor...6 Inserting...19 Removing ...20...
- Page 83 Troubleshooting ...67 Turning off the power ...13 Turning on the power...13 USB A connector ... 4 USB Mini-B connector ...4 Using the auto power ON/OFF timer...41 Videos ...29 Adjusting the volume ...29 Fast-forward/backward playback ...29 Pausing playback...29 Weather ...23 Setting the city...23 Temperature display...24 Weather Settings ...58 Celsius/Fahrenheit...58...
- Page 84 © 2011 Sony Corporation http://www.sony.net/...
Need help?
Do you have a question about the DPF-WA700 and is the answer not in the manual?
Questions and answers