Table of Contents
Advertisement
Available languages
Available languages
Quick Links
Advertisement
Chapters
Table of Contents

Related Manuals for Electrolux EZA5420AOX


Summary of Contents for Electrolux EZA5420AOX
- Page 1 EZA5420AOX Oven User Manual Four Notice d'utilisation...
-
Page 2: Table Of Contents
13. ENERGY EFFICIENCY.................. 23 WE’RE THINKING OF YOU Thank you for purchasing an Electrolux appliance. You’ve chosen a product that brings with it decades of professional experience and innovation. Ingenious and stylish, it has been designed with you in mind. So whenever you use it, you can be safe in the knowledge that you’ll get great results every time. -
Page 3: Safety Information
ENGLISH SAFETY INFORMATION Before the installation and use of the appliance, carefully read the supplied instructions. The manufacturer is not responsible for any injuries or damages that are the result of incorrect installation or usage. Always keep the instructions in a safe and accessible location for future reference. -
Page 4: Safety Instructions
Always use oven gloves to remove or put in • accessories or ovenware. Before maintenance cut the power supply. • Ensure that the appliance is switched off before • replacing the lamp to avoid the possibility of electric shock. - Page 5 ENGLISH • Do not let mains cables touch or • Open the appliance door carefully. come near the appliance door, The use of ingredients with alcohol especially when the door is hot. can cause a mixture of alcohol and • The shock protection of live and air.
- Page 6 2.4 Care and cleaning household appliances. Do not use it for house lighting. WARNING! WARNING! Risk of injury, fire, or Risk of electrical shock. damage to the appliance. • Before replacing the lamp, disconnect • Before maintenance, deactivate the the appliance from the power supply.
-
Page 7: Product Description
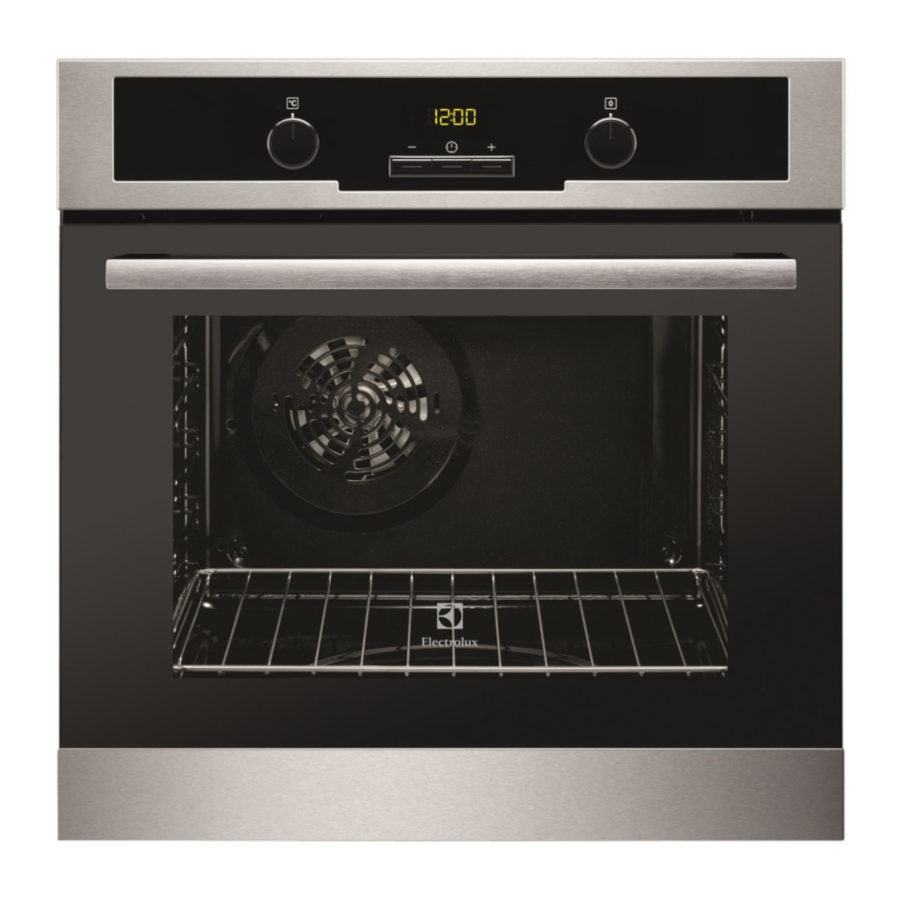
ENGLISH 3. PRODUCT DESCRIPTION 3.1 General overview Control panel Temperature indicator / symbol Knob for the temperature Electronic programmer Knob for the oven functions Power lamp / symbol Air vents for the cooling fan Heating element Lamp Shelf support, removable Shelf positions 3.2 Accessories •... -
Page 8: Daily Use
4.4 Preheating 5. Set the function and set the maximum temperature. Preheat the empty appliance to burn off 6. Let the appliance operate for 15 the remaining grease. minutes. Accessories can become hotter than 1. Set the function and the maximum usual. - Page 9 ENGLISH Oven function Application Top Heat To brown bread, cakes and pastries. To finish cooked dishes. Bottom Heat To bake cakes with crispy bottom and to preserve food. Grilling To grill flat food and to toast bread. Fast Grilling To grill flat food in large quantities and to toast bread.
-
Page 10: Clock Functions
6. CLOCK FUNCTIONS 6.1 Clock functions table Clock function Application Time of day To set, change or check the time of day. Minute Minder To set countdown time. This function has no effect on the operation of the appliance. - Page 11 ENGLISH 7.2 Installing the telescopic runners You can put the telescopic runners on each level. Make sure that the two telescopic runners are on the same level. 1. Install the telescopic runners. Deep pan: Push the deep pan between the guide bars of the shelf support.
-
Page 12: Additional Functions
1. Pull out the right and left hand telescopic runners. °C °C Make sure you push back the telescopic 2. Put the wire shelf on the telescopic runners fully in the appliance before you runners and carefully push them into close the oven door. - Page 13 ENGLISH 9.2 Baking cakes • To prevent too much smoke in the oven during roasting, add some water • Do not open the oven door before 3/4 into the deep pan. To prevent the of the set cooking time is up. smoke condensation, add water each •...
- Page 14 Food Top / Bottom Heat True Fan Cooking Time Com‐ (min) ments Tempera‐ Shelf po‐ Tempera‐ Shelf po‐ ture (°C) sition ture (°C) sition Sponge 35 - 45 In a 26 cm cake (Fat‐ cake less mould sponge cake)
- Page 15 ENGLISH Food Top / Bottom Heat True Fan Cooking Time Com‐ (min) ments Tempera‐ Shelf po‐ Tempera‐ Shelf po‐ ture (°C) sition ture (°C) sition Rye bread 190 30 - 45 In a bread Bread 2 (1 and 25 - 40 6 - 8 rolls in a bak‐...
- Page 16 Food Top / Bottom Heat True Fan Cooking Time Com‐ (min) ments Tempera‐ Shelf po‐ Tempera‐ Shelf po‐ ture (°C) sition ture (°C) sition Veal 90 - 120 On a wire shelf and a deep English 44 - 50...
- Page 17 ENGLISH Food Top / Bottom Heat True Fan Cooking Time Com‐ (min) ments Tempera‐ Shelf po‐ Tempera‐ Shelf po‐ ture (°C) sition ture (°C) sition Pheasant 90 - 120 Whole on a deep Fish Food Top / Bottom Heat True Fan Cooking Time Com‐...
-
Page 18: Care And Cleaning
Food Quantity Tempera‐ Time (min) Shelf po‐ ture (°C) sition Pieces 1st side 2nd side Toasted 4 - 6 5 - 7 sandwich‐ Toast 4 - 6 2 - 4 2 - 3 10. CARE AND CLEANING frame of the oven cavity. Do not use... - Page 19 ENGLISH 3. Set the oven temperature to 250 °C and let the oven operate for 1 hour. 4. When the appliance is cool, clean it with a soft and moist sponge. 10.6 Cleaning the oven door The oven door has two glass panels. You can remove the oven door and the internal glass panel to clean it.
- Page 20 3. Close the oven door halfway to the first opening position. Then pull forward and remove the door from its seat. 90° 7. First lift carefully and then remove the glass panel. 4. Put the door on a soft cloth on a stable surface.
-
Page 21: Troubleshooting
ENGLISH 10.7 Replacing the lamp 1. Deactivate the appliance. 2. Remove the fuses from the fuse box Put a cloth on the bottom of the interior or deactivate the circuit breaker. of the appliance. It prevents damage to the lamp glass cover and the cavity. The back lamp WARNING! 1. -
Page 22: Installation
We recommend that you write the data here: Model (MOD.) ......... Product number (PNC) ......... Serial number (S.N.) ......... 12. INSTALLATION 12.2 Securing the appliance to WARNING! the cabinet Refer to Safety chapters. 12.1 Building In min. 550 min. 560 12.3 Electrical installation... -
Page 23: Energy Efficiency
ENGLISH 13. ENERGY EFFICIENCY 13.1 Product Fiche and information according to EU 65-66/2014 Supplier's name Electrolux Model identification EZA5420AOX Energy Efficiency Index 106.3 Energy efficiency class Energy consumption with a standard load, con‐ 0.85 kWh/cycle ventional mode Energy consumption with a standard load, fan- 0.84 kWh/cycle... - Page 24 office.
- Page 25 13. RENDEMENT ÉNERGÉTIQUE..............48 NOUS PENSONS À VOUS Merci d'avoir choisi ce produit Electrolux. Avec ce produit, vous bénéficiez de dizaines d'années d'expérience professionnelle et d'innovation. Ingénieux et élégant, il a été conçu sur mesure pour vous. Grâce à cet appareil, vous savez que chaque utilisation vous apportera satisfaction.
-
Page 26: Informations De Sécurité
INFORMATIONS DE SÉCURITÉ Avant d'installer et d'utiliser cet appareil, lisez soigneusement les instructions fournies. Le fabricant ne pourra être tenu pour responsable des blessures et dégâts résultant d'une mauvaise installation ou utilisation. Conservez toujours les instructions dans un lieu sûr et accessible pour vous y référer ultérieurement. -
Page 27: Consignes De Sécurité
FRANÇAIS AVERTISSEMENT : L'appareil et ses parties • accessibles deviennent chauds pendant son fonctionnement. Veillez à ne pas toucher les éléments chauffants. Les enfants de moins de 8 ans doivent être tenus à l'écart, à moins d'être surveillés en permanence. Utilisez toujours des gants de cuisine pour retirer ou •... - Page 28 2.2 Branchement électrique distance d'ouverture des contacts d'au moins 3 mm. AVERTISSEMENT! • Cet appareil est conforme aux Risque d'incendie ou directives CEE. d'électrocution. 2.3 Utilisation • L'ensemble des branchements électriques doit être effectué par un AVERTISSEMENT! technicien qualifié.
- Page 29 FRANÇAIS 2.4 Entretien et nettoyage AVERTISSEMENT! Risque d'endommagement AVERTISSEMENT! de l'appareil. Risque de blessure corporelle, d'incendie ou de • Pour éviter tout endommagement ou dommage matériel à décoloration de l'émail : l'appareil. – ne posez pas de plats allant au four ni aucun autre objet •...
-
Page 30: Description De L'appareil
2.6 Mise au rebut les animaux de s'enfermer dans l'appareil. AVERTISSEMENT! 2.7 Maintenance Risque de blessure ou d'asphyxie. • Pour réparer l'appareil, contactez un service après-vente agréé. • Débranchez l'appareil de • Utilisez exclusivement des pièces l'alimentation électrique. d'origine. -
Page 31: Utilisation Quotidienne
FRANÇAIS Appuyez sur à plusieurs reprises Reportez-vous au chapitre jusqu'à ce que le voyant de l'heure du « Entretien et nettoyage ». jour clignote. Pour régler l'heure, reportez-vous au Nettoyez l'appareil et les accessoires chapitre « Réglage de l'heure ». avant de les utiliser pour la première fois. - Page 32 1. Tournez la manette des fonctions du 2. Tournez la manette du thermostat four pour sélectionner une fonction. pour sélectionner la température souhaitée. 3. Pour éteindre l'appareil, tournez les manettes des fonctions du four et celle de température en position ARRET.
-
Page 33: Fonctions De L'horloge
FRANÇAIS 5.5 Touches Touche Fonction Description MOINS Pour régler l'heure. HORLOGE Pour régler une fonction de l'horloge. PLUS Pour régler l'heure. 6. FONCTIONS DE L'HORLOGE 6.1 Tableau des fonctions de l'horloge Fonction de l'horloge Utilisation Heure du jour Pour régler, modifier ou vérifier l'heure. Minuteur Pour régler un décompte. -
Page 34: Utilisation Des Accessoires
6.3 Annulation des fonctions de 2. Maintenez la touche enfoncée. l'horloge La fonction de l'horloge s'éteint au bout de quelques secondes. 1. Appuyez sur à plusieurs reprises jusqu'à ce que le voyant de la fonction souhaitée clignote. 7. UTILISATION DES ACCESSOIRES métallique entre les rails se trouvant... -
Page 35: Fonctions Supplémentaires
FRANÇAIS 1. Tirez sur les rails télescopiques de droite et de gauche pour les sortir. °C 2. L'élément d'arrêt (A) situé à une 2. Placez la grille métallique sur les rails extrémité du rail télescopique doit télescopiques et poussez-les dans être pointé... -
Page 36: Conseils
8.2 Thermostat de sécurité thermostat de sécurité interrompant l'alimentation électrique. Le four se remet Un mauvais fonctionnement de l'appareil automatiquement en fonctionnement ou des composants défectueux peuvent lorsque la température baisse. causer une surchauffe dangereuse. Pour éviter cela, le four dispose d'un 9. - Page 37 FRANÇAIS 9.5 Tableau de rôtissage et de cuisson des gâteaux Gâteaux Plat Voûte Chaleur tournante Durée Commen‐ (min) taires Tempéra‐ Positions Tempéra‐ Positions ture (°C) des gril‐ ture (°C) des gril‐ Pâtes à 2 (1 et 3) 45 - 60 Dans un gâteaux moule à...
- Page 38 Plat Voûte Chaleur tournante Durée Commen‐ (min) taires Tempéra‐ Positions Tempéra‐ Positions ture (°C) des gril‐ ture (°C) des gril‐ Petits gâ‐ 3 (1 et 3) 20 - 30 Sur un teaux plateau de cuisson Biscuits/ 20 - 30 Sur un Gâteaux...
- Page 39 FRANÇAIS Plat Voûte Chaleur tournante Durée Commen‐ (min) taires Tempéra‐ Positions Tempéra‐ Positions ture (°C) des gril‐ ture (°C) des gril‐ Petits 2 (1 et 3) 25 - 40 6 à 8 pe‐ tits pains pains sur un pla‐ teau de cuisson 20 - 30 Dans un...
- Page 40 Viande Plat Voûte Chaleur tournante Durée Commen‐ (min) taires Tempéra‐ Positions Tempéra‐ Positions ture (°C) des gril‐ ture (°C) des gril‐ Bœuf 50 - 70 Sur la gril‐ le métalli‐ que et dans un plat à rôtir Porc 90 - 120 Sur la gril‐...
- Page 41 FRANÇAIS Plat Voûte Chaleur tournante Durée Commen‐ (min) taires Tempéra‐ Positions Tempéra‐ Positions ture (°C) des gril‐ ture (°C) des gril‐ Dinde 210 - 240 Entière dans un plat à rôtir Canard 120 - 150 Entier dans un plat à rôtir 150 - 200 Entière dans un...
-
Page 42: Entretien Et Nettoyage
Plat Quantité Tempéra‐ Durée (min) Positions ture (°C) des gril‐ Morceaux (g) 1re face 2e face Steaks de 10 - 12 6 - 8 bœuf Saucisses 8 12 - 15 10 - 12 Côtelettes 12 - 16 12 - 14... - Page 43 FRANÇAIS 10.2 Appareils en acier inoxydable ou en aluminium Nettoyez la porte uniquement avec une éponge ou un chiffon humides. Séchez-la avec un chiffon doux. N'utilisez jamais de produits abrasifs ou acides ni d'éponges métalliques car ils 2. Écartez l'arrière du support de grille peuvent endommager la de la paroi latérale et retirez le surface du four.
- Page 44 AVERTISSEMENT! Tenez les enfants éloignés de l'appareil lorsque vous le nettoyez à température élevée. Les surfaces du four deviennent très chaudes et représentent un risque de brûlures. Avant d'activer le nettoyage catalytique, retirez tous les accessoires du four. Les parois avec revêtement catalytique sont autonettoyantes.
- Page 45 FRANÇAIS Une fois le nettoyage terminé, remettez le panneau de verre et la porte du four en place. Suivez les étapes ci-dessus dans l'ordre inverse. La zone imprimée doit faire face à l'intérieur de la porte. Après l'installation, vérifiez que la surface du panneau de verre où...
-
Page 46: Cas D'anomalie De Fonctionnement
11. EN CAS D'ANOMALIE DE FONCTIONNEMENT AVERTISSEMENT! Reportez-vous aux chapitres concernant la sécurité. 11.1 En cas d'anomalie de fonctionnement Problème Cause probable Solution Le four ne chauffe pas. Le four est éteint. Mettez le four en marche. Le four ne chauffe pas. -
Page 47: Installation
FRANÇAIS 12. INSTALLATION 12.3 Installation électrique AVERTISSEMENT! Reportez-vous aux chapitres Le fabricant ne pourra être concernant la sécurité. tenu pour responsable si vous ne respectez pas les 12.1 Encastrement précautions de sécurité du chapitre « Consignes de sécurité ». Cet appareil n'est fourni qu'avec un câble min. -
Page 48: Rendement Énergétique
13. RENDEMENT ÉNERGÉTIQUE 13.1 Fiche du produit et informations conformément à la norme EU 65-66/2014 Nom du fournisseur Electrolux Identification du modèle EZA5420AOX Index d'efficacité énergétique 106.3 Classe d'efficacité énergétique Consommation d'énergie avec charge standard et 0.85 kWh/cycle mode traditionnel Consommation d'énergie avec charge standard et... - Page 49 FRANÇAIS 14. EN MATIÈRE DE PROTECTION DE L'ENVIRONNEMENT Recyclez les matériaux portant le électroniques. Ne jetez pas les appareils portant le symbole avec les ordures symbole . Déposez les emballages ménagères. Emmenez un tel produit dans les conteneurs prévus à cet effet. dans votre centre local de recyclage ou Contribuez à...
- Page 50 www.electrolux.com...
- Page 51 FRANÇAIS...
- Page 52 www.electrolux.com/shop...
Need help?
Do you have a question about the EZA5420AOX and is the answer not in the manual?
Questions and answers