Table of Contents
Advertisement
Quick Links
Advertisement
Table of Contents

Related Manuals for Waves DiGoGrid IOX


Summary of Contents for Waves DiGoGrid IOX
- Page 1 DiGiGrid IOX User Guide...
-
Page 2: Table Of Contents
System Info Page and About Page ..........................19 Presets ..................................20 USING AN I/O DEVICE WITH A DAW ..........................21 SPECIFICATIONS ................................22 RESETTING THE UNIT ..............................24 Waves Inc 2800 Merchants Drive, Knoxville, TN 37912 USA 1-865-909-9200 www.waves.com DiGiGrid IOX / User Guide... -
Page 3: Introduction
This super-low-latency I/O is ASIO/Core Audio compatible. SoundGrid is the Waves high-speed networking protocol for moving audio, clock, and other information between a host system and I/O devices—and between I/O devices themselves. A SoundGrid host manages the network and assigns servers and I/O devices to mix, process, and record, depending on the host. -
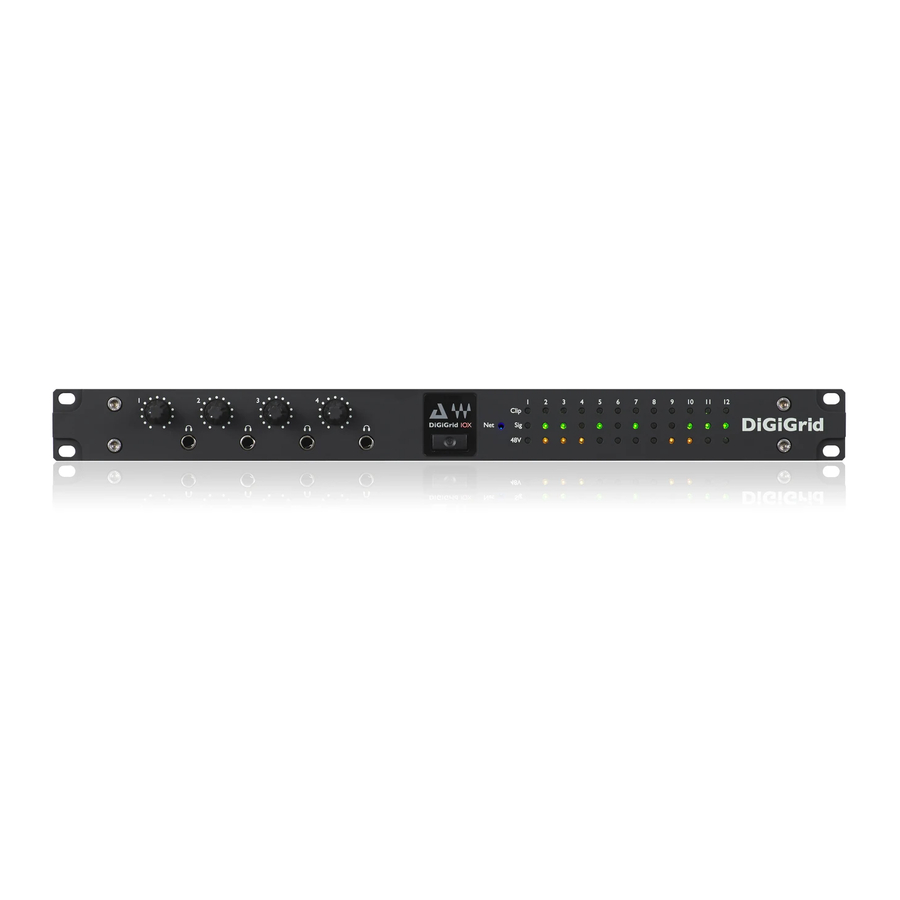
Page 4: Hardware And Connections
Hardware and Connections IOX is a 1U rack-mounted device. Aside from headphone jacks, all connections are on the rear panel. There are twelve Mic/Line input connections, six line output connections, word clock and Ethernet I/O. IOX F RONT ANEL Input clipping Red = Clipping (level can be set through the control panel) Input signal present Green = Signal present 48V phantom power Orange = Phantom On... - Page 5 IOX R ANEL Mains input: 90VAC–240 VAC 50/60 Hz Built-in 1GB Ethernet switch, two ports The two-port Ethernet switch can connect IOX directly to a host computer and one other device without an external Ethernet switch. For larger systems, a 1GB SoundGrid-approved Ethernet switch is necessary. It is not important which of the Ethernet ports is used to connect to the SoundGrid network.
-
Page 6: Getting Started
Getting Started Configure SoundGrid and assign your devices as follows, however large or small your system. Connect the hardware Install the software Configure your system Connect the Hardware One I/O In this example, one DiGiGrid IOX is connected directly to the SoundGrid host computer using a Cat 5e Ethernet cable or better. -
Page 7: Add I/Os
This moves all DSP processing from the host computer to the server, which provides a higher plugin count and enables the eMotion LV1 and eMotion ST mixers. Visit the waves.com hardware pages to learn more about SoundGrid servers. Consult your SoundGrid host application’s user guide to learn about using servers. -
Page 8: Download And Install Software
YSTEM If you are already using a Waves SoundGrid host application and your device does not appear in the Network Devices list, use Waves Central to update the host application, which also updates the device drivers—or install just the missing device driver from Waves Central. -
Page 9: Configure The System
Configure the System A SoundGrid network is configured and devices are assigned in a host’s Setup window. At the heart of this window are racks where devices are assigned. Any compatible device that’s part of the host’s SoundGrid network will be available for assignment. -
Page 10: Manual Device Configuration
Manual Device Configuration You can assign, remove, and manage a device manually. Click on the plus or arrow symbol in a device slot to open the Device Menu, then select a device. Any device not already used will be available for assignment. If no other devices are assigned, the current device will become your clock master. -
Page 11: Device Firmware
Device Firmware An I/O that is using outdated or incompatible firmware will not work properly in a SoundGrid network until its firmware is updated. The color of the FW button in a device slot indicates the current firmware status. Grey Compatible firmware Blue Compatible firmware, but a newer version exists... -
Page 12: Iox Control Panel
RIVER ONTROL ANEL Open the driver control panel and then click the Hardware Control Panel button. The driver control panel is located here in the host computer: PC: C:\Program Files (x86)\Waves\SoundGrid\Driver Control Panel Mac: System HD/Applications/Waves/SoundGrid ONTROL ANEL AGES The About and System Info pages provide information about the unit, such as MAC address, SOE master MAC Address, firmware version, and more. -
Page 13: Controls Page
Controls Page This is where you configure the inputs and outputs of the IOX. Mic preamps, line inputs and outputs, digital I/O, level control and metering. The Controls page is divided into three sections: Top Bar Analog section Focus section: input and output levels and 48V phantom power for selected I/O channel are controlled here. - Page 14 NALOG ECTION There are twelve mic preamp and line inputs and six line outputs. Each preamp channel is represented by a button that turns the channel on or off. Each channel has a meter and a clip indicator. Select a channel and it will appear in the Focus section, where preamp parameters are controlled.
- Page 15 EMOTE REAMP ONTROL You can control input preamp functions directly from the channel strip of SoundGrid applications, including eMotion LV1 and eMotion ST mixers, and SuperRack SoundGrid. Control Function 48V Phantom On or Off Preamp Gain Input Controls analog gain in an assigned I/O device that includes a controllable preamp.
- Page 16 NDICATION AND MALL ETERS Clip Indication Threshold sets the level where clipping is shown on the meter in the Focus section. The threshold can be set to 0 dB, -1 dB, -2 dB, or -3 dB. This setting is global: it affects level indication for all channels, inputs and outputs. Each channel button—analog or digital, input, or output—has a small level meter that indicates when signal is present and provides a rough idea of level.
-
Page 17: Clock Page
Clock Page Use the Clock page to set the clock source and sample rate for the device and to assess clock status. SOURCE sets the requested clock source. Internal The device itself provides the SEO clock. External WC Clock is provided by an external device via the Word Clock Input connector. Sync over Ethernet The device receives clock from the SoundGrid network. - Page 18 SAMPLE RATE sets the sample rate when Clock Source is set to Internal. Range: 44.1 / 48 / 88.2 / 96 kHz. If the device is the network (SOE) clock master, as determined in the Device Racks of the SoundGrid host, then this setting determines the sample rate of the SoundGrid network. If Clock Source is set to an external clock source, you cannot change the sample rate from the host.
-
Page 19: System Info Page And About Page
The About page contains a description of the device. The System Info page contains technical details about the device, including MAC address, firmware version, and module version. This information is useful for troubleshooting. Please have this information handy if you contact Waves technical support concerning the device. DiGiGrid IOX / User Guide... -
Page 20: Presets
Presets The Top Bar is used to load and save device presets and to identify device hardware. You can save and load presets of device settings. A saved preset includes all Clock and Control panels parameters. Save IOX presets to use on future sessions or copy them to another computer to duplicate a configuration. Click the Identify button to indicate which IOX hardware device belongs to this Control Panel. -
Page 21: Using An I/O Device With A Daw
ONFIGURE THE OUND 1. Set the DAW playback engine to “Waves SoundGrid.” The SoundGrid driver channels will now appear in the DAW I/O preferences and in the Input/Output selector in each DAW channel. 2. Route the DAW inputs and outputs to SoundGrid. -
Page 22: Specifications
Specifications XLR Input Input Gain Adjustable from 0 dB to 60 dB, in steps of 1 dB Frequency Response: +0/-0.2 dB 16 Hz to 21 kHz @ 48 kHz sample rate (+ 4 dBu input @ +20 dB gain) +0/-0.2 dB, 17 Hz to 40 kHz @ 96 kHz sample rate Dynamic Range: (measured bandwidth limited 20 Hz - 20 kHz) 110 dB Gain = 0 EIN (Gain 60, 150 Ohms) -128.7 dBu A weighted THD+N (measured at 1 kHz @ +4 dBu, Gain = +20) 0.0019%... - Page 23 XLR Balanced Outputs Selectable maximum output level: +18 dBu or + 24 dBu Frequency Response: +0/-0.2 dB 15 Hz to 22 kHz @ 48kHz sample rate +0/-0.2 dB 17 Hz to 40 kHz @ 96kHz sample rate Dynamic Range: (Measured bandwidth limited 20 Hz to 20 kHz) 110 dB Gain = 0 EIN (Gain 60, 150 ohms) -128.7 dBu A weighted THD+N (measured at 1 kHz, Gain = 0) 0.0015% Phase Response:...
-
Page 24: Resetting The Unit
Resetting the Unit If an unsuccessful firmware update results in the device no longer being recognized by the host, follow these steps to reset the unit: 1. Turn off the unit. 2. Press and hold the Reset button. 3. Restart the unit while holding the button. 4.
Need help?
Do you have a question about the DiGoGrid IOX and is the answer not in the manual?
Questions and answers