Table of Contents
Advertisement
Advertisement
Table of Contents

Related Manuals for Waves Scheps Omni Channel


Summary of Contents for Waves Scheps Omni Channel
- Page 1 Scheps Omni Channel User Guide...
-
Page 2: Table Of Contents
Gate Module ....................................19 Master Module ....................................20 Insert Plugin Slot ................................... 21 Rearranging Processing Sequence ............................... 22 Using Scheps Omni Channel ........................23 Practical examples ..................................23 Working with M/S ..................................26 Focus Mode ....................................28 Controls ..............................29 Controls common to all modules .............................. -
Page 3: Scheps Omni Channel
Hello and welcome to the Scheps Omni Channel user guide! I’m really excited about this plugin, and so is everyone at Waves. It took a lot of hard work to bring it to life, and I think the final product has not only met, but exceeded, all of our expectations. -
Page 4: Startup Condition
You’ll quickly see just how much freedom you have to create the sound you’re looking for. Startup Condition When you instantiate Scheps Omni Channel on a track, all processing modules and all sections within modules are switched off. A module that’s off does not consume any CPU power. Sections within a module can be bypassed independently—this does not affect CPU. -
Page 5: Using Presets
“Set as Default Preset” saves the current settings as the default preset. It will load each time Scheps Omni Channel is instantiated. Stereo and mono components have different default presets. If you do not want any default preset, use the host computer’s operating system to delete the file. -
Page 6: Components
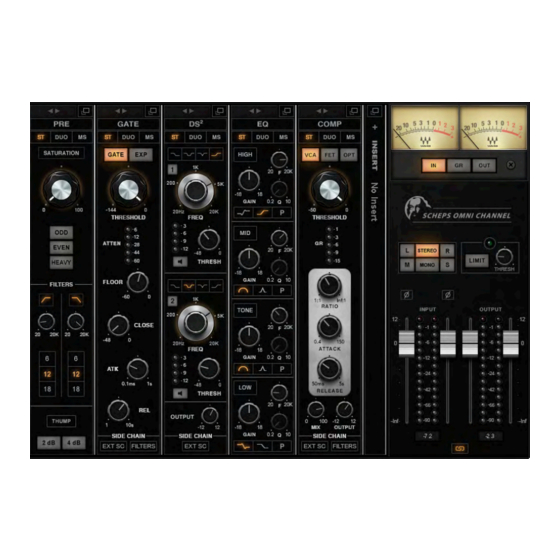
Components Scheps Omni Channel has two components: Mono and Stereo. Mono Component Collapsed View Master Section Processing Modules Insert Point Scheps Omni Channel / User Guide... -
Page 7: Stereo Component
Stereo Componen Collapsed View Stereo Mode Select Processing Modules Master Section Insert Point Scheps Omni Channel / User Guide... -
Page 8: Expanded View
Click to link/unlink the left and right controls. Link Click to turn on or off the module’s external sidechain. EXT SC Click on the window symbol to return to the Collapsed view. Close window Scheps Omni Channel / User Guide... -
Page 9: Stereo Mode And Stereo Controls Linking
Regardless of a module’s Stereo Mode, its output is always stereo. If needed, it will be converted to M/S at the input of the next module in the chain. This allows re-ordering of the modules on the fly with no impact on the stereo processing. Pro Tools provides only a mono sidechain. Scheps Omni Channel / User Guide... - Page 10 L and R. In the M/S mode, the labels will change to M and S, for mid and side Left and right, or mid and side, are always linked in the Collapsed view. Scheps Omni Channel / User Guide...
-
Page 11: Common Controls
This opens the Stereo Copy drop-down menu. Copy the parameters of the left side to the right, or vice versa. Copying overwrites the parameters of the target channel. Scheps Omni Channel / User Guide... -
Page 12: Sidechain
It’s common for a bass to interfere with a vocal track. You can, to an extent, tame this problem with level control or EQ, but this undeniably compromises the performance. What you want is gain reduction on the bass, based on the vocalist’s activity. Hence, an external sidechain. Scheps Omni Channel / User Guide... - Page 13 Collapsed view—will light, indicating activity in the sidechain. Click the SC Filters button to turn all sidechain filters on or off. This lets you audition the sidechain to hear how sidechain EQ is influencing sidechain performance. Scheps Omni Channel / User Guide...
- Page 14 EQ module to quickly and accurately locate a frequency. When Sidechain Listen is engaged, the output faders control monitor level for the sidechain. This is indicated by a change in color. Scheps Omni Channel / User Guide...
-
Page 15: Channel Strip Modules
HP/LP filters and an EQ that adds a gentle low-frequency “thump” or resonance. Expanded view button Collapsed Stereo mode selector View Saturation Control Panel HP/LP filter on/off HP/LP filter frequency Expanded View HP/LP filter slope Thump on/off and gain select Scheps Omni Channel / User Guide... -
Page 16: Eq Module
Stereo mode selector Collapsed View High section High filter type Mid bell EQ Mid bell filter type Tone bell EQ Tone bell EQ filter type Expanded View filter type Standared Low section Low filter type Scheps Omni Channel / User Guide... -
Page 17: Ds 2 Module
Collapsed View #1 sideband filters types #1 on/off #1 frequency #1 gain reduction meter #1 threshold #1 sidechain listen #2 controls are the same as DS Expanded View module level adjust External sidechain on/off Scheps Omni Channel / User Guide... -
Page 18: Compressor Module
Expanded view button Stereo mode selector Collapsed Compressor type View Threshold Gain reduction meter Ratio Attack Release Expanded View Module output level and mix Access Expanded view to adjust sidechain EQ Scheps Omni Channel / User Guide... -
Page 19: Gate Module
Expanded view button Collapsed Stereo mode selector View Gate/Expander mode select Threshold Attenuation Meter Gate Floor (attenuation) Gate close (max attenuation) Expanded View Attack time Release time Access Expanded view to adjust sidechain EQ Scheps Omni Channel / User Guide... -
Page 20: Master Module
• Input and output faders and meters Output VU meters: Input, Output, Gain Reduction Meter trim pot Output/monitor mode Output brickwall limiter Input phase invert Input/output peak and clip indicators Stereo Link Input/output faders and meters Scheps Omni Channel / User Guide... -
Page 21: Insert Plugin Slot
This allows you to, for instance, add a second EQ plugin so you can have one before and one after dynamics processing, or double-compress a signal. Scheps Omni Channel / User Guide... -
Page 22: Rearranging Processing Sequence
2. Move module to its new position. 3. Let go. Other modules move left. The position of a module in the proceeding chain can dramatically alter its influence on the overall sound of the signal. Experiment! Scheps Omni Channel / User Guide... -
Page 23: Using Scheps Omni Channel
Using Scheps Omni Channel Practical examples Andrew Scheps gives us a few examples of using Scheps Omni Channel in the studio. Example #1: Kick Drum • When mixing a kick drum, you’ll usually want to start with the EQ. • You can get to work right away on the main interface and start with the EQ while completely ignoring the rest of the modules in the strip. - Page 24 • Lastly put the Expander first in the chain to help duck the headphone bleed for you automatically to cut down on the amount of fader rides you’ll need to do later. Scheps Omni Channel / User Guide...
- Page 25 • Also, don’t forget to try the compressor in Duo mode instead of Stereo mode. Unlinking the compressors might make the drums feel wider. Scheps Omni Channel / User Guide...
-
Page 26: Working With M/S
Try adding these frequencies just to the sides and actually dialing back the low end in the middle. This will leave more room for bass and vocals in the middle while still giving you a present, powerful piano. Scheps Omni Channel / User Guide... - Page 27 VCA compressor in the middle to add attack to the kick and snare in a loop, while quickening up the attack and slowing down the release on the sides to even out and add sustain to percussion and cymbals. Scheps Omni Channel / User Guide...
-
Page 28: Focus Mode
Click the blue button on the WaveSystem Toolbar to enable the Focus mode. This mode simplifies working with Scheps Omni Channel presets. Load a preset in this mode and certain controls will be highlighted. These are the controls that you are most likely to use with this particular preset. All other controls will also remain active. -
Page 29: Controls
Range: Not Illuminated=bypassed; Illuminated=not bypassed Most modules use one control for both left and right channels (when using the stereo component). To access channels independently or to create offsets between the two, open the Expanded view window. Scheps Omni Channel / User Guide... -
Page 30: Pre Module
In contrast to Even and Odd, Heavy is less about adding harmonics and is more of a traditional clipper. It has a custom response to give you a different sound than most clippers, allowing you to shape the sound in ways a simple clipper can’t. Range: Radio switch selects between the three saturation types Scheps Omni Channel / User Guide... - Page 31 Thump introduces a wide boost that feels more like resonance than EQ. This adds warmth and color. Range: off or on Boost: +2 dB or +4 dB The Pre module Collapsed and Expanded views are identical in functions and controls. Scheps Omni Channel / User Guide...
-
Page 32: Ds 2 Module
Indicates gain reduction imposed by the compressor. Range: -12 dB to -3 dB (four steps) Sidechain control access Expanded view for sidechain control. Click on the SC button to access the DS Expanded View Scheps Omni Channel / User Guide... - Page 33 Main outs are muted and only sidechain is heard. Frequency sweep To precisely locate a sidechain frequency, hold Ctrl and drag vertically on a frequency control. This activates sidechain listen and lets you sweep across frequencies. Scheps Omni Channel / User Guide...
-
Page 34: Eq Module
Experiment. Parametric This is a bell-shaped EQ, and unlike the shelf filters, the Q control is available. Q (parametric mode only) Range: 0.2 to 10 Scheps Omni Channel / User Guide... - Page 35 Selects the shape of the bell filter. Range: Wide, Narrow, Parametric (In the Parametric mode, the Q control is available for adjusting the width of the bell.) Q (parametric mode only) Range: 0.2 to 10 Scheps Omni Channel / User Guide...
- Page 36 Low filter types Resonate Shelf (fixed Q), Shelf (fixed Q), Parametric (bell with adjustable Q) Q (parametric mode only) Range: 0.2 to 10 The EQ module Collapsed and Expanded views are identical in functions and controls. Scheps Omni Channel / User Guide...
-
Page 37: Compressor Module
Determines how quickly the compressor reacts to a signal. Range: 0.4 ms to 150 ms Release Determines how fast the compressor reduces processing after the signal falls below the threshold. Range: 50 ms to 5000 ms Scheps Omni Channel / User Guide... - Page 38 Filter active: (off or on) Gain (range -18 dB to +18 dB) Frequency (range: 20 Hz to 20 kHz) High pass filter Filter active (off or on) Frequency (range: 20 Hz to 20 kHz) Scheps Omni Channel / User Guide...
-
Page 39: Gate Module
Attack Determines how quickly the Gate opens. Range: 0.1 ms to 10,000 ms Release Sets how fast the Gate closes (fades out) after the signal falls below Threshold. Range: 0.1 ms to 10,000 ms Scheps Omni Channel / User Guide... - Page 40 Allows you to keep the bandwidth between the HP and LP filters, but use either knob to sweep the frequency spectrum. This essentially turns the HP and LP filters into a band pass filter. Scheps Omni Channel / User Guide...
-
Page 41: Master Module
Clipping is indicated at the top of the meter and peak level hold is at the bottom. Click on the meter to clear all indicators. Scheps Omni Channel / User Guide...
Need help?
Do you have a question about the Scheps Omni Channel and is the answer not in the manual?
Questions and answers