
Related Manuals for Jensen CD-785


Summary of Contents for Jensen CD-785
- Page 1 Portable Bluetooth CD Music System with Cassette and Digital AM/FM Radio MODEL: CD-785 USER MANUAL PLEASE READ THIS USER MANUAL COMPLETELY BEFORE OPERATING THIS UNIT AND RETAIN THIS BOOKLET FOR FUTURE REFERENCE...
-
Page 2: Important Safety Instructions
WARNING TO PREVENT FIRE OF SHOCK HAZARD, DO NOT USE THIS PLUG WITH AN EXTENSION CORD, RECEPTACLE OR OTHER OUTLET UNLESS THE BLADES CAN BE FULLY INSERTED TO PREVENT BLADE EXPOSURE. TO PREVENT FIRE OR SHOCK HAZARD, DO NOT EXPOSE THIS APPLIANCE TO RAIN OR MOISTURE. The Caution Marking is located at the back enclosure of the apparatus. - Page 3 16. Do not overload wall outlet. Use only power source as indicated. 17. Use replacement part as specified by the manufacturer. 18. Upon completion of any service or repairs to this product, ask the service technician to perform safety checks. 19.
-
Page 4: Compliance With Fcc Regulations
COMPLIANCE WITH FCC REGULATIONS FCC ID: 2AB4KMETYH1480 This device complies with Part 15 of the FCC Rules. Operation is subject to the following two conditions: This device may not cause harmful interference, and (2) This device must accept any interference received, including interference that may cause undesired operation. - Page 5 CAUTION Follow the advice below for safe operations. ON PROTECTION AGAINST LASER ENERGY EXPOSURE As the laser beam used in this compact disc player is harmful to the eyes, do not attempt to disassemble the casing. Stop operation immediately if any liquid or solid object should fall into the cabinet. Do not touch the lens or poke at it.
- Page 6 The serial number of this product is found on its bottom cover. You should note the serial number of this unit in the space provided as a permanent record of your purchase to aid in identification in the event of theft of loss. Model Number: CD-785 Serial Number:...
-
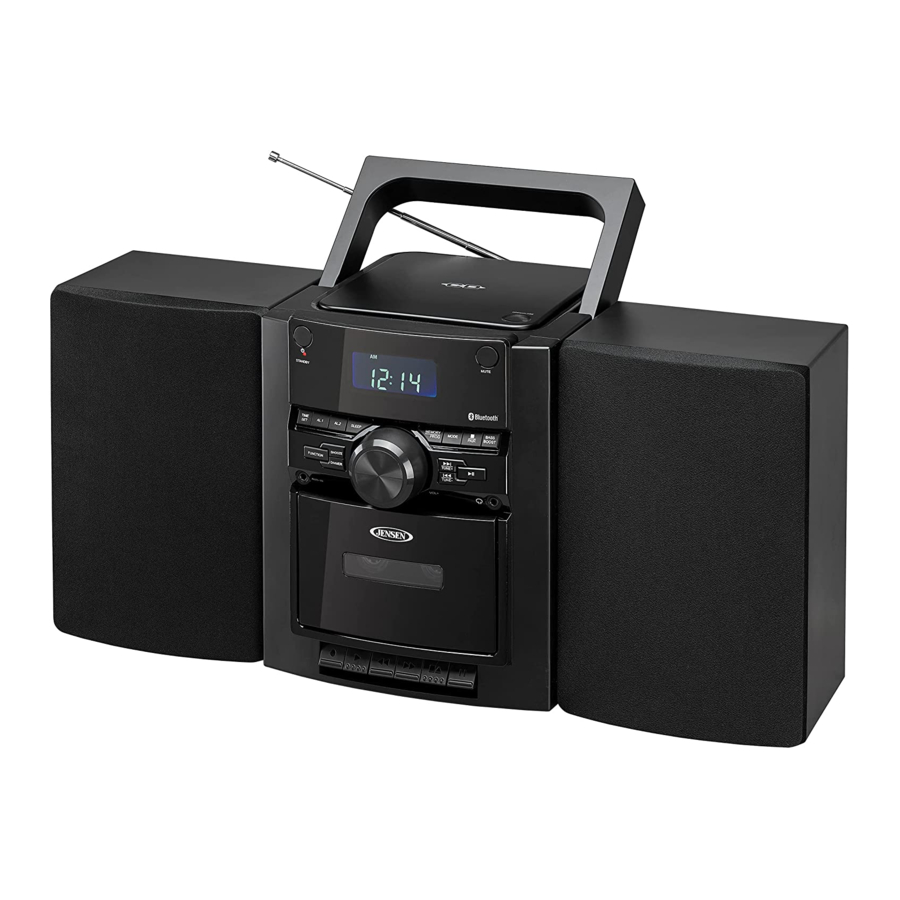
Page 7: Location Of Controls
LOCATION OF CONTROLS MAIN UNIT... -
Page 8: Pause Button
FM TELESCOPE ANTENNA / TUNE+ BUTTON FOLDABLE HANDLE CD PLAY/PAUSE BUTTON CD DOOR OPEN/CLOSE SWITCH / TUNE– BUTTON CD COMPARTMENT HEADPHONE JACK TIME SET BUTTON VOLUME CONTROL STANDBY LED INDICATOR RIGHT SPEAKER POWER BUTTON CASSETTE COMPARTMENT ALARM 1 BUTTON CASSETTE CONTROL BUTTONS ALARM 2 BUTTON RECORD BUTTON... -
Page 9: Remote Control
REMOTE CONTROL The remote control operates on one CR2025 battery (included). To activate the remote control, remove the insulation tab inserted in the battery compartment. When the operation of the remote control becomes intermittent or weak, replace the original battery with a new 3-volt lithium battery. -
Page 10: Getting Started
GETTING STARTED The CD-785 features removable speakers, so it can be used on a shelf or desktop with speakers detached, or as a portable unit with speakers attached. SPEAKER CONNECTION NOTE: Make sure that the power is switch off when connect or disconnect the speakers. Make sure that the speakers are plugged into the correct jacks. -
Page 11: Standby Mode
B. BATTERY OPERATION NOTE: For best performance and longer operating time, we recommend the use of alkaline-type batteries. 1. Remove the BATTERY DOOR (#30) on the back of the unit. 2. Follow the marked polarities and install 8 X “D” size (UM-1) batteries. 3. -
Page 12: Setting The Clock
SETTING THE CLOCK The LCD DISPLAY (#11) will flash when the unit is plugged in for the first time. The unit is now in standby mode. Setting the Time: In standby mode, press and hold the TIME SET BUTTON (#5) until the hour digits of the clock display begin to flash. -
Page 13: Snooze Function
Review the Alarm time setting: In standby mode, tap the ALARM 1 / ALARM 2 buttons once. The corresponding alarm indicator/alarm time and wake up option will flash alternately on the LCD DISPLAY (#11). The unit will automatically return to standby mode if no buttons are pressed within 5 seconds. -
Page 14: Bluetooth Operation
4. Turn on the Bluetooth function of your device and enable the search or scan function to find the CD-785. 5. Select the CD-785 from the device list when it appears on your device’s screen. If required, enter the pass code “0000” to pair (link) the CD-785 with your device. - Page 15 CD OPERATION NOTES: This player will not only play commercial CDs, but also self-complied CD-R/RW discs. • Do not attempt to play CD-ROM, CDI, VCD, DVD or computer CDs. • PLEASE READ THIS IMPORTANT INFORMATION: CD mechanisms used in devices like this are designed to read all commercial CDs. It will also read self-compiled CD-R/CD-RW discs, but it may take up to 10 seconds for the actual playback to begin.
- Page 16 SEARCH MODE 1. During PLAY mode, press and hold the BUTTON (#22) for few seconds, it will start searching forward. 2. During play mode, press and hold the BUTTON (#24) for few seconds, it will start searching backwards. REPEAT PLAY During CD playback, press the MODE BUTTON (#13) repeatedly to select a different playback mode: REPEAT ONCE >...
- Page 17 RECORDING The cassette recorder features an Automatic Volume Level Control Recording System that prevents overloaded or distorted recordings. You can change the volume level as often as you like during the recording process. It will not have any effect on the volume level of the recording itself.
-
Page 18: Bass Boost
BASS BOOST Press the BASS BOOST BUTTON (#16) to enable bass boost function if you want more bass effect when listening. BASS icon will light on the LCD DISPLAY #11). Press BASS BOOST BUTTON (#16) again to turn off bass boost function. BASS icon will be turned off. AUXILIARY INPUT This unit provides an auxiliary audio signal input jack for connecting external audio devices like MP3 players, CD players and older, non-dockable iPods (except iPod... -
Page 19: Care And Maintenance
USE HEADPHONES (NOT INCLUDED) Inserting the plug of your stereo headphones (not included) into the headphone jack will enable you to listen in private. When using headphones, the speakers will be disconnected Read this Important Information before Using Your Headphones Avoid extended play at very high volume as it may impair your hearing. -
Page 20: Cassette Care
CASSETTE CARE Two common causes of trouble experienced when using cassettes are: 1) Tape Jamming – Leading to uneven speed in playback, and 2) Tape Tangling – Where the tape wraps itself around ital parts of the mechanism. To reduce the likelihood of these problems occurring, the following precautions should be observed: Check that there are no loose layers of tape visible through the cassette center window (see Fig. -
Page 21: Compact Disc Care
COMPACT DISC CARE Handle the disc only by its edges. Never allow your fingers to come in contact with the shiny, unprinted side of the disc. Do not attach adhesive tape, stickers etc., to the disc label. Clean the disc periodically with soft, lint-free, dry cloth. Never use detergents or adhesive cleaners to clean the disc. -
Page 22: Troubleshooting Guide
TROUBLESHOOTING GUIDE PROBLEM POSSIBLE CAUSE SOLUTION The unit is disconnected from the Reconnect to the AC outlet. AC outlet The unit does not Plug another device into the same respond (no AC outlet is not functioning. outlet to confirm the outlet is power) working. - Page 23 90 DAY LIMITED WARRANTY AND SERVICE VALID IN THE U.S.A. ONLY SPECTRA MERCHANDISING INTERNATIONAL, INC. warrants this unit to be free from defective materials or factory workmanship for a period of 90 days from the date of original customer purchase and provided the product is utilized within the U.S.A. This warranty is not assignable or transferable.
Need help?
Do you have a question about the CD-785 and is the answer not in the manual?
Questions and answers
The speakers are not playing. The headphone jack works but no sound from speakers.
The speakers may not be playing on the Jensen CD-785 while the headphone jack works because the speaker cables might not be plugged into the correct jacks, or the speakers may not be properly locked into position. Ensure the left speaker is connected to the SPEAKER OUT L JACK (#35) and the right speaker to the SPEAKER OUT R JACK (#34), and that both speakers are firmly attached until a "click" is heard.
This answer is automatically generated