Table of Contents
Advertisement
Quick Links
Advertisement
Table of Contents

Related Manuals for S.R.Smith PAL2 Series


Summary of Contents for S.R.Smith PAL2 Series
- Page 1 PAL2 AQUATIC LIFT SERIES – CEC COMPLIANT MODELS OWNER’S MANUAL MAINTENANCE PROCEDURES S.R. SMITH, LLC CORPORATE HEADQUARTERS P.O. Box 400 • 1017 S.W. Berg Parkway Canby, Oregon 97013 Phone (800) 824 4387 Fax (503) 266 4334 • www.srsmith.com 702-1002-BC 4.29.2021...
-
Page 2: Table Of Contents
TABLE OF CONTENTS PAL2 202-0000 INTRODUCTION ............................2 INTENDED LIFT USER ..........................2 USING THE PAL2 LIFT ..........................2 WARNINGS AND SAFETY SUMMARY ....................... 3 PRODUCT OVERVIEW ..........................5 PAL2 – PRODUCT COMPONENTS ......................5 UNPACKING & ASSEMBLY INSTRUCTIONS ................... 10 USING THE PAL2 ............................ -
Page 3: Warnings And Safety Summary
WARNINGS AND SAFETY SUMMARY DANGER – FAILURE TO FOLLOW THESE WARNINGS, INSTRUCTIONS AND THE OWNER’S MANUAL MAY RESULT IN SEROUS INJURY OR DEATH Model / Product No.______ Product Name ___________ S.R. Smith, LLC PO Box 400 1017 SW Berg Parkway Canby, Oregon 97013 USA Phone: 503-266-2231 Fax: 503-266-4334... - Page 4 ADA GUIDELINE SUMMARY* (USA Only) 1009.2.1 Pool Lift Location Pool lift shall be located where the water level does not exceed 48” (1219mm). If entire pool water level exceeds 48” (1219mm), place pool lift where convenient. 1009.2.2 Seat Location In the raised position, the centerline of the seat shall be located over the deck a minimum of 16” (406mm) from the edge of the pool.
-
Page 5: Product Overview
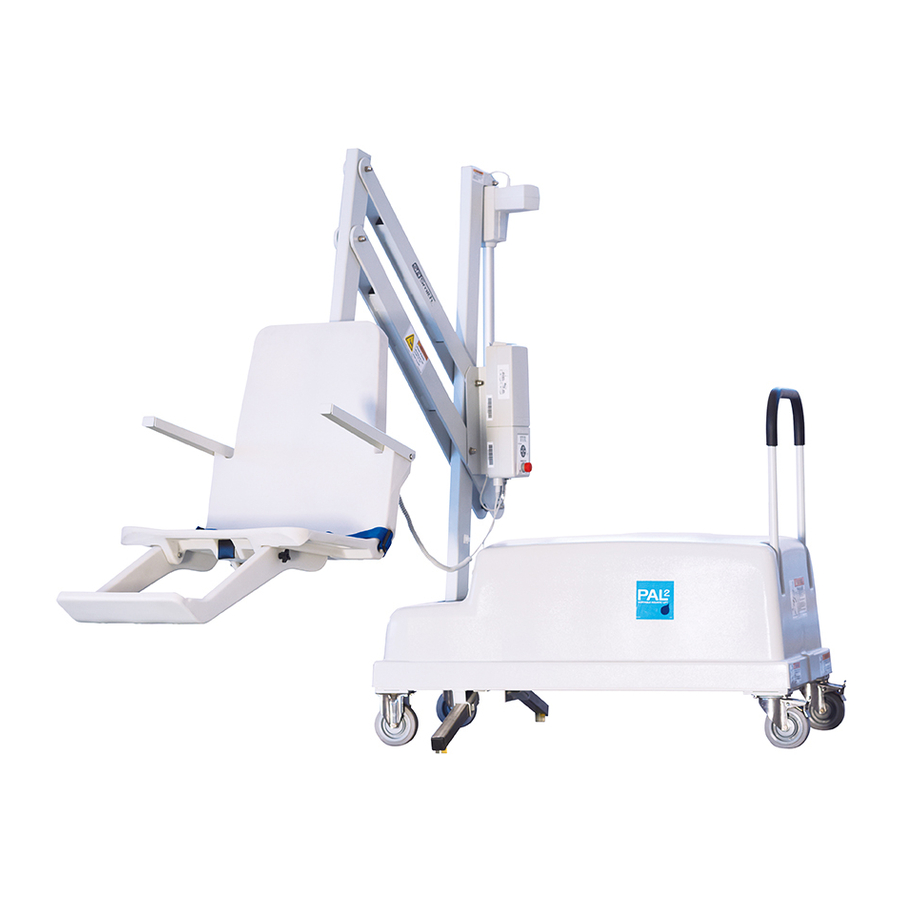
PRODUCT OVERVIEW S.R. Smith’s PAL2 pool lift is designed for safety, as well as consistent, reliable operation. It is essential to follow all instructions in this owner’s manual, as well as all warning labels located on the product to ensure safe operation, proper performance and to avoid injury. The PAL2 Aquatic Lift is a portable lift system designed so that individuals with disabilities and mobility impairments can have universal access to any type of swimming pool. - Page 6 Main Frame - The rectangular piece that is fixed to the wheels - the main frame is made up of several components: Stabilizing Arms - Two arms pull out to level the lift and must always be fully extended when the lift is in use.
- Page 7 The Emergency Alert (audible and LED) can be activated by pressing any two buttons on the hand control at the same time (provided with the lift). This will stop all lift movement and activate the audible alert and the Red LED will flash. Once both buttons are released, the lift will return to normal operation and the emergency audible alert will silence.
- Page 8 Battery Pack - The battery pack is located on top of the Control Box and is removable. To remove - pull the battery pack away from the mounting plate so that the latch on the battery pack clears the side tabs on the mounting plate - then lift the battery pack up and away from the Control Box.
- Page 9 The battery charger has an LED indicator to show charging status. The following describes LED indicator operation. Amber Light Flashing – The amber light flashing indicates that the battery charger has AC power and the microprocessor is functioning properly. If the amber light continues to flash, either the battery voltage is too low (battery pack needs to be replaced), or the battery charger is not properly connected to the battery.
-
Page 10: Unpacking & Assembly Instructions
Locking Plate Assembly - The battery pack can be secured to the mounting plate using the provided lock plate assembly. To install open the lock plate so that the bottom tabs are moved close to one another to allow the lock plate to be inserted into the slots on the mounting plate secured to the lift. Close the lock plate assembly so that the tabs are captured by the slots. - Page 11 The PAL2 is shipped on a covered pallet and is VERY HEAVY. You will need the following tools for unpacking and assembly: • 3/4” or 19mm socket wrench • 9/16” or 14mm socket and 9/16” or 14mm wrench • small flat blade screwdriver •...
- Page 12 IMAGE 3 IMAGE 4 Image 3 shows the first layer of concrete weights installed. Image 4 shows how to properly stack the last two layers of concrete weights, using all 24 blocks. Close all gaps between the top layers, ensure they are all touching and pressed firmly together before tightening the weight straps.
- Page 13 10. Remove plastic from the mast assembly. Remove 3/8”(10mm) bolt and nut from the end of the actuator arm. Following the illustration below, attach actuator end to end of actuator arm using the 3/8”(10mm) bolt and nut. Fully tighten bolt and nut using 9/16”(14mm) socket and wrench 11.
- Page 14 13. Remove the battery from the accessory carton and carefully attach to controller. 14. Insert actuator cable (green label) into connector #2 on the Control Box. Make sure the plug is secure and fully seated. 24V MOTOR HAND CONTROL ACTUATOR 15.
- Page 15 A: Clip the wire into the lower mast clip B: Lightly tension the wire and clip it into the higher mast clip. C: Make sure there are no tangles. Then plug the 24V Motor into place. 20. Check up and down controls for proper operation - both touch pad and hand controls. 21.
-
Page 16: Using The Pal2
23. Remove battery and charge it fully before use. 24. Fully extend both stabilizer bars and fully lock both rear wheels to prevent movement. 25. Attach seat assembly with bolt and thumbnut in appropriate hole. For storage, seat can be attached facing inward for less space. - Page 17 2. Position the PAL2 on level ground not to exceed a slope of 2º and in an area that allows for safe transfer to and from a wheelchair. Consult the ADA guidelines on page 4 for more detailed information. 3. Fully extend both stabilizing arms. 4.
-
Page 18: Transferring
TRANSFERRING Once the unit is positioned for use with both stabilizing arms fully extended and both rear wheels locked - use the following procedure to transfer to the seat and into the water. Only persons healthy enough for water activities should use the PAL2. Users should consult with their physician to determine if water activities are appropriate for the User: •... -
Page 19: Maintenance And Cleansing
Optional accessories may be purchased for your PAL2 – through your Authorized Reseller. The following accessories are available: Deck Cover PAL2 - # 920-5000: Made of weather resistant nylon material to keep unit protected from elements when not in use. Spine Board Attachment - # 500-1000: Can be used to convert lift for use with any standard spine board. -
Page 20: Trouble Shooting
TROUBLE SHOOTING Visit srsmith.com/en-us/customer-service/lift-troubleshooting to view our library of pool lift maintenance and troubleshooting videos. Be sure the battery is fully charged before troubleshooting. Lift does not rotate Does lift raise or lower? Yes. 1. Check connection to Control Box. Be sure plug is pushed in all the way. 2. -
Page 21: Long-Term Storage
LONG-TERM STORAGE When storing the lift for an extended period of time: • Wash seat with disinfection solution and then rinse with fresh water and dry entire lift • Spray gear assembly with a heavy duty rust inhibitor and lubricant such as LPS 3 •... -
Page 22: Specifications
SPECIFICATIONS 1. Dimensions/Capacity Overall Height 66”/167.6cm Base Dimensions Height 23”/58 cm, length. 47”/119cm, width 28”/71cm Overall Length with Footrest 119”/302cm (longest possible length) Overall Length without Footrest 102”/259cm (longest possible length) Overall Length in Stored position 72”/183cm (raised position, seat facing in) Total Weight 1060 lb/481 kg Power... - Page 23 PART LIST Item # Part Number Description 400-7000-BC 4 Button Control 1001495-BC Battery Pack 1001530-BC Battery Charger (Not Shown) 120-1100 24v Motor 800-5065 Small Gear 130-1000 Hub Assembly 120-1000 Motor Mount Assembly 152-1100A Gray, Mast Assembly 100-5000A LA34 Actuator 152-1200A Gray, Actuator Arm 152-1300A Gray, Support Arm...
Need help?
Do you have a question about the PAL2 Series and is the answer not in the manual?
Questions and answers