Table of Contents
Advertisement
Available languages
Available languages
Quick Links
AVERTISSEMENT: Lire et assimiler ce manuel avant d'utiliser ce produit.
Une utilisation incorrecte de ce produit pourrait causer des dommages aux biens et aux personnes.
Conserver ce manuel pour pouvoir le consulter ultérieurement.
WARNING: Carefully read this instruction manual before operating this appliance. Incorrect operation
may cause injury and/or damages.
Please keep this manual for future reference.
AVVERTENZA:
Leggere attentamente questo manuale di istruzioni prima di utilizzare l'attrezzo.
Il funzionamento non corretto può causare lesioni e/o danni.
Conservare il presente manuale per futuri consulti.
Imp. par / by : Ribimex
.
. – 56 Route de Paris –RN4– FR-77340 Pontault-Combault
S
A
Imp da: Ribimex Italia s.r.l. – Via Igna, 18 – IT-36010 Carrè (Vi)
[v_2016-04-13]
FR
POMPE À MAIN À PILES
Manuel d'instructions et d'utilisation
EN
B
ATTERY
User and maintenance manual
IT
POMPA A MANO A PILE
MANUALE DI ISTRUZIONI E DI MANUTENZIONE
Réf : PRKG110P / 580072
O
P
PERATED
UMP
1
Advertisement
Table of Contents

Related Manuals for Ribimex Ribitech PRKG110P


Summary of Contents for Ribimex Ribitech PRKG110P
- Page 1 Il funzionamento non corretto può causare lesioni e/o danni. Conservare il presente manuale per futuri consulti. Imp. par / by : Ribimex . – 56 Route de Paris –RN4– FR-77340 Pontault-Combault Imp da: Ribimex Italia s.r.l. – Via Igna, 18 – IT-36010 Carrè (Vi) [v_2016-04-13]...
-
Page 2: Consignes De Sécurité
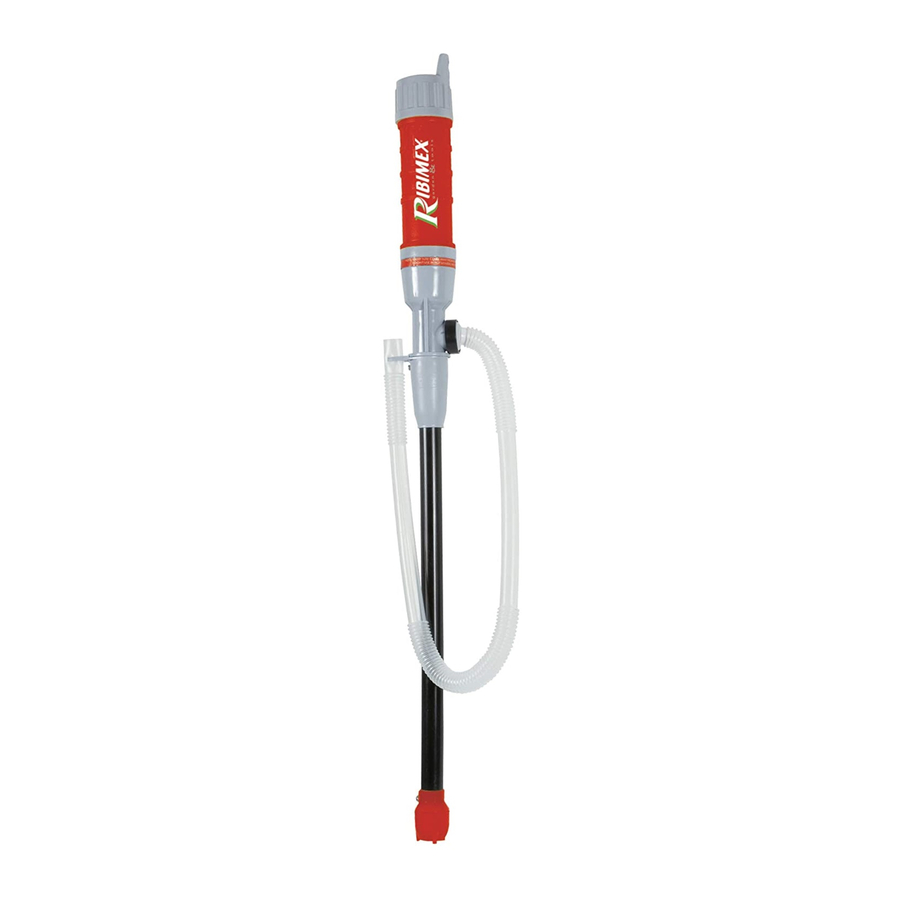
I. Nomenclature II. Caractéristiques techniques III. Consignes de sécurité IV. Utilisation V. Entretien et Entreposage I. NOMENCLATURE PRODUIT Fig. A 1- Interrupteur 2- Porte compartiment à piles 3- Compartiment à piles 4- Sortie d’évacuation Fig. A II. CARACTERISTIQUES Référence PRKG110P / 580072 Alimentation (2 x 1,5V type D / LR20) Température... -
Page 3: Mise En Route
IV. MISE EN ROUTE 4.1- Déballage - Retirez le produit de son emballage. - Vérifiez que le produit ne présente de dégâts. 4.2- Mise en place et remplacement des piles : (voir Fig. B) Note : piles non fournies 1- Dévisser le couvercle du compartiment à pile. 2- Insérer 2 piles type LR20 (D) en respectant la polarité. -
Page 4: Entretien Et Entreposage
5.3- Utilisation : (voir Fig. C) 1- Insérer le plongeur (1) dans le récipient contenant le liquide à transvaser. Note : Insérer le plongeur jusqu’au niveau indiqué sur celui-ci. 2- Insérer le tuyau de décharge (2) dans un récipient ou réservoir (3). 3- Appuyer sur l’interrupteur Marche/Arrêt pour commencer ou arrêter le transfert du liquide. -
Page 5: Safety Instructions
I. Parts List II. Characteristics III. Safety Instructions IV. Operation V. Maintenance and Storage I- PARTS LIST Fig. A 1- Switch 2- Battery compartment door 3- Battery Compartment 4- Outlet Fig. A II. CHARACTERISTICS Reference PRKG110P / 580072 Power source (2 x 1,5V type D / LR20) Liquid Temperature <... -
Page 6: Getting Started
IV. GETTING STARTED 4.1- Unpacking Remove product from its packaging. Check that it is not damaged. 4.2- Battery insertion and replacement (see fig.B) Note: the batteries are not included. 1- Unscrew the battery compartment door. 2- Insert 2 batteries LR20 (D) type, respecting the polarity 3- Close battery compartment door. -
Page 7: Maintenance And Storage
5.3- Operation: (see Fig. C) 1- Insert the suction inlet (1) into the container containing the liquid to be transferred. Note: Insert suction inlet up to the max level mark. 2- Insert the discharge hose (2) in the tank (3) you wish to fill. 3- Press the ON/OFF Switch to start and stop the transfer. -
Page 8: Elenco Componenti
I. Elenco componenti II. Caratteristiche III. Istruzioni di sicurezza IV. Funzionamento V. Pulizia e conservazione I. ELENCO COMPONENTI Fig. A 1- Interrutore 2- Porta d’accesso a compartimento a pile 3- Compartimento a pile 4- Evacuazione Fig. A II. CARATTERISTICHE Riferimenti PRKG110P / 580072 Alimentazione (2 x 1,5V type D / LR20) -
Page 9: Per Iniziare
- se il prodotto è danneggiato, male regolato o non completamente o saldamente montato. - se il interrutore non permette di fare funzionare o di fermare il prodotto (fatte sostituire il interrutore difettoso da un centro di riparazione autorizzata o una persona di qualificazione per evitare ogni pericolo) IV. -
Page 10: Pulizia E Conservazione
Funzionamento: (vedere fig. C) 5.3- 1. inserire il tuffatore (1) nel recipiente che contiene il liquido per transferir. Nota: Inserire il tuffatore fino al livello indicato su quest'ultimo. 2. Inserire il condotto di scarico (2) in un recipiente o serbatoio (3). 3.
Need help?
Do you have a question about the Ribitech PRKG110P and is the answer not in the manual?
Questions and answers