Table of Contents
Advertisement
Quick Links
Advertisement
Table of Contents

Subscribe to Our Youtube Channel
Related Manuals for Gewiss JOINON Column


Summary of Contents for Gewiss JOINON Column
- Page 1 JOINON Manuale d'installazione e uso Installation and Operation Manual Manuel d'installation et usage Manual de instalación y uso Installations- und Bedienungsanleitung Manual de instalare și utilizare Telepítési és használati útmutató Installatie- en gebruikshandleiding...
-
Page 2: Table Of Contents
Content Gewiss Content Content ......................................41 1. Information about this manual ............................... 42 1.1. Field of application ................................42 1.2. Target readers ..................................42 1.3. Symbols ....................................42 2. Device description ..................................43 2.1. Models ....................................43 2.2. Device description ................................43 2.3. -
Page 3: Information About This Manual
1.1. Field of application This manual applies for the following charging stations: JOINON Column - Stand-Alone version with Autostart JOINON Column - Stand-Alone version with RFID reader JOINON Column - connected with 3G router JOINON WallBox - Stand-Alone version with Autostart... -
Page 4: Device Description
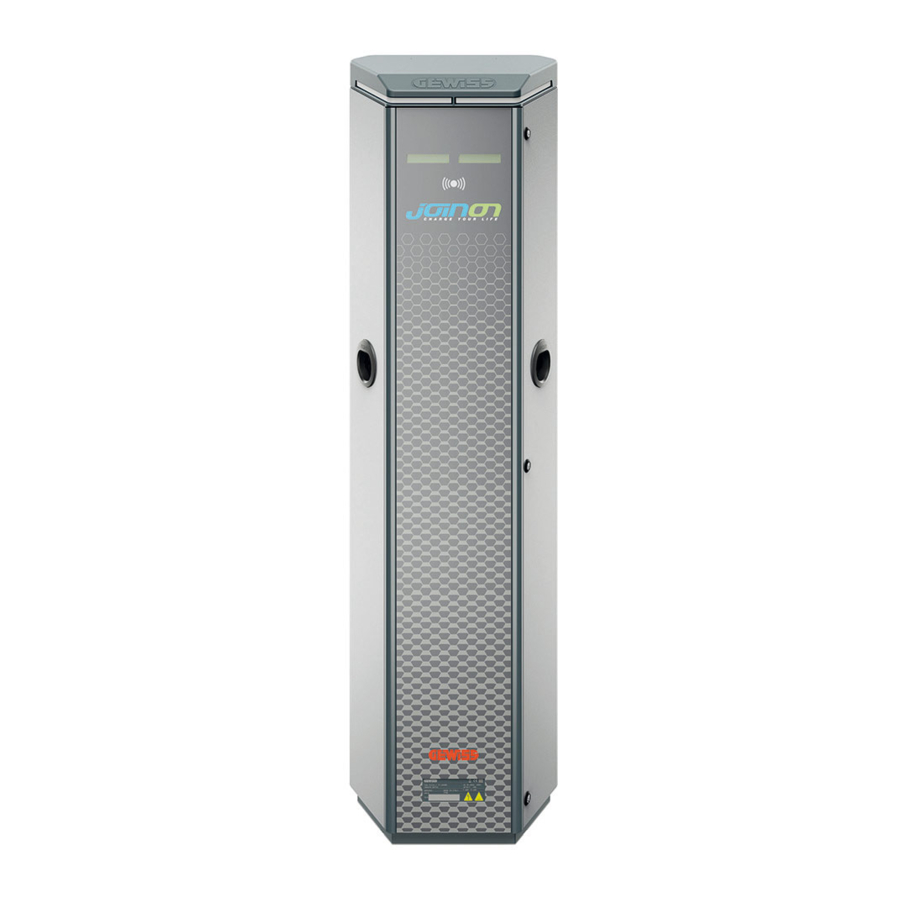
2. Device description 2.1. Models JOINON Column - Stand-Alone version with Autostart JOINON Column - Stand-Alone version with RFID reader JOINON Column - connected with 3G router JOINON WallBox - Stand-Alone version with Autostart JOINON WallBox - Stand-Alone version with RFID reader JOINON WallBox - connected with 3G router 2.2. -
Page 5: Fulfilment Of Regulations
Gewiss Device description 2.3. Fulfilment of regulations EC marking The EC marking is essential for selling the products in question within the European Union and the European Economic Area. The charging stations have CE marking as they comply with the following directives: Low Voltage Directive 2014/35/EU. - Page 6 Device description Gewiss Depending on the model, the column version of JOINON charging stations may have two socket-outlets that can be used simultaneously. The product may also be fitted with Schuko socket-outlets (available upon request), located above the Type 2 socket-outlets.
-
Page 7: Safety
Gewiss declines all liability for any damage caused by inappropriate use of the charging stations. Any operation carried out on these charging stations that involves a change in the original electrical settings must be authorised by Gewiss in advance. All such proposals must be examined and approved by Gewiss. -
Page 8: Personal Protective Equipment (Ppe)
Safety Gewiss HAZARD: crushing and injury of limbs. Always follow the instructions supplied in the manual for device handling and positioning. The weight of the device can cause injuries if not handled correctly. Potential hazards for the device In order to protect the device, observe the following warnings. -
Page 9: Device Delivery And Storage
Gewiss Device delivery and storage 4. Device delivery and storage 4.1. Delivery Keep the device packaged until installation. 4.2. Device identification The serial number of the device identifies it in an unequivocal manner. The device serial number is also shown on the technical data plate on the lower part of the front panel. -
Page 10: Device Handling
Device handling Gewiss 5. Device handling During transportation, the device must be protected against mechanical shock, vibrations, water spray (rain), and any other product or situation that could damage it or alter its behaviour. Transport the products horizontally. Do not transport the products by levering on the charging sockets. -
Page 11: Preparation For Device Installation
Gewiss Preparation for device installation 6. Preparation for device installation To decide the location of the device and prepare for its installation, a series of instructions connected to the properties of the device must be followed. 6.1. Environment • Position the charging station in a location that can be accessed for installation and maintenance, which permits its use and the reading of the LED indicators. - Page 12 Preparation for device installation Gewiss The installation surface must be suitably prepared according to the type of ground, to guarantee that the device is stable during use. You are therefore advised to use the base supplied (column version), fixing it to the ground by means of tie-rods (not supplied) or plugs, or embedded in cement.
-
Page 13: Device Installation And Connection
Gewiss Device installation and connection 7. Device installation and connection Before proceeding with device installation, remove the packaging, paying particular attention to not damage the casing. Make sure there is no condensation inside the packaging. Otherwise, install the device only when it is completely dry. -
Page 14: Device Installation (Column Version)
Device installation and connection Gewiss 7.2. Device installation (column version) 7.2.1. Mechanical installation Prepare the assembly area with four tie-rods embedded in the cement (if you are using the fixing plate - accessory GWJ8021 - embed it in the ground). The figure below shows the position of the anchorage point on the device. There are two options... -
Page 15: Connection Of The Device Power Supply
Gewiss Device installation and connection 7.2.2. Connection of the device power supply Wiring requirements The connection must satisfy certain requisites: Connection specifications Type of connection Single-phase Three-phase Number of wires 2P+E 3P+N+E Rated current up to 64A up to 64A... - Page 16 Device installation and connection Gewiss R, S, T: R, S, T phases N: Neutral PE: Earth Three-phase charging station If, for technical reasons, a three-phase charging station is powered via a single-phase line, the terminals to be used are R, N and PE.
-
Page 17: Device Installation (Wallbox Version)
Gewiss Device installation and connection 7.3. Device installation (WallBox version) 7.3.1. Mechanical installation If the product is to be installed on the wall (using the accessory supplied), the procedure is as follows: Prepare the assembly area by fixing the support bracket to the wall, drilling holes with the centre distances shown below:... - Page 18 Device installation and connection Gewiss Assemble the brackets (supplied) on the back plate of the WallBox; 2,5 Nm Assemble the WallBox on the bracket that you have already fixed to the wall. After positioning the product, drill the wall using the lower bracket as your centre point, then tighten the locking screw.
- Page 19 Gewiss Device installation and connection If the product is to be installed on a pole (using the accessory GW46551), the procedure is as follows: Assemble the support brackets on the back plate of the WallBox, as shown below: Position the WallBox on the pole and fix it in place by tightening the locking nuts of the two plates as shown in the figure;...
- Page 20 Device installation and connection Gewiss Check that the device is correctly fixed in place; Remove the protective film from the front panel; To make the electrical connection, insert the power supply cables in the device. The charging station is wired by connecting the single-phase or three-phase cables inserted in the cable glands.
-
Page 21: Connection Of The Device Power Supply
Gewiss Device installation and connection 7.3.2. Connection of the device power supply Wiring requirements In the case of the WallBox charging station, the protection and disconnection of the power supply is upstream. As there is no device inside the product to check current continuity, type B residual current protection devices must be fitted upstream. -
Page 22: Operation
Operation Gewiss 8. Operation 8.1. Autostart AUTOSTART mode ensures that the charging station is always ready to provide the recharging service, without needing to identify the client who wants to activate it. Just insert the plug to begin the recharging operation. -
Page 23: Status Indicators
Gewiss Status indicators 9. Status indicators Depending on the operating modes available on the model purchased, the recharging station will have at least one tool for informing the client about the status and the actions to be carried out. 9.1. RGB LED The recharging station has 2 RGB LEDs, one for each side and socket-outlet. -
Page 24: Lighting Inside The Type 2 Socket-Outlet
Status indicators Gewiss LOCAL RFID CARD CONTROL Words on the display Description When you are swiping the RFID card that you want to add, the system will display RECOGNITION this message. If the read result is OK, the card will be added to or removed from *PLEASE WAIT* the local White List. -
Page 25: Charging Process
Gewiss Charging process 10. Charging process The steps needed to carry out a recharging session are listed below, on the basis of the various operating modes. 10.1. Autostart In this mode, the station is always accessible and ready to begin a recharging session as soon as the car connection plug is inserted. To... - Page 26 Charging process Gewiss Action needed RGB LED status Words on the display *SAVING* Swipe the MASTER key across the RFID reader to access the Fixed green storage menu SWIPE THE CARDS *DELETION* Swipe the MASTER key across the RFID reader until you reach the...
-
Page 27: Via Mobile App And Cloud Platform
Gewiss Charging process 10.3. Via mobile app and cloud platform In this mode, the station is connected to a control centre. Recharge enabling is only possible for users registered with the JOINON service (via the JOINON app or the website). To activate and interrupt the recharging process, follow the instructions given on the app. -
Page 28: Faults And Troubleshooting
Faults and troubleshooting Gewiss 11. Faults and troubleshooting The station codifies any errors encountered by the electronic card. The following table explains the codes and how to solve the errors. The operations described in this manual may only be performed by duly qualified personnel. - Page 29 Gewiss Faults and troubleshooting Code Error description Solution Position The residual current circuit breaker of the relative sock- Restore the correct operation et-outlet/side is OFF. of the residual current circuit Error 3 breaker. If the error persists, NB: error not managed on the replace the device.
- Page 30 Faults and troubleshooting Gewiss Code Error description Solution Position Manually check the mobility Error in the control of the socket- of the pin by moving the red Error 6 outlet locking motor (it does not lever on the back of the type 2 shift from OPEN to CLOSED) socket-outlet locking motor.
- Page 31 In the case of products connected to the JOINON platform and the “maintenance package in case of necessity” has been purchased, is necessary contact the toll-free number 800 123 325. In all other case when the technical support is needed, contact the GEWISS SAT technical assistance service. 7.55.4.502.0 - Installation and Operation Manual...
-
Page 32: Updating The Firmware
Insert the SD card in the specific slot of your PC to open the folder Paste the update file in the main folder of the SD card NB: contact GEWISS SAT Customer Service for the most recent file Put the SD card back in the slot on the electronic card... -
Page 33: Modifying The Operating Parameters Of The Recharging Station
Gewiss Modifying the operating parameters of the recharging station 13. Modifying the operating parameters of the recharging station Even after installing the product, you can still modify certain station operating parameters by means of a text file to be saved in the micro SD card inserted in the recharging station itself. -
Page 34: Device Disconnection
Device disconnection Gewiss 14. Device disconnection This section explains how to disconnect the device. If you want to work inside the device (qualified personnel only), it is compulsory to follow the voltage disconnection steps in the order given here. 14.1. Device disconnection process To switch the station off completely (column versions), open the front using the key supplied, then intervene on the switch disconnector. -
Page 35: Preventive Maintenance
Gewiss Preventive maintenance 15. Preventive maintenance 15.1. Differential current devices The residual current circuit breaker must be tested using the relative test button key at least once every 6 months. Keep a record of the correct test result, as per the rules in force. -
Page 36: Device Dimensions
Device dimensions Gewiss 16. Device dimensions 231 mm 430 mm COLUMN: max 50kg 7.55.4.502.0 - Installation and Operation Manual... - Page 37 Gewiss Device dimensions 33,5 mm 231 mm 430 mm WALLBOX: max 23kg 7.55.4.502.0 - Installation and Operation Manual...
Need help?
Do you have a question about the JOINON Column and is the answer not in the manual?
Questions and answers