Table of Contents
Advertisement
Quick Links
Advertisement
Table of Contents

Related Manuals for Trotec TES 200


Summary of Contents for Trotec TES 200
- Page 1 TES 200 ORIGINAL INSTRUCTIONS VERTICAL HEATER...
-
Page 2: Table Of Contents
Children aged from 3 years and less than 8 years shall not plug in, regulate and clean the appliance or perform user maintenance. vertical heater TES 200... - Page 3 Risk of electric are damaged! shock! • The electrical connection must correspond to the specifications in chapter Technical data. • Insert the mains plug into a properly secured mains socket. vertical heater TES 200...
- Page 4 Maintenance tasks which require the housing to be opened device! must only be carried out by specialist electrical companies or by Trotec. The following label is attached to the device in English. Safety warnings: Warning! Fire hazard. Do not use in living spaces! vertical heater TES 200...
- Page 5 Persons sensitive to heat must only stay has been resolved. in the room after the room has cooled down. Remove objects and substances not suitable for these temperatures from the room. Observe the combustibility of the objects and substances in the room. vertical heater TES 200...
-
Page 6: Information About The Device
Pest control HEPA air purification Central room heating with optional air purification Central room heating Decentralised room heating via existing ventilation systems or textile air distributors As standard, the TES 200 DD is equipped with the DualDecon blowing-out tower. vertical heater TES 200... -
Page 7: Transport And Storage
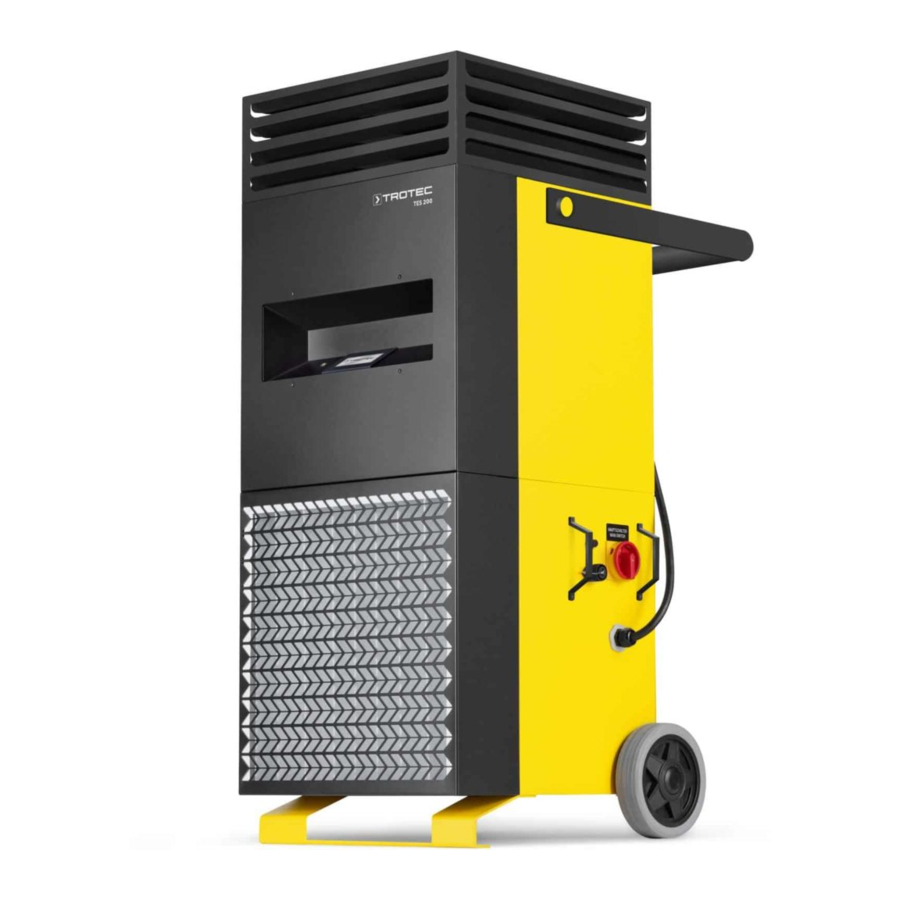
Foot • Have the device checked once a year by an electrically Air inlet with air filter skilled person at any rate. Display and button HEPA air filter Transport handle Cable holder vertical heater TES 200... -
Page 8: Assembly And Installation
This prevents up to three sides of the tower from discharging air, e.g. if discharged air is not desired or required on the respective side(s). Connecting the power cable • Insert the mains plug into a properly secured mains socket. vertical heater TES 200... -
Page 9: Operation
After the device has cooled down, 2. Switch the device off by turning the main switch to the display can be switched back on by touching it position OFF. again. vertical heater TES 200... -
Page 10: Available Accessories
• The overheating protection may have been tripped. Have a specialist electrical company or Trotec check the electrics and replace the overheating protection. The device is loud or vibrates: • Check whether the device is set up in a stable and upright position. -
Page 11: Maintenance
Error messages Maintenance The following error messages can be indicated on the Trotec electric heaters are designed for long hours of operation display (15): with minimum maintenance effort. Safe operation of the device Message Cause Troubleshooting requires all built-in components, especially the safety temperature limiter (STB), to be checked and cleaned... - Page 12 10. Date: ........11. Date: ........12. Date: ........Signature: ........Signature: ........Signature: ........Signature: ........13. Date: ........14. Date: ........15. Date: ........16. Date: ........Signature: ........Signature: ........Signature: ........Signature: ........vertical heater TES 200...
- Page 13 3. Check the inside of the device for dirt. 4. If you see a thick layer of dust, have the inside of the device cleaned by a specialist company or by Trotec. 5. Put the air filter back in. 2. Remove the filter from the holder.
-
Page 14: Technical Annex
3 x 380 to 480 V, 50 / 60 Hz Type of protection IP44 Dimensions (length x 690 x 610 x 1300 mm width x height) Minimum distance to all 30 cm sides during operation Weight 84 kg Version equipped with DualDecon blowing- out tower Flap structure 360° omnidirectional vertical heater TES 200... - Page 15 Circuit diagram vertical heater TES 200...
- Page 16 TES 200...
- Page 17 TES 200...
- Page 18 TES 200...
- Page 19 TES 200...
- Page 20 Hexagon nut (DIN 934 – M 5) Detent-edged washer (SKK5, Ø5.3xØ10x1.25) Controls Hexagon screw (with shaft, DIN 931 – M 10 x 230) Top housing Cylinder head screw (DIN 912 – M 4 x 6) Air flap cover Protective cap Filter case Air filter Filter case Bottom housing vertical heater TES 200...
- Page 21 Slotted pan head screw (with shoulder, DIN 923 M6 x Housing 5 VZ) Allen screw (DIN 933 – M 5 x 16 VA) Front panel Washer (DIN 125 – A Ø5.3) Electrical system Hexagon nut (DIN 934 – M 5) Finger protection M5 bottom star knob Heating M5 yellow star knob cap Handle (stainless steel) Finger protection vertical heater TES 200...
- Page 22 Gasket strip Protective bar Finned plug Cover for maintenance work Sealing tape (w/h=19/2 mm, l=1500 mm) Cylinder head screw (DIN 912 – M 5 x 40) Sealing tape (w/h=19/2 mm, l=423 mm) Hexagon screw (DIN 933 – M 10 x 25) Allen screw (M6 x 8) Wheel Sealing tape (w/h=19/2 mm, l=1400 mm) vertical heater TES 200...
- Page 23 Countersunk serrated lock washer (DIN 6798 – A Ø5.3) Protective cap Cable gland (M40x1.5 UL black) Countersunk screw (Allen, DIN 7991 M4 x 21) Nut (M40x1.5 UL black) Hexagon nut (self-locking, DIN 985 – M4) Operating hours counter Cylinder head screw (DIN 912 – M 3 x 8) vertical heater TES 200...
- Page 24 Lock nut (M16 x1.5, metal) Pipe Switch Operating panel Sealing plug (Ø25.5xØ19xØ12.5x1.5xL8 mm) Spacer sleeve (M4x45-SW7-IG) Sealing plug (Ø30xØ25.5xØ20.5x1.5xL8 mm) Spacer sleeve (M4-25-SW7-IG-AG) Feed-through (Ø17.5xØ12xØ10x2xL6.8) Cylinder head screw (DIN 912 – M 5 x 6) Feed-through (Ø14xØ9.5xØ8x1.5xL8 mm) Cylinder head screw (DIN 912 – M 4 x 10) vertical heater TES 200...
- Page 25 Filter box Note: The position numbers of the spare parts differ from those describing the positions of the components mentioned in these instructions. Spare part Filter box Seal vertical heater TES 200...
-
Page 26: Disposal
The Section A addresses can be obtained from your municipality or local Herewith, we – Trotec GmbH– declare that the machinery administration. For further return options provided by us please designated below was developed, constructed and produced in refer to our website https://de.trotec.com/shop/. - Page 27 Trotec GmbH Grebbener Str. 7 D-52525 Heinsberg +49 2452 962-400 +49 2452 962-200 info@trotec.com www.trotec.com...
Need help?
Do you have a question about the TES 200 and is the answer not in the manual?
Questions and answers