Table of Contents
Advertisement
Quick Links
Advertisement
Table of Contents

Related Manuals for ALGE-Timing Timy3


Summary of Contents for ALGE-Timing Timy3
- Page 1 Version: E210608 Manual Track + Field...
- Page 2 Important Information General Before using your ALGE-TIMING device read the complete manual carefully. It is part of the device and contains important information about installation, safety and its intended use. This manual cannot cover all conceivable applications. For further information or in case of problems that are mentioned not at all or not sufficiently detailed, please contact your ALGE-TIMING representative.
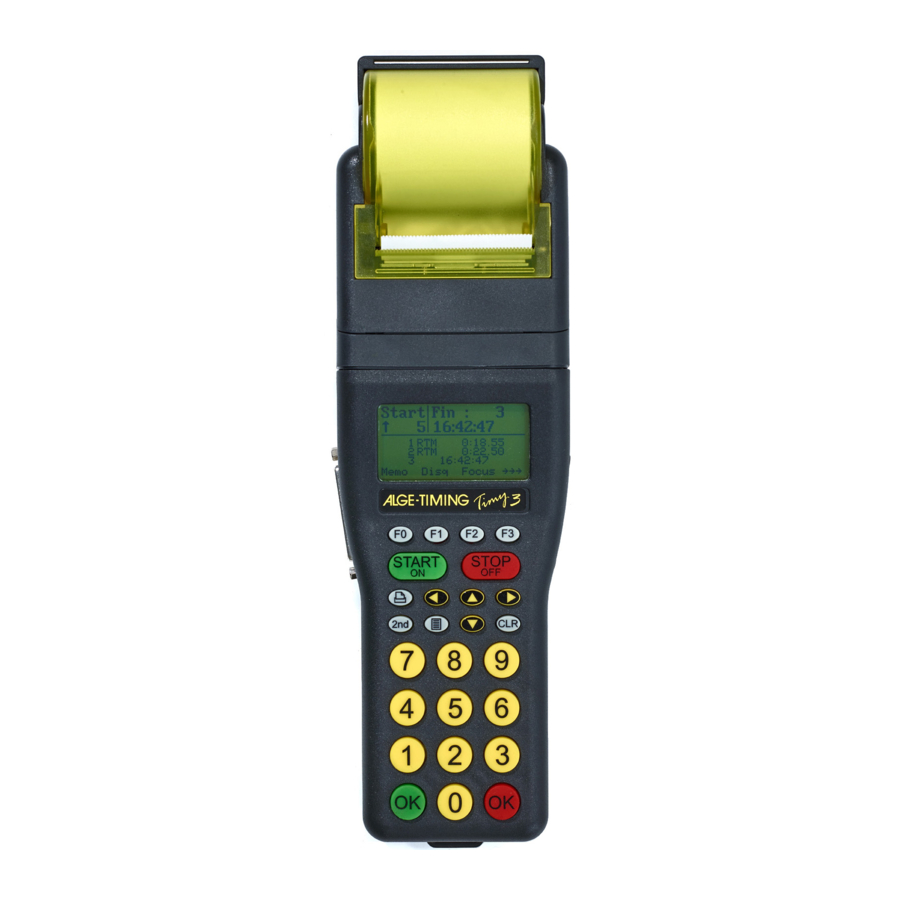
- Page 3 Manual Timy3 - General Control elements A ..paper roll B ..thermal printer C ..printer hood D ..printer hood opener E ..LCD graphic display F ..silicon keyboard G ..carrying band eyelet 1 ... USB interface 2 ...
-
Page 4: Table Of Contents
Manual Timy3 - General Table of contents Device Description ...................... 5 Timy3 Models ...................... 5 Timy3 Software ....................6 Driver Installation ....................6 Keypad ........................ 7 Start Up ........................8 Switch On ......................8 Switch Off ......................8 Track + Field Program ....................9 Windspeed ...................... -
Page 5: Device Description
USB interface. The memory of the Timy3 can store up to 30,000 times which can be shown on the display or transmitted to a computer by RS232 or USB interface at any time. -
Page 6: Timy3 Software
Manual Timy3 - General 1.2 Timy3 Software Available programs for the Timy3: Stopwatch: universal timing program which is suitable for several heats (run/total time) Backup: to measure time of day times (e. g. as backup-system or as time reference for the computer) -
Page 7: Keypad
1.4 Keypad The Timy3 has a weather-proof (water-proof) silicone keypad. The keypad is ideal for outdoor use. The keys are raised and have ideal pressure points. Although the Timy3 is small in dimen- sions, the keys are easy to operate. -
Page 8: Start Up
Choose the program: with the keys you can select the program “Track + • Field“. Confirm it with the key 2.2 Switch Off You have got two possibilities to switch off the Timy3: Method 1: Press „STOP/OFF“ key for 3 seconds. • •... -
Page 9: Track + Field Program
Manual Timy3 - General Track + Field Program The Track + Field program has 3 sub-programs: • WINDSPEED Only used to measure wind in running and infield competitions. • TRACK TIMER Only a short description here, see the separate instructions for Timy TRACKTIMER •... - Page 10 Manual Timy3 - General Display Board: We recommend to use a 3-digit D-LINE display board to show the wind. In case of a anemom- eter with radio connection (WTN) the anemometer and WTN-WS is supplied direct from the display board.
-
Page 11: Tracktimer
Manual Timy3 - General 3.2 Tracktimer Simple program for hand timing in training or competitions. You can enter the start number (run number) (1). The run- ning time is displayed in field (2), while the intermediate times are displayed in field 3. You can enter the running dis- tance by pressing the <F0>... -
Page 12: Field-Event
Manual Timy3 - General 3.3 Field-Event After selecting the FIELD-EVENT program, the functions listed below are available for selection. 1. Windspeed 2. ID-Number, Attempt, Width 3. Adjusted Countdown Time 4. Countdown Time in selected (in use) 5. Status of Windspeed Depending on the display boards used, all data can be shown on the display. - Page 13 17 Freeze Decimal Point or Colon With older ALGE-TIMING timing devices it can happen that the decimal point or the colon are not part of the protocol. In such a case it can be programmed permanently on the D-LINE.
-
Page 14: Technical Data
5 channels per extension, max. 99 channels Power supply: Internal: NM-TIMY2 battery pack or 6 x AA-Alkaline 2 Ah (only for Timy3 W) External: with charger PS12A, 12 V battery or 8 -24 VDC Operating time (20 °C): Alkaline: without printer about 50 hours... -
Page 15: Pin Assignment
Timy3 - General 4.1 Pin Assignment USB Interface (1): The USB interface is used as interface between Timy3 and computer. Via this interface the Timy3 can be controlled completely and all data can be recalled. Charger Connection (2): ALGE-TIMING Multiport (3): Pin assignment: 1 .. - Page 16 Manual Timy3 - General Photocell socket (7) Pin assignment: 1 .... c0 ..start channel 2 .... c1 ..stop channel 3 .... GND..common ground 4 .... +Ua ..power supply out 8-22 VDC (only on external supply) 5 .... +5V ..stabilized voltage out (+5 VDC 100 mA limited) 6 ....
Need help?
Do you have a question about the Timy3 and is the answer not in the manual?
Questions and answers