Table of Contents
Advertisement
Available languages
Available languages
12-CUP PROGRAMMABLE
Coffeemaker
CafeTera
Customer
USA/Canada
1-800-231-9786
Mexico
01-714-2500
Accessories/Parts
(USA / Canada)
Accesorios/Partes
(ee.UU / Canadá)
1-800-738-0245
IMPORTANT / IMPORTANTE
WASH CARAFE BEFORE FIRST USE!
LAVE LA JARRA ANTES
DEL PRIMER USO
* Filters not included
* No incluye los filtros
For online customer service
and to register your product, go to
www.prodprotect.com/applica
PROGRAMABLE DE 12 TAZAS
Care
Line:
*
*
ModelS/ModeloS
❍ DLX1050B
❍ DLX1050W
Advertisement
Table of Contents

Related Manuals for Black & Decker DLX1050


Summary of Contents for Black & Decker DLX1050
- Page 1 12-CUP PROGRAMMABLE Coffeemaker CafeTera Care Customer USA/Canada 1-800-231-9786 Mexico 01-714-2500 Accessories/Parts (USA / Canada) Accesorios/Partes (ee.UU / Canadá) 1-800-738-0245 IMPORTANT / IMPORTANTE WASH CARAFE BEFORE FIRST USE! LAVE LA JARRA ANTES DEL PRIMER USO * Filters not included * No incluye los filtros For online customer service and to register your product, go to www.prodprotect.com/applica PROGRAMABLE DE 12 TAZAS...
-
Page 2: Important Safeguards
Please Read and Save this Use and Care Book IMPORTANT SAFEGUARDS When using electrical appliances, basic safety precautions should always be followed to reduce the risk of fire, electric shock and/or injury to persons, including the following: ❑ Read all instructions. ❑ do not touch hot surfaces. Use handle or knobs. ❑ To protect against electric shock, do not place cord, plug or appliance in water or other liquids. ❑ Close supervision is necessary when any appliance is used by or near children. ❑ Unplug from outlet when not in use and before cleaning. Allow to cool before putting on or taking off parts and before cleaning the appliance. ❑ do not operate any appliance with a damaged cord or plug or after the appliance malfunctions, or has been damaged in any manner. Return the appliance to the nearest authorized service facility for examination, repair, or adjustment. or, call the appropriate toll-free number on the cover of this manual. ❑ The use of an accessory not evaluated for use with this appliance may cause injuries. ❑ do not use outdoors. ❑ do not let cord hang over the edge of table or counter, or touch hot surfaces. -
Page 3: Control Panel
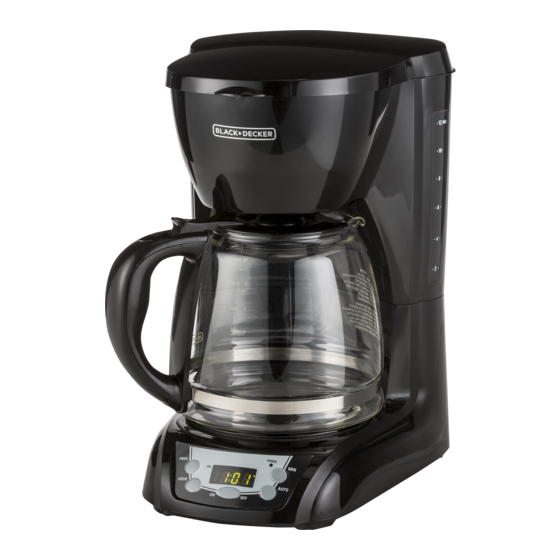
Product may vary slightly from what is illustrated. †1. One-piece cover White (Part # DLX1050W-01) Black (Part # DLX1050B-01) 2. Showerhead †3. Removable filter basket White (Part # DLX1050W-02) Black (Part # DLX1050B-02) 4. Water reservoir with level markings 5. -
Page 4: Delayed Brewing
How to Use This product is for household use only. GETTING STARTED • Remove all packing material, and any stickers from the product. • Remove and save literature. • Please go to www.prodprotect.com/applica to register your warranty. • Wash all removable parts as instructed in CARe And CleAnIng section of this manual. • open one-piece cover and insert empty basket-style paper filter into removable filter basket (C). • Pour fresh cold water into the water reservoir up to the 12 MAX mark (D). • Uncoil power cord and plug into standard electrical outlet. • Brew water through appliance following the BReWIng CoFFee instructions without adding coffee grounds. This removes any dust or residue that may remain in the system during the manufacturing process. • discard the water from the carafe and the paper filter from filter basket. • Turn off the appliance; unplug it and allow appliance to cool down. BREWING COFFEE 1. open the one-piece cover of the coffeemaker. 2. Fill carafe with desired amount of cold tap water using water markings on carafe; pour into water reservoir. do not exceed the 12-cup MAX level (E). -
Page 5: Care And Cleaning
8. At the preset time, the PoWeR indicator light comes on and the coffeemaker begins brewing. 9. To cancel delAYed BReWIng, press the on/oFF button. All lights turn off. The time of day will still be visible on the digital display. COFFEE BREWING TIPS • Stir coffee in carafe before serving to evenly distribute the flavor. • Coffee that is poured during brewing cycle may vary in strength from the finished brew. • not sure how much coffee to use – begin by using 1 level tablespoon of medium grind coffee for each cup of coffee to be brewed. • For variety, add a 2-inch piece of lemon or orange peel to the coffee grounds before brewing. • For a special occasion, whip some heavy cream with 1 or 2 tablespoons of hazel nut, chocolate or almond liqueur. Use to top off each cup of coffee. • Add a 2-inch piece of vanilla bean to the sugar bowl. You’ll be surprised at how good it tastes. • Keep your coffeemaker scrupulously clean; you will be pleased with the flavor. Care and Cleaning This product contains no user serviceable parts. Refer service to qualified service personnel. CLEANING 1. Be sure the unit is unplugged and has cooled. 2. open the one-piece cover. 3. To remove the filter basket, grip the handle and lift straight up. 4. discard the paper filter with the coffee grounds. -
Page 6: Troubleshooting
TROUBLESHOOTING PROBLEM POSSIBLE CAUSE Coffeemaker does Coffeemaker is not not turn on. plugged in. Coffeemaker is • Water reservoir may be leaking. overfilled. • Carafe may not be correctly placed on “Keep Hot” carafe plate. The coffeemaker might Brewing takes too need cleaning. long. Coffee is not brewing. Water reservoir might be empty. There may be no coffee The coffee maker grounds in the removable brews clear water. filter basket. The one-piece cover Removable filter basket does not close. may not be correctly placed. Carafe may be improperly Filter basket placed on the “Keep Hot” overflows. carafe plate. grounds in the The filter and/or the filter brewed coffee. -
Page 7: Need Help
NEED HELP? For service, repair or any questions regarding your appliance, call the appropriate 800 number on cover of this book. Please DO NOT return the product to the place of purchase. Also, please DO NOT mail product back to manufacturer, nor bring it to a service center. You may also want to consult the website listed on the cover of this manual. Two-Year Limited Warranty (Applies only in the United States and Canada) What does it cover? • Any defect in material or workmanship provided; however, Applica’s liability will not exceed the purchase price of product. For how long? • Two years after date of purchase. What will we do to help you? • Provide you with a reasonably similar replacement product that is either new or factory refurbished. -
Page 8: Instrucciones Importantes De Seguridad
Por favor lea este instructivo antes de usar el producto. INSTRUCCIONES IMPORTANTES DE SEGURIDAD Cuando se utilizan aparatos eléctricos, especialmente en la presencia de los niños, siempre se debe tomar ciertas medidas de seguridad, incluyendo las siguientes: ❑ Por favor lea todas las instrucciones. ❑ no toque las superficies calientes Utilice las asas o las perillas. ❑ A fin de protegerse contra el riesgo de un choque eléctrico, no coloque el aparato de manera que el cable, el enchufe o el mismo aparato entre en contacto con agua o cualquier otro líquido. ❑ Todo aparato eléctrico utilizado en la presencia de menores de edad o por ellos mismos requiere la supervisión de un adulto. ❑ desconecte el aparato del tomacorriente cuando no esté en funcionamiento y antes de limpiarlo. espere que el aparato se enfríe antes de instalar o retirar las piezas y antes de limpiarlo. ❑ no se debe utilizar ningún aparato eléctrico que tenga el cable o el enchufe averiado, que presente un problema de funcionamiento o que esté dañado. devuelva el aparato al centro de servicio autorizado más cercano para que lo examinen, reparen o ajusten. También puede llamar gratis al número apropiado que aparece en la cubierta de este manual. ❑ el uso de un accesorio no evaluado para ser utilizado con este aparato podría ocasionar lesiones personales. -
Page 9: Panel De Control
Este producto puede variar ligeramente del que aparece ilustrado. 1. Tapa 2. Distribuidor de agua 3. Cesto desmontable para el filtro 4. Tanque de agua con nivel de tazas marcado 5. Dispositivo de interrupción de colado Sneak-A-Cup 6. Jarra Duralife™ 12 tazas / 60 oz / 1 800 ml 7. - Page 10 Como usar este aparato es para uso doméstico solamente. PASOS PRELIMINARES • Retire todo material de empaque y calcomanía adherida al producto. • Retire y conserve el manual de uso y cuidado. • Por favor, visite www.prodprotect.com/applica para registrar su garantía. • lave todas las piezas según las instrucciones en la sección de CUIdAdo Y lIMPIezA de este manual. • Abra la tapa e inserte un filtro vacío de papel en el cesto removible para el filtro (C). • Vierta agua fría en el tanque de agua hasta el nivel que indica 12 tazas MAX (D). • desenrolle y enchufe el cable a un tomacorriente normal. • Sin agregar café molido, cuele agua a través del aparato, siguiendo las instrucciones en la sección, CoMo ColAR el CAFÉ. esto elimina cualquier residuo de polvo que pudiera haber en el sistema debido al proceso de fabricación. • deseche el agua de la jarra y el filtro usado. • Apague el aparato, desconéctelo y espere que se enfríe. COMO COLAR EL CAFÉ 1. Abra la tapa de la cafetera. 2. llene la jarra con agua fría de la llave hasta el nivel deseado, usando las marcas indicadas en la jarra.
-
Page 11: Cuidado Y Limpieza
4. Programación de la hora para colado automático: Presione el botón HoUR y después MIn para escoger la hora deseada para el inicio del colado automático (por ejemplo, las 8:00 AM). 5. Presione el botón de programación (PRog) nuevamente. la luz (PoWeR) en la parte superior derecha de la pantalla digital aparece intermitentemente, indicando que la cafetera ha sido programada para el ciclo de colado automático. 6. Presione el botón AUTo para activar el ciclo de colado automático. la luz indicadora en la parte superior derecha de la pantalla digital permanece constante. 7. Para verificar la hora programada, presione el botón de programación (PRog) y la pantalla exhibe la hora que uno ha seleccionado para el inicio del ciclo de colado. Presione el botón AUTo nuevamente para reactivar el ciclo de colado automático. 8. la luz indicadora de funcionamiento (PoWeR) se enciende al inicio del ciclo de colado que uno ha programado. 9. Para cancelar el ciclo de colado automático, presione el botón de fencendido/ apagado (on/oFF) . Todas las luces de la cafetera se apagan y solamente la hora permanece visible en la pantalla digital. CONSEJOS PARA COLAR CAFÉ • Revuelva el café de la jarra antes de servirlo para distribuir bien el sabor. • el café que uno sirve durante el ciclo de colado puede variar en intensidad. • ¿Tiene duda de cuánto café usar? Comience por medir 1 cucharada rasada de café molido de textura media por cada taza de café a colar. • Para variar, antes de colar, agregue al café molido un pedazo de 2 pulgadas de piel de limón o naranja. • Para una ocasión especial, puede batir crema y agregar 2 o 3 cucharadas de licor de avellana, chocolate o almendra para coronar cada taza de café. - Page 12 COMPARTIMIENTO PARA CABLE ELÉCTRICO Para mayor conveniencia, el compartimiento para el cable permite la flexibilidad de usar solamente la longitud necesaria y mantener el resto del cable almacenado en el aparato. Para aumentar la longitud del cable, hale cuidadosamente hacia fuera y para guardar el exceso de cable, aliméntelo en el compartimiento de la cafetera (J). Importante: Nunca agarre y tire del cable. PRECAUCIÓN RIESGO DE INCENDIO O DE CHOQUE ELÉCTRICO. NO ABRA. el símbolo de un rayo indica voltaje peligroso. el signo de exclamación indica importantes instrucciones de mantenimiento. Consulte a continuación: Precaución: Para reducir el riesgo de incendio o de choque eléctrico, no retire la cubierta de la cafetera.
-
Page 13: Necesita Ayuda
¿NECESITA AYUDA? Para servicio, reparaciones o preguntas relacionadas al producto, por favor llame al número del centro de servicio en el país donde usted compró su producto. no devuelva el producto al fabricante. llame o lleve el producto a un centro de servicio autorizado. DOS AÑOS DE GARANTÍA LIMITADA (No aplica en México, Estados Unidos o Canadá) ¿Qué cubre la garantía? • la garantía cubre cualquier defecto de materiales o de mano de obra. Applica no se responsabiliza por ningún costo que exceda el valor de compra del producto. ¿Por cuánto tiempo es válida la garantía? • Por dos años a partir de la fecha original de compra. ¿Cómo se puede obtener servicio? • Conserve el recibo original de compra. - Page 14 Por favor llame al número correspondiente que aparece en la lista a continuación para solicitar que se haga efectiva la garantía y donde Ud. puede solicitar servicio, reparaciones o partes en el país donde el producto fué comprado. También puede consultarnos en el e-mail servicio@applicamail com.mx Argentina México SeRVICIo TeCnICo CenTRAl Articulo 123 # 95 local 109 y 112 ATTendAnCe Col. Centro, Cuauhtemoc, Avda. Monroe n° 3351 México, d.F. Buenos Aires – Argentina Tel. 01 800 714 2503 Fonos: 0810 – 999 - 8999 Nicaragua 011 - 4545 - 4700 ServiTotal 011 – 4545 – 5574 de semáforo de portezuelo supervision@attendance.com.ar 500 metros al sur. Chile Managua, nicaragua, MASTeR SeRVICe SeRVICenTeR Tel. (505) 248-7001 nueva los leones n° 0252 Panamá Providencia Servicios Técnicos CAPRI Santiago – Chile Tumbamuerto Boulevard Fono Servicio: (562) – 232 77 22 el dorado Panamá servicente@servicenter.cl 500 metros al sur. Colombia Tel. 3020-480-800 sin costo PlInAReS (507) 2360-236 / 159 Avenida Quito # 88A-09 Perú...
- Page 15 Copyright © 2009 Applica Consumer Products, Inc. R12009/2-13-8e/S Printed on recycled paper. Impreso en papel reciclado.
Need help?
Do you have a question about the DLX1050 and is the answer not in the manual?
Questions and answers