Table of Contents
Advertisement
Quick Links
Advertisement
Table of Contents

Related Manuals for ELPRO LIBERO Tx


Summary of Contents for ELPRO LIBERO Tx
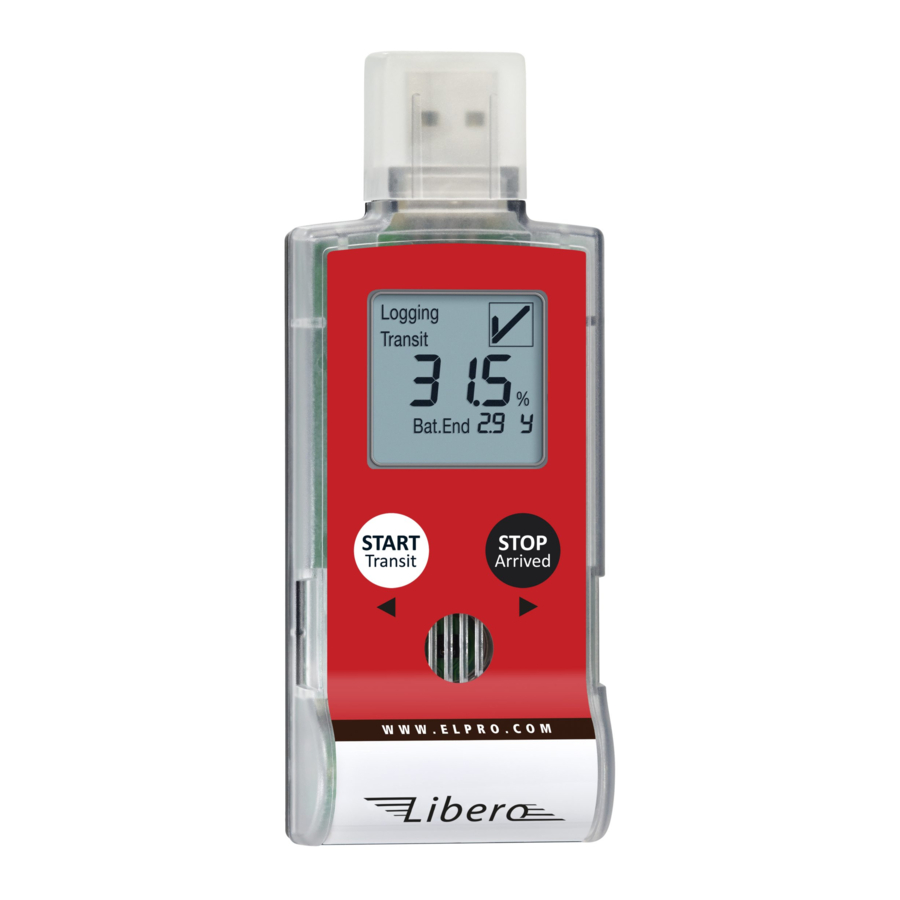
- Page 1 LIBERO Tx PDF Logger Operation Manual...
- Page 2 In the event of a guarantee claim, customers receive a repair cost estimate from ELPRO-BUCHS AG to obtain the corresponding consent before starting work. The customer will bear the transport costs incurred for any repairs carried out by ELPRO-BUCHS AG. The DAP (value added tax) is borne by ELPRO-BUCHS AG.
-
Page 3: Table Of Contents
3.3.4 Menus ................... 19 3.3.5 Buttons ..................19 3.3.6 Confirmation ................. 19 3.3.7 Configuration Profiles ..............20 Configuring the LIBERO Tx ................21 3.4.1 Description..................22 3.4.2 Logging ..................23 3.4.3 Alarm conditions ................25 3.4.4 Single Alarm Thresholds............... 26 3.4.5... - Page 4 3.6.1 Check PDF Report Integrity............40 3.6.2 Create PDF from Switched Off Device ......... 42 3.6.3 Set Time Zone of Device .............. 42 LIBERO SmartStart - Settings ..............43 3.7.1 Items ..................... 45 3.7.2 Configuration Report ..............48 3.7.3 Report Settings ................49 3.7.4 Report Content ................
- Page 5 ELPRO Customer Service Information ............75 7.2.1 Software license ................76 Revision History................763 EN - 5 liberoCONFIG LI6002Eg...
- Page 6 IMPORTANT INFORMATION AND WARNINGS Reference to supplementary section [xxx / yyy / zzz; e.g. 3.4.6 PDF Options / daylight saving / start date] or document LIBERO Tx Name of the device team LIBERO THx Notes which apply to LIBEROs that measure tempera- ture and humidity.
- Page 7 If the LIBERO Tx is connected to any USB port, it automatically generates a PDF report with the logging results. No additional software is required to read out the LIBERO Tx. The PDF...
- Page 8 Common Period of use 100 Days 400 Days 3 Years LIBERO Tx Sensor position Types 16'000 Temperature values internal Ti1-S Ti1-L -35 °C..+70 °C -90 °C..+70 °C Ti1-D down to - 90 °C external NTC Te1-U Te1-NY Te1-N -90 °C..+85 °C...
-
Page 9: Libero Tx - Safety Information
LIBERO Tx - safety information Influence of temperature For the operation range see page 7 or: www.elpro.com. There is danger of a gas explosion when the lithium battery heats up to temperatures exceeding 100 °C. Do not throw data loggers into fire, the battery could explode. - Page 10 LIBERO T X - SAFETY INFORMAT ION X-rays can harm the data logger. The specifications are on file at ELPRO-BUCHS AG. This product must be certified with CE The manufacturer warrants this product is compliant to the following guidelines EN 61000-6-2:2006 and EN 61000-6-4:2006.
-
Page 11: Configuration Of A Libero Tx
CONFIGURAT ION OF A LIB ERO TX Configuration of a LIBERO Tx Do not connect a LIBERO Tx to the USB port until liberoCONFIG is started. Configuration at delivery The display shows ConF The configuration mode is used to define all logging parameters (profile). The liberoCON- FIG is used to set or change all logging possibilities. -
Page 12: Start Configuration Mode
CONFIGURAT ION OF A LIB ERO TX Start Configuration Mode TRANSIT- & ARRIVED-Button To switch the data logger into the configuration mode, simultaneously press the TRANSIT- and ARRIVED-button for at least 3 seconds. Configuration Mode As soon as the data logger is put into the configuration mode, it has to be connected to an USB port within 10 seconds. -
Page 13: Configuration Software
SmartStart and Pack & Go. Configuration variants SmartStart Pack & Go (.exe) file with a LIBERO Tx can be used on any PC, how- ever it requires the LIBERO USB driver. EN - 13... -
Page 14: System Requirements
CONFIGURA TION S OFTW AR E System requirements Windows XP, 7 or 8 CPU 1.5GHz Memory: 512 MB RAM Free hard disk space: 100 MB Monitor: 800 x 600 Pixel Information on the latest functions is given in the "ReadMe" file. 14 - EN liberoCONFIG LI6002Eg... -
Page 15: Common - Liberoconfig
After configuration, continue with 5.2 Transport Monitoring. 3.3.1 Start of liberoCONFIG On this screen all available LIBERO Txs are visible. Start window of liberoCONFIG with 2 LIBERO Tx The following infor- LIBERO ID No mation is shown Type Status Remaining battery lifetime Single / multiple Except "Device - Configuration"... - Page 16 CONFIGURA TION S OFTW AR E Refresh Refreshes the start window of liberoCONFIG Edit configuration 2 Configuration of a LIBERO Tx LIBERO SmartStart 3.7 LIBERO SmartStart - Settings Check the PDF file integrity 3.6.1 Check PDF Report Integrity...
-
Page 17: Options - General
Dutch Default File Loca- For the following profiles, the file location can be defined or selected: tions Configuration profile: 3.4 Configuring the LIBERO Tx Calibration profile: 6.1 View/Print Calibration 3.7 LIBERO SmartStart - Settings EN - 17... -
Page 18: Options - Additional
The factory defined layout of the calibration document is used for printouts. tion Data • Use custom template The customer has the possibility to design his own calibration template. Please contact ELPRO-BUCHS AG for further support. Paper Size You may choose between A4 and Letter. 18 - EN... -
Page 19: Menus
CONFIGURA TION S OFTW AR E 3.3.4 Menus Chapter 3.4 Configuring the LIBERO Tx 3.5 Passwords 6 Calibration 3.6 Integrity of the PDF report 3.7 LIBERO SmartStart - Settings 3.3.5 Buttons The following buttons are used within liberoCONFIG: •... -
Page 20: Configuration Profiles
Handling options Configuration profiles are saved as "***. LiberoCFG" files can either be applied to multiple LIBERO Tx or saved for later use. Profile Checksum The checksum is used to prove the validity of the profile and as reference value for a con- 1.204.440.652... -
Page 21: Configuring The Libero Tx
Configuring the LIBERO Tx The following chapter represents a step-by-step procedure for the configuration. LIBERO Tx selected for configuration Configuration Mode Only LIBERO Tx in configuration mode are visible in the start window. 2 Configuration of a LIBERO Tx Configuration file Configuration or creation of a configuration file (****.liberoCFG) is only possible if at least... -
Page 22: Description
CONFIGURA TION S OFTW AR E 3.4.1 Description Report Title Information used as head line on the evaluation report; up to 60 characters Additional Informa- Free text that can be added to the profile to appear on the PDF report; up to 8 lines of 80 tion characters. -
Page 23: Logging
Depending on the model the recording interval is between 1 or 5 minutes and up to 60 min- Duration utes. www.elpro.com Logging Mode Logging is blinking • Loop Logging is done continuously. If the memory is full (16'000 measuring data points), each further value overwrites the oldest data with the newest one. - Page 24 Start Mode Determines the oper- • Start immediately ating condition of the Data recording starts as soon as the LIBERO Tx is configured. LIBERO Tx after it has • Start after pressing the TRANSIT-button been configured. Data recording starts after the TRANSIT-button has been pressed for 2 seconds.
-
Page 25: Alarm Conditions
CONFIGURA TION S OFTW AR E 3.4.3 Alarm conditions Threshold violation AN ALARM CAN BE RESET BY A NEW CONFIGURING! There are 3 different alarm conditions, selectable by the Alarm Mode pull down menu Selection: Alarm disabled Alarm mode OFF (Alarm disabled) No alarm monitoring takes place. -
Page 26: Single Alarm Thresholds
CONFIGURA TION S OFTW AR E 3.4.4 Single Alarm Thresholds LIBERO Tx for temperature recording LIBERO THi1-x for temperature and humidity recording Upper Thresholds / Data entry fields for the lower and upper thresholds. Lower Thresholds 26 - EN liberoCONFIG... -
Page 27: Multiple Alarm Zones
Zone 4 repre- sents the temperature range where none of the alarm conditions are fulfilled. Possible for LIBERO Tx only. Used These check boxes are used to select the desired alarm zones. Temperature T[°C] or T[°F] Data entry fields for the threshold values. - Page 28 CONFIGURA TION S OFTW AR E Zonen 3 + 5 coupled If this check box is set, an alarm won’t be triggered unless it is outside the threshold defined for zone 3 and 5 (accumulation deviations). Graphical Representation / Evaluation Temperature plot with zones Data Zone Tempera-...
-
Page 29: Pdf Options
CONFIGURA TION S OFTW AR E 3.4.6 PDF Options Selection of the infor- mation contained in the PDF report Inspection Range The inspection range determines the period over which the data shall be evaluated. There are 3 possibilities for the statistic calculation: •... - Page 30 2. File name specified for the PDF report during configuration 3. Date of report creation 4. Time of report creation 5. Device ID Logging results - File This timestamp corresponds to the last point of time at which the LIBERO Tx was evalu- created ated. Error Messages 5.3.4 Error Messages...
- Page 31 CONFIGURA TION S OFTW AR E 3.4.6.3 Example: PDF report - possible hidden information Profile ID Not shown: Alarm Conditions Not shown: Alarm Conditions & Alarm Status Not shown: Alarm Condition & Alarm Status & Logging Results EN - 31 liberoCONFIG LI6002Eg...
-
Page 32: Format Settings
CONFIGURA TION S OFTW AR E 3.4.7 Format Settings Country-specific set- tings. Time Zone used in Represents the time zone used in the PDF report. This setting is based on UTC. Daylight Saving A set checkmark adds 1h to the selected time zone. Time (1 hour) Default setting... -
Page 33: Handling Options
CONFIGURA TION S OFTW AR E 3.4.8 Handling Options Used to determine the button functions and data shown on the dis- play. Button Mode Switch to configuration mode for a new setting. 2.3 Start Configuration Mode Buttons see Introduc- tion Full functionality: •... - Page 34 CONFIGURA TION S OFTW AR E Transit - Arrived LIBERO Tx could be used for one transit - arrived period only! ONCE / Display- Statistics • To start recording, press the TRANSIT-button for 2 seconds. • Enables the buttons to mark the start and the arrival of the shipment. Those markings are visible in the PDF report.
- Page 35 The delay time starts after the LIBERO Tx has been started by keypress. Use Transit Delay Delay time starts after the LIBERO Tx mode changed from Arrived mode to Transit mode by keypress. Minutes / Hours / Days...
-
Page 36: Profile Information
CONFIGURA TION S OFTW AR E 3.4.9 Profile Information MKT Activation Possibility to enter a product specific value for the MKT activation energy between Energy 42..125 kJ/mol. Profil-ID The summarized information in the configuration profile could be assigned with a Profil-ID for easier handling. -
Page 37: Apply Configuration Profile
CONFIGURA TION S OFTW AR E 3.4.10 Apply Configuration Profile All selected LIBERO Tx are directly configured with a previously saved profile. 3.4.11 View/Print configuration Creates a report with all configuration data. This report contains as many pages as LIBERO Tx selected. - Page 38 CONFIGURA TION S OFTW AR E 38 - EN liberoCONFIG LI6002Eg...
-
Page 39: Passwords
CONFIGURA TION S OFTW AR E Passwords LIBERO Tx offers 2 different password functions. Both passwords can be set, changed or reset. • Configuration password It is used to protect the LIBERO Tx against unauthorized configuration. • Data access password If the data access password is set, data transfer into elproVIEWER or elproLOG ANALYZE needs user authorisation. -
Page 40: Integrity Of The Pdf Report
Procedure: File integrity check 1. Select and open PDF reports that should be checked 2. PDF report check A report with the check results will be created. This report contains as many pages as LIBERO Tx selected. Menu bar 40 - EN liberoCONFIG... - Page 41 CONFIGURA TION S OFTW AR E EN - 41 liberoCONFIG LI6002Eg...
-
Page 42: Create Pdf From Switched Off Device
Create PDF from Switched Off Device This function gives the possibility to read the logged data from an already switched off LIBERO Tx as PDF report. After the file has been read, the LIBERO Tx switches itself off again automatically. -
Page 43: Libero Smartstart - Settings
The used LIBERO SmartStart application allows a fast and secure configuration of many Create and make set- LIBERO Tx. End users can select from a list of possible pre-defined profiles in the Pack & tings see 3.3.4 Menus Go file and have the opportunity to add shipment-specific information that will later appear - Extras on the PDF report. - Page 44 CONFIGURA TION S OFTW AR E Start LIBERO SmartStart Settings 3.7.1 Items 3.7.2 Configuration Report 3.7.7 Create SmartStart Pack & Go File Return to liberoCONFIG. File format ****.liberoSMS 44 - EN liberoCONFIG LI6002Eg...
-
Page 45: Items
CONFIGURA TION S OFTW AR E 3.7.1 Items Manage items Overview: LIBERO SmartStart Settings EN - 45 liberoCONFIG LI6002Eg... - Page 46 LIBERO SmartStart. Start Mode • Use existing data logger configuration Is used if it is not necessary to assign a specific profile to the LIBERO Tx. The LIBERO Tx retains the current configuration. • Apply configuration profile A profile previously assigned with liberoCONFIG is used.
- Page 47 CONFIGURA TION S OFTW AR E Apply password 3.7.1.1 Add information during configuration Device Family Manual or automatic recognition of the device team. When the LIBEROs are selected for configuration, SmartStart automatically enables the possible information window. Add information It is possible to make entries for all variable information of the PDF report during profile during configuration assignment.
-
Page 48: Configuration Report
The configuration report is an option and not required for LIBERO SmartStart Pack & Go. If no automatic reporting of the configured LIBERO Tx is needed, skip this section and continue with 3.7.7 Create SmartStart Pack & Go. Menu bar - configuration report The configuration report documents all configurations done by LIBERO SmartStart. -
Page 49: Report Settings
CONFIGURA TION S OFTW AR E 3.7.3 Report Settings File settings Path Default setting for saving the configuration report. Subdirectories & Filename This button is used to insert placeholders for the designation of subdirectories and file names. 3.7.4 Report Content Report Content This window is used to define the placeholders and the formats used to create the report. -
Page 50: Placeholder Editor
CONFIGURA TION S OFTW AR E Options The current report can be added as an extension to the existing one or the existing report replaced by the new one. This button starts the „Placeholder Editor“. The selected placeholders determine the con- tent of the PDF report. - Page 51 Data Logger ID %LoggerID% ID of the data logger configured with SmartStart. Data Logger Type %LoggerType% Type of the LIBERO Tx e.g. Ti1- S, configured with LIBERO SmartStart. Firmware Version %FirmwareVersion% Firmware version of the LIBERO Tx configured with LIBERO SmartStart.
- Page 52 CONFIGURA TION S OFTW AR E Description Syntax Function Profile Checksum %ProfileChecksum% Automatically calculated check- SmartStart Item Name %SmartStartItem- Name of the selected LIBERO Name% SmartStart item Application Name %ApplicationName% Corresponds to the "Window Title" 3.7.7 Create SmartStart Pack & Go Placeholder: This placeholder allows a customized date and time format.
-
Page 53: Example Of A Configuration Report
CONFIGURA TION S OFTW AR E 3.7.6 Example of a configuration report The following line numbers refer to the line of text in the "Placeholder Editor" The used control characters quotation marks ("...") and semicolon (;) are interpreted according to the country settings of MS Excel. Depending on the country settings different characters for the described functions have to be used. -
Page 54: Create Smartstart Pack & Go
CONFIGURA TION S OFTW AR E 3.7.7 Create SmartStart Pack & Go Menu bar - Pack & Go This is a function to set up an executable file of LIBERO SmartStart including all required settings and configuration profiles. LIBERO USB DEVICE DRIVER REQUIRED File format (.exe) Pack &... -
Page 55: Help
• Expiry Date - the program is going to run until this date only. Workflow of Pack & 1. Define profiles and LIBERO SmartStart settings: 3.4 Configuring the LIBERO Tx 3.5 Passwords 2. Create an (.exe) file which includes the following information:... -
Page 56: Using Smartstart Pack & Go
The window text and the respective color code is defined in the LIBERO SmartStart settings. 3.7 LIBERO SmartStart - Settings Mode The LIBERO Tx must be in OFF or ConF mode! If the modes are not set properly, a PDF report will be shown! In the window, the first item from the list is shown with a color code and name tag. - Page 57 US IN G SMARTS TART PA CK & GO If various variable entries are defined during creation of the SmartStart Pack & Go, the win- dow for entering the free configuration data is opened. The data can be entered with the keyboard or with the Barcode reader.
-
Page 58: Change Of Settings
US IN G SMARTS TART PA CK & GO When all entries have done, the profile settings and the variable entries are applied to the LIBERO. Now disconnect the LIBERO from the USB port and continue with the next LIBERO. Change of Settings A SmartStart Pack &... -
Page 59: Error Messages
US IN G SMARTS TART PA CK & GO Error Messages In case of an error, a message will be displayed. Reasons for error massages: Profile incompatible "Cancel" has been during data configuration problems LIBERO has been disconnected during configuration. EN - 59 liberoCONFIG LI6002Eg... -
Page 60: Example - Transportation
Bat.End is blinking Remaining lifetime < 30 days If no lifetime for "Bat. End" is displayed, change LIBERO Tx at your next possibility (as soon as possible). Battery operation time has been expired. After 20 days in this mode, the display changes to "EoL" - End of Life The display shows Recorded data are still available for evaluation. -
Page 61: Transport Monitoring
E X A M P L E - T R A N S P O R T A T IO N Transport Monitoring Packing For transport monitoring, the LIBERO Tx data logger has to be placed according to the product related transportation SOP. Data logging LIBERO Tx have several possibilities to start/stop a recording. -
Page 62: Statistics
E X A M P L E - T R A N S P O R T A T IO N 5.3.2 Statistics LIBERO Tx have the capabilities to calculate and display statistical data. Data logging continu- There are 3 possibilities for the statistic calculation: ous during the evalua- Graphics &... - Page 63 None Will be shown as long as no data were logged • After the status has been change from Arrived to Transit • After a restart of the LIBERO Tx Exit statistic display If the last statistic display has been reached...
- Page 64 E X A M P L E - T R A N S P O R T A T IO N 5.3.2.3 Multiple Alarm Zones Profile-ID If "Show Profil-ID on LCD" is selected, the ID will be shown after the display test. ...
-
Page 65: Pdf Report At Any Usb Port
E X A M P L E - T R A N S P O R T A T IO N 5.3.3 PDF report at any USB port • LIBERO Tx have the feature to create a, PDF report which could be printed out on any printer. • Data logging continuous during the creation of the PDF report. -
Page 66: Further Options
The software liberoCONFIG has the capability to check the integrity of the logged data. 3.6.1 Check PDF Report Integrity USB-Device A LIBERO Tx data logger could be treated as any other USB device. Start of data evalua- tion 2.3 Start Configuration Mode. -
Page 67: Calibration
CA LIB RAT ION Calibration The following chapter describes the set-up and procedure to calibrate a LIBERO Tx. Process 1. Launch the configuration utility and choose calibration. 3.3.4 Menus 2. Set LIBERO Tx into the configuration mode. 2.3 Start Configuration Mode. - Page 68 CA LIB RAT ION Case 2, single-point The LIBERO Tx has been calibrated according to the requirements of a single or multi point Case 3, multi-point calibration procedure. (Document: Calibration Certificate). After the calibration, the docu- ment shows true and rated values instead of system test values. This document may be printed out and signed or archived for inspection purpose.
-
Page 69: New Calibration
CA LIB RAT ION New Calibration Starts the process for calibrating a LIBERO Tx. 6.2.1 Calibration points Used to determine the number of calibration points and the calibration values. LIBERO Tx for temperature recording EN - 69 liberoCONFIG LI6002Eg... - Page 70 CA LIB RAT ION LIBERO THi1 for temperature and humidity recording Number of used Cali- There are up to 4 calibration points selectable. bration Points Calibration values Data entry fields for each calibration value, "Rated Value" and the "Allowed Tolerance". Calibration data could be saved as a calibration profile.
-
Page 71: Calibration Process
CA LIB RAT ION 6.2.2 Calibration Process LIBERO Tx for temperature recording LIBERO THi1 for temperature and humidity recording Process • Start-up delay Data entry field for the desired delay time between manual calibration start and start of data logging. The "Start Delay" depends on the time required to reach the "Rated Value"... -
Page 72: Start Of Calibration
CA LIB RAT ION • Measuring Time Data entry field for the determined measurement period. This value depends on accept- able temperature deviation within the evaluated data, e.g. 10 minutes returns an average value measured over the last 10 minutes. Remarks Additional comment about the calibration, e.g. -
Page 73: Assign Calibration Profiles
TO COMPLETE THE CALIBRATION PROCESS, PRESS THE ARRIVED- BUTTON. End of calibration The display changes to ConF-Mode. To print the calibration document, 6.1 View/Print Calibration 6.2.4 Assign calibration profiles Assigns an already created or saved calibration profile to selected LIBERO Tx. EN - 73 liberoCONFIG LI6002Eg... -
Page 74: Methods For Temperature Calibration
CA LIB RAT ION Methods for Temperature Calibration • 0°C Ice-water Calibration, which uses the triple point of ice-water (0°C) as reference temperature. You can expect an accuracy of approx. 0°C ±0.1K. • Calibration bath If a calibration bath is used (-35°C .. 70°C), the reference sensor should be fastened to the data logger under calibration. -
Page 75: Miscellaneous
3.3.2 Options - General ELPRO Customer Service Information If you need any assistance from the ELPRO Customer Center, please make sure you can provide the following information: Software version; Select "About.." in the menu option "Help" Device type used Which were the preceding actions, before problems arose (exact description of the data loggers deployment: time, temperature, shock etc.) - Page 76 This license entitles the owner to install the software on several computers if those belong to the same user group of a company. Without written permission of ELPRO-BUCHS Ltd., the software neither may be passed on to other users nor be spread by e-mail, data medium or Internet.
- Page 77 MIS CELLANEOU S Index Date 52 Actions - confirmed 19 Date / Time 32 Activation energy 36 Daylight saving time 32 Alarm 29 Decimal separator 32 Alarm - Off 25 Default file location 17 Alarm delay time 27 Delay time 35 Alarm mode 26 Device 21 Alarm reset 25...
- Page 78 MIS CELLANEOU S Logging interval 23 Start mode 24 Logging mode 23 Start options 24 Loop mode 23 Start/Stop mode 23 Statistics 62 Statistics - move up / down 62 Mac OS 14 System requirements (PC) 14 Measurement statistics 33 Measurement value format 32 Measuring value unit 27 Temperature unit 32...
- Page 79 MIS CELLANEOU S EN - 79 liberoCONFIG LI6002Eg...
- Page 80 ELPRO-BUCHS AG Langäulistrasse 62 CH-9470 Buchs SG Switzerland E-Mail: swiss@elpro.com For local agencies see: www.elpro.com Operation Manual liberoCONFIG LI6002Eg 09.2013...
Need help?
Do you have a question about the LIBERO Tx and is the answer not in the manual?
Questions and answers