Table of Contents
Advertisement
Quick Links
Advertisement
Table of Contents

Related Manuals for Uniz SLASH 2


Summary of Contents for Uniz SLASH 2
- Page 1 USER MANUAL APPLICABLE TO SLASH 2 UNIZ DESKTOP PRINTER...
- Page 3 UNIZ; d) to damage caused by service (including upgrades and expansions) performed by anyone who is not a representative of UNIZ; e) to a Hardware Product or part that has been modified to alter functionality or capability without the written permission of UNIZ; f) to consumable parts, unless damage has occurred due to a defect in materials or workmanship;...
-
Page 5: Table Of Contents
TABLE OF CONTENTS A SLASH 2 3D PRINTER ......................1 MEET THE PRINTER ..............................1 PACKING LIST ................................5 SPECIFICATIONS ................................6 B GET STARTED ......................... 7 UNBOXING .................................. 7 SOFTWARE PREPARATION ............................8 C PRINTER ACTIVATE AND UPGRADE ..................9 PRINTER NETWORK SETUP ............................ -
Page 7: A Slash 2 3D Printer
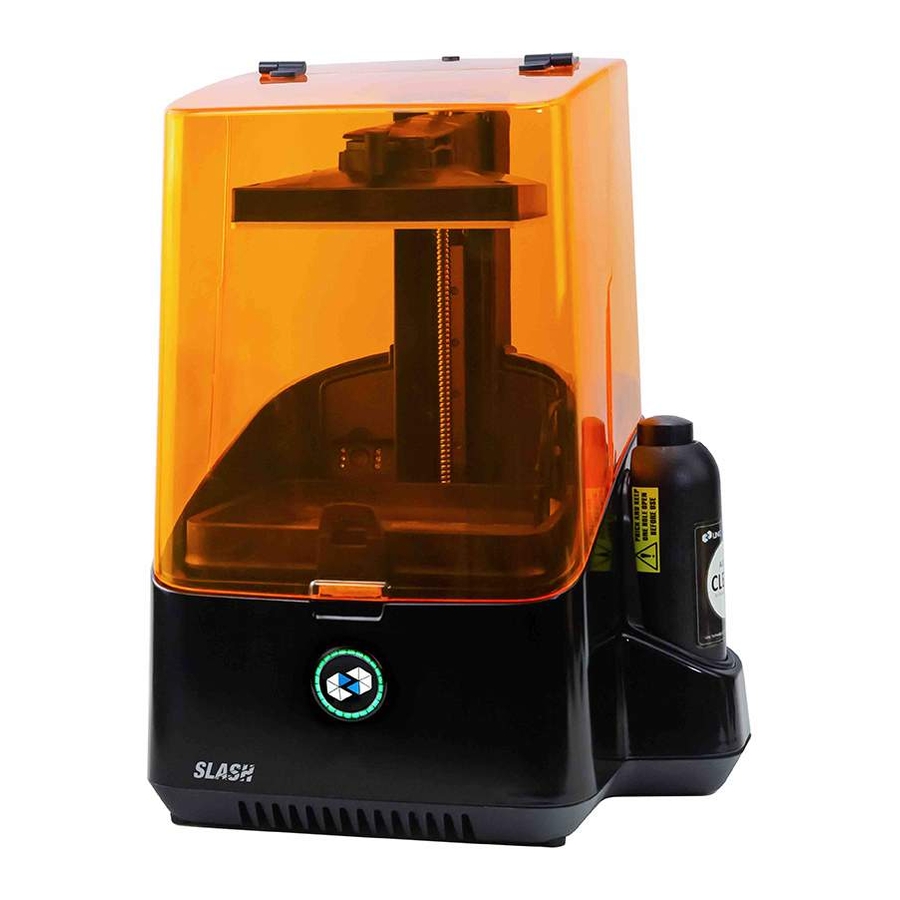
A SLASH 2 3D PRINTER This user manual is designed to help you start your SLASH 2 printer experience. Learn everything about using your 3d printer by following the instructions in this user manual and experience how easy it is to produce great quality prints. - Page 8 A SLASH 2 3D PRINTER...
- Page 9 SLASH 2 3D PRINTING SYSTEM A SLASH 2 3D PRINTER...
- Page 10 FRONT BUTTON COLOR GUIDE A SLASH 2 3D PRINTER...
-
Page 11: Packing List
Sand Paper Protective Film Shovel Resin Bottle Clean Bottle Open Spanner-17mm Hexagon Wrench M3 Injector Cross Screwdriver Warranty Card MSDS Quick Guide User Manual Detail Packing List Sample Piece For more questions please email: support@uniz.com A SLASH 2 3D PRINTER... -
Page 12: Specifications
Built-in advanced model repair, Ultra large file support (1GB+) Compatible Format STL, OBJ, AMF, 3MF, UNIZ MOBILE Compatible Systems iPhone, iPad, Android Phone and Tablet APPS * Maximum accuracy only achievable at integer multiples of smallest pixel sizes. A SLASH 2 3D PRINTER... -
Page 13: B Get Started
B GET STARTED Now your SLASH 2 printer has arrived you’re ready to unpack it and set it up! Carefully unpack your printer and set it up according to the following instructions. UNBOXING The SLASH 2 comes in reusable, durable packaging that has been specially designed to protect your printer in transport. -
Page 14: Software Preparation
REMOVE THE FOAM PACKAGING On the top foam part, you will find all accessories of your SLASH 2. Take these out and put them aside. Open up the package by removing the foam wrap at the middle. Now you may take out the printer and place it on your desk. -
Page 15: C Printer Activate And Upgrade
2. Connect the printer and PC via USB and start the software. 3. Select the Control interface in the software. 4. Select the SLASH 2 type in the printer list and click 5. View network status. Press the ‘Printer Settings’ button to open the submenu. - Page 16 · Disconnected icon means the printer is not connected to any wireless network. · Wi-Fi icon with Wi-Fi name shows the printer is connected to this wireless network. · Ethernet Disconnected shows the printer is not connected to Ethernet. · Ethernet Connected shows the printer is connected to Ethernet.
- Page 17 Method2: Using web page Settings 1. Plug into a power supply and switch on the printer. Connect to the printer's Wi-Fi hot spot. a. Find the SSID and Password on the S/N label. b. Access the Wi-Fi Setting of your PC or mobile device, and connect to UNIZ3D##:##:##:##:##:## as shown in the label.
-
Page 18: Activate The Printer
Method1: Activate from the UNIZ Desktop 1. Start the UNIZ Desktop and select the printer in the list to open the printer control interface. 2. Click the ‘Printer Settings’ button to open the submenu. The second option shows the activation status. -
Page 19: Update The Firmware
1. Connect the PC or mobile device to the printer’s Wi-Fi and open the printer page in the browser. 2. Select the Activation tab in the printer page and input UNIZ account and password, then click the Activate to complete the activation. - Page 20 Method2: Upgrade from the UNIZ APP 1.Check the firmware version of the current printer Click ‘Printer’ in the main menu of App, find the printer that needs to be updated in the list of printers, open the printer control panel, click the ‘Utilities’...
-
Page 21: D Uniz Software
UNIZ Desktop may be used without logging in. However, the Add to Favorite, Add to Cart, View Purchased Models, and Uploading to Cloud functions will be disabled. Online Model Store The Online Model Store provides browsing, comment, add to favorite, and purchase functionalities, you may send any purchased model to printer with a single click. - Page 22 Consumption), Summary, Price and buttons for Add to Favorite and Shopping Cart are on the right. Below there is comment area where users can browse the submitted historical comments or add a new one. Clicking the button on the top left will return to the Store page. D UNIZ SOFTWARE...
- Page 23 Example Projects Example Projects are files that UNIZ has set up suitable parameters for printing and they have been verified by real printing. Users can test printer status by printing them after receiving printers. Example Prints consist of NP mode and UDP mode. Double-click the file names on the right to switch into the Control interface and load the file.
- Page 24 Natural Peel Mode Note: SLASH 2 does not support UDP-Mode. Uploaded Prints Users can view and manage all uploaded print files under current login account here. The function button of uploading files is at the left bottom of the Control interface.
- Page 25 Users can view the printed files from other sources stored on the machine and utilize the one- click printing function. Select the target printer in the right toolbar and click the button for printing. Right click ‘Local Slices’ and click ‘Select Folder’ to modify the storage path of the printed file. D UNIZ SOFTWARE...
- Page 26 Convert SLC to Slice Users can convert SLC (stereo lithography contour) file to Uniz print file. Layer Thickness Requirements Most resins have a variety of layer thickness as follows: Resin Type Layer Thickness(mm) zABS AMBER 0.010/0.025/0.050/0.075/0.100/0.150/0.200/0.300 zABS GRAY 0.010/0.025/0.050/0.075/0.100/0.150/0.200/0.300 zABS GREEN 0.010/0.025/0.050/0.075/0.100/0.150/0.200/0.300...
- Page 27 Select resin type and save path of UNIZ slice file. Then click ‘OK’ to start converting. Printer Control Interface Open UNIZ Desktop and click Control button to switch to the 3D model viewer and printer control interface. D UNIZ SOFTWARE...
- Page 28 3D Model Viewer Main Tools Printer Control D UNIZ SOFTWARE...
-
Page 29: Prepare Print File
To load one or more 3D models, you may either drag-and-drop onto the 3D viewer, click Load File Button from the Main Tools, or double click on the file directly (If UNIZ Desktop is set as default software to open such file format). Supported file formats: STL, OBJ, AMF, 3MF and UNIZ. - Page 30 Notes: 1. A different orientation will be applied to models if click ‘One Quick Print’ for another time. 2. Users don't need to select printers if there is only one printer connected to UNIZ software. Change Position Pressing ‘Position’ Button will open following sub menu.
- Page 31 • The activated object can also be rotated by inputting X/Y/Z values in the field. Press ‘Enter’ to apply changes. UNIZ's orientation tools are relative not absolute, so the X, Y, and Z rotation angles reset to 0 degrees after applying a rotation •...
- Page 32 Adjusting support parameters may lead to better printing results or printing failure which depends on the user’s printing knowledge. There are two ways for generating supports: Automatic Generation and Manual Edit Click ‘Supports’ button on left to open the settings dialogue box: D UNIZ SOFTWARE...
- Page 33 The connections are used to reinforce multiple long supports. The support head is perpendicular to the model surface, preventing the support from sticking to the model and facilitating the removal of the support. D UNIZ SOFTWARE...
- Page 34 Big touch points increase the reliability of the supports but may overlap the details of the model surface and cause problems with removal, or may result in the loss of the model surface quality. Base Type The software offers four base types: Point, Line, Triangulation and Plane. D UNIZ SOFTWARE...
- Page 35 Long supports are unstable in structure. Ticking the Connection box will add connections between long supports which reinforce their stabilities. The left picture below is with connections and the right one is without. This option is ticked by default. D UNIZ SOFTWARE...
- Page 36 Select the model needs to add supports and adjust the parameters Lift and Down Clicking the Lift button will raise the selected model up 5mm from the platform. Clicking the Down button will put the selected model down onto the platform. D UNIZ SOFTWARE...
- Page 37 Trace the mouse cursor over the model, when your cursor appears as a green line, click on the surface of the model will add a support. If the cursor appears as a red line, it means there is no need to add a support. D UNIZ SOFTWARE...
- Page 38 Head Length and Touch point Size. The corresponding attributes of the model will be updated simultaneously. Delete Support Once a support is selected simply click ‘DELETE’ to remove it. Tips The ‘Lift’, ‘Down’, ‘Generate’ buttons are only enabled when a model is being selected and activated. D UNIZ SOFTWARE...
- Page 39 The left menu is to start Slice and Show Slices, and the right drag bar and menu is for customization of slice profile. Slice Parameters This is to customize the slice parameters of each segment of a model. Resin Type provides different default values for different resin type. D UNIZ SOFTWARE...
- Page 40 When users modify the exposure time and execute slicing function, the system will record the new exposure time and the corresponding layer thickness and modify the suggested exposure time which will be applied during the next printing. Click the ‘Restore Default’ button to use the preset value by the system. D UNIZ SOFTWARE...
- Page 41 LCD panel. • In case of 0mm, maintain original slicing, no extra handling. • For positive value, e.g. 0.1mm, slicing internal profile inward deviate 0.1mm, internal profile outward deviate 0.1mm. D UNIZ SOFTWARE...
- Page 42 100% infill Please view Advanced Settings for the hollowing wall thickness and infill type. UDP: SLASH 2 does not support UDP-mode. Pause sets a pre-set pause at the layer of choice during printing, and the pause may be resumed after pressing the Resume button in the printing control tab.
- Page 43 Slice Tools Click ‘Slice’ Button to slice all models on the Build Platform with the defined parameters. The estimated print information will show in the status bar. Click ‘Show Slices’ Button to check slice of any sliced layer. D UNIZ SOFTWARE...
- Page 44 ‘Print When Finished’ will only be enabled when a printer is connected, the corresponding Printer Control Panel is open, and the printer is in ready status. Upload Slice (Optional) If you want to share your print to the UNIZ Cloud, press ‘Upload’ Button on the main tools to open following sub menu.
-
Page 45: Printer Control
Printer Control Panel. The Printer Control Panel is used to control the printer for printing and regular maintenance. Click the icon again to close the Panel. UNIZ provides printer control function based on USB and network connection. This function also supports multiple printers’ control. - Page 46 Show Logo is used to verify if the LCD screen is functional. Before using this function, please remove the Build Platform and Resin Tank, and then click ‘Show Logo’ Button to show the UNIZ logo on the LCD screen to test communication and LCD screen.
- Page 47 This function is used only when the printed model is smaller than the theoretical value on the Z axis direction. The adjustment value is equal to the theoretical value minus the actual value. Calibration of Resin Level Sensor Click ‘Calibration of Resin Level Sensor’ button, open Calibration dialog. D UNIZ SOFTWARE...
- Page 48 This function only supports setting via USB connection. Tips : The Printer's Wi-Fi feature supports 2.4GHz band only, it does not support 5 GHz connections. 2. Activation This shows the activation status of the printer. Click to start activating. D UNIZ SOFTWARE...
- Page 49 Take Photo, Pause Job and Cancel Job. The remote monitoring function is completely cloud based, so only printer owners have access to the remote monitoring functions and pictures. UNIZ does NOT have access to the remote monitoring functions nor the pictures. Users may manually turn on/off the remote control function.
- Page 50 (2) Functions Illustration Users may check the real-time status of the printer under their names and initiate snapshot and other functions from their UNIZ App or Web dashboard (https://www.uniz.com). (3) App a. Click ‘Remote Monitoring’...
- Page 51 (4) Web a. Open the UNIZ website https://www.uniz.com with a browser. b. Click ‘My Account’ to enter the interface of account management after logging in with an UNIZ account. c. Click ‘My Printers’ menu in the Account Dashboard and all the activated printers under the login account will be listed in the right area.
- Page 52 Gray represents total lifespan. Tool tips will exhibit concrete running-time when cursor hovered over the bar, e.g. • Accessories replacing and timer reset If you replace the Resin Pump Tube, you need to re-time it on UNIZ Desktop. Open running-time menu on Printer Setting, click reset button , pop out ‘Confirm’ dialog, confirm and it will restart timer.
-
Page 53: Additional Tools
Double click the icon to start upgrading. Restart the printer when the upgrade is finished. Note : DO NOT disconnect the printer and the software or turn off the UNIZ software during the data transmission. ADDITIONAL TOOLS New Project: The current project will be discarded, and a new project will be created. - Page 54 Wall Thickness of Hollowing sets the shell thickness of parts hollowed with the advanced settings in the slice menu. Fill Style sets the fill style of parts hollowed with the advanced settings in the slice menu. D UNIZ SOFTWARE...
- Page 55 For example: If Offset X is 0.98 and Offset Y is 0.99, the slice will be minified to 98% of original size in the X axis and 99% in the Y axis. D UNIZ SOFTWARE...
- Page 56 Generate Reports: Ticking this option will generate reports after printing. Click the button to modify saving path of reports. D UNIZ SOFTWARE...
-
Page 57: E Maintenance
E MAINTENANCE In order to have a smoothly working SLASH 2 printer, it is important to maintain it correctly. In this chapter the most important maintenance tips are described. It is recommended to read them carefully in order to achieve the best results with your printer. -
Page 58: Build Platform And Resin Tank
BUILD PLATFORM AND RESIN TANK BUILD PLATFORM The Build Platform is the platform where the first layer of the model burns-in to, its levelness and roughness are crucial to successful prints. INSTALLATION AND REMOVAL OF BUILD PLATFORM 1. Turn the platform locking arm clockwise to lock. 2. - Page 59 4. Put back the platform when it is in unlocked status. 5. Turn the arm clockwise to lock. 6. Installation is completed. E MAINTENANCE...
- Page 60 SANDING BUILD PLATFORM After the platform has been used for a long time, its surface will become smooth which leads to poor model adhesion and increases the printing failure rate. To deal with this problem, users need to sand the platform. 1.
- Page 61 3. Push the Build Platform down until it comes into contact with the LCD. 4. Place four pieces of paper under four corners of Build Platform then push down Build Platform to touch LCD screen. At this time, there is at least one pieces of paper is pressed between Build Platform and LCD screen (which means this corner is in good position).
- Page 62 6. Select a corner where the paper is loose. Use screwdriver to loosen screw by turning anti- clockwise and pull and push paper. When the paper cannot be pulled, it means this corner touch the screen closely and in good position. Use the same method to adjust other corners and ensure all corners are pressed firmly.
- Page 63 INSTALLATION 1. Find the two fitting slots. 2. Insert the Resin Tank to the slots by 30-40 degrees and put the tank down onto the screen. 3. Put inward the hatch to lock the Resin Tank. E MAINTENANCE...
- Page 64 4. Make sure the Resin Tank is stably locked and repeat the above steps if the tank shakes. CLEANING BUILD PLATFORM AND RESIN TANK When printing fails, there may be residues on the platform and in the Resin Tank which needs to be cleaned in time to avoid damage to the screen.
-
Page 65: Change Lcd Protective Film
CHANGE LCD PROTECTIVE FILM There is a protective film on the LCD of SLASH 2. If the film is scratched or dirty with cured resin, you should change for a new one. 1. Peel off the old film. 2. Take out a new film. - Page 66 3. Clean the surface of LCD and make sure there is no dust and residue left. 4. Peel off the cover film marked ‘①’. 5. Using a card and cloth to paste the film onto the surface of LCD. E MAINTENANCE...
-
Page 67: Z-Axis Compensation
6. Peel off the cover film marked ‘②’. 7. All done. The bubble between film and LCD will get out automatically in a period of time. Z-AXIS COMPENSATION To discharge resin between Resin Tank and Build Platform, great down force is needed when the first layer is printed. -
Page 68: Resin Level Control System
After the z-axis recalibration is performed, the factory set fine-tuning value A will be forced to reset. At this time, the standard height test piece needs to be printed again to calculate the value A. The z-axis height compensation operation before the next printing can ensure the accurate printing height. - Page 69 2. Make sure the pipe and line are connected well. 3. Plug the holder into the positioning slot on the Resin Tank as shown on the photo. 4. The installation is completed. E MAINTENANCE...
- Page 70 BOTTLE HOLDER AND RESIN BOTTLE The Resin Bottle is inserted to the right side of the printer and is connected and controlled by the Tank Resin Level Sensor. There is also a Bottle Resin Level Sensor integrated in the Bottle Holder. 1.
- Page 71 4. Now your resin feeding system is ready to use. 5. If you want to use CLEAN bottle to clean the feeding system, disconnect the cap and tube first. 6. Pour alcohol into Clean Bottle. Take Resin Bottle off and insert Clean Bottle in. Then go back to step 2 and continue.
- Page 72 3. Click ‘Fill’ again to stop pumping in. 4. The resin level should be under the MAX LEVEL mark. Pumping out If resin in tank will not be used in a long time, it is suggested to pump the resin back to Resin Bottle.
- Page 73 2. Click ‘Redraw’ again to stop pumping. Note: Keep the vent hole on the top of bottle open when pumping resin, otherwise the resin pumping system may burst inside the printer. RESIN STORAGE 1. For long-term storage, it is recommended to redraw resin back to the Resin Bottle to avoid curing.
-
Page 74: Change Bottom Filter
CHANGE BOTTOM FILTER 1. Put printer sideways like the picture shows. Lay protections to prevent possible damage to the printer. 2. Take off the bottom filter holder. E MAINTENANCE... -
Page 75: Release Pressure In Cooling System
3. Change for a new filter. 4. Lock the holder back. RELEASE PRESSURE IN COOLING SYSTEM Notes (1) There are two separated cooling systems: one for LCD Screen and the other for LED light board. The colors of coolant are all clear transparent; (2) Please maintain and release pressure every month for best performance;... - Page 76 Release pressure in LCD cooling system. 1. Put the printer sideways like picture shows. Lay protections to prevent possible damage to the printer. 2. Find out the plastic elbow. E MAINTENANCE...
- Page 77 3. Take the black pipe off from the elbow and use some paper to catch coolant. 4. Connect the black pipe and elbow back when no coolant comes out. Release pressure in LED cooling system. 1. Open the front Cover and take off Resin Tank. 2.
-
Page 78: F Help And Support
F HELP AND SUPPORT There are a few printer specific issues that could show up while using your SLASH 2 printer. If you ever run into one of these issues, you can easily troubleshoot the issue yourself with help of the information on the following pages. - Page 79 not be touched). Increase cool down time. Insufficient adhesion Increase exposure time. between printed layers 3. Abnormal LCD performance The LCD cable is not Follow the guidance to re-insert or install the under the show logo function: no inserted properly; LCD cable.
- Page 80 6. Edge warp defects on the Problems with supports Follow the guidance to manually add the printed model structures supports The model bottom is not Check the first layer slice for any error pressed to the XY plane tightly 7. There are wavy lines on the XY Wrinkles on the Resin Replace with a new Resin Tank and increase the plane...
- Page 81 10. Excessive printed part appears. Light-blocking tape Replace with new tape, cut and cover any Light leaks outside the screen damaged exposed area display area 11. Printed model has ripples or Shaky Z axis Adjust the tightness of the lead screw nut and wavy lines on the side face the Build Platform holder according to the guide 12.
- Page 82 15. Automatic pumping failed. The peristaltic pump nut Install the nut according to the guidance fell off The peristaltic pump tube Install or replace the tube according to the fell off or blocked guidance buckle Install the tube according to the guidance peristaltic pump fell off 16.
- Page 83 2. The coolant has leaked onto circuit damaged components 20. Printer activation fails Invalid printer SN Contact distributor or customer service 21. The printer can't be connected 1. The client's router is 1. The customer needs to use 2.4G Wi-Fi to Wi-Fi 5G, and the wireless 2.
-
Page 84: G Certificate
G CERTIFICATE G CERTIFICATE... - Page 85 G CERTIFICATE...
- Page 86 G CERTIFICATE...
Need help?
Do you have a question about the SLASH 2 and is the answer not in the manual?
Questions and answers