HunterLab MiniScan EZ User Manual
Hide thumbs
Also See for MiniScan EZ:
- Supplemental manual (29 pages) ,
- Quick start manual (2 pages) ,
- Supplemental manual (29 pages)

Related Manuals for HunterLab MiniScan EZ


Summary of Contents for HunterLab MiniScan EZ
- Page 1 User’s Manual for MiniScan ® Hunter Associates Laboratory 11491 Sunset Hills Road Reston, Virginia 20190 USA www.hunterlab.com A60-1014-085 Version 2.0...
- Page 2 Windows is a registered trademark of Microsoft Corporation in the United States and other countries. Caution: If the equipment is used in a manner not specified by the HunterLab, the overall safety may be impaired. The instrument is for indoor use only and not suitable for a wet location.
-
Page 3: Table Of Contents
Rechargeable Batteries ......................9 USB Cable ..........................10 Tile data sheet ........................10 Installation ........................10 THE BASICS OF MINISCAN EZ OPERATION ............13 The Button Pad and LCD Display ..................13 Menus ..........................14 About Your Instrument ..................... 15 Taking a Simple Measurement .................. - Page 4 Sample Presentation ......................45 Directional Samples ........................ 46 Non-Opaque Samples ......................46 Translucent Samples ......................46 MAINTAINING AND TESTING MINISCAN EZ ............49 Recharging/Replacing the Batteries .................. 49 Cleaning the MiniScan EZ ....................49 Maintaining the Instrument Standards ................49 Replacing the Lamp ......................
- Page 5 MiniScan EZ User’s Manual Version 2.0 45/0 LAV Nose Cone with Lower Glass Assembly (HL#A02-1014-374) or Nose Cone with Lower Polycarbonate Assembly (HL# D02-1014-427) ............64 420-nm UV Filter Assembly (HL# D02-1014-436) ..............64 EasyMatch QC Software ......................64 INSTRUMENT REPLACEMENT, REPAIR, PROBLEMS, AND QUESTIONS ....65 When You Need Assistance ....................
- Page 6 MiniScan EZ User’s Manual Version 2.0...
-
Page 7: Setting Up The Miniscan Ez
Because of its compact design and portability, MiniScan EZ can be used to measure objects that would be difficult to position at the measurement port of a larger color instrument normally found in a laboratory, and in locations other than a laboratory. -
Page 8: Standard Accessories
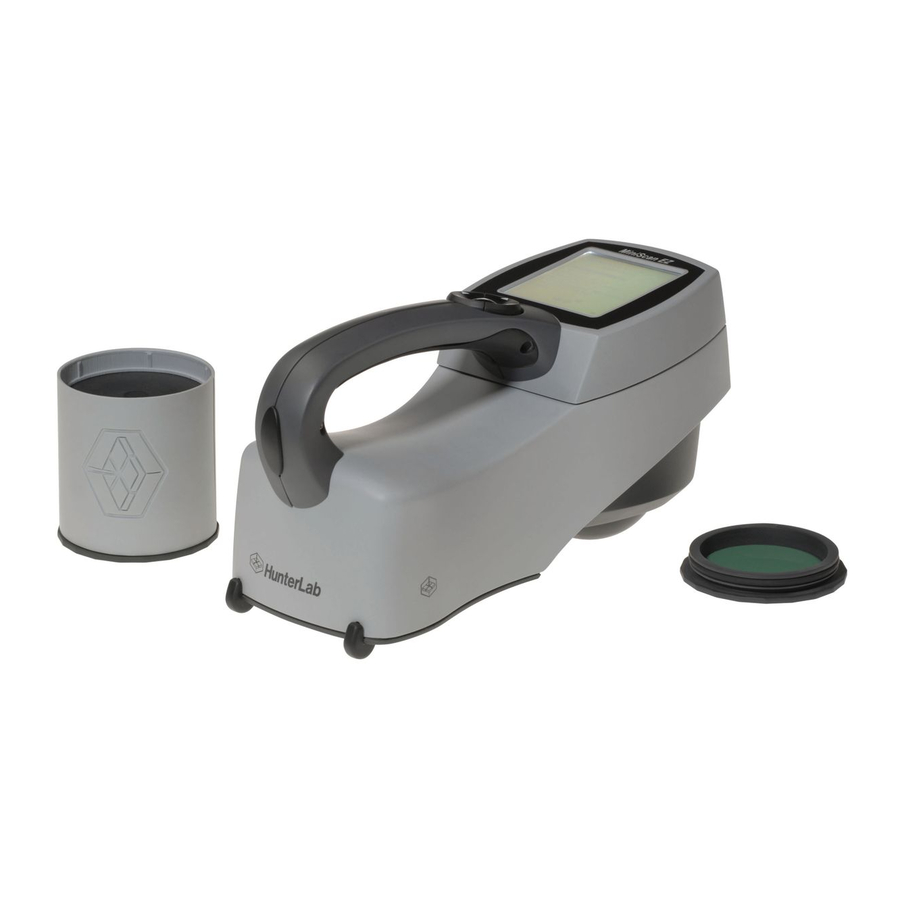
MiniScan EZ User’s Manual Version 2.0 Standard Accessories The following accessories are included with the MiniScan EZ and can be found in the provided carrying case: • Dust Cover • Calibration Cylinder with calibrated white tile, black glass or light trap and green check tile •... -
Page 9: Calibration Cylinder
MiniScan EZ User’s Manual Version 2.0 Calibration Cylinder The Calibration Cylinder houses the NIST traceable white calibrated tile that is placed at the sample port during standardization to set the top of scale, the black glass or light trap that is placed at the sample port during standardization to set the zero, and the green check tile that is used to assess long-term instrument performance during the green tile test. -
Page 10: Usb Cable
Installation Before operating the MiniScan EZ, you need only install the batteries. You may also wish to connect it to a computer or to an optional component, such as a printer. Instructions are provided below. 1. Unpack the carrying case and remove wrappings and cable ties. Inspect for damage and notify the carrier and HunterLab immediately if any is discovered. - Page 11 5. If the instrument is to be used connected to a computer, printer, or other USB device, plug the hexagonal (Mini-A) end of the USB cable into the USB port on the MiniScan EZ. Some device cables may require use of a Standard-A to Mini-A adapter.
- Page 12 MiniScan EZ User’s Manual Version 2.0...
-
Page 13: The Basics Of Miniscan Ez Operation
160 x 160-pixel liquid crystal display (LCD) screen. When an item is to be measured using the MiniScan EZ, the area of interest should be placed flush at the sample port with the side of the sample to be measured toward the instrument. The sample must completely cover the sample port. -
Page 14: Menus
Across the top of each measurement screen are numbers indicating (left to right) the datalog number for this reading if it was saved to the MiniScan EZ’s memory, the lamp flash count since the batteries were last replaced, and the number of hours and minutes since the instrument was last standardized. -
Page 15: About Your Instrument
MiniScan EZ any time there is a significant change (greater than 5°F) in ambient temperature. For example, if you move your MiniScan EZ from your air-conditioned office to an outdoor site that is 90°F, you should standardize again outdoors after the instrument has had a chance to stabilize under the new temperature. -
Page 16: Standardization Process
Testing MiniScan EZ. Figure 16. Calibration Cylinder Note: If your MiniScan EZ is a 45°/0° model, your cylinder will contain a black glass. If it is a diffuse/8° (sphere) model, it will contain a light trap. 3. Select STANDARDIZE from the MiniScan EZ’s main menu by moving the cursor highlight to its position using the up and down arrow buttons and then pressing the center (GO) button. - Page 17 7. Replace the black glass or light trap with the white tile, which is contained in the calibration can’s end cap. Press the nose cone of the MiniScan EZ to the white side of the tile. Check that the sample port is flat against the tile.
- Page 18 MiniScan EZ User’s Manual Version 2.0 Figure 21. Standardization is Complete...
-
Page 19: Reading Individual Samples
Note: These instructions apply when AVERAGE in the product setup is set to OFF. 1. Select READ from the MiniScan EZ’s main menu. Move the cursor highlight to its position using the up and down arrow buttons and then press the center (GO) button. - Page 20 MiniScan EZ User’s Manual Version 2.0 Figure 24. Reading a Standard or Sample 6. Press the center (GO) button to read. The standard or sample is read and its values (as configured in the product setup) displayed on the screen.
-
Page 21: Defining Standard, Sample And Tolerances
This object is the one to which others will be compared and deemed acceptable or unacceptable. The product standard may either be a physical item that you measure using the MiniScan EZ or a set of color values that you enter the MiniScan EZ’s memory. - Page 22 MiniScan EZ User’s Manual Version 2.0...
-
Page 23: Configuring Options And Setups
This chapter describes how to configure and maintain the instrument options and product setups. A product setup is a set of parameters that describe the operation of the MiniScan EZ for a specific product. Up to 100 setups may be stored in the instrument’s memory. The parameters that must be defined for each product include the color scale for display, target color values for the product, and the acceptable tolerances applied to the standard values. -
Page 24: Setup Name
MiniScan EZ User’s Manual Version 2.0 then move on to configure more parameters in the same manner, if desired. When all parameters are as desired, press the CENTER (Main Menu) button to accept the settings and return to the main menu or LEFT ARROW (Back) to select another setup to configure. -
Page 25: Average
The color values for a numeric standard are entered and stored in the product setup. Choose HITCH when you wish to alter the readings made on the MiniScan EZ to better correlate to another color measurement instrument. A specific standard with known color values from the other (reference) instrument will then be read with the MiniScan EZ and that reading manually adjusted within the product setup to match the reference instrument. - Page 26 MiniScan EZ User’s Manual Version 2.0 2. Display: Use the down arrow button to move down to the Display parameter, then scroll through your choices using the right arrow button. Your display choices are as follows: a. ABSOLUTE causes raw color scale values (such as L, a, and b) to be displayed for the most recent standard or sample read.
- Page 27 MiniScan EZ User’s Manual Version 2.0 e. SPECTRAL PLOT displays the raw reflectance values for each wavelength plotted for the most recent standard or sample. Figure 38. Spectral Plot Display DIFF PLOT, displays the difference between the standard and the most recent sample plotted in raw reflectance values.
- Page 28 MiniScan EZ User’s Manual Version 2.0 Note: Refer to the Measurement Values chapter for a description of each color scale. COLOR INDEX: Choose the color index you wish to see. Use the down arrow button to move down to the Color Index parameter, then scroll through your choices using the right arrow button.
- Page 29 MiniScan EZ User’s Manual Version 2.0 Table 1. Summary of Measurement Values on MiniScan EZ Illuminant/Observer Scales Differences Indices A/2, A/10 CIE Lab dL*a*b* C/2, C/10 CIE LCh dL*C*h D50/2, D50/10 Hunter Lab dLab YI E313 D55/2, D55/10 dXYZ WI E313...
-
Page 30: Standard Values
MiniScan EZ User’s Manual Version 2.0 STANDARD VALUES The Standard Values parameter is only relevant when the Standard Type is physical, numeric, or hitch. When Standard Values is highlighted, press the RIGHT ARROW button to move to the Standard Values configuration screen. -
Page 31: Autosearch
MiniScan EZ User’s Manual Version 2.0 AUTOSEARCH Select YES if you wish to include this product setup when using the automatic standard searching feature, which transfers you to the most appropriate product setup (based on the standard’s color values) each time a sample is read. Select NO if you do not which to include this product setup in automatic standard searching. -
Page 32: Global Options
Figure 45. Display Settings Menu 1. Screen angle: You may rotate the text on the MiniScan EZ screen so that it may be easily read from any side of the instrument. Each press of the RIGHT ARROW button increases the displayed value 90°. -
Page 33: Setups Locked
1. When the display turns off, the press of any button on the button pad causes the display to turn back on. Note: The MiniScan EZ will turn off entirely once 5 minutes elapse since the last button press. -
Page 34: Stdz Interval
AUTOSEARCH One of the features of the MiniScan EZ is that it allows you to automatically find the closest physical, numeric, or hitch standard stored in the instrument’s memory to a sample read. When AUTOSEARCH is highlighted and the RIGHT ARROW button is pressed, a submenu appears. In... -
Page 35: Setup Maintenance
MiniScan EZ User’s Manual Version 2.0 Year is set first, then month, then day, followed by the hour and minutes. Press SET to accept the entered date and time and leave the Date/Time screen. Press BACK to discard the entered date and time and leave the Date/Time screen. -
Page 36: Print All Setups
Figure 51. Setup Output to Printer CLONE ALL SETUPS CLONE ALL SETUPS appears in the Setup Maintenance menu only when two MiniScan EZs are connected via the standard MiniScan EZ USB cable and a Standard-A to Mini-A adapter. When Clone All Setups is... - Page 37 MiniScan EZ User’s Manual Version 2.0 chosen on one of the MiniScan EZs, the full set of 100 product setups are sent from the initiating instrument to the second connected instrument. This process takes several minutes. Press CANCEL to stop the setup cloning while it is in progress.
- Page 38 MiniScan EZ User’s Manual Version 2.0...
-
Page 39: Reading, Storing And Printing Data
Note: These instructions apply when Average in the product setup is set to a value other than OFF. 1. Select READ from the MiniScan EZ’s main menu. Move the cursor highlight to its position using the UP and DOWN ARROW buttons and then press the center (GO) button. - Page 40 Note: The meanings of the keypad buttons have now changed slightly, as shown on the keypad map at the bottom of the screen. 6. Press SAVE/PRINT (down arrow) to both save the reading in the MiniScan EZ’s memory and print the reading (if a USB printer is connected).
-
Page 41: Working With Saved Readings
Figure 58. View Std Dev Working with Saved Readings Readings stored in the MiniScan EZ’s memory during the read process may be viewed, printed, and deleted later, if desired. To work with saved readings, select SAVED READINGS from the main menu by moving the cursor highlight to its position using the UP and DOWN ARROW buttons and then pressing the center (GO) button. -
Page 42: Delete All Readings
Select the PRINT ALL READINGS using the UP AND DOWN arrows. This function outputs all the measurements stored in the MiniScan EZ’s memory to the connected device (computer or printer) attached to the MiniScan EZ’s USB port. When complete, you are returned to the Saved Readings menu. ... -
Page 43: Filter By Setup
FILTER BY SETUP FILTER BY SETUP allows you to view readings saved in the MiniScan EZ’s memory by choosing the product setup used to measure the readings of interest. The Saved Readings screen that allows you to choose the appropriate setup is shown first. - Page 44 MiniScan EZ User’s Manual Version 2.0...
-
Page 45: Sample Preparation And Presentation
When taking readings, make sure that the MiniScan EZ sample port is flat against the sample surface. This may be difficult if the sample is curved or irregularly shaped. Look at the instrument from all angles... -
Page 46: Directional Samples
MiniScan EZ User’s Manual Version 2.0 Figure 63. Measuring Curved Surfaces When measuring thin, soft materials (such as fabric or paper) place a hard, flat surface behind the product to ensure proper contact with the sample port and to ensure that it does not pillow into the sample port. - Page 47 MiniScan EZ User’s Manual Version 2.0...
- Page 48 MiniScan EZ User’s Manual Version 2.0...
-
Page 49: Maintaining And Testing Miniscan Ez
Keep the calibration cylinder closed and in the carrying case when it is not being used. If a tile is lost or damaged, contact HunterLab as described in ‘When You Need Assistance’ concerning replacement. -
Page 50: Replacing The Lamp
Replacing the Lamp Lamp replacement requires a trained technician. Contact the HunterLab Customer Experience Team to arrange for lamp replacement. Please read ‘When You Need Assistance’, prior to contacting HunterLab. Diagnostics Diagnostics is selected from the main menu by moving the cursor highlight to its position using the up and down arrow buttons and then pressing the center (GO) button. -
Page 51: Green Tile Check
GREEN TILE CHECK The first Green Tile Check screen allows you to compare the values in your MiniScan EZ’s memory to the values read at factory printed on the back of your green check tile. If the values match, press the center button (GO) to continue. -
Page 52: Signal Levels
SIGNAL LEVELS The Signal Levels diagnostic first prompts you to place a sample at the measurement port. Normally this will be the white tile, but you may be instructed otherwise by HunterLab’s Customer Experience Team. Place the sample and press GO. - Page 53 MiniScan EZ User’s Manual Version 2.0 Figure 75. Diagnostics Self-Test Press DIAGS MENU to return to the Diagnostics menu. Press MAIN MENU to return to the main menu.
- Page 54 MiniScan EZ User’s Manual Version 2.0...
-
Page 55: Specifications
Operating Conditions MiniScan EZ can be stored in an area with a temperature range of -20°C to 65°C (-5°F to 150°F) for up to 3 weeks and can be operated under temperature conditions of 10°C to 40°C50 (°F to 104°F). For specification-level performance, the recommended temperature range is 21-28°C (70 -82°... -
Page 56: Conditions Of Illumination
MiniScan EZ User’s Manual Version 2.0 Conditions of Illumination and Viewing Light Source Pulsed xenon Source UV Content Match to D65 with CIE rating of CC or better Lamp Life >1 million flashes 45°/0° Illumination Circumferential using a cylindrical mirror Integrating Sphere 2.5-inch (63.5 mm) diameter, coated with... -
Page 57: Instrument Performance
MiniScan EZ User’s Manual Version 2.0 Instrument Performance Range: 400-700 nm Spectral Data Reporting Interval every 10 nm Bandwidth at Half-height 10 nm Wavelength Accuracy ≤0.75 nm Photometric Range 0-150% reflectance Photometric Resolution 0.01% reflectance Measurement Speed (at 23°C) ≤1.5 seconds... - Page 58 MiniScan EZ User’s Manual Version 2.0 DECLARATION OF CONFORMITY according to ISO/IEC Guide 22 and EN 45014 Manufacturer’s Name: Hunter Associates Laboratory, Inc. Manufacturer’s Address: 11491 Sunset Hills Road Reston, Virginia U.S.A. 20190 Declares that the Product: Product Name: MiniScan EZ Model: MSEZ-4500L, MSEZ-4500S, MSEZ-4000L, MSEZ-4000S.
-
Page 59: Options And Sample Devices
Options and Sample Devices There are many options and devices available for positioning samples at the measurement port of the MiniScan EZ and for making the instrument easier to use. HunterLab part numbers are provided for your convenience in ordering. -
Page 60: Bar Code Scanner
STANDARD-A TO MINI-A USB ADAPTER (HL#A21-1013-859) The optional Standard-A to Mini-A USB adapter allows USB devices—such as printers, keyboards, and the bar code scanner—to connect to the MiniScan EZ’s Mini-A USB port. It can also be used to connect two MiniScan EZ instruments together. - Page 61 Otherwise, data loss might occur. Thumb drive information If a thumb drive has been inserted and is recognized, the MiniScan EZ will beep 2 times. Pressing the RIGHT ARROW key from the MAIN MENU displays a Thumb Drive Information screen showing certain characteristics of the drive.
-
Page 62: White Tile Replacement Or Recalibration
(152-mm), 10-inch (254-mm), and 12-inch (305-mm) cylindrical fiber or yarn package diameters. To use the assembly, snap the appropriate port adapter onto the nose cone of the MiniScan EZ. Position the port adapter over the cylindrical fiber or yarn package and proceed with measurements. Take care to position the MiniScan EZ so that it will not move during readings. -
Page 63: Skein Holder (Hl# 02-7396-00)
Secure it in place with the detachable arms on the sides of the skein holder. Place the skein holder on a flat surface or the calibration tile holder and press the MiniScan EZ’s sample port flat against the sample. -
Page 64: Lower Polycarbonate Assembly (Hl# D02-1014-427)
420-nm UV Filter Assembly (HL# D02-1014-436) This option provides a 420-nm UV filter in a replaceable assembly for the 45/0 LAV MiniScan EZ. The UV filter may be replaced when necessary, however, the instrument is not to be used without the UV filter assembly in place. -
Page 65: Instrument Replacement, Repair, Problems, And Questions
Customer Experience team. Often remote troubleshooting can resolve most issues. If repair is required, your instrument will need to be returned to HunterLab for service by a trained technician. HunterLab offers an on-site preventative maintenance program where in a HunterLab Service technician will come to your location to perform this maintenance. -
Page 66: Warranty
The HunterLab warranty does not cover consumable items such as lamps, fuses, batteries, etc. An instrument registration card is available online at https://www.hunterlab.com/ras-registration.html. It is important that the instrument owner fills this out on receipt of equipment. -
Page 67: Shortage
Notify HunterLab immediately of the shortage in writing. INCORRECT SHIPMENT Perform the following procedure if material received does not correspond with your order. • Notify HunterLab immediately, referencing your order number and item. • Hold incorrect items until return shipping instructions are received. - Page 68 MiniScan EZ User’s Manual Version 2.0...
-
Page 69: Index
MiniScan EZ User’s Manual Version 2.0 Index 420-nm UV filter assembly, 64 EasyMatch QC Software, 64 45/0 fiber package adapter, 62 External Printer, 59 45/0 LAV nose cone with glass, 64 Fiber package adapter, 62 45/0 LAV nose cone with polycarbonate, 64 Filter By Setup, 43... - Page 70 MiniScan EZ User’s Manual Version 2.0 Product Setups, 23 Spectral Data display, 26 Product Standard, 21 Spectral Difference display, 26 Prompts, 14 Spectral Plot display, 27 Reading, 19 Standard, 21 Regulatory Notice, 57 Standard, 24 Replacing the Batteries, 49 Standard Values, 30...
Need help?
Do you have a question about the MiniScan EZ and is the answer not in the manual?
Questions and answers