
Related Manuals for HunterLab EasyMatch QC


Summary of Contents for HunterLab EasyMatch QC
- Page 1 EasyMatch ® 4.50 and above User’s Manual UltraScan ® A60-1012-402 Manual Version 2.1 Hunter Associates Laboratory 11491 Sunset Hills Road Reston, Virginia 20190, USA www.hunterlab.com An ISO 9001:2008 Certified Company...
- Page 2 SOFTWARE VALIDATION STATEMENT HunterLab’s Software Validation program details the following requirements for software projects: • Establishment of performance requirements • Creation of a project plan • Development and approval of program requirements • Design • Coding • Design review and approval •...
- Page 3 Copyrights and Trademarks This documentation contains proprietary information of Hunter Associates Laboratory, Inc. Its reproduction, in whole or in part, without express written consent of Hunter Associates Laboratory, Inc. is prohibited. Windows is a registered trademark of Microsoft Corporation in the United States and other countries. Duraflect, Spectraflect, and Spectralon are trademarks of Labsphere, Inc.
- Page 4 Safety Notes For your safety when using your color measurement equipment, you should pay particular attention to the following types of statements in the hardware section of this User’s Manual. Each description is shown in its representative typeface. Notice: General safety instruction that should be observed at all times while operating the instrument. CAUTION Specific safety instruction critical to the type of instrument operation being explained in the area of the manual where the caution appears.
-
Page 5: Table Of Contents
Table of Contents PART I. SOFTWARE OVERVIEW INTRODUCTION TO EASYMATCH QC ..............1-1 Organization of the EasyMatch QC User’s Manual ............... 1-1 What is EasyMatch QC? ........................1-2 Features ............................... 1-3 Jobs ..............................1-3 Templates ............................1-4 Data Views ............................1-6 Database ............................ - Page 6 File/Header//Footer Setup ........................ 3-19 File/Print Job Setup .......................... 3-20 File/Print Job Preview ........................3-22 File/Print Job ............................ 3-23 File/Printer Setup ..........................3-24 File/Page Setup ..........................3-25 File/Import QTX Format ......................... 3-26 File/Export ............................3-27 QTX Format ............................ 3-27 SLI-Taper ............................3-27 File/E-Mail ............................
- Page 7 Sensor/Diagnostics ..........................8-15 THE WINDOW MENU ....................9-1 Window/New Window ........................9-1 Window/Cascade ..........................9-2 Window/Tile ............................9-3 Window/List of Open Jobs ........................ 9-4 THE HELP MENU ...................... 10-1 Help/Help Topics ..........................10-1 Help/About ............................10-2 HunterLab on the Web ........................10-3...
- Page 8 PART III. INSTRUMENTS ULTRASCAN VIS ....................11G-1 UltraScan VIS Features ........................ 11G-2 Reflectance Port ........................... 11G-2 Small Area View .......................... 11G-2 Retroviewer ..........................11G-3 Sample Clamp ..........................11G-3 Transmission Compartment ......................11G-4 Specular Included/Excluded Port ....................11G-4 Automated UV Control ........................ 11G-5 Indicator Lights ..........................
- Page 9 Maintaining the Instrument Standards ..................11G-49 Cleaning the Lens Surface and Didymium Filter ............... 11G-50 Cleaning the Sphere ........................11G-50 UltraScan VIS Specifications ...................... 11G-51 Physical Characteristics......................11G-51 Environmental Requirements ..................... 11G-51 Power Required .......................... 11G-51 Conditions of Illumination and Viewing ..................11G-52 Instrument Performance ......................
- Page 10 APHA-10, -20, and -50 mm ......................A-16 ASBC 10-mm ..........................A-16 ASTM D1500-33 mm ........................A-17 b/a Ratio ............................A-18 b*/a* Ratio ............................. A-18 Brightness 457 ..........................A-19 Color Value ............................ A-19 Dominant Wavelength and Excitation Purity ................A-20 EBC-10 mm............................ A-21 EP 10-mm and EP-20 mm ......................
-
Page 11: Part I. Software Overview
Part I. Software Overview... -
Page 12: Introduction To Easymatch Qc
This manual is comprehensive in that it provides information concerning your color measurement instrument and computer hardware (including installation, use, maintenance, and troubleshooting) as well as instructions for use of the EasyMatch QC software. Thus, every component of your color measurement system is covered. -
Page 13: What Is Easymatch Qc
The basic features of EasyMatch QC are discussed in the rest of this chapter, lessons helping you learn to use those features are given in Chapter 2, and the various software menus are explained in chapters 3 through 10. -
Page 14: Features
If you wanted to transfer a job to another computer or another user who also has EasyMatch QC, the job file (with a .JSD file extension) would contain all the information needed to examine and/or reproduce your results. -
Page 15: Templates
EasyMatch QC User’s Manual Version 2.1 Color Data Table display Standard Samples Color Plot display Tab with the Spectral Plot job name display As you can see on the tab, this job is called “Green.” You can see that the job contains a standard called “Standard 1”... - Page 16 A template is meant to be used as a starting point in creating a new job when the same views are used for many jobs. You can then “fill” the template with measurements and configuration settings. Several application-specific templates are installed with EasyMatch QC. These templates provide a starting point for new jobs.
-
Page 17: Data Views
EasyMatch QC User’s Manual Version 2.1 Templates contain no standards or samples. The measurements would be added to the job as they are made. The screen configuration and options for each data view comprise the template and will be part of any job created using the template. - Page 18 EasyMatch QC User’s Manual Version 2.1 Note: The Job Tree is only visible when Job Tree is checked in the View menu. Single or multiple items may be highlighted in this view. Click the “+” next to an item to open the branches below it or the “-”...
- Page 19 EasyMatch QC User’s Manual Version 2.1 many scales, indices, and differences in as many illuminant/observer combinations as you wish and/or indicate hitch factors to apply to the standard and its samples. See the “Default Tolerances” section in the Options Menu chapter for instructions on setting tolerances.
- Page 20 EasyMatch QC User’s Manual Version 2.1 See Lesson 5 in the next chapter for detailed instructions on using a hitch standard. • Show This Item Only: This command appears for standards only and causes the chosen standard and its associated samples alone to be displayed in the Job Tree. All other standards and samples are removed from the Job Tree display.
- Page 21 EasyMatch QC User’s Manual Version 2.1 • Print this View: This command prints the Job Tree view in a fashion similar to that shown below. 1-10 Introduction to EasyMatch QC...
- Page 22 EasyMatch QC User’s Manual Version 2.1 • Icon Sizes: Choosing this command allows you to choose to display small icons, large icons, or no icons to represent each standard and sample in the Job Tree. • Show All Items: This command opens all the branches of the Job Tree so that every standard and sample is visible.
- Page 23 EasyMatch QC User’s Manual Version 2.1 • Collapse the tree: This command closes all the branches of the Job Tree so that only the standards are visible. • Maximize this View: This command causes the currently-selected view to be enlarged to the full size of the job.
- Page 24 You may also insert custom fields into the Color Data Table using the Insert Custom Field button. These fields may consist of data obtained from outside EasyMatch QC or calculated formulas. Follow the instructions below to insert a custom field. More detailed instructions are also provided in Lesson 8 in the next chapter.
- Page 25 EasyMatch QC User’s Manual Version 2.1 2. Click the radio button next to Data Field and then the radio button next to New. Type a label for the data field into the Label box. In this example, “Oven Temperature” was used.
- Page 26 EasyMatch QC User’s Manual Version 2.1 Custom Formula Field 1. Click Insert Custom Field. The Configure Custom Field box appears. 2. Click the radio button next to Formula Field. Type a label for the formula field into the Label box. In this example, “ABC Index” was used.
- Page 27 EasyMatch QC User’s Manual Version 2.1 4. The outlined cell represents where your custom field will be inserted. Place your cursor in the Formula box at the top of the screen and type “=” (equals). 5. Type the formula. Further information follows.
- Page 28 EasyMatch QC User’s Manual Version 2.1 The operators you may use in your formulas are: Addition Subtraction Power operator Multiplication Division & Logical And Logical Or Negation > Greater than < Less than Equality Sum a range of cells. Use parentheses as necessary to indicate the desired order of operations.
- Page 29 EasyMatch QC User’s Manual Version 2.1 the cell at Column G, same row. (A1+B1)*C1 Adds the first two cells and multiplies the result by the third. IF(A1>5, A1*2, A1*3) If the contents of A1 are greater than 5, then multiply A1 by 2, else multiply A1 by 3.
- Page 30 EasyMatch QC User’s Manual Version 2.1 • Change View: This command allows you to replace the current view with another type of view (i.e., replace the 2D Color Plot with a Spectral Plot). • Delete View: This command allows you to remove the current view from the job display.
- Page 31 EasyMatch QC User’s Manual Version 2.1 on the plot relative to the standard and each other. If tolerances have been set, the tolerance limits will be shown as a red box (for rectangular tolerances), ellipse (for elliptical tolerances), or “pie segment”...
- Page 32 EasyMatch QC User’s Manual Version 2.1 • Print Preview: This command shows on-screen what the 2D Color Plot will look like when printed. • Print this View: This command prints the 2D Color Plot view in a fashion similar to that shown below.
- Page 33 EasyMatch QC User’s Manual Version 2.1 • Change View: This command allows you to replace the current view with another type of view (i.e., replace the 2D Color Plot with a Spectral Plot). • Delete View: This command allows you to remove the current view from the job display.
- Page 34 EasyMatch QC User’s Manual Version 2.1 rectangular tolerances), ellipsoid (for elliptical tolerances), or “pie segment” (for polar tolerances) around the standard position. Click on this view to make it active. While this view is active, the following options are available by clicking the right mouse button: •...
- Page 35 EasyMatch QC User’s Manual Version 2.1 • Print Preview: This command shows on-screen what the 3D Color Plot will look like when printed. • Print this View: This command prints the 3D Color Plot view in a fashion similar to that shown below.
- Page 36 EasyMatch QC User’s Manual Version 2.1 • Change View: This command allows you to replace the current view with another type of view (i.e., replace the 3D Color Plot with a Spectral Plot). • Delete View: This command allows you to remove the current view from the job display.
- Page 37 EasyMatch QC User’s Manual Version 2.1 you may display a flag indicating the name of the item displayed and the illuminant/observer combination shown. The following options are available by clicking the right mouse button within the boundaries of the view: •...
- Page 38 EasyMatch QC User’s Manual Version 2.1 • Print this View: This command prints the Color Render view in a fashion similar to that shown below. Introduction to EasyMatch QC 1-27...
- Page 39 EasyMatch QC User’s Manual Version 2.1 • Change View: This command allows you to replace the current view with another type of view (i.e., replace the 2D Color Plot with a Spectral Plot). • Delete View: This command allows you to remove the current view from the job display.
- Page 40 EasyMatch QC User’s Manual Version 2.1 Make one selection in the Illuminant/Observers box and then select either one color scale and one difference or index or a total of four differences and indices. The red number next to each parameter indicates how many more selections you have available.
- Page 41 EasyMatch QC User’s Manual Version 2.1 • Change View: This command allows you to replace the current view with another type of view (i.e., replace the 2D Color Plot with a Spectral Plot). • Delete View: This command allows you to remove the current view from the job display.
- Page 42 EasyMatch QC User’s Manual Version 2.1 Click anywhere in the white portion of the view and begin typing to enter your memo. Text does not wrap, so you will want to use the Enter key at the end of each line to proceed to the next line. While this view is active, the following options are available by clicking the right mouse button: •...
- Page 43 EasyMatch QC User’s Manual Version 2.1 • Print Preview: This command shows you on-screen what the view will look like when printed. • Print this View: This command prints the Memo View in a similar fashion to that shown below.
- Page 44 EasyMatch QC User’s Manual Version 2.1 • Change View: This command allows you to replace the current view with another type of view (i.e., replace the 2D Color Plot with a Spectral Plot). • Delete View: This command allows you to remove the current view from the job display.
- Page 45 EasyMatch QC User’s Manual Version 2.1 transmittance (maximum absorbance) for each measurement is shaded pink. An example of this view is shown below. Click on this view to make it active. While this view is active, the following options are available by clicking the right mouse button: •...
- Page 46 EasyMatch QC User’s Manual Version 2.1 Spectral Data Type is Reflectance/Transmittance) When Auto Size Cells is checked, the spreadsheet cells will be automatically sized based on the data contained in them. • Print Preview: This command shows you on-screen what the view will look like when printed.
- Page 47 EasyMatch QC User’s Manual Version 2.1 • Change View: This command allows you to replace the current view with another type of view (i.e., replace the 2D Color Plot with a Spectral Plot). • Delete View: This command allows you to remove the current view from the job display.
- Page 48 EasyMatch QC User’s Manual Version 2.1 Click on this view to make it active. While this view is active, the following options are available by clicking the right mouse button: • Show Background: This item, when checked, causes the colored background to be shown on the Spectral Plot.
- Page 49 EasyMatch QC User’s Manual Version 2.1 • Print this View: This command prints the Spectral Plot view in a similar fashion to that shown below. 1-38 Introduction to EasyMatch QC...
- Page 50 EasyMatch QC User’s Manual Version 2.1 • Change View: This command allows you to replace the current view with another type of view (i.e., replace the 2D Color Plot with a Spectral Plot). • Delete View: This command allows you to remove the current view from the job display.
- Page 51 EasyMatch QC User’s Manual Version 2.1 In this example, “Standard 1” is the name of the standard. Four separate graphs are shown, each with three samples displayed. The top graph shows the change in lightness/darkness, or L*. The standard is plotted as the center line of this graph.
- Page 52 EasyMatch QC User’s Manual Version 2.1 Make your selections for each parameter, including the color scale, fourth trace, and illuminant/observer combination. A line and point display is shown in the example at the beginning of this section. A column display graphs each data point as a rectangle above or below the standard line.
- Page 53 EasyMatch QC User’s Manual Version 2.1 • Print this View: This command prints the Trend Plot view in a fashion similar to that shown below. 1-42 Introduction to EasyMatch QC...
-
Page 54: Database
(Chapter 3) for information on saving data to the database and recalling data from the database and the Options Menu chapter (Chapter 7) for information on configuring the database type and location. Once the database is configured, its name is displayed on the EasyMatch QC title bar after the job name. -
Page 55: Toolbar Buttons
Toolbar Buttons The toolbar at the top of the screen provides quick access to many functions in EasyMatch QC via its buttons. All functions incorporated into the toolbar may also be accessed through the drop-down menus. -
Page 56: Lessons
This chapter provides lessons that walk you step-by-step through some common procedures in EasyMatch QC. These lessons have you configure screens and use sample data which may not apply to your situation. However, if you work through the lessons you should end up with a good feel for how the software operates and then you can substitute your own samples and displays for the examples. -
Page 57: Lesson 1: Setting Up A Job Template
EasyMatch QC User’s Manual Version 2.1 Lesson 1: Setting Up a Job Template Suppose you wish to configure a job template called “Lesson 1” to use for jobs in which you display your measurement data. The information you require is listed below. - Page 58 EasyMatch QC User’s Manual Version 2.1 6. Locate CIELAB in the Scales drop-down list and select it. Click the left arrow (<<) button next to the Scales list. CIELAB will move into the Selected Items box. 7. Locate dE* in the Differences drop-down list and select it. Click the left arrow (<<) button next to the Differences list.
- Page 59 EasyMatch QC User’s Manual Version 2.1 11. Click D65/10, then C/2 in the Illuminant/Observers box to select them. 12. Click Average in the Statistics box to select it. 13. At the right bottom of the screen, make the following selections:...
- Page 60 EasyMatch QC User’s Manual Version 2.1 15. Right click the data view to the right of the Color Data Table at the top of the screen. Select Change View from the menu that appears and then 2D Color Plot. The view will be changed to the 2D Color Plot.
- Page 61 EasyMatch QC User’s Manual Version 2.1 22. Make the following selections on the Trend Plot Configuration screen: Quick set with Scale Unchecked Trace 1 Difference, dL* Trace 2 Difference, da* Trace 3 Difference, db* Trace 4 Difference, dE* Illuminant/Observer D65/10...
- Page 62 EasyMatch QC User’s Manual Version 2.1 23. Click OK to accept the configuration. 24. Choose Default Tolerances from the Options menu. The Tolerances screen appears. 25. On the Scales tab, choose CIELAB from the drop-down box beneath Selected Scale. Also choose D65/10 from the drop-down box beneath Illuminant/Observer.
- Page 63 32. Back on the template screen, select Save Job Template from the File menu. Choose to name the template “Lesson 1” and save it in the Job Templates subfolder to EasyMatch QC. 33. Move your mouse over the right edge of the Job Tree until a double-headed arrow appears.
- Page 64 EasyMatch QC User’s Manual Version 2.1 36. Select Save Job Template from the File menu. The template will be saved again. 37. Close the open job. 38. Choose Application Preferences from the Options menu. The Application Preferences screen appears. 39. On the Startup Defaults tab, Select Lesson 1 for the Default Template and click OK.
-
Page 65: Lesson 2: Standardizing And Confirming Standardization Using The White Tile
After standardization, we will confirm a reading of the white calibration tile. Your instrument should already be attached to the computer and installed in EasyMatch QC before performing this lesson. Instructions for standardization in transmittance are provided in Lesson 3. - Page 66 EasyMatch QC User’s Manual Version 2.1 5. Center the black glass at the measurement port with the shiny side toward the port. For a sphere instrument, cover the reflectance port with the light trap. Click Next to continue. 6. The instrument will read the glass or trap and set the zero. When it is finished, the following prompt will appear.
- Page 67 EasyMatch QC User’s Manual Version 2.1 9. Click Finish to complete the standardization process and OK to exit the Modes screen. You will see the standardization mode update on the right side of the status bar if you chose to view the status bar.
-
Page 68: Lesson 3: Measuring In A Transmittance Mode
LabScan XE, MiniScan XE Plus, or MiniScan EZ, do not attempt this lesson. Your instrument should already be attached to the computer and installed in EasyMatch QC before performing this lesson. Most transmission measurements are made using the TTRAN (total transmittance) mode. The steps required for performing this type of measurement are described below. - Page 69 EasyMatch QC User’s Manual Version 2.1 5. Remove the black card from the transmission compartment. If you will be measuring a film or other clear solid sample, simply click Next to continue the standardization process. If you will be measuring a liquid, place a clear liquid (distilled water for water-based samples, toluene or benzene for resins, or mineral oil for oils) in a cell of the desired size and center the clear portion of the cell over the transmission port (sphere) in the transmission compartment.
-
Page 70: Lesson 4: Using A Hitch Standard
The offset value may be positive or negative and is automatically calculated by EasyMatch QC. When performing an additive hitch, the hitch standard should be very close in color to the samples you wish to measure using the hitch. For example, a reddish-orange standard should be used when measuring tomato products. - Page 71 Color Data Table for each parameter (such as L, a, and b) is the measured value times the ratio value determined by the hitch standard. The ratio value is automatically calculated by EasyMatch QC. The ratio hitch is slightly more robust than the additive hitch for measuring samples of varying colors.
- Page 72 EasyMatch QC User’s Manual Version 2.1 Note: Geometric differences between instruments cause differences in measured values, as can differences in sample preparation. Hitch standardization is recommended for use only among instruments with the same geometry and using a set procedure for sample preparation.
-
Page 73: Lesson 5: Querying The Database To Recall Or Delete Data
The calendar starts out with today’s date marked. Since we wish to delete all samples that are more than two weeks old, the starting date can be somewhat arbitrary. Choose January 1, 2004, which is a date before EasyMatch QC was released. 2-18... - Page 74 EasyMatch QC User’s Manual Version 2.1 6. Click the date drop-down in the “To” area to obtain a calendar on which you may select the ending date. As before, today’s date will be shown initially. Since we want to delete samples read two or more weeks ago, simply click on the date of two weeks ago.
- Page 75 EasyMatch QC User’s Manual Version 2.1 12. At this point you can examine the samples located and change your mind if you wish to keep any of them. You can click any of the column headers to sort the list on that column. Click (check) the box next to each sample you wish to delete.
- Page 76 EasyMatch QC User’s Manual Version 2.1 Data to be displayed in your job (not deleted) can be recalled in a very similar fashion. Simply choose Recall Measurement From Database from the File menu rather than Delete Measurement From Database. Lessons...
-
Page 77: Lesson 6: Using The Autotolerancing Feature
EasyMatch QC User’s Manual Version 2.1 Lesson 6: Using the Autotolerancing Feature CMC autotolerancing can be used to automatically fit a CMC ellipsoid to a standard and to calculate CIE L*a*b*, CIEL*C*h, or Hunter L, a, b tolerances for that standard based on the size and shape of that ellipsoid. - Page 78 EasyMatch QC User’s Manual Version 2.1 Hue and Chroma Unchecked 3. Standardize the instrument and then read your standard. Name the standard however desired. 4. Right-click on the standard in the Job Tree and choose Properties from the menu that appears.
- Page 79 EasyMatch QC User’s Manual Version 2.1 11. Click the Calculate button. The L*a*b* D65/10° tolerances for this standard are automatically calculated and shown in the Tolerances boxes. 12. Click OK twice to accept the tolerances. You will now see the tolerances in your Color Data Table and 2D Color Plot for this standard.
- Page 80 EasyMatch QC User’s Manual Version 2.1 13. Save the job and save the standard to the database. The automatically-generated tolerances will also be saved. 14. You may now read samples to be compared to this standard. Lessons 2-25...
-
Page 81: Lesson 7: Sharing Data And Setups With A Colorflex, Miniscan Xe Plus, Or Miniscan Ez
EasyMatch QC. See the Sensor Menu chapter and Chapter 11 for more information. 2. Open an EasyMatch QC job and configure it as desired. You may modify the views later as long as SPECTRAL or ABSOLUTE TRISTIMULUS data is being uploaded. - Page 82 7. Suppose you wish to copy all of the measurements into your database for later use. Click Select All. All of the measurements will be highlighted. 8. Click Copy to Database. The measurements are saved in the EasyMatch QC database. 9. Click Close to close the Data log screen.
- Page 83 EasyMatch QC User’s Manual Version 2.1 1. Select Configure Setups from the Sensor menu. The following screen appears. 2. Since you wish to edit one setup, click Edit. The Product Setup Configuration screen appears. ColorFlex and MiniScan EZ MiniScan XE Plus 3.
- Page 84 EasyMatch QC User’s Manual Version 2.1 ColorFlex and MiniScan EZ MiniScan XE Plus 4. Click the Retrieve button. The parameters that are currently stored in your instrument for Setup Number 10 are brought into the Product Setup Configuration screen. ColorFlex and...
- Page 85 EasyMatch QC User’s Manual Version 2.1 ColorFlex and MiniScan EZ MiniScan XE Plus 6. Select YI (YIE for MiniScan EZ) from the drop-down box next to Index Scale. ColorFlex and MiniScan EZ MiniScan XE Plus 7. Select Physical from the drop-down box next to Standard Type. Center your product standard at the sample port and click the Read Standard button.
- Page 86 EasyMatch QC User’s Manual Version 2.1 ColorFlex and MiniScan EZ MiniScan XE Plus 8. Your setup has now been modified as desired on your computer screen. Click the Update Sensor button. The altered setup is sent to your instrument. Observe the change on your instrument’s display.
-
Page 87: Lesson 8: Using Custom Data And Formula Fields
EasyMatch QC User’s Manual Version 2.1 Lesson 8: Using Custom Data and Formula Fields Suppose you are measuring liquids with your spectrophotometer to assess color, and you also use a pH meter to assess the pH of each liquid. It would be wonderful if you could show the color values and the pH for each sample on one printout. - Page 88 EasyMatch QC User’s Manual Version 2.1 5. Click OK. 6. Add the “Data Fields” Text Field to the display and then OK from the Color Data Table Configuration screen. Note that the pH field has been added to the Color Data Table.
- Page 89 EasyMatch QC User’s Manual Version 2.1 11. Enter pH values for more samples and standards if you wish. 12. Right-click in the Color Data Table and return to the Color Data Table Configuration screen. 13. Click the Insert Custom Field button. The Configure Custom Field box appears.
- Page 90 EasyMatch QC User’s Manual Version 2.1 17. Click Set Formula, then OK. 18. Add the “pH Lightness” Text Field to the display, then click OK. The formula fills the pH Lightness column for each displayed sample and standard. Lessons 2-35...
-
Page 91: Lesson 9: Setting Up A Print Job
In the future, you may use any paper size and orientation you desire. Accept these settings and exit the printer properties pages. 3. In EasyMatch QC, choose File/Configure Company Logo. The Configure Company Logo screen appears. 4. Use the “...” (browse) button to locate your company logo file. This file must be in bitmap (.BMP) format. - Page 92 EasyMatch QC User’s Manual Version 2.1 7. In the Header Information box, delete the current text and type in “Lesson 9” as your header text. In the Footer Information box, delete the current text and type in “%n” to use the page number as the footer.
- Page 93 EasyMatch QC User’s Manual Version 2.1 10. Choose Print Job Setup from the File menu. The Print Job Setup screen appears. Note that the name of the default printer and the dimensions of the page and the printable area on the page are indicated at the top of the screen.
- Page 94 EasyMatch QC User’s Manual Version 2.1 12. Click on the Name “Company Logo” in the Selected Items box so that it is highlighted. Note the color that will be used to represent the logo (magenta in this example). 13. Move your mouse over the page representation in the middle of the screen. Click where you would like to locate one of the top corners of the logo box, drag the mouse across the page to where you would like to locate the opposite bottom corner of the logo box, and then release the mouse button.
- Page 95 EasyMatch QC User’s Manual Version 2.1 14. Highlight “Header” in the Available Items box and click Add to add a header to your printout. 15. Highlight Header in the Selected Items box and click and drag on the piece of paper to place the header on the page.
- Page 96 EasyMatch QC User’s Manual Version 2.1 18. Add the Color Data Table to the display across the bottom half of the page. 19. Add the 2D Color Plot to the printout in the left half of the remaining blank space.
- Page 97 EasyMatch QC User’s Manual Version 2.1 20. Add the Spectral Plot to the printout in the remaining blank space. The completed print layout for the first page of your printout appears as follows: 21. Click Add Page to add the second page to your report. You will receive a blank page on the Print Job Setup screen.
- Page 98 EasyMatch QC User’s Manual Version 2.1 22. Add the header and footer to your page, and then fill the rest of the page with the Spectral Data Table. The completed print layout for the second page of your printout appears as follows: 23.
- Page 99 EasyMatch QC User’s Manual Version 2.1 printed on this page (i.e., 400-550 nm) and then add and configure a Spectral Data Table on another page to print the rest of the range (i.e., 560-700 nm). Click OK to accept this spectral range.
-
Page 100: Lesson 10: Obtaining Shade Numbers
EasyMatch QC User’s Manual Version 2.1 Lesson 10: Obtaining Shade Numbers Shade numbers provide a convenient way of sorting samples into groups of similar color. This is helpful in situations where several separate pieces will be combined into a whole and the colors of the pieces must be closely matched. - Page 101 EasyMatch QC User’s Manual Version 2.1 7. Drop down the box next to Shade Blocks and select the number of shade blocks you wish to have fit inside your tolerance. For this lesson, select 5. 8. Look at tolerances you wrote down in Step 2. If the positive and negative values for each parameter (L*, a*, and b*) do not match exactly, calculate the average of the two.
- Page 102 EasyMatch QC User’s Manual Version 2.1 14. Read another sample, one that is further from the standard that the first one and link it to the same standard. Once the data is displayed in the Color Data Table, click the 555 Shade column header to sort the measurements based on their shade numbers.
-
Page 103: Lesson 11: Using A Data Series
EasyMatch QC User’s Manual Version 2.1 Lesson 11: Using a Data Series Suppose an ideal physical standard does not exist for your product, so you cannot read this standard with your instrument and then compare samples from your process with this standard. However, you do have... - Page 104 EasyMatch QC User’s Manual Version 2.1 Y Max = No maximum value Z Min = No minimum value Z Max = 70. 6. Click OK twice to exit the Tolerances screen and the Series Properties screen. The minimum and maximum values entered now show in the tolerance rows of the Color Data Table.
- Page 105 EasyMatch QC User’s Manual Version 2.1 2-50 Lessons...
-
Page 106: Lesson 12: Averaging Readings
EasyMatch QC User’s Manual Version 2.1 Lesson 12: Averaging Readings Suppose you are measuring a sample, such as corduroy, which is very directional. You’ve decided that the best way to measure it, taking its directionality into account, is to make four readings of the sample, rotating the fabric 90°... - Page 107 EasyMatch QC User’s Manual Version 2.1 5. In the Average Method area, click the radio button next to n of N and select 4 as the number of readings to average. 6. At the bottom of the screen, check the boxes next to both “Use Sample presentation prompts” and “Show prompts when measuring standards.”...
- Page 108 EasyMatch QC User’s Manual Version 2.1 8. Click the right arrow button to move to the prompt boxes for readings 3 and 4. Enter “Rotate sample 90 degrees” for these prompts, as well. 9. Click OK to close the Average Method screen.
- Page 109 EasyMatch QC User’s Manual Version 2.1 12. Rotate the sample 90 degrees and replace it at the port. Click Read. The standard is read again and its values placed in the Average Reading spreadsheet. 13. Per the prompt, rotate the sample 90 degrees again and replace it at the port. Click Read. The standard is read for the third time and its values placed in the Average Reading spreadsheet.
- Page 110 EasyMatch QC User’s Manual Version 2.1 14. Per the prompt, rotate the sample 90 degrees again and replace it at the port. Click Read. The standard is read for the fourth time and its values placed in the Average Reading spreadsheet.
- Page 111 EasyMatch QC User’s Manual Version 2.1 16. Right-click the averaged standard in the Job Tree and select Properties. The Standard Properties screen appears. 17. Note that the standard deviation and range for the 4 readings made and averaged are still available.
-
Page 112: Part Ii: Software Menu Commands
Part II. Software Menu Commands... -
Page 113: The File Menu
From the File menu you can open, save, and close jobs, as well as access the database, control the printer, e-mail jobs, and exit EasyMatch QC. The functions available through the File menu are described in the remainder of this chapter. -
Page 114: File/Open Job
EasyMatch QC User’s Manual Version 2.1 File/Open Job The Open Job command in the File menu allows you to open a pre-existing job that has been saved to your computer. The keyboard shortcut for this command is Ctrl + O. -
Page 115: File/Open Job Template
EasyMatch QC User’s Manual Version 2.1 File/Open Job Template The Open Job Template command in the File menu allows you to select a template to open and modify or use as the basis of a new job. When the Open dialog box appears, locate the template you wish to open from any drive or folder accessible by your computer. -
Page 116: File/Recall Measurement From Database
EasyMatch QC User’s Manual Version 2.1 File/Recall Measurement From Database When you choose Recall Measurement From Database from the File menu, a window appears where you must first choose whether you wish to recall a standard, sample, or series by choosing the appropriate radio button at the top right of the screen. - Page 117 EasyMatch QC User’s Manual Version 2.1 Choose whether you wish to search based on differences from a standard or sample and then highlight the standard or sample for comparison in the white box. Then click OK. The Search Criteria screen appears.
- Page 118 EasyMatch QC User’s Manual Version 2.1 Select (check) the items you wish to recall into the current job and click OK. They will be recalled and placed in the job. The keyboard shortcut for the Recall Measurement From Database command is Ctrl + R. More instructions on recalling measurements are provided in Lesson 6 in Chapter 2.
-
Page 119: File/Delete Measurement From Database
EasyMatch QC User’s Manual Version 2.1 File/Delete Measurement From Database When you choose Delete Measurement From Database from the File menu, a window appears where you must first choose whether you wish to delete a standard, sample, or series by choosing the appropriate radio button at the top right of the screen. - Page 120 EasyMatch QC User’s Manual Version 2.1 Choose whether you wish to search based on differences from a standard or sample and then highlight the standard or sample for comparison in the white box. Then click OK. The Search Criteria screen appears.
- Page 121 EasyMatch QC User’s Manual Version 2.1 Select (check) the items you wish to delete from the database and click OK. They will be deleted from the database. More instructions on deleting measurements are provided in Lesson 6 in Chapter 2.
-
Page 122: File/Close Job
EasyMatch QC User’s Manual Version 2.1 File/Close Job The Close Job command in the File menu saves the current job using its pre-established name and then closes the job. If the job is untitled, it prompts for a job name and then saves the job using its new name before closing the job. -
Page 123: File/Save Job
EasyMatch QC User’s Manual Version 2.1 File/Save Job The Save Job command in the File menu saves the current job, including its measurements and screen configuration. If the job has been saved previously, it will automatically be saved under the same name. -
Page 124: File/Save Job As
EasyMatch QC User’s Manual Version 2.1 File/Save Job As The Save Job As command in the File menu allows you to save the current job under a new name or to name a previously untitled job. The complete job, including its measurements and screen configuration, is saved. -
Page 125: File/Save Job Template
EasyMatch QC User’s Manual Version 2.1 File/Save Job Template The Save Job Template command in the File menu saves the screen configuration of the current job as a template. If the template has been saved previously, it will automatically be saved under the same name. -
Page 126: File/Save Job Template As
EasyMatch QC User’s Manual Version 2.1 File/Save Job Template As The Save Job Template As command in the File menu allows you to save the job template currently in use under a new name. When the Save As dialog box appears, locate the drive and folder where you wish to save the template (any that are accessible by your computer). -
Page 127: File/Apply Template To Job
EasyMatch QC User’s Manual Version 2.1 File/Apply Template to Job The Apply Template to Job command in the File menu allows you to apply a template to an existing job and have the configuration of that job change accordingly. The keyboard shortcut for this command is Ctrl + T. -
Page 128: File/Save Measurement To Database
EasyMatch QC User’s Manual Version 2.1 File/Save Measurement to Database The Save Measurement to Database command in the File menu saves any standards and samples currently selected (highlighted) in the Job Tree to the database. Once the measurement(s) are saved, the following message is shown. -
Page 129: File/Esignature (-Er Version Only)
The eSignature command in the File menu allows you to apply an electronic signature to the job. The following screen appears: Enter your EasyMatch QC user name and password, and type in the meaning of the signature or choose the meaning of the signature (creation, review, approval, etc.) from the drop-down box in the Comments box. -
Page 130: File/Configure Company Logo
EasyMatch QC User’s Manual Version 2.1 File/Configure Company Logo The Configure Company Logo command in the File menu allows you add a bitmap (.BMP) company logo or other graphic to printouts created using the Print Job Setup command, also in the File menu. -
Page 131: File/Header//Footer Setup
EasyMatch QC User’s Manual Version 2.1 File/Header//Footer Setup The Header/Footer Setup command in the File menu allows you to configure the headers and footers that will be applied to all of your printouts in this job. You may type any information into the Header Information and Footer Information boxes that you wish to have displayed on every page of your printouts. -
Page 132: File/Print Job Setup
EasyMatch QC User’s Manual Version 2.1 File/Print Job Setup The Print Job Setup command in the File menu allows you to lay out a report that will be printed when you select Print Job from the File menu or click the Print button on the default toolbar. All of the data views currently in your job except the Job Tree may be printed as part of your report. - Page 133 EasyMatch QC User’s Manual Version 2.1 You may click the Add Page button to add a new page to your report and scroll through the pages of your report using the Prev Page and Next Page buttons. When a Spectral Data Table has been added to the Selected Items box and is highlighted, a Configure button appears next to the Remove>>...
-
Page 134: File/Print Job Preview
EasyMatch QC User’s Manual Version 2.1 File/Print Job Preview The Print Job Preview command in the File menu allows you to view your configured print job on- screen as it will appear when printed. If you select this command without having configured the print out using the Print Job Setup command, you will be prompted to do so. -
Page 135: File/Print Job
EasyMatch QC User’s Manual Version 2.1 File/Print Job The Print Job command in the File menu initiates printing of the print job that was configured using the Print Out Setup command. The job is printed to the Windows default printer. The keyboard shortcut for this command is Ctrl + P. -
Page 136: File/Printer Setup
The Printer Setup command in the File menu causes the Windows Print Setup dialog box to be displayed so you can configure your printer parameters without printing anything. Click OK when your configuration is complete. The configuration indicated here is used for all printing in EasyMatch QC, regardless of job. -
Page 137: File/Page Setup
EasyMatch QC User’s Manual Version 2.1 File/Page Setup The Page Setup command in the File menu opens the Page Setup window in which you can set the margins you wish to leave on each page when printing the print job configured using the Print Job Setup command described earlier in this chapter. -
Page 138: File/Import Qtx Format
The Import QTX Format command in the File menu opens the Windows Open box that allows you to choose an existing QTX file for import into the current EasyMatch QC job. Once you click Open, the data records in the QTX file will be added to the current job. -
Page 139: File/Export
EasyMatch QC User’s Manual Version 2.1 File/Export The Export command in the File menu allows you to export job data to either the QTX format or SLI- Taper format. A submenu appears from which you can make this selection. QTX Format... - Page 140 EasyMatch QC User’s Manual Version 2.1 3-28 The File Menu...
-
Page 141: File/Email
EasyMatch QC User’s Manual Version 2.1 File/Email The Email command in the File menu, and then the choice of Job or Template from the submenu that appears opens a new e-mail message and attaches the current job or template to that message. This command appears in the File menu only if an e-mail program is installed and available on your computer. -
Page 142: File/Time Synchronization (-Er Version Only)
EasyMatch QC User’s Manual Version 2.1 File/Time Synchronization (-ER Version Only) The Time Synchronization command in the File menu causes your client computer’s clock to be synchronized with the server computer. Your system administrator should check the time and date on the server periodically to ensure that it is correct. -
Page 143: File/Database
Access database. A submenu appears containing these four choices. Backup Database Select Backup Database to save a second copy of your EasyMatch QC Access database file to a location other than the one where it is currently stored. The following screen appears. -
Page 144: Create New Database
Select All button. Then click Import Database. You will be given the choice to place the records in your EasyMatch QC database, in your current job, or in a new job. When you click OK, the records will be imported to the location you chose. -
Page 145: Import Textiles Database
EasyMatch QC User’s Manual Version 2.1 Import Textiles Database Select Import Textiles Database to import measurements from an EasyMatch Textiles database. The following screen appears first. Note: Select Textiles Database must be checked with a Textiles Database Path set in Options/System Configuration/Data Storage before the Import Textiles Database command will be available in the File menu. - Page 146 EasyMatch QC User’s Manual Version 2.1 Indicate whether you wish to import the EasyMatch Textiles measurements into the current EasyMatch QC job or the EasyMatch QC database. Then click OK. The measurements will be imported as you instructed. If you imported sample(s) to a job, you will be asked to link the sample(s) to a standard before they are inserted into the job.
-
Page 147: File/Log Off
The Log Off command in the File menu logs the current user out of EasyMatch QC and returns to the EasyMatch QC splash screen so that the next user may log on. If the current job has not yet been saved, you will be prompted to save it before log off occurs. -
Page 148: File/Most Recently Opened Jobs
EasyMatch QC User’s Manual Version 2.1 File/Most Recently Opened Jobs The most recently opened jobs area of the File menu lists the four most recently opened jobs. You may select the name of any of these jobs to open it quickly and easily. -
Page 149: File/Exit
EasyMatch QC User’s Manual Version 2.1 File/Exit The Exit command in the File menu allows you exit EasyMatch QC. If the current job has not yet been saved, you will be prompted to save it before exit occurs. The File Menu... - Page 150 EasyMatch QC User’s Manual Version 2.1 3-38 The File Menu...
-
Page 151: The Edit Menu
EasyMatch QC User’s Manual Version 2.1 CHAPTER FOUR The Edit Menu From the Edit menu you can cut or copy the samples and standards highlighted in the Job Tree to the Windows clipboard for use in another job. Likewise, you can paste measurements from another job into this one. -
Page 152: Edit/Copy
EasyMatch QC User’s Manual Version 2.1 Edit/Copy The Copy command in the Edit menu allows the measurement(s) highlighted in the Job Tree to be copied to the Windows clipboard. The measurement(s) can then be pasted into another job. The keyboard shortcut for this command is Ctrl + C. -
Page 153: Edit/Paste
EasyMatch QC User’s Manual Version 2.1 Edit/Paste The Paste command in the Edit menu allows you to paste measurement(s) from one job into another. Before you select Paste, select the job in which you would like the measurement to be placed and click in the Job Tree (in a blank area if you cut or copied a standard or on the desired “Samples”... -
Page 154: Edit/Delete
EasyMatch QC User’s Manual Version 2.1 Edit/Delete The Delete command in the Edit menu deletes the measurement(s) that are highlighted in the Job Tree from the current job. You are prompted to confirm that you actually wish to delete. The keyboard shortcut for this command is Del. -
Page 155: The View Menu
The Toolbar command in the View menu allows you to choose whether or not to display the toolbar beneath the menu bar at the top of your EasyMatch QC screen. When a check appears next to Toolbar, the toolbar is displayed. When no check appears, the toolbar is not displayed. The setting chosen here applies to this installation of EasyMatch QC as a whole, regardless what job is in use. - Page 156 EasyMatch QC User’s Manual Version 2.1 Toolbar is not displayed. The View Menu...
-
Page 157: View/Status Bar
The Status Bar command in the View menu allows you to choose whether or not to display the status bar at the bottom of your EasyMatch QC screen. When a check appears next to Status Bar, the bar is displayed. When no check appears, the status bar is not displayed. The setting chosen here applies to this installation of EasyMatch QC as a whole, regardless what job is in use. -
Page 158: View/Job Tree
The Job Tree command in the View menu allows you to choose whether or not to display the Job Tree at the left of your EasyMatch QC screen for the current job. When a check appears next to Job Tree, the Job Tree is displayed. -
Page 159: View/Audit Log (-Er Version Only)
EasyMatch QC User’s Manual Version 2.1 View/Audit Log (-ER Version Only) The Audit Log command in the View menu allows you to view the audit log for the current job. Select the types of events you would like to view from the drop-down box next to “Filter By.” The available choices are Save (the job), Edit, Print (the job or a view), Signature, and All. -
Page 160: The Measurements Menu
EasyMatch QC User’s Manual Version 2.1 CHAPTER SIX The Measurements Menu From the Measurements menu you may read either a standard or a sample. You may also average data. The functions available through the Measurements menu are described in the remainder of this chapter. -
Page 161: Measurements/Read Sample
EasyMatch QC User’s Manual Version 2.1 Measurements/Read Sample The Read Sample command in the Measurements menu initiates reading of a sample. Place the sample before initiating the Read Sample command. If Prompt for sample name was checked in Naming Conventions in the Options menu, you will then be prompted to enter a name for the sample (as well as a Product ID and Extra ID, if you wish) and to choose the standard with which the sample should be linked. -
Page 162: Measurements/Read Series
EasyMatch QC User’s Manual Version 2.1 Measurements/Read Series The Read Series command in the Measurements menu creates a new standard in the current job. This standard has no color values (i.e., L=0, a=0, b=0), but can be used to indicate a tolerance box of color values within which samples must fall to be considered “in-spec.”... -
Page 163: Measurements/Average
EasyMatch QC User’s Manual Version 2.1 Measurements/Average The Average command in the Measurements menu, when checked, initiates on reading the Average Method selected in the Options menu. After the first reading is taken, the following screen appears. Click Read to initiate each additional reading in the set of readings and Average to complete the average and add the averaged measurement to the job. -
Page 164: Measurements/Timed Read
EasyMatch QC User’s Manual Version 2.1 Measurements/Timed Read The Timed Read command in the Measurements menu, when checked, initiates on reading the timed read method selected using the Configure Timed Read command in the Options menu. When Read Sample is chosen, measurements are made at the interval chosen until the number of measurements indicated have been made or until the Read Sample button on the toolbar is clicked. -
Page 165: Measurements/Automatic Standard Search
EasyMatch QC User’s Manual Version 2.1 Measurements/Automatic Standard Search The Automatic Standard Search command in the Measurements menu, when checked, initiates on reading the automatic standard search function as configured using the Configure Automatic Standard Search command in the Options menu. When Automatic Standard Search is chosen and... -
Page 166: Measurements/Average Selected To Measurement
EasyMatch QC User’s Manual Version 2.1 Measurements/Average Selected to Measurement The Average Selected to Measurement command in the Measurements menu creates a new sample that is the arithmetic average of all the measurements currently highlighted in the Job Tree. You are prompted to choose the standard to which this new sample will be linked and allowed to name the sample. -
Page 167: Measurements/Average Selected To Standard
EasyMatch QC User’s Manual Version 2.1 Measurements/Average Selected to Standard The Average Selected to Standard command in the Measurements menu averages the items that are currently selected (highlighted) in the Job Tree and replaces the current standard on the branch with the averaged measurement, while retaining the current standard name. -
Page 168: Measurements/Average Selected To New Standard
EasyMatch QC User’s Manual Version 2.1 Measurements/Average Selected to New Standard The Average Selected to New Standard command in the Measurements menu averages the items currently selected (highlighted) in the Job Tree and creates a new standard for the averaged measurement, which you are prompted to name. -
Page 169: The Options Menu
EasyMatch QC User’s Manual Version 2.1 CHAPTER SEVEN The Options Menu From the Options menu you can set various preferences concerning your use of the software, such as your naming conventions and default tolerances. The functions available through the Options menu are described in the remainder of this chapter. - Page 170 EasyMatch QC User’s Manual Version 2.1 into the box that appears when reading is initiated as long as the Prompt for standard name box is checked. If this box is unchecked, the naming convention will be used automatically without allowing you to override it.
- Page 171 EasyMatch QC User’s Manual Version 2.1 At the bottom of the screen, you may choose to limit your Standard Product IDs to only those that already exist, to the current selection in the drop-down box, or neither. You may choose to limit your Sample Product IDs to those that already exist, to the current selection in the drop-down box, to the Standard Product ID, or none of these options.
-
Page 172: Options/Average Method
EasyMatch QC User’s Manual Version 2.1 Options/Average Method The Average Method command in the Options menu allows you to indicate the method by which you wish to average when standard and sample measurements are made in the current job. The Display Method controls the information shown in the averaging window while you are taking measurements. -
Page 173: Options/Read Method
EasyMatch QC User’s Manual Version 2.1 Options/Read Method When you select Read Method from the Options menu you can select to use, in this job, one of the types of special read methods that are available for the sensor you are using. These are types of measurement that require more than one reading to obtain a result. - Page 174 EasyMatch QC User’s Manual Version 2.1 desired boxes. Also choose the Illuminant/Observer combination for which you would like to display Haze. Note: Haze is available only with the ColorQuest XE, ColorQuest II Sphere, UltraScan XE, UltraScan PRO, and UltraScan VIS sensors.
-
Page 175: Options/Configure Timed Read
Options/Configure Timed Read The Configure Timed Read command in the Options menu allows you to select how you wish EasyMatch QC to automatically perform sample readings within the current job at a specified time interval. Select the Read Count Method desired. You may choose either continuous readings or a fixed number of readings between 1 and 1000. -
Page 176: Options/Configure Automatic Standard Search
EasyMatch QC User’s Manual Version 2.1 Options/Configure Automatic Standard Search The Configure Automatic Standard Search command in the Options menu allows you to specify how you would like automatic standard searching to be performed in the current job. This feature is initiated when you read a sample, at which time the sample is compared to all standards currently saved in the database. -
Page 177: Options/Default Tolerances
EasyMatch QC User’s Manual Version 2.1 Options/Default Tolerances The Default Tolerances command in the Options menu allows you to set the tolerances that will be assigned to new standards in the current job by default. You may set tolerances for as many scales, indices, and differences for as many illuminant/observer combinations as you wish. - Page 178 EasyMatch QC User’s Manual Version 2.1 On the Differences tab, set all tolerances you wish to assign based on color differences. Choose the difference from the Selected Difference drop-down box and the illuminant/observer combination from the Illuminant/Observer drop-down box. Then enter the upper and lower tolerance limits for the difference for this illuminant/observer combination.
- Page 179 EasyMatch QC User’s Manual Version 2.1 On the Haze and Opacity tab, enter the tolerances you wish to use for the haze and opacity read methods. Click OK to accept the default tolerances and close the Tolerances screen. The Options Menu...
-
Page 180: Options/Adjust Scale Factors
EasyMatch QC User’s Manual Version 2.1 Options/Adjust Scale Factors The Adjust Scale Factors command in the Options menu allows you to set various factors used in the calculations for dE CMC, dE CIE94, DIN99, and dE* 2000 differences, plus the ASTM D1500-33mm and Saybolt-50/100mm indices when using a ColorQuest XE, ColorQuest XT, UltraScan XE, UltraScan PRO, or UltraScan VIS. -
Page 181: Options/Ascii Export
EasyMatch QC User’s Manual Version 2.1 Options/ASCII Export The ASCII Export command in the Options menu opens a submenu with two commands: Export Data and Configure. Export Data option initiates export of the readings that are currently highlighted in the Job Tree in the format that was chosen using the Configure command, described below. - Page 182 EasyMatch QC User’s Manual Version 2.1 Each job may have its own ASCII export configuration. Multiple jobs may export to the same file as long as all the jobs have the same ASCII export configuration. Column headers are written to the top of the file when the file is first created. From that point on, only data is appended to the file (not headers).
-
Page 183: Options/Data Send
EasyMatch QC User’s Manual Version 2.1 Options/Data Send The Data Send command in the Options menu opens a submenu with two commands: Send Data and Configure. The Send Data option initiates sending the readings that are currently highlighted in the Job Tree in the format that was chosen using the Configure command, described below. - Page 184 EasyMatch QC User’s Manual Version 2.1 arrow buttons allow you to move selected items up or down the list. Also enter the device definition for the send in the box below “Auto Send Uses This Port.” Click Configure to define all COM port parameters.
-
Page 185: Options/Application Preferences
Options/Application Preferences The Application Preferences command in the Options menu allows you to set various preferences concerning your use of the software. These preferences apply globally when EasyMatch QC is in use, no matter which job or jobs are open. - Page 186 EasyMatch QC User’s Manual Version 2.1 On the Language Settings tab, you may set the language in which the software text will presented. Choices are English, Spanish, German, Italian, French, Japanese, and Chinese. Note: The keyboard shortcut Ctrl + E returns the software to English.
- Page 187 Note: When Login Required is checked, the default administrator user name “admin” and password “hunterlab” may be used for initial entry to the software and configuration of user accounts. When the Keep Sample Measurement Window Open box is checked, a Read button is added to the Read Sample screen and this window remains open after a sample is read.
- Page 188 When either or both of these boxes is checked, a second level of status bar is shown at the bottom of the EasyMatch QC screen, showing the job’s sensor type and the job’s standardization mode. The lower status bar continues to show the current sensor and standardization mode.
-
Page 189: Options/System Configuration
Click Create to actually create the account. This user may log into EasyMatch QC using the account name and password chosen here. On the right side of the screen, right-click on a user name to receive a pop-up menu containing the... - Page 190 EasyMatch QC User’s Manual Version 2.1 • Set Password: Choose this command and enter the old password then the new password twice to change this user’s password. • Edit: Choose this command to edit the full name for this user.
- Page 191 EasyMatch QC User’s Manual Version 2.1 Right-click on Groups to display a pop-up menu with one command: New Group. New Group brings up a screen on which you may create a new group. Click Add to add users to the group and Remove to remove any highlighted users from the group.
- Page 192 EasyMatch QC User’s Manual Version 2.1 For 21 CFR 11 compliance, the following commands should be prohibited for users that are not the system administrator: • File/Delete Measurement From Database • File/Time Synchronization • Edit/Cut • Edit/Delete • View/Audit Log •...
-
Page 193: Data Storage
EasyMatch QC User’s Manual Version 2.1 • Edit Privileges: Choose this command to edit the privileges of this group. The same screen that was displayed when you initially set the privileges is received. • Delete: Choose this command to delete this group. -
Page 194: Server Settings (-Er Version Only)
Note: Create and configure a SQL database as described in Appendix D. Server Settings (-ER Version Only) At the end of the installation of the EasyMatch QC-ER Client software, the server name was entered. However, if the server name should change or require re-entry, use the Server Settings command to do so, then click OK. -
Page 195: Options/Customize Toolbar
EasyMatch QC User’s Manual Version 2.1 Options/Customize Toolbar The Customize Toolbar command in the Options menu allows you to modify the icons of the buttons on the toolbar and the commands performed by the buttons on the toolbar. This configuration applies to this installation of the software, no matter what job or jobs are in use. -
Page 196: Options/Easygroup
EasyMatch QC User’s Manual Version 2.1 Options/EasyGroup The EasyGroup command in the Options menu allows you to launch HunterLab’s tapering and grouping program, EasyGroup, if you purchased and installed that package. Refer to the User’s Guide for EasyGroup for complete operational instructions. -
Page 197: Options/Import Easygroup Sequence
EasyGroup, to bring the grouping or tapering information back into EasyMatch QC and display it as a new column in the Color Data Table view. The column header is “Group” for grouped samples and “Group/Sequence” for group + tapered samples. -
Page 198: The Sensor Menu
EasyMatch QC User’s Manual Version 2.1 CHAPTER EIGHT The Sensor Menu From the Sensor menu you can select and configure a new sensor, set its standardization modes, and standardize the sensor. You may also set the standardization interval for the instrument and calibrate the optional UV filter. - Page 199 EasyMatch QC User’s Manual Version 2.1 Next, you are prompted to configure a standardization mode for the sensor. Enter a name for the mode, and indicate the other mode parameters. Check the box next to Standardize Now if you would like standardization to proceed immediately upon completion of sensor configuration.
- Page 200 EasyMatch QC User’s Manual Version 2.1 To rename a sensor, highlight it in the Sensor Name box and click Rename. Type the new name into the New Name box and click OK to implement the change. To set the standardization modes for a sensor, highlight it in the Sensor Name box and click Set Modes.
-
Page 201: Sensor/Standardize
EasyMatch QC User’s Manual Version 2.1 Sensor/Standardize The Standardize command in the Sensor menu yields prompts that lead you through the standardization procedure for the standardization mode currently selected using the Set Modes command. The prompts will appear slightly differently depending on the instrument in use and the standardization mode. -
Page 202: Sensor/Set Modes
EasyMatch QC User’s Manual Version 2.1 Sensor/Set Modes The Set Modes command in the Sensor menu allows you to configure standardization modes for the currently active sensor. To add a new mode, click the Add Mode button. To remove an already configured mode, highlight it in the Mode Names box and click Remove. -
Page 203: Sensor/Set Interval
The Set Interval command in the Sensor menu allows you to set the standardization interval for the currently active sensor. When that interval has elapsed, the software will prompt you to standardize before more readings can be made. The interval indicated here applies to EasyMatch QC as a whole, regardless of the job currently in use. -
Page 204: Sensor/Uv Filter Calibration
HunterLab-supplied fluorescent standard. Also choose whether the value is for Brightness 457, Whiteness Index CIE (and the illuminant/observer combination), Whiteness Index Ganz, or Z%. The scale used will be WI Ganz for a HunterLab standard. - Page 205 EasyMatch QC User’s Manual Version 2.1 fluorescent standard with the UV filter in the position indicated at the bottom of the screen. If desired, the slider bar may be used to change the filter position between manual readings. Click Standardize to initiate standardization. You will be returned to the UV Calibration screen after standardization is complete.
-
Page 206: Sensor/Configure Multi Mode
EasyMatch QC User’s Manual Version 2.1 Sensor/Configure Multi Mode The Configure Multi Mode command in the Sensor menu appears only when the connected instrument is a ColorQuest XE, LabScan XE, UltraScan XE, UltraScan PRO, or UltraScan VIS. This command is use to set up the process by which the instrument can standardize and read in two separate but similar modes when the standardization and read commands, respectively, are given. -
Page 207: Sensor/Import Logged Reads
EasyMatch QC User’s Manual Version 2.1 Sensor/Import Logged Reads The Import Logged Reads command in the Sensor menu appears only when the connected instrument is a ColorFlex, MiniScan XE Plus, or MiniScan EZ. There must be items saved to the instrument datalog in order to use this command. - Page 208 ID number is used as the item ID. The measurements copied to the job or EasyMatch QC database are NOT deleted from the instrument’s datalog. If you wish to delete them, you must do so manually though the instrument firmware.
-
Page 209: Sensor/Configure Setups
Get to retrieve that saved group of setups or Delete to delete the group of setups. Download When you click Download, the setups in the current EasyMatch QC setup group are sent back to the instrument. Edit When you click Edit, the Product Setup Configuration screen appears. - Page 210 Read Standard button to read the standard to be saved with the setup using your instrument or Recall Standard to recall a standard from your EasyMatch QC database to be saved with the setup. When all parameters are as desired for this setup, click Update Sensor to send the setup to your instrument.
-
Page 211: Sensor/Diagnostics
EasyMatch QC User’s Manual Version 2.1 Sensor/Diagnostics The Diagnostics command in the Sensor menu opens to a submenu allowing access to the various diagnostic tests available to verify performance of your instrument. Those tests are described below. Green Tile Test... - Page 212 Click Yes to close the Green Tile Job. The following pdf report will appear documenting the results of the test. As an option, this report can be printed as a hardcopy for your records. In addition, this Green Tile Report is automatically saved in c:\HunterLab\EasyMatchQC-ER Client\Reports with a unique data/time stamp for future reference.
- Page 213 EasyMatch QC User’s Manual Version 2.1 As instructed, make sure that the standard port plate for your instrument is currently installed. This will generally be the port insert with the largest opening that is not covered by glass. Click OK when this port plate is installed.
- Page 214 Click Yes to close the Repeatability Job. The following pdf report will appear documenting the results of the test. As an option, this report can be printed as a hardcopy for your records. This Repeatability Test Report is automatically saved in c:\HunterLab\EasyMatchQC-ER Client\Reports with a unique data/time stamp for future reference.
- Page 215 EasyMatch QC User’s Manual Version 2.1 As instructed, make sure that the standard port plate for your instrument is currently installed. This will generally be the port insert with the largest opening that is not covered by glass. Click OK when this port plate is installed.
- Page 216 EasyMatch QC User’s Manual Version 2.1 A pass/fail assessment is provided for the averaged reading along with instructions concerning what to do if your instrument failed the test. Click Yes if you wish to save the test data to the job or No if you wish the data to be discarded.
- Page 217 Click Yes to close the Didymium Filter Job. The following pdf report will appear documenting the results of the test. As an option, this report can be printed as a hardcopy for your records. This Wavelength Accuracy Didymium Filter Report is automatically saved in c:\HunterLab\EasyMatchQC- ER Client\Reports with a unique data/time stamp for future reference.
- Page 218 EasyMatch QC User’s Manual Version 2.1 Click Standardize to select the standardization mode desired and standardize the instrument as usual. Click Read to show the spectral data for the sample that is currently at the sample port. Click Refresh to read again.
- Page 219 EasyMatch QC User’s Manual Version 2.1 Click Signal Level and then click Flash to display raw signal level counts for the sample that is currently at the sample port. Check any of the available boxes to show the data a different way, such as in a graph.
-
Page 220: The Window Menu
The New Window command in the Window menu allows you to open a second window for the current job on your EasyMatch QC screen. This allows you to create additional displays for the job, if you wish, without running out of room on the screen. -
Page 221: Window/Cascade
Window/Cascade The Cascade command in the Window menu moves all of the current jobs so that they are cascaded one on top of the other and only the title bar of each job is visible. You may click on any of the title bars to show that job as the top job. -
Page 222: Window/Tile
EasyMatch QC User’s Manual Version 2.1 Window/Tile The Tile command in the Window menu moves all of the current jobs so that they are displayed on the screen with one on top of the other. The sizes of the jobs are adjusted so that they all fit on the screen. -
Page 223: Window/List Of Open Jobs
Window/List of Open Jobs You can make any job active by selecting it from the Window menu. A check will appear next to that job in the Window menu, the title bar of the active job will be highlighted, and the job will come to the front. -
Page 224: The Help Menu
CHAPTER TEN The Help Menu From the Help menu you can view the EasyMatch QC help file and information about your version of the program. The functions available through the Help menu are described in the remainder of this chapter. -
Page 225: Help/About
EasyMatch QC User’s Manual Version 2.1 Help/About The About command in the Help menu brings up the About EasyMatch QC Software box specifying the version of EasyMatch QC being run and giving copyright and contact information. 10-2 The Help Menu... -
Page 226: Hunterlab On The Web
EasyMatch QC User’s Manual Version 2.1 Help/HunterLab on the Web The HunterLab on the web command in the Help menu opens your web browser and takes you to the HunterLab web site in case you need to get information on color measurement, instruments, or technical assistance. -
Page 227: Part Iii. Instruments
Part III. Instruments... -
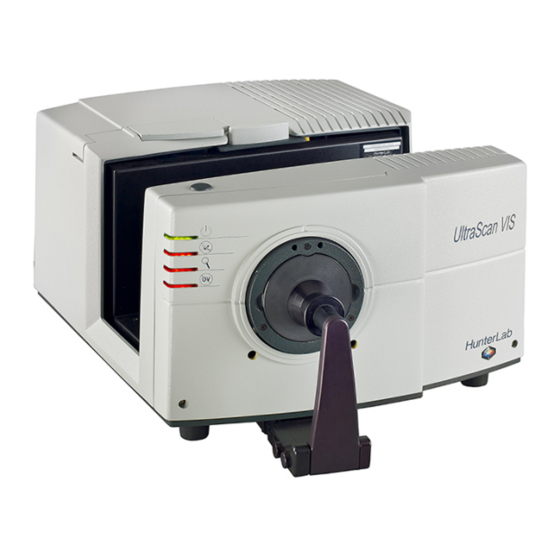
Page 228: Ultrascan Vis
EasyMatch QC User’s Manual Version 2.1 CHAPTER ELEVEN G ® UltraScan Notice: Use of this equipment in a manner not specified by the manufacturer may impair the protection afforded by the equipment. Notice: Danger of electric shock if liquids are spilled and fire if volatile or flammable liquids are spilled. -
Page 229: Ultrascan Vis Features
1. Remove the original port plate from the reflectance port and replace it with the small area port plate. 2. Standardize the instrument. Be sure to select 0.375 inch (9.525 mm) as the area view in the Setup Mode window in EasyMatch QC. The lens will automatically adjust. 3. Place the sample at the reflectance port. -
Page 230: Retroviewer
EasyMatch QC User’s Manual Version 2.1 5. Read the sample. Note: The instrument flashes multiple times per measurement when the small area view option is employed. Retroviewer The retroviewer is a lamp in the sphere that allows you to view the sample that is currently at the reflectance port on a screen. -
Page 231: Transmission Compartment
The UltraScan VIS sphere contains a specular exclusion port door which is closed during specular included and transmission measurements and opened during specular excluded measurements. The position of the door is controlled through EasyMatch QC. See the UltraScan VIS Standardization section of this chapter for more information on the various measurement modes. -
Page 232: Automated Uv Control
EasyMatch QC User’s Manual Version 2.1 Specular exclusion port closed and open Automated UV Control The UltraScan VIS has the ability to perform a Ganz-Griesser calibration, which uses a 400-nm UV filter to achieve and maintain the proper ratio of the energy in the UV region of the electromagnetic spectrum to that in the visible region of the spectrum. -
Page 233: Macro Button
EasyMatch QC User’s Manual Version 2.1 Power on Specular excluded Small area view UV excluded: UV cut-off filter is 100% inserted Macro Button The macro button, also known as the “Sensor button,” activates a sample measurement. 11G-6 UltraScan VIS... -
Page 234: Ultrascan Vis Accessories
EasyMatch QC User’s Manual Version 2.1 UltraScan VIS Accessories The following accessories are provided with the UltraScan VIS system and can be found in the standards case: • White calibrated tile - placed at the reflectance port (with pegs in the guidance holes) during standardization. - Page 235 EasyMatch QC User’s Manual Version 2.1 Standards care card and certificate of traceability Envelope containing spare fuses Didydium filter and Allen wrench Lens brush Non-slip pad for Light trap sample clamp White Black card device calibrated tile Green tile Optional port...
-
Page 236: Ultrascan Vis Options And Sample Devices
There are many options and devices available for positioning samples at the measurement ports of the UltraScan VIS and for making the instrument easier to use. Any or all of the following options and sample devices may be purchased for use with your UltraScan VIS. HunterLab part numbers are included for your convenience in ordering. -
Page 237: Foot Switch Assembly
EasyMatch QC User’s Manual Version 2.1 Foot Switch Assembly Pressing the foot switch performs the same function as the macro switch on the front of the sensor. Install the foot switch by plugging it into the round connector on the back of the UltraScan VIS. - Page 238 EasyMatch QC User’s Manual Version 2.1 3. Connect the air compressor to the lower input port of the modified sample clamp assembly using the 1/4” tubing. Also connect the compressor to a power source. To operate the compression clamp assembly: 1.
-
Page 239: Skein Holder
EasyMatch QC User’s Manual Version 2.1 5. Turn on the flow of clean, dry, compressed air to the clamp. You should attach a filter dryer to the assembly. 6. Pull out the knob on the sample clamp and turn it until the desired pressure is obtained as shown on the pressure gauge. -
Page 240: 1-Inch Port Plate With Glass
EasyMatch QC User’s Manual Version 2.1 1-inch Port Plate with Glass This option provides a snap-in port plate with an opening one inch in diameter that is covered with glass. The glass insert protects the inside of the instrument from sample and airborne particles. - Page 241 EasyMatch QC User’s Manual Version 2.1 3. Tighten the sample shelf into place by turning both knobs clockwise. 4. Place your sample on the shelf and cover it with the light cover (if included). 5. Measure the sample. 11G-14 UltraScan VIS...
-
Page 242: Semi-Micro Powder Holder
EasyMatch QC User’s Manual Version 2.1 Semi-micro Powder Holder This option provides a holder and special port plate that allow the measurement of small quantities (approximately 0.4 cc) of packed powder. To install and use the powder holder, complete the steps below. - Page 243 7. Between measurements, remove the powder holder, unscrew the top, and clean the glass. The glass insert may be removed from the powder holder for cleaning or replacement. Replacement inserts may be purchased from HunterLab. No adhesive is required. 11G-16...
-
Page 244: Reflectance Preform Holder
EasyMatch QC User’s Manual Version 2.1 Reflectance Preform Holder This option provides an adjustable holder for measuring translucent and opaque preforms at the reflectance port of the UltraScan VIS. The holder is appropriate for preforms with a shaft diameter between 15 and 40 mm and a length of at least 50 mm. -
Page 245: Transmission Clamp
EasyMatch QC User’s Manual Version 2.1 2. Open the holder. It is easiest to do this by placing your fingers around the handle and resting the thumb of the same hand on the end of one of the spring screws. Pull the handle toward the thumb until the holder provides an opening large enough for insertion of the desired preform. - Page 246 EasyMatch QC User’s Manual Version 2.1 5. Close the transmission compartment door and make the measurement. Transmission clamp as placed in the transmission compartment for measurements in regular transmission. The clamp is placed flat at the lens. For measurements in Total Transmission: 1.
-
Page 247: Transmission Cell Holder
EasyMatch QC User’s Manual Version 2.1 Transmission Cell Holder The optional transmission cell holder permits measurement of liquids in 10-mm, 20-mm, 33-mm, or 50-mm transmission cells. To install it, slide the transmission cell holder into the transmission compartment at the... -
Page 248: Transmission Cells With Two Screw Tops
EasyMatch QC User’s Manual Version 2.1 during standardization to set the top of the scale. For transmission measurements, use the cell size recommended by your measurement specification (such as an ASTM method), or use the general rule that smaller path lengths should be used for more concentrated colorants. -
Page 249: Transmission Spill Tray
EasyMatch QC User’s Manual Version 2.1 Transmission Spill Tray The transmission spill tray, when installed in the UltraScan VIS’s transmission compartment, protects the compartment from spills of liquid samples. The tray can hold up to 600 mL of liquid. The top portion of the spill tray simulates the function of the transmission cell holder. -
Page 250: Flow-Through Transmission Cell Holder And Cells
(upper) tube to a drain. Using a pump (not sold by HunterLab), the liquid is pumped into the cell until the cell is filled. A sample reading is then taken and the liquid pumped from the cell to the drain. -
Page 251: Holder For Small Volume Transmission Cells And 10-Mm Small Volume Transmission Cells
EasyMatch QC User’s Manual Version 2.1 To operate the flow-through cell assembly, 1. Standardize the instrument in a transmittance mode. The flow-through cell should be filled with distilled water or another clear solvent to set the top of scale. 2. Inject the sample to be measured into the cell. - Page 252 EasyMatch QC User’s Manual Version 2.1 Sliding lever To install the holder, position it so that the holes in its base are down toward the floor of the transmission compartment and the cutout in the vertical section is at the transmission port (hole in the sphere).
-
Page 253: Cylindrical Cell Holder
This option provides a holder for 27-mm to 30-mm (OD) cylindrical sample tubes at the instrument transmission port. This holder may be used for measurement of transparent liquids in cylindrical glass tubes with 20-mL, 40-mL, or 60-mL volumes (not sold by HunterLab). Ball detent screw Complete the following steps to install and use the tube holder: 1. -
Page 254: Semi-Micro Cell Holder And Optical Assembly
The analytical cells to be used with this holder are not sold by HunterLab, though several disposable semi-micro 10-mm cells are included as examples. Approximate sample volumes required for the various types of cells are as follows:... - Page 255 EasyMatch QC User’s Manual Version 2.1 Cell holder and optical assembly Example of semi- micro disposable 10-mm cell Example of masked semi- micro glass Example of 20-mm cell standard disposable 10-mm cell Example of Example of masked semi- standard glass 10-...
- Page 256 EasyMatch QC User’s Manual Version 2.1 3. Initiate standardization in TTRAN mode for the 1.000-inch (25.400 mm) area view, sliding the black card device between the cell holder and the hole in the sphere when prompted for the black card.
- Page 257 EasyMatch QC User’s Manual Version 2.1 6. Complete the standardization by measuring the cell blank as the top of scale. 7. Remove the cell from the cell holder and rinse it with the sample to be measured. Fill the cell with the sample and measure it the same way you did the blank.
-
Page 258: Transmission Preform Holder
EasyMatch QC User’s Manual Version 2.1 8. Periodically clean the two lenses on the cell holder with isopropyl alcohol and a cotton swab. Transmission Preform Holder This option provides an adjustable holder for measuring transparent preforms at the transmission port of the UltraScan VIS. -
Page 259: Blue Denim Tile Assembly
EasyMatch QC User’s Manual Version 2.1 4. If possible, close the transmission compartment door, and then make your measurement. 5. Open the transmission compartment door, rotate the preform, and measure it again. 6. Repeat step 5 until the preform has been measured the desired number of times. -
Page 260: Ultrascan Vis Installation
1. Unpack all cartons and remove wrappings and cable ties. Inspect for damage and notify the carrier and HunterLab immediately if any is discovered. Save the packing material in case it becomes necessary to return the instrument to the factory. - Page 261 EasyMatch QC User’s Manual Version 2.1 10. Click the radio button for “No, not this time,” then click Next. 11. Click the radio button for “Install the software automatically (Recommended),” then click Next. 12. The required driver should be located on the CD and installed, producing the following two screens.
- Page 262 EasyMatch QC User’s Manual Version 2.1 13. The opening screen of the Found New Hardware wizard may appear again. If it does, repeat Steps 10-12. If the screen does not appear again, proceed with Step 14. 14. At the end of the process, observe the Windows “balloons” that appear until the message “Found New Hardware: Your new hardware is installed and ready to use”...
- Page 263 17. Note the COM port number assigned to the USB port you are using. In this example, it is COM10. Once EasyMatch QC is installed and you configure your sensor, you will need to indicate this COM port address as the location for the instrument.
- Page 264 EasyMatch QC User’s Manual Version 2.1 20. Configure the screen as shown above, then click Next. Return to Step 12 and proceed through Step 21. Remove the tape covering the reflectance port and the exterior of the sphere in the transmission compartment.
-
Page 265: Ultrascan Vis Standardization
EasyMatch QC User’s Manual Version 2.1 UltraScan VIS Standardization The UltraScan VIS must be standardized on a regular basis to keep it operating properly. General Standardization sets the top and bottom of the scale for the photometric scale. During standardization the bottom of the scale is set first. -
Page 266: Standardization Modes
EasyMatch QC User’s Manual Version 2.1 Standardizing on the light trap. Standardizing on the white tile It is recommended that the instrument be standardized at least once every eight hours. Also, standardize the instrument whenever the hardware changes, such as the placement of the UV filter, or with environmental, such as temperature, changes. - Page 267 EasyMatch QC User’s Manual Version 2.1 When standardizing in transmittance modes you are prompted to place the white calibrated standard at the reflectance port. Alternatively, a plug of barium sulfate (BaSO ) or magnesium oxide (MgO) may be used to more closely approximate the actual sphere wall reflectance. When taking transmittance measurements, the calibrated white tile or the plug used during standardization must be kept at the reflectance port.
-
Page 268: Ultrascan Vis Maintenance And Testing
Notice: Do not disassemble the instrument and attempt to clean the optical components. Do not open the instrument or remove any covers except using the instructions given in this User’s Manual, the EasyMatch QC help file, or under the direction of HunterLab Technical Support. -
Page 269: Running The Didymium Filter Test
EasyMatch QC User’s Manual Version 2.1 contact HunterLab Technical Support for assistance. Please read “When You Need Assistance” prior to contacting HunterLab. Running the Didymium Filter Test The didymium filter can be used to check the wavelength accuracy of your UltraScan VIS. This check should be done on a regular basis (i.e., weekly or bi-weekly) as part of your routine instrument... - Page 270 EasyMatch QC User’s Manual Version 2.1 4. Loosen the two screws on the front cover with a flat screwdriver. Note: These screws are captive within the instrument cover housing and cannot be removed. 5. Loosen the thumb screw on the inner panel bezel.
- Page 271 EasyMatch QC User’s Manual Version 2.1 7. Remove the screws and cover from the lamp housing using a Phillips-head screwdriver. 8. Unplug the white connector of the lamp assembly by squeezing the latches on the sides of the connector. 9. Remove the lamp assembly and replace with a new assembly. Be sure not to touch the bulb of the lamp, as fingerprints reduce lamp efficiency and weaken the glass.
-
Page 272: Replacing The Fuses
EasyMatch QC User’s Manual Version 2.1 10. Plug in the white connector of the new lamp. 11. Replace the cover and screws on the lamp housing. 12. Plug the harness from the instrument into the indicator lights of the front panel. - Page 273 EasyMatch QC User’s Manual Version 2.1 3. Pull back the tab to release the fuse holder. 4. Remove the fuses and replace with new ones. Notice: Use only the fuse specified above for your instrument or one which is identical in type, voltage rating, and current rating.
-
Page 274: Replacing The Optional View Lamp
EasyMatch QC User’s Manual Version 2.1 Replacing the Optional View Lamp The view lamp is used to illuminate the sample when using the retroviewer option. Note: Replace with a specified lamp, HL#A13-1004-022. To change the view lamp: 1. Disconnect the UltraScan VIS from its power source. - Page 275 EasyMatch QC User’s Manual Version 2.1 6. Remove the front cover from the instrument by sliding it forward and unplug the harness which connects the indicator lights on the front cover to the instrument. 7. Remove the view lamp assembly and replace it with a new one. Be sure not to touch the bulb of the lamp as fingerprints reduce lamp efficiency.
-
Page 276: Maintaining The Instrument Standards
Significant scratches may cause standardization to be in error. If the light trap is scratched, call the HunterLab Order Processing Department or contact your local HunterLab representative to order a replacement. Please read “When You Need Assistance” prior to contacting HunterLab. -
Page 277: Cleaning The Lens Surface And Didymium Filter
EasyMatch QC User’s Manual Version 2.1 The fluorescent standard used with the UV control feature must be cleaned as well. This plastic standard can be cleaned with a weak liquid detergent solution and rinsed with distilled water. Cleaning the Lens Surface and Didymium Filter The lens and filter may be cleaned using photographic-quality lens solution and lens paper. -
Page 278: Ultrascan Vis Specifications
If this happens, restandardize the instrument before making measurements. HunterLab recommends using a line conditioner with a minimum 600 VA rating and a battery back-up system. -
Page 279: Conditions Of Illumination And Viewing
EasyMatch QC User’s Manual Version 2.1 Power Cord Wire Color Code: Color Definition 220V Cord Brown LINE Blue NEUTRAL Green/Yellow SAFETY 110V Cord Black LINE White NEUTRAL Green SAFETY Instrument-Computer Ground Potential Check: Perform this check if the power cord wiring is being changed, such as for replacement of the cord or if changing the plug. -
Page 280: Instrument Performance
EasyMatch QC User’s Manual Version 2.1 Total Transmittance (TTRAN) for path lengths up to 80 mm Regular Transmittance (RTRAN) for path lengths up to 80 mm Instrument Performance Wavelength Range 360-780 nm Wavelength Resolution <2 nm Wavelength Bandpass 10 nm equivalent triangular... - Page 281 EasyMatch QC User’s Manual Version 2.1 DECLARATION OF CONFORMITY according to ISO/IEC Guide 22 and EN 45014 Manufacturer’s Name: Hunter Associates Laboratory, Inc. Manufacturer’s Address: 11491 Sunset Hills Road Reston, Virginia U.S.A. 20190 Declares that the Product: Product Name: UltraScan VIS...
-
Page 282: Color Measurement Notes
EasyMatch QC User’s Manual Version 2.1 Color Measurement Notes This instrument can be used to measure virtually any kind of product. Opaque and translucent materials can be placed at the reflectance port on the front of the sensor for measurement of reflected color. -
Page 283: Reflectance Measurements
EasyMatch QC User’s Manual Version 2.1 Transparent Samples When measuring transparent samples (such as iced tea) where the color is dependent on the transmission of light, place the liquid in a special optical cell with flat parallel surfaces. The path length of the sample presented should be chosen to maximize the color or haze difference. -
Page 284: Instrument Replacement, Repair, Problems, And Questions
• Technical Assistance. Warranty HunterLab warrants that all instruments it manufactures will be free from defects in material and workmanship under normal use and service. Our obligation under this warranty is limited to repairing or replacing any defective parts which our examination discloses to have been factory defective when returned to us by prepaid transportation. -
Page 285: Shipping Claims
4. Advise HunterLab regarding replacement. Parcel Post Shipment 1. Notify HunterLab at once in writing, giving details of the loss or damage. This information is required for filing a claim. 2. Hold the damaged goods with their container and packaging for possible inspection by postal authorities. -
Page 286: Incorrect Shipment
3. Ascertain that the item was not removed by unauthorized personnel prior to complete unpacking and checking. 4. Notify HunterLab immediately of the shortage in writing. Incorrect Shipment Perform the following procedure if material received does not correspond with your order. -
Page 287: Returns
EasyMatch QC User’s Manual Version 2.1 Returns A service request order (SRO) number is required before any items can be returned to HunterLab. Contact HunterLab's Order Processing Department to obtain an SRO for damaged or incorrect parts, or Technical Support to obtain an SRO to return an instrument for service. - Page 288 EasyMatch QC User’s Manual Version 2.1 weight limits. Single wall cardboard cartons should not be used. (A proper packing carton with packing material may be purchased from HunterLab, if desired.) • Insure the shipment. • Provide an itemized packing list of all contents of the shipment.
-
Page 289: When You Need Assistance
2. The serial number of the instrument (usually found on a tag on the back or bottom of the sensor, or inside the transmission compartment). 3. The type of software you use to access the sensor output (EasyMatch QC), the version of the software (seen after choosing About from the Help menu), the operating system, and the brand and type of computer. -
Page 290: Part Iv. Reference
Part IV. Reference... -
Page 291: Measurement Values
APPENDIX A Measurement Values Color values calculated using EasyMatch QC are relative to the absolute value of a perfect reflecting diffuser as measured under the same geometric conditions, according to the January 1, 1969 recommendation of the International Commission on Illumination, CIE. These values are traceable to measurements made at the National Institute of Standards and Technology. -
Page 292: Opponent-Color Scales (Hunter Lab, Cie 1976 L*A*B*, And Cie Lch
EasyMatch QC User’s Manual Version 2.1 Opponent-Color Scales (Hunter Lab, CIE 1976 L*a*b*, and CIELCh) The opponent-color scales give measurements of color in units of approximate visual uniformity throughout the color solid. Thus, in the Hunter scale, L measures lightness and varies from 100 for perfect white to zero for black, approximately as the eye would evaluate it. - Page 293 EasyMatch QC User’s Manual Version 2.1 where: dL = L (if + dL, sample is lighter than standard; if - dL, sample is darker than standard.) da = a (if + da, sample is redder than standard; if - da, sample is greener than standard.) db = b (if + db, sample is yellower than standard;...
- Page 294 EasyMatch QC User’s Manual Version 2.1 if Z/Z > (24/116) ≤ (24/116) if Z/Z and X , and Z are tristimulus values for any illuminant.
-
Page 295: Hunter Rdab Color Scale
EasyMatch QC User’s Manual Version 2.1 Yellow(+) - Blue(-) axis = CIE 1976 a,b chroma= h° CIE 1976 a,b hue-angle = arctan (b*/a*) h° - h° − − CIE 1976 a,b hue-difference =... -
Page 296: Rxryrz Reflection Factors
EasyMatch QC User’s Manual Version 2.1 , and Z are the tristimulus values of the standard illuminant with Y always equal to 100.00 (normalized). and K are the chromaticity coefficients for the illuminant used. dR Rdab = L(Rd) - L(Rd) -
Page 297: Other Color Difference Scales
EasyMatch QC User’s Manual Version 2.1 Other Color Difference Scales Elliptical Tolerancing Scales (CMC, CIE94, DIN99, and CIE00) The equation for dE CMC describes an ellipsoidal volume with axes in the direction of lightness (l), chroma (c), and hue (h) centered about a standard. When the semi-axis lengths for the dE CMC formula equal the calculated lSL, cSC, and SH values for the standard, the resulting ellipsoid describes a 1.0 dE... - Page 298 EasyMatch QC User’s Manual Version 2.1 SH = (FT + 1 - F) SC ° = arctan dL* = L* - L* dC* = C* - C* − − 1900 T = 0.36 + |0.4 cos (35 + h)| if h = 164°...
- Page 299 EasyMatch QC User’s Manual Version 2.1 ratio. This ratio is generally 1:1:1 for coatings, 1.3:1:1 for plastics, and 2:1:1 for textiles. DIN99 The German standards institute (DIN) developed the DIN99 standard as a new color difference formula that globally models color space using logarithms of the CIELAB coordinates rather than the linear and hyperbolic functions of CMC and CIE94.
-
Page 300: Fmc-2 (Friele - Macadam - Chickering) Color Difference
EasyMatch QC User’s Manual Version 2.1 2000 2000 2000 2000 2000 ... - Page 301 AATCC Evaluation Procedure 1.) ISO Grey Scale, as implemented in EasyMatch QC, is based on ISO 105-A02:1993, Textiles — Tests for colour fastness — Part A02: Grey scale for assessing change in colour. It is intended as an alternative to visual assessment as described in AATCC Evaluation Procedure 1, “Gray Scale for Color Change.”...
-
Page 302: Iso Grey Stain
EasyMatch QC User’s Manual Version 2.1 − - 280| ≤ 180 if |h 360 - h - 280 if |h - 280| > 180 | ≤ 180 if |h if |h | >... -
Page 303: Metamerism Index
AATCC Evaluation Procedure 2). ISO Grey Stain, as implemented in EasyMatch QC, is based on ISO 105-A04:1989, Textiles — Tests for colour fastness — Part A04: Method for the instrumental assessment of the degree of staining of adjacent fabrics. It is intended as an alternative to visual assessment as described in AATCC Evaluation Procedure 2, “Gray Scale for Staining.”... -
Page 304: Strength
EasyMatch QC User’s Manual Version 2.1 Strength % Strength SUM % Strength SUM, also known as Relative Average Strength, is calculated as follows: Color Value Strength 100.0 Color Value Color Value SUM is defined in the “Indices” section of this appendix. % Strength WSUM is preferred over % Strength SUM for measurements made in reflectance. -
Page 305: Indices And Related Color Difference Scales
APHA stock solution, which has an APHA value of 500. The HunterLab application of this scale is designed for use with bluish liquids. Be certain to use the size of transmission cell corresponding to the scale you are calculating. The sensor should be standardized in TTRAN mode using a clear liquid in that cell as a blank. -
Page 306: Apha-10, -20, And -50 Mm
EasyMatch QC User’s Manual Version 2.1 APHA-10, -20, and -50 mm (ColorQuest II Sphere, ColorQuest XE, ColorQuest XT, UltraScan PRO, UltraScan XE, and UltraScan VIS only) The American Public Health Association (APHA) Index was developed in the 1890s as a visual indicator of the purity of wastewater, where color is due to the presence of naturally-occurring organic materials such as leaves, bark, roots, humus, and peat. -
Page 307: Astm D1500-33 Mm
EasyMatch QC User’s Manual Version 2.1 this chapter. Its range is approximately 1 to 11 units, with the more yellow, pale worts at the low end of the scale and the redder color of dark worts, beers, and caramels at the upper end of the scale. -
Page 308: B/A Ratio
EasyMatch QC User’s Manual Version 2.1 Z is the Z tristimulus value for the sample calculated for C/2° conditions. For values greater than 8, 8 is displayed. For values less than 0, 0 is displayed. When the D1500 function is optimized, the following equation is used: D1500* = α... -
Page 309: Brightness 457
457 nm Brightness can be used to measure the relative brightness of paper. 457 nm brightness is calculated over the range of 400 nm to 510 nm in accordance with TAPPI document T452. While HunterLab’s spectrophotometer geometries do not conform exactly to those specified by TAPPI, the measurements correlate closely with those made on TAPPI-compliant instruments. -
Page 310: Dominant Wavelength And Excitation Purity
EasyMatch QC User’s Manual Version 2.1 Color Value SWL Color Value SWL is the K/S measured at the wavelength of maximum absorption (minimum reflection) for reflectance measurements or the absorbance at the wavelength of maximum absorption (minimum transmittance) for transmittance measurements. K/S and Absorbance are described in the Spectral Data Types section of this appendix. -
Page 311: Ebc-10 Mm
EasyMatch QC User’s Manual Version 2.1 Excitation purity is the percentage contribution of the dominant wavelength to the mixture. Thus, 1.00 is the purity of all spectral colors and 0 is the purity of the illuminant. Excitation purity correlates with saturation. -
Page 312: Ep 10-Mm And Ep-20 Mm
9 Bs, 7 BYs, 7 Ys, 7 GYs, and 7 Rs. The EP physical standards A HunterLab spectrophotometer standardized in a transmission mode may be used to instrumentally determine the closest EP standard to any sample solution read. Samples should be measured using a 10- mm or 20-mm path length transmission cell, choosing the matching version of the EP index for display. - Page 313 EasyMatch QC User’s Manual Version 2.1 The D6166 index conforms to ASTM Method D6166 and uses a look-up table to determine Gardner Color based on the sample’s Yxy (C/2°) values. Gardner Color 0.3177 0.3303 0.3233 0.3352 0.3329 0.3452 0.3437 0.3644 0.3558...
-
Page 314: Saybolt-50/100 Mm
EasyMatch QC User’s Manual Version 2.1 = the x chromaticity coordinate of the Gardner color standard which is darker than the test material. The fractional portion of the Gardner color is calculated as follows: where = the y chromaticity coordinate of the Gardner color standard which is lighter than the... -
Page 315: Tint Indices
= (Saybolt-50/100 mm) - (Saybolt-50/100 mm) sample standard. Tint Indices Three tint indices are available in EasyMatch QC as defined below. These indices are available only when the instrument is standardized in a reflectance mode. Measurement Values A-25... - Page 316 EasyMatch QC User’s Manual Version 2.1 CIE Tint and ASTM E313 Tint are calculated using the same equation, given below, but are available for different illuminant/observer combinations, as described below. Refer to CIE Publication 15.2, “Colorimetry,” for more information on CIE Tint. Refer to ASTM E313, “Standard Practice for Calculating Yellowness and Whiteness Indices from Instrumentally Measured Color Coordinates,”...
-
Page 317: Usp 10-Mm And Usp 20-Mm
USP liquid color standards labeled A-T. A HunterLab spectrophotometer standardized in a transmission mode may be used to instrumentally determine the closest USP standard to any sample solution read. Samples should be measured using a 10-mm or 20-mm path length transmission cell, choosing the matching version of the USP index for display. - Page 318 EasyMatch QC User’s Manual Version 2.1 Whiteness Index per CIE is equivalent to the whiteness index published in ASTM Method E313. WI CIE = Y + 800 (x - x) + 1700 (y - y) = WI E313 where Y, x, y are the luminance factor and chromaticity coordinates of the specimen, and x and y the chromaticity coordinates for the CIE standard illuminant and source used.
- Page 319 EasyMatch QC User’s Manual Version 2.1 δ ϕ π = -3695.690 for UltraScan XE δ ϕ = a similar value, optimized for each individual instrument for ColorQuest XE, LabScan XE, UltraScan PRO, and UltraScan VIS δ...
-
Page 320: Y Brightness
EasyMatch QC User’s Manual Version 2.1 Note: Only the ColorQuest XE, LabScan XE, UltraScan XE, UltraScan PRO, and UltraScan VIS instruments with the UV control option installed may correctly calculate Ganz Whiteness. Information from Griesser, Rolf, “Assessment of Whiteness and Tint of Fluorescent Substrates with Good Interinstrument Correlation,”... -
Page 321: Paper Brightness (Z
EasyMatch QC User’s Manual Version 2.1 Coefficient C/2° D65/2° C/10° D65/10° 1.2769 1.2985 1.2871 1.3013 1.0592 1.1335 1.0781 1.1498 YI E313 Difference is also available, and is defined as follows: dYI E313 = (YI E313) - (YI E313) sample standard. -
Page 322: Read Methods
A transmission haze measurement is a ratio of the diffuse light to the total light transmitted by a specimen. Useful measurements of haze can be made on the HunterLab instruments listed above, although the results do not conform exactly to ASTM method D1003 because of differences in instrument geometry. -
Page 323: Opacity
EasyMatch QC User’s Manual Version 2.1 6. Place your sample against the transmission port (the hole in the sphere inside the transmission compartment) and place the white calibration tile at the reflectance port. Click Read. The instrument reads and then the following prompt appears. - Page 324 EasyMatch QC User’s Manual Version 2.1 1. Select Read Method from the Options menu. 2. Select Opacity from the dialog box that appears. The screen changes to allow additional options. 3. Opacity is automatically selected for display in your Color Data Table. Check the boxes next to Y White and/or Y Black to also show these components of the opacity calculation.
- Page 325 EasyMatch QC User’s Manual Version 2.1 Measurement Values A-35...
-
Page 326: Spectral Data Types
EasyMatch QC User’s Manual Version 2.1 Spectral Data Types % Strength Selecting % Strength as a difference data type for display in the Spectral Data Table results in the display of % Strength values for samples as compared to a standard. % Strength is calculated separately... -
Page 327: Reflectance
EasyMatch QC User’s Manual Version 2.1 In the Spectral Data Table configuration, a wavelength range appropriate for your instrument should be chosen. Do not choose wavelengths above or below the range of your instrument or the results of these calculations may be in error. -
Page 328: Keyboard Shortcuts
Help Topics In addition, the EasyMatch QC menus may be opened using Alt + the first letter of the menu name and then the desired menu command may be selected by typing the underlined letter in the name of the command. - Page 329 EasyMatch QC User’s Manual Version 2.1 Open Measurements Menu Alt + M Open Options Menu Alt + O Open Sensor Menu Alt + S Open Window Menu Alt + W Open Help Menu Alt + H Commands from an Open File Menu:...
- Page 330 EasyMatch QC User’s Manual Version 2.1 Commands from an Open Edit Menu: Copy Paste Delete D Commands from an Open View Menu: Toolbar Status Bar Job Tree Audit Log Commands from an Open Measurements Menu: Read Standard Read Sample Average...
- Page 331 EasyMatch QC User’s Manual Version 2.1 Commands from an Open Sensor Menu: Install/Configure Standardize Set Modes Import Logged Reads Configure Setups Configure Multi Mode Commands from an Open Window Menu: New Window Cascade Tile Bring this Job to the Front...
-
Page 332: Software Messages
This appendix lists some of the more prevalent messages for EasyMatch QC. If any error message is displayed which is not described in this chapter, it may be a Windows message. Refer to your Windows User’s Guide for a possible explanation. - Page 333 EasyMatch QC User’s Manual Version 2.1 Message Text Meaning Possible Solution(s) Difference data You are attempting to copy a Save all data to the ColorFlex or cannot be retrieved DIFFERENCE TRISTIMULUS MiniScan XE Plus datalog as from the data log...
-
Page 334: Creating And Configuring A Sql Database
1. In SQL Server, select Open from the File menu and choose to open the C:\Program Files\HunterLab\EasyMatchQC\SQL Database Script\EZMQC.sql script file. This is the location of the file if you installed EasyMatch QC to the default folder. If you installed elsewhere, you will find the SQL Database Script subfolder in your installation folder. - Page 335 EasyMatch QC User’s Manual Version 2.1 7. Close SQL Server. 8. On the computer where EasyMatch QC will be run, open EasyMatch QC. 9. Select the Options menu, System Configuration, and then Data Storage. The Data Storage Screen appears. 10. Select the SQL Server, enter the server and database name (EZMQC). Click OK.
- Page 336 EasyMatch QC User’s Manual Version 2.1 11. Restart EasyMatch QC and the SQL database is ready for use. Creating and Configuring a SQL Database...
- Page 337 Index % Strength ................A-36 % Strength SUM ..............A-14 % Strength SWL ..............A-14 % Strength WSUM ..............A-14 1-inch port plate with glass ColorQuest XE ..............11B-12 UltraScan PRO ..............11F-10 UltraScan VIS ..............11G-12 1.25-inch glass port insert, ColorFlex ........11A-7 1.25-inch UV port insert, ColorFlex ........11A-8 10-mm small volume transmission cells ColorQuest XE ..............11B-24 ColorQuest XT ..............11C-11...
- Page 338 UltraScan PRO ..............11F-6 UltraScan VIS ..............11G-6 Accuracy ................13-1 Achromatic color ..............13-1 Adjust scale factors ..............7-12 ADMI ..................A-15 Angle of incidence ..............13-1 Angle of view .................13-1 APHA ..................A-16 Applet manager ..............11C-3 Applets, ColorQuest XT ............11C-19 Application preferences ............7-17 Apply template to job.............3-15 Archiving setups ColorFlex ................11A-18 ASBC-10 mm.................A-16...
- Page 339 Calibration cylinder ...............11E-3 Cannot calculate tristimulus data for ### ......2-27 Cannot execute the application due to invalid license ...C-1 Carrying case, ColorFlex ............11A-5 Cascade ..................9-2 Certificate of traceability ............11A-3, 11B-5, 11D-3, 11E-3, 11F-6, 11G-6 Charger ...................11E-3 Chromatic ................13-1 Chromatic attributes ...............13-1 Chromaticity ................13-1 Chromaticity coordinates ............13-1 CIE ..................13-1...
- Page 340 ColorFlex ................11A-1 Accessories .................11A-3 Archiving setups ..............11A-18 Carrying case ..............11A-5 Cleaning ................11A-18 Color measurement notes ...........11A-24 Declaration of conformity ..........11A-23 Directional samples ............11A-25 Error messages ..............11A-19 Features ................11A-2 Fluorescing samples ............11A-25 Foot switch .................11A-5 Glass port insert ..............11A-7 Glass sample cup ..............11A-9 Green tile test ..............11A-17 Illumination ................11A-21 Installation ................11A-13...
- Page 341 Testing ................11A-17 Tomato red tile..............11A-11 UV port insert ..............11A-8 Viewing ................11A-21 Colorimeter ................13-2 ColorQuest XE ...............11B-1 10-mm small volume transmission cells ......11B-24 4-mm port plate ..............11B-13 Accessories .................11B-5 Blue denim tile..............11B-31 Color measurement notes ...........11B-51 Compression clamp kit ............11B-10 Cylindrical cell holder ............11B-25 Declaration of conformity ..........11B-50 Didymium filter ..............11B-46 Didymium filter test............11B-38...
- Page 342 RSIN ...................11B-35 RTRAN ................11B-35 Sample clamp ..............11B-2 Sample devices ..............11B-7 Selecting samples ...............11B-51 Semi-micro cell holder and optical assembly .....11B-26 Semi-micro powder holder ..........11B-14 Skein holder ................11B-12 Small area view ..............11B-8 Source lamp ................11B-38 Specifications..............11B-47 Specular included/excluded port ........11B-3 Sphere .................11B-46 Standardization ..............11B-34 Standardization modes ............11B-35 Tall transmission cells ............11B-22...
- Page 343 Lens surface ................11C-30 Macro button...............11C-2 Maintenance ................11C-25 Options................11C-4 Physical characteristics ............11C-31 Power on light ..............11C-2 Power required ..............11C-31 Preparing samples ...............11C-35 Presenting samples .............11C-35 Regulatory notice ..............11C-33 RTRAN ................11C-24 Sample devices ..............11C-4 Selecting samples ...............11C-35 Semi-micro cell holder and optical assembly .....11C-14 Serial printer ...............11C-5 Specifications..............11C-31 Sphere .................11C-30...
- Page 344 Configure timed read .............7-7 Configuring a SQL database ..........D-1 Confirming standardization ...........2-10 Contrast ratio ................13-2 Copy ..................4-2 Create new database ...............3-32 Creating a SQL database ............D-1 Custom data field ..............1-13, 2-32 Custom field ................1-13 Custom formula field .............1-15, 2-31 Customize toolbar ..............7-27 Cut ..................4-1 Cylindrical cell holder ColorQuest XE ..............11B-25...
- Page 345 ColorQuest XT ..............11C-31 LabScan XE ................11D-18 UltraScan PRO ..............11F-44 UltraScan VIS ..............11G-47 EP ...................A-22 Error messages ColorFlex ................11A-19 EasyMatch QC ..............C-1 eSignature ................3-17 European pharmacopoeia color ..........A-22 Excitation purity..............A-20 Exit ..................3-37 Export ..................3-27 External printer, MiniScan EZ ..........11E-4 External serial printer ColorFlex ................11A-5...
- Page 346 Features ColorFlex ................11A-2 ColorQuest XE ..............11B-2 ColorQuest XT ..............11C-2 LabScan XE ................11D-1 Software ................1-3 UltraScan PRO ..............11F-1 UltraScan VIS ..............11G-2 Fiber package adapter MiniScan EZ ...............11E-5 File menu ................3-1 Apply template to job ............3-15 Close job ................3-10 Configure company logo ............3-18 Database ................3-31 Delete measurement from database ........3-7 E-mail .................3-29...
- Page 347 UltraScan PRO ..............11F-49 UltraScan VIS ..............11G-52 FMC-2 ..................A-10 Foot switch ColorFlex ................11A-5 ColorQuest XE ..............11B-10 ColorQuest XT ..............11C-5 LabScan XE ................11D-8 UltraScan PRO ..............11F-8 UltraScan VIS ..............11G-9 Fuses ColorQuest XE ..............11B-41 ColorQuest XT ..............11C-28 LabScan XE ................11D-3 UltraScan PRO ..............11F-38 UltraScan VIS ..............11G-6, 11G-41 Ganz-griesser calibration, UltraScan PRO ......11F-3 Gardner ..................A-22...
- Page 348 Help topics ................10-1 HunterLab on the web ............10-3 Help topics ................10-1 Hitch standards...............2-15, 13-3 Holder for small volume transmission cells ColorQuest XE ..............11B-24 ColorQuest XT ..............11C-11 UltraScan PRO ..............11F-19 UltraScan VIS ..............11G-23 Hue ..................13-3 Hunter L, a, b scale ..............13-3 Hunter Lab ................A-2...
- Page 349 MiniScan EZ ...............11E-14 UltraScan PRO ..............11F-46 UltraScan VIS ..............11G-49 Instrument standards ..............13-3 ColorFlex ................11A-18 ColorQuest XE ..............11B-45 MiniScan EZ ...............11E-11 UltraScan PRO ..............11F-42 UltraScan VIS ..............11G-45 ISO grey scale ................A-10 ISO grey stain ................A-12 Job conventions ..............1-4 Job template ................2-2 Job tree ...................1-6, 5-4 Jobs ..................1-3 Keep sample measurement window open ......7-19...
- Page 350 Regulatory notice ..............11D-20 Repeatability test ..............11D-16 Retroviewer ................11D-5 Ring and disk set..............11D-12 Sample clamp ..............11D-6 Sample cup opaque cover ...........11D-11 Sample cup port plate ............11D-11 Sample cup set for translucent liquids ........11D-10 Sample devices ..............11D-4 Selecting samples ...............11D-22 Sensor port-down stand ............11D-7 Skein holder ................11D-8 Specifications..............11D-18 Standardization ..............11D-15...
- Page 351 Log off ...................3-35 Macro button ColorQuest XE ..............11B-4 ColorQuest XT ..............11C-2 LabScan XE ................11D-2 UltraScan PRO ..............11F-5 UltraScan VIS ..............11G-5 Maintenance of instrument standards LabScan XE ................11D-17 Maintenance ColorFlex ................11A-17 ColorQuest XE ..............11B-37 ColorQuest XT ..............11C-25 LabScan XE ................11D-16 MiniScan EZ ...............11E-11 UltraScan PRO ..............11F-33 UltraScan VIS ..............11G-37 Manual organization ..............1-1...
- Page 352 UltraScan VIS ..............11G-51 Non-slip pad for sample clamp ..........11B-5, 11F-6, 11G-6 Nose cone w/lower polycarbonate assembly MiniScan EZ ...............11E-6 Not an EasyMatch QC key ............C-2 Object color ................13-3 Observing conditions .............13-3 OJ4 orange juice standard, ColorFlex ........11A-11 Opacity ...................7-5, 13-4, A-33 Opacity tolerances ..............7-11...
- Page 353 Options ColorFlex ................11A-4 ColorQuest XE ..............11B-7 ColorQuest XT ..............11C-4 LabScan XE ................11D-4 MiniScan EZ ...............11E-4 UltraScan PRO ..............11F-7 UltraScan VIS ..............11G-8 Options menu .................7-1 Adjust scale factors .............7-12 Application preferences ............7-17 ASCII export...............7-13 Average method ..............7-4 Configure automatic standard search .........7-8 Configure timed read ............7-7 Customize toolbar ...............7-27 Data send ................7-15...
- Page 354 Port inserts ColorFlex ................11A-7 LabScan XE ................11D-9 Port-forward stand, ColorFlex ..........11A-6 Power cord ................11B-5, 11C-3, 11D-3, 11F-6 Power on light, ColorQuest XT ..........11C-2 Power required ColorFlex ................11A-21 ColorQuest XE ..............11B-47 ColorQuest XT ..............11C-31 LabScan XE ................11D-18 MiniScan EZ ...............11E-14 UltraScan PRO ..............11F-44 UltraScan VIS ..............11G-47 Precision .................13-4 Preparing samples...
- Page 355 Rechargeable batteries, MiniScan EZ ........11E-3 Recharging batteries, MiniScan EZ ........11E-11 References ................B-1 Reflectance ................A-37 Reflectance measurements ColorQuest XE ..............11B-52 UltraScan PRO ..............11F-49 UltraScan VIS ..............11G-52 Reflectance port ColorQuest XE ..............11B-2 UltraScan PRO ..............11F-2 UltraScan VIS ..............11G-2 Reflectance preform holder ColorQuest XE ..............11B-17 UltraScan VIS ..............11G-16 Reflectance sample shelf with light cover ColorQuest XE ..............11B-13...
- Page 356 LabScan XE ................11D-5 UltraScan PRO ..............11F-4 UltraScan VIS ..............11G-3 Returns ...................12-4 Ring and disk set ColorFlex ................11A-10 LabScan XE ................11D-12 RS-232 computer interface cable ...........11A-3, 11B-5, 11C-3, 11F-6, 11G-6 RSEX ColorQuest XE ..............11B-35 UltraScan PRO ..............11F-31 UltraScan VIS ..............11G-35 RSIN ColorQuest XE ..............11B-35 UltraScan PRO ..............11F-31 UltraScan VIS ..............11G-35...
- Page 357 Save job ..................3-11 Save job as ................3-12 Save job template ..............3-13 Save job template as...............3-14 Save measurement to database..........3-16 Saybolt ...................A-24 Scale tolerances ..............7-9 Scattering ................13-4 Secondary standards...............13-4 Selecting samples ColorFlex ................11A-24 ColorQuest XE ..............11B-51 ColorQuest XT ..............11C-35 LabScan XE ................11D-22 UltraScan PRO ..............11F-48 UltraScan VIS ..............11G-51 Semi-micro cell holder and optical assembly...
- Page 358 Shipping claims ..............12-2 Shipping instrument ...............12-4 Shortage .................12-2 Skein holder ColorFlex ................11A-6 ColorQuest XE ..............11B-12 LabScan XE ................11D-8 MiniScan EZ ...............11E-6 UltraScan PRO ..............11F-9 UltraScan VIS ..............11G-11 SLI-Taper ................3-27 Small area view ColorQuest XE ..............11B-8 UltraScan PRO ..............11F-4 UltraScan VIS ..............11G-2 Small volume transmission cells ColorQuest XE ..............11B-24 ColorQuest XT ..............11C-11...
- Page 359 ColorQuest XE ..............11B-46 ColorQuest XT ..............11C-30 UltraScan PRO ..............11F-43 UltraScan VIS ..............11G-46 SQL database .................D-1 Stain scale ................A-13 Standard .................13-5 Standard-A to mini-A USB adapter ........11E-5 Standard’s standardization mode doesn’t match....C-2 Standardization ..............13-5 ColorFlex ................11A-15 ColorQuest XE ..............11B-34 ColorQuest XT ..............11C-23 LabScan XE ................11D-15 MiniScan EZ ...............11E-10 UltraScan PRO ..............11F-30...
- Page 360 UltraScan VIS ..............11G-37 Tile data sheet ................11B-5, 11D-3, 11E-3, 11F-6, 11G-6 Tile ..................9-3 Time synchronization.............3-30 Timed read ................6-5 Tolerance................13-5 Tolerances, default ..............7-9 Tomato red tile ColorFlex ................11A-11 Toolbar ...................5-1 Toolbar buttons ..............1-42 Total reflection ...............13-5 Total transmission ..............13-5 Touch screen ColorQuest XE ..............11B-10 ColorQuest XT ..............11C-2, 11C-30 Transfer standards ..............13-5...
- Page 361 UltraScan VIS ..............11G-30 Transmission spill tray ColorQuest XE ..............11B-21 ColorQuest XT ..............11C-9 UltraScan PRO ..............11F-17 UltraScan VIS ..............11G-21 Transmittance measurements ColorQuest XE ..............11B-52 ColorQuest XT ..............11C-35 UltraScan PRO ..............11F-49 UltraScan VIS ..............11G-52 Transmittance mode ...............2-13 Transparent samples ColorQuest XE ..............11B-52 UltraScan PRO ..............11F-49 UltraScan VIS ..............11G-52 Transparency ................13-5...
- Page 362 Instrument standards ............11F-42 Lens surface ................11F-43 Macro button...............11F-5 Maintenance ................11F-33 Medium area view ..............11F-4 Non-opaque samples............11F-48 Options................11F-7 Physical characteristics ............11F-44 Power required ..............11F-44 Preparing samples ...............11F-48 Presenting samples .............11F-49 Reflectance measurements ..........11F-47 Reflectance port ..............11F-2 Reflectance sample shelf with light cover ......11F-11 Regulatory notice ..............11F-46 Repeatability test ..............11F-33 Retroviewer ................11F-4...
- Page 363 4-mm port plate ..............11G-12 Accessories .................11G-6 Blue denim tile..............11G-31 Color measurements notes ..........11G-51 Compression clamp kit ............11G-9 Cylindrical cell holder ............11G-25 Declaration of conformity ..........11G-50 Didymium filter ..............11G-46 Didymium filter test............11G-38 Direction samples ...............11G-51 Environmental requirements ..........11G-47 Features ................11G-2 Flow-through transmission cell holder and cells ....11G-22 Fluorescing samples ............11G-52 Foot switch assembly............11G-9 Fuses ...................11G-41...
- Page 364 Skein holder ................11G-11 Small area view ..............11G-2 Source lamp ................11G-38 Specifications..............11G-47 Specular included/excluded port ........11G-4 Sphere .................11G-46 Standardization ..............11G-34 Standardization modes ............11G-35 Tall transmission cells ............11G-21 Testing ................11G-37 Transmission cell holder .............11G-19 Transmission cells ..............11G-19 Transmission cells with two screw tops ......11G-20 Transmission clamp ............11G-17 Transmission compartment..........11G-4 Transmission preform holder ..........11G-30...
- Page 365 MiniScan EZ ...............11E-13 UltraScan PRO ..............11F-45 UltraScan VIS ..............11G-48 Warranty ................12-1 Wavelength ................13-5 What is EasyMatch QC? ............1-2 When you need assistance .............12-6 White backup tile ..............11D-3 White calibrated tile ...............11A-3, 11B-5, 11D-3, 11F-6, 11G-6 WI CIE ...................A-27 WI-E313 .................A-27 Window menu ................9-1...
- Page 366 EasyMatch QC User's Manual version 2.1 A60-1012-402 EasyMatch QC User's Manual version 2.1 A60-1012-402 EasyMatch QC User's Manual version 2.1 A60-1012-402 EasyMatch QC User's Manual version 2.1 A60-1012-402 EasyMatch QC User's Manual version 2.1 A60-1012-402 EasyMatch QC User's Manual version 2.1 A60-1012-402...
Need help?
Do you have a question about the EasyMatch QC and is the answer not in the manual?
Questions and answers
we currently use a ColorQuest XE, our purified water results are close to 0.0 (Spec +/- 0.10) We are switching to a UtlraScan Vis and our water results range from -0.12 to -0.08, would you know what could be causing this discrepancy?
A discrepancy in purified water results between the HunterLab UltraScan VIS and the ColorQuest XE could be caused by differences in instrument-specific optimized values used in calculations, such as P, Q, and C in the WI Ganz equation. These values are tailored for each instrument. Additionally, differences in UV filter calibration procedures or the condition of the fluorescent standard used for calibration (e.g., faded spot 3 vs. spot 4) could also contribute to variations in results.
This answer is automatically generated