Advertisement
Quick Links
INSTALLATION INSTRUCTIONS
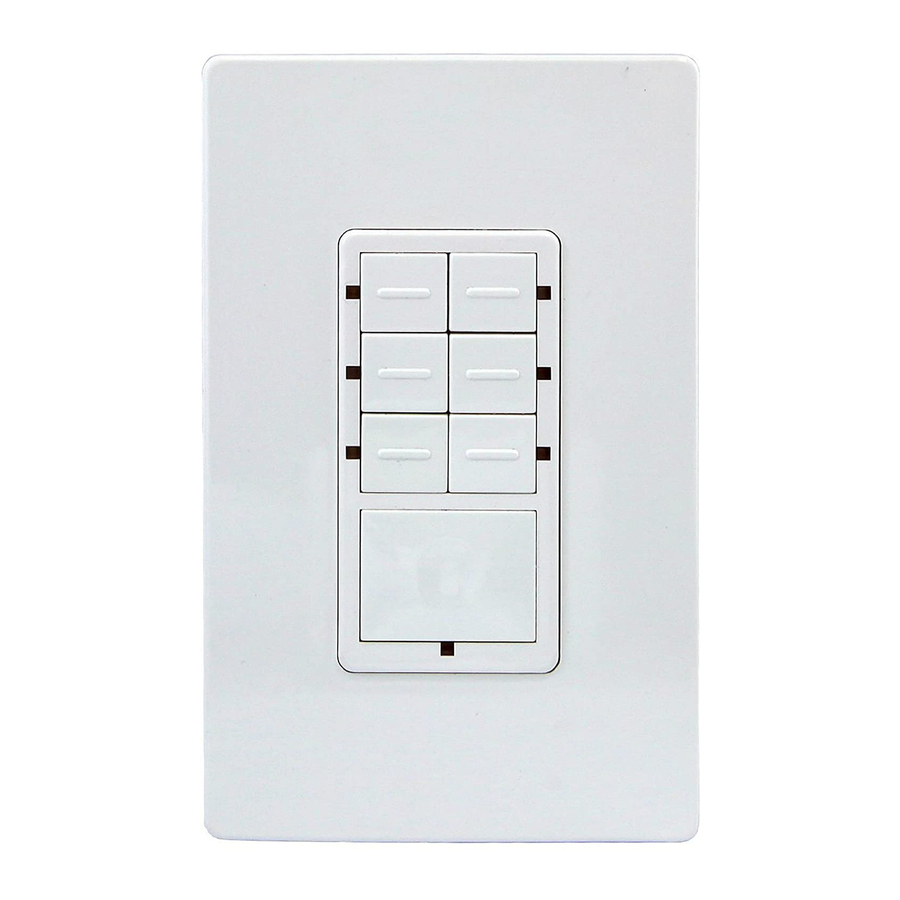
7-Button Scene Controller
SPECIFICATIONS
Voltage........................................................................ 120/277VAC, 50/60Hz
Z-Wave Frequency...................................................................... 908.42 MHz
Operating Temperature................................................................ 32°F-104°F
Range....................................................................Up to 100 feet line of sight
between the Wireless Controller and the closest Z-Wave receiver module.
FEATURES
Ideal retrofit solution, neutral wire is required
Ease of installation
Interoperable with other Z-Wave enabled devices
Blue LED indicates the current status of scene
Easily create up to 7 different scenes for Z-Wave enabled device as well
as on/off function of a single pole application
DESCRIPTION
The 7-Button Scene Controller (ZWN-SC7) is a Z-Wave scene controller that
provides user the ability to control up to 7 scenes with the touch of a single
button. Setting up it requires specific advanced controller functionalities.
ZWN-SC7 can be placed at entranceways, or in a convenient location where
control of multiple desired. This device not only provides dramatic scene
transitions and unique experience, but also enhances the value to your home.
A master controller is required to create and transfer scenes into the ZWN-SC7.
Note: This 7-Button Scene Controller can not be a master controller. It can be
used to activate up to 7 scenes in a master controller, such as a smart gateway.
BUTTON INFORMATION
Your 7-Button Scene Controller includes a label, which provides several scene
options. User can select the desired label and label them on the button.
-01-
ZWN-SC7
Scene Button 1
Scene Button 3
Scene Button 5
Scene Button 7
INSTALLATION
WARNING: TO AVOID FIRE, SHOCK, OR DEATH, TURN OFF THE POWER
AT THE CIRCUIT BREAKER BEFORE YOU INSTALL THIS CONTROLLER.
Wiring Diagram:.
1. Connect the 7-button scene controller as shown in the wiring diagram: Black
lead to hot wire, white lead to neutral wire, green lead to ground wire.
2. Check connections to be sure they are tight and no bare conductors are exposed.
3. Put the controller into the outlet box carefully.
4. Use the supplied screws to mount the controller into wall box.
5. Attach the wall plate.
6. Restore power to the circuit breaker and test the system.
Scene Button 2
Scene Button 4
Scene Button 6
Scene Status LED
HOT(BLACK)
NEUTRAL(WHITE)
GROUND(GREEN)
-02-
OPERATIONS
Manual Learning (Adding/Deleting)
The ZWN-SC7 7-Button Scene Controller can be added/deleted from any Z-Wave
network manually. The ZWN-SC7 has blue LEDs which will all blink when the
device is not added in a Z-Wave network. While the LEDs will not blink when the
device is in a Z-Wave network.
Press and hold the BIGGEST(7) button of scene controller for 3 seconds, the TOP
2 LEDs will be turned on.
Press and release the TOP-LEFT(1) button, LED will drop down to the MIDDLE LEFT(3).
Press and release the MIDDLE-LEFT(3) button, LED will drop down to the BOTTOM-LEFT(5).
After you press the BUTTOM-LEFT(5) button, it will run into manual learning for about
5 seconds.
All LEDs will blink slowly, it means scene controller is ready to be added/deleted
from Z-Wave network.
If the controller has successfully added/deleted, all LEDs will flash 3 times slowly
and stay on. LED will flash 5 times quickly when it was failed.
Factory default
The scene controller supports factory default setting. It will clear the memory and
the Z-Wave network ID.
Press and hold the BIGGEST(7) button of scene controller for 3 seconds, the TOP
2 LEDs will be lit up.
Press and release the TOP-RIGHT(2) button, LED will drop down to the MIDDLE-RIGHT(4).
Press and release the MIDDLE-RIGHT(4) button, LED will drop down to the BUTTOM
-RIGHT(6).
After you press the BUTTOM-RIGHT(6) button, it will run into factory default.
Once the controller is reset successfully, all LEDs will flash 3 times and stay on.
Scene Activation
After ZWN-SC7 is added to a master controller and assigned the scene
number, it can activate scenes of the master controller. Refer to master controller
manual to implement scene assignment. e.g, with Vera3, programming this device
is to add a trigger.
Press and release the specific button which has been assigned a scene of master
controller. The LED of selected button will blink 3 times during transferring data.
If successfully activate a scene, specified LED will stay on. All LEDs will flash 5
times and stay on if transferring was failed or button has not been assigned.
WARRANTY INFORMATION
Our company warranties its products to be free of defects in materials and
workmanship for a period of two(2) years. There are no obligations or liabilities
on the part of our company for consequential damages arising out of or in
connection with the use or performance of this product or other indirect damages
with respect to loss of property, revenue, or profit, or cost of removal, installation
or reinstallation.
-03-
Feb, 2014
11022A
Advertisement

Related Manuals for Z-Wave ZWN-SC7


Summary of Contents for Z-Wave ZWN-SC7
- Page 1 The ZWN-SC7 7-Button Scene Controller can be added/deleted from any Z-Wave network manually. The ZWN-SC7 has blue LEDs which will all blink when the device is not added in a Z-Wave network. While the LEDs will not blink when the Scene Button 2 device is in a Z-Wave network.
- Page 2 FCC Certification Requirements Caution: Any changes or modifications in construction of this device which are not expressly approved by the party responsible for compliance could void the user's authority to operate the equipment. This device complies with part 15 of the FCC Rules. Operation is subject to the following two conditions: (1) This device may not cause harmful interference, and (2) This device must accept any interference received, including interference that may cause undesired operation.
Need help?
Do you have a question about the ZWN-SC7 and is the answer not in the manual?
Questions and answers