Table of Contents
Advertisement
Available languages
Available languages
Quick Links
RaZberry2
(ZME*RAZ2)
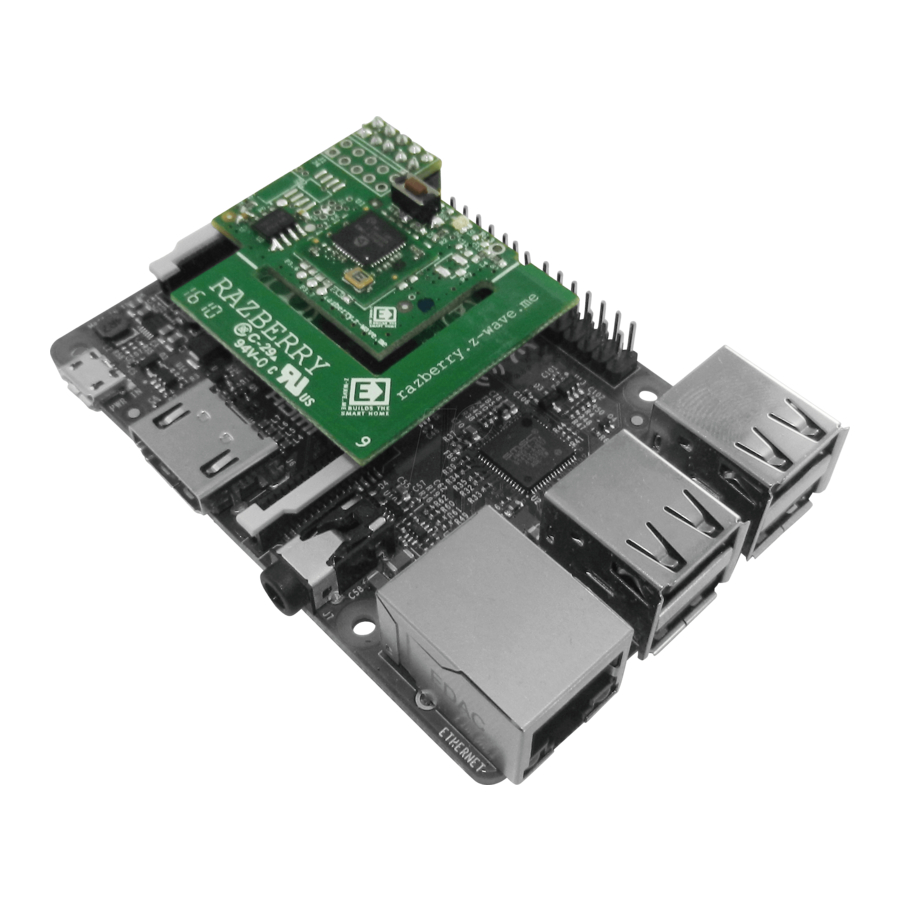
Thanks for you buying RaZberry which turns your Raspberry Pi into a
Z-Wave enabled smart home gateway. There are three parts: (A) the RaZberry
Z-Wave hardware shield that is plugged on top of the Raspberry Pi, (B) the Raspberry
Pi as such and (C) a Z-Wave controller software running on the Raspberry Pi itself. You
can download a free copy of the certified "Z-Way" software from razberry.z-wave.me.
The RaZberry shield works with all Raspberry Pi type A, B, B+, 2, Zero and 3.
Note: The RaZberry works with all third party Z-Wave software supporting Sigma Serial
API.
Here are two ways to install and start Z-Way:
1.
You don't have installed Linux OS on your Raspberry Pi: Please download a SD card image (SD card must have
min. 4 GB) from the download section of http://razberry.z-wave.me. It is based on the Raspberry Pi distribution
'Jessie'.
2.
You already have a working Linux running: Log in and execute the following command line:
wget -q -O - http://razberry.z-wave.me/install | sudo bash. Please use Raspian image 'Jessie'.
In order to use Z-Way make sure that your Pi is connected to the internet using the Ethernet port. Now use a web browser
from a PC in the very same network and go to http://find.zwave.me. You will see the local IP address of your Pi below the
login window. Click on the IP to reach the initial setup screen of Z-Way that gives you the device ID of your RaZberry and
requests you to set your admin password. (If you know your Pi's local IP address you can type this into the browser as
follows: http://YOUR_IP:8083)
Now you can access your controller from outside your home too, using the service find.zwave.me. Use
DEVICEID/LOGIN (e.g. 12345/admin) and your password.
Privacy Note: Z-Way always connects to the server find.zwave.me in order to give you remote access to your system. If
you don't want this, you can turn off this feature after logging into Z-Way (Setup > Management > Remote Access). Please
be aware that you will have to set a port forwarding to port 8083 or you will not have any remote access from outside your
home. All communication between Z-Way and the server find.zwave.me is encrypted and protected by valid certificates.
The user interface ("SmartHome UI") looks similar on different devices such as desktop pc, smartphone or tablet pc (both
native app and browser) but it will adapt to the screen sizes. It allows controlling devices and read sensor status. Every
function of any device is shown as one single
Element (7). In case a physical device has
multiple functions – like switching and metering
– it will generate multiple elements. All elements
are listed in the Element View (3) and can be
filtered by function type (switch, dimmer,
sensor) or other filtering criteria. Every element
offers a Configuration View (8) for changing
names, remove it from the screens etc.
Important elements can be placed in the
Dashboard (1). Additionally, the elements can
be accessed using Rooms (2) assignments.
Every change of a sensor value or a switching
status is called an Event (4) and is shown in the
Timeline (4). Filtering allows monitoring the
changes of one single function or device.
All other functions such as time triggered
actions, the use of information from the internet,
scene plugins of other technologies and
services are realized in so-called Apps. These
apps are ready-to-use scripts/ templates that
can add extra logic and functionality such as
logic rules like "IF
THEN", scene definitions, timers, interactions with external (non Z-Wave) devices connected via USB
Dongle or via internet etc. Some apps are built-in into the system. More can be downloaded from an App Store. To use an
app, you have to create an instance of this app and configure its properties. If useful you can create more than one
instances of one single app. The apps can create none, one or multiple new elements and events. You can install new
apps and manage them using the Configuration Menu (6) > Apps.
Dashboard (1), Rooms (2), Elements (3), Events/Timeline (4), Server Time
(5), Configuration Menu (6), Elements (7), Element Configuration (8)
1.
Raspberry Pi Connector, used GPIO pins 1-10
(A)
2.
Second Open Connector, identical to (1)
3.
Button: No function (reserve)
4.
Open hole for a PigTail antenna. You need to break off the
PCBA antenna to make this work.
5.
Pads to solder an uFL connector for external antenna. See
https://www.adafruit.com/products/1661
details. You need to break off the PCBA antenna to make this
work.
6.
Two LEDs for status information.
(B)
More information, including full manuals and training videos can be
found in the support section of
www.zwave.me
wave.info. The support forum
forum.z-wave.me
RaZberry can be used in multiple areas of the world and adapted
to the local Z-Wave frequency just using the Z-Wave Experts UI
(http://YOURIP:8083/expert, Network > Management). The SKU code determines the default frequency. Do not change
the frequencies outside your SKU code group.
•
SKU: ZMEERAZ2 (865...869 MHz): Europe (EU) [default], India (IN), Russia (RU), Malaysia (MY), China (CN), RSA
(EU), Middle East (EU)
•
SKU: ZMEURAZ2 (908 ... 917 MHz): All America ex. Brasil and Peru (US) [default], Israel (ISL)
•
SKU: ZMEARAZ2 (919 ... 921 MHz): Australia/NewZealand/Brazil/Peru (ANZ) [default], Hongkong (HK),
Japan/Taiwan (JP), Korea (KR)
Z-Wave Transceiver
Sigma Designs ZM5202
Wireless Range
Min. 40 m line of sight indoor
Self-Test
On power-on both LEDs must shine for about 2 seconds and then go off. If they don't, the device is
defect and must be returned
Dimensions/Weight
20 mm x 40 mm/ 16 gr.
Display
Red LED: Inclusion and Exclusion Mode
Green LED: Send Data Indication
Host Interface
TTL UART (3.3V) compatible to Raspberry Pi GPIO pins
The complete CE declaration can be found on: www.z-wave.me/ce
FCC Device ID: 2AAYU- ZMEURAZ
FCC Statement (FCC - Federal Communications Commission)
This device complies with Part 15 of the FCC Rules. Operation is subject to the following two conditions:
(1)
This device may not cause harmful interference, and
(2)
This device must accept any interference received, including interference that may cause undesired operation.
Note: This equipment has been tested and found to comply with the limits for Class B digital devices, pursuant to Part 15 of the FCC rules. These limits are designed to
provide reasonable protection against harmful interference in a residential installation. This equipment generates, uses and can radiate radio frequency energy and, if not
installed and used in accordance with the instructions, may cause harmful interference to radio communications. However, there is no guarantee that interference will not
occur in a particular installation. If this equipment does cause harmful interference to radio or television reception, which can be determined by turning the equipment off
and on, the user is encouraged to try to correct the interference by one or more of the following measures:
•
Reorient or relocate the receiving antenna.
•
Increase the separation between the equipment and receiver.
•
Connect the equipment into an outlet on a circuit different from that to which the receiver is connected.
•
Consult the dealer or an experienced radio/TV technician for help.
Use of shielded cable is required to comply with Class B limits in Subpart B of Part 15 of the FCC rules. Do not make any changes or modifications to the equipment
unless otherwise specified in the manual. If such changes or modifications should be made, it may be necessary to stop operation of the equipment.
Note: If static electricity or electromagnetism causes data transfer to discontinue midway (fail), restart the application or disconnect and connect the communication cable
(USB, etc.) again.
Radiation Exposure Statement: This equipment complies with FCC radiation exposure limits set forth for an uncontrolled environment.
Co-location warning:
This transmitter must not be co-located or operating in conjunction with any other antenna or transmitter.
OEM integration instructions: This module has a LIMITED MODULAR APPROVAL, and is intended only for OEM integrators under the following conditions: As single,
non-colocated transmitter, this module has no restrictions in relation to a safe distance from any user. The module shall be only used with the antenna(s) that have been
originally tested and certified with this module.
As long as these conditions above are met, further transmitter test will not be required. However, the OEM integrator is still responsible for testing their end-product for
any additional compliance requirements required with this module installed (for example, digital device emissions, PC peripheral requirements, etc.).
Validity of using the module certification: In the event that these conditions cannot be met, or when installing this module in another host as tested in this FCC filing, then
the FCC authorization for this module in combination with the host equipment is no longer considered valid and the FCC ID of the module cannot be used on the final
product. In these circumstances, the OEM integrator will be responsible for re-evaluating the end product (including the transmitter) and obtaining a separate FCC
authorization.
Custom design antennas may be used, however the OEM installer must follow the FCC 15.21 requirements and verify if new FCC approval will be necessary.
for
component
or the portal
z-
may help as well.
Advertisement
Table of Contents

Related Manuals for Z-Wave RaZberry2


Summary of Contents for Z-Wave RaZberry2
- Page 1 RaZberry can be used in multiple areas of the world and adapted min. 4 GB) from the download section of http://razberry.z-wave.me. It is based on the Raspberry Pi distribution to the local Z-Wave frequency just using the Z-Wave Experts UI ‘Jessie’.
- Page 2 Eigenschaften und Funktionen erweitern – z.B. Logik-Regeln nach dem „WENN RaZberry2 Timer-Funktionen, Integration externer (nicht Z-Wave) Geräte, die über ein USB Dongle oder via Internet verbunden werden. Einige Apps sind bereits vorinstalliert, weitere Apps können über einen App Store hinzugefügt werden. Um eine (ZMEERAZ2) App zu verwenden, muss eine Instanz davon erstellt und konfiguriert werden.
Need help?
Do you have a question about the RaZberry2 and is the answer not in the manual?
Questions and answers