Table of Contents
Advertisement
Quick Links
Advertisement
Table of Contents

Related Manuals for DV Power RMO500


Summary of Contents for DV Power RMO500
- Page 1 RMO500 MICROOHMMETER Manual BEKO OWER...
-
Page 2: Table Of Contents
Manufacturer Contact Information ....... . 28 Manual Version: RMO500. MV.03... -
Page 3: Introduction
RMO500 should only be operated by trained and authorized personnel. Rules for Use • RMO500 should only be used when in a technically fit condition. Its use should be in accordance with the safety regulations for the actual working site and application. -
Page 4: Designated Use
• The serial interface of RMO500 should only have external devices connected that meet the requirements for SELV equipment according to EN 60950 or IEC 60950. • When setting up RMO500, make sure that the air slots of the test set remain unobstructed. -
Page 5: Functionality
Functionality 4.1 Single Test The RMO500 generates a filtered (true) DC current and outputs it in an automatically regulated current ramp. The current increases with a constant slope from zero up to a set maximum value. When the current has reached its maximum, RMO500 measures the resistance of the test object. -
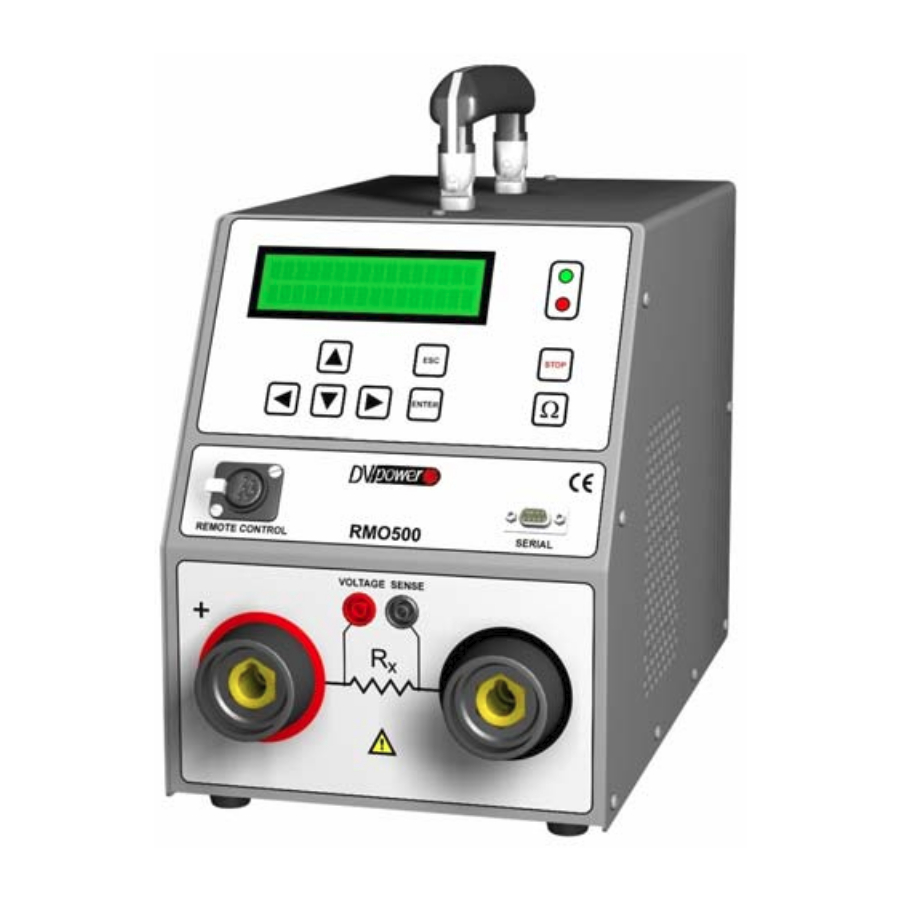
Page 6: Description
Press to start a test. Test current and memory position must be selected beforehand. green LED • Lights continuously when RMO500 is turned on. • Flashes when a test can be started. • Flashes alternately with the red LED during a test. - Page 7 Description 5.2 Rear Panel Components Connector for Power switch mains power supply I In this position, RMO500 is connected to the mains power supply. 0In this position, RMO500 is separated from the mains power supply with both poles. Equipotential connector.
-
Page 8: Getting Started
6.2 Setting the Measurement Parameters Single Test Turn on RMO500 with the power switch on the back of the test set. The display shows the Sing menu. Test current Memory position Figure 6-2:... - Page 9 RMO500 Getting Started Continuous Test Turn on RMO500 with the power switch on the back of the test set. The display shows the Sing menu. Go to Cont menu using and then button. LEFT, Figure 6-3: The Cont menu In the Cont menu, define a test current, memory location and test current duration time.
- Page 10 ). If one of these values has to be changed, m:40 press to return to the Sing menu. The flashing green LED indicates that RMO500 is now ready to start the test. Press the button to run a test. Ω...
- Page 11 STOP current will immediately drop to 0A. 6.4 Viewing the Test Results Once a Single test is finished, RMO500 automatically changes to the Result menu to display the test results. For Continuous Test only the last performed test is shown.
- Page 12 30 6.6 Printing the Test Results RMO500 stores up to 100 test results. They can be printed using the Print menu at memory positions 0 ... 99. Connect the RS 232 port of the RMO and the printer with a serial cable.
- Page 13 RMO500 Getting Started 6.7 Duty Cycles During tests, RMO500 generates a high DC current that heats up the test set. To prevent RMO500 from overheating, certain duty cycles apply depending on the used test current. Table 6-11: S i n g l e...
-
Page 14: Rmo Win Software
RMO500 RMO Win Software 7 RMO Win Software RMO Win is a Windows program for working with Micro OhmMeters RMO series. It enables the two-way communication RMO – PC over the serial port RS232. RMO Win supports the following functions:... - Page 15 RMO500 RMO Win Software 7.3 Starting Connect the RS 232 port of the RMO Micro OhmMeter and the PC, with a serial cable. Start RMO Win: - Click on ”Start”, - Click on ”Programs”, - Click on ''RMO Win’’, - Click on ‘’RMO Win6’’.
- Page 16 RMO500 RMO Win Software File Open Opening the file. Save As Saving the table in the working directory. Print Printing the active table. Exit Exiting the program. Download Data From RMO With this command the results from the internal RMO memory can be transferred to the PC.
- Page 17 RMO500 RMO Win Software Date The results that are filled in on the chosen date are going to be transferred to the PC. Date from – up to After choosing this option, a new window appears. It provides a choice of selecting a time-interval when the measurement was done.
- Page 18 RMO500 RMO Win Software Transfer After pressing this key, the selected results are going to be transferred from the internal RMO memory to the PC. Unless the user chooses some other option, all the results from the RMO memory will be transferred (the option All is a default).
- Page 19 RMO500 RMO Win Software Tools Clearing of table Erasing all the data from the main menu board. RS232 Choosing the PC serial port to which an RMO is being connected. This window provides a choice of the serial port to be used. After a correct choice has been made, the green led diode ”Communication”...
- Page 20 RMO500 RMO Win Software The test results are going to be put in the table (as in the picture below). It is highly recommended to write the information in the columns ”Object”, ”Code” and ”Comments” for better systemization of the saved results.
-
Page 21: Remote Control
RMO500 Remote Control 8 Remote Control The RMO Remote Control Unit is an optional control unit that is used to start and stop the tests from a remote location, away from the actual RMO. Provided that, for a series of tests, the same test current is fed through the test object, multiple measurements can be carried out with the RMO Remote Control Unit. - Page 22 RMO500 Remote Control 8.2 Operational Components Sockets to connect the Remote Control Unit directly to a test object "Voltage Sense +" and "Voltage Sense -" Depending on the situation, The LEDs of the Remote button has Control Unit function Ω/STOP...
-
Page 23: Kelvin's Probes
RMO500 Kelvin’s Probes 9 Kelvin’s Probes Kelvin’s Probes provide easy and simple testing. Current and voltage connections where joined inside single cable having thus no need to use heavy current cables. Measurement is performed by 10 A current. In case higher current is given RMO will limit it to value of 15 A maximally. - Page 24 RMO500 Kelvin’s Probes 9.2 Operational Components Sense pin Current pin Depending on the situation, The LEDs of the Kelvin’s button has Ω/STOP Probes function synchronized varying functions: with the ones of RMO. • When the green LED Green LED flashes, a new test can be •...
-
Page 25: Error Messages
Note: an erroreous result. The display will not show this asan error message. 10.2 Error Message "Open Connection" Figure 10-2: If one of RMO500 current Disconnection of the current cables ("+" or " -") to the test cables and error... - Page 26 In this case, wait for the test set to cool down and repeat the test. 10.5 Error Message "Malfunction" If this message is shown on the display, or if RMO500 cannot be operated anymore at all, a serious internal error occurred.
-
Page 27: Technical Data
RMO500 Technical Data Technical Data 11.1 Mains Power Supply - Connection according to IEC/EN60320-1; UL498, CSA 22.2 - Voltage single phase 110 – 240 VAC, +10% – -15% - Frequency 50/60 Hz - Fuse 15 A 11.2 Output data - Test current 10A –... -
Page 28: Accessories
RMO500 Technical Data, Accessories 11.7 RS232 Interface RMO500 is equipped with an RS232 serial interface to connect to an external computer. not connected not connected not connected not connected Housing = shield not connected TXD (out) Transmit Data RXD (in) - Page 29 RMO500 Contact Information BEKO OWER Box 1346, 181 25 Lidingö, Sweden Fax: + 46 8 73 17 799 E-Mail: support@dv-power.com Website: http://www.dv-power.com...
Need help?
Do you have a question about the RMO500 and is the answer not in the manual?
Questions and answers