Table of Contents
Advertisement
Quick Links
Advertisement
Table of Contents

Related Manuals for Chauvet Professional STRIKEARRAY2


Summary of Contents for Chauvet Professional STRIKEARRAY2
- Page 1 User Manual Model ID: STRIKEARRAY2...
- Page 2 Edition Notes The Strike Array 2 User Manual includes a description, safety precautions, installation, programming, operation and maintenance instructions for the Strike Array 2 as of the release date of this edition. Trademarks CHAUVET, the Chauvet logo and Strike Array 2 are registered trademarks or trademarks of Chauvet & Sons, LLC (d/b/a Chauvet and Chauvet Lighting) in the United States and other countries.
-
Page 3: Table Of Contents
Table of Contents TABLE OF CONTENTS 1. Before You Begin ............... What Is Included ................... Claims ......................Text Conventions ..................Symbols ......................Safety Notes....................Personal Safety....................Mounting and Rigging ..................Power and Wiring....................Operation ......................Expected LED Lifespan................. 2. Introduction ................Description .................... - Page 4 Table of Contents Configuration (Standalone) ................Static Color......................Automatic Program .................... Configuration (Settings) ................Red Shift ......................Master Slave ...................... Dimmer Mode..................... Pulse Width Modulation ..................Display Back Light....................Key Lock ......................Product Information.................... Temperature....................... Factory Reset..................... 5. Maintenance................Product Maintenance ..................6.
-
Page 5: Before You Begin
Before You Begin 1. Before You Begin What Is Included • Strike Array 2 • Omega bracket with mounting hardware • Seetronic Powerkon IP65 power cord • Quick Reference Guide Claims Carefully unpack the product immediately and check the container to make sure all the parts are in the package and are in good condition. -
Page 6: Safety Notes
Before You Begin Safety Notes Read all the following safety notes before working with this product. These notes contain important information about the installation, usage, and maintenance of this product. This product contains no user-serviceable parts. Any reference to servicing in this User Manual will only apply to properly trained, certified technicians. -
Page 7: Introduction
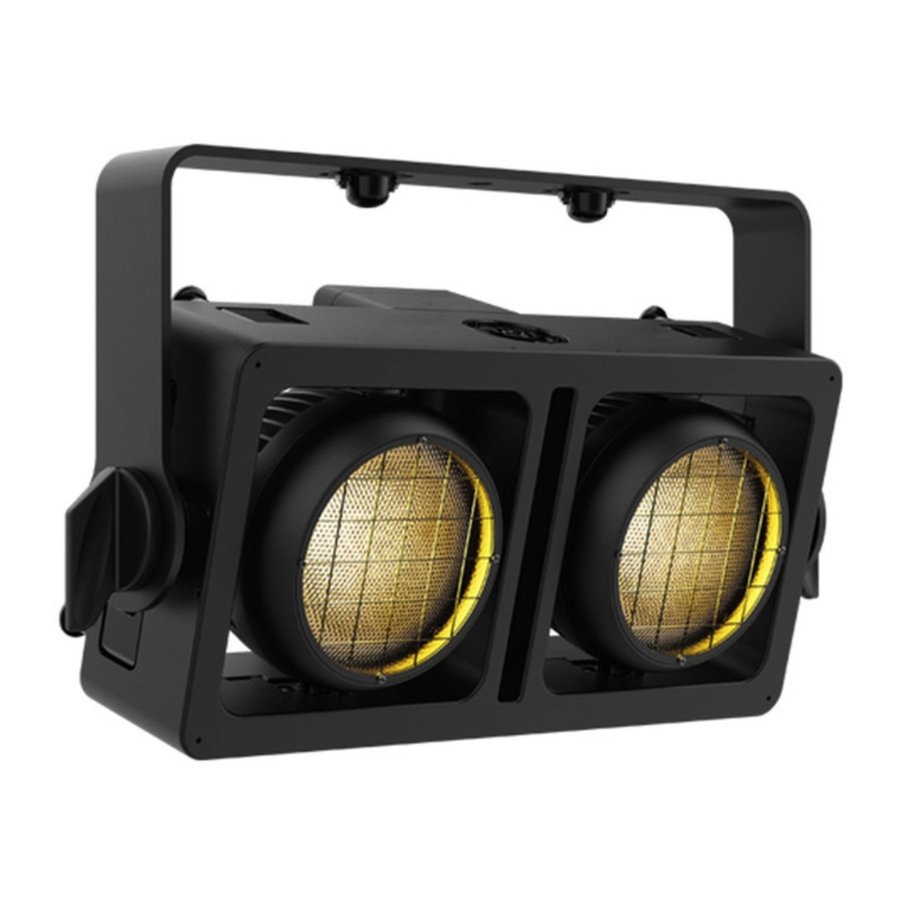
Introduction 2. Introduction Description The Strike Array 2 is an outdoor-ready audience blinder powered by two 100 W warm white LEDs housed in independently focusable pods. An emulated “amber shift” warms the color temperature of the light as it dims to deliver a classic tungsten look. Its variable PWM and high CRI make it ideal for broadcast applications. -
Page 8: Product Dimensions
Introduction Product Dimensions 1.65 in 42 mm 8.89 in 225.8 mm 6.42 in 163 mm 18.58 in 472 mm 15.09 in 383.3 mm 7.61 in 193.3 mm 4.55 in 115.6 mm 2.05 in 52 mm 0.51 in 13 mm Page 4 of 18 Strike Array 2 User Manual Rev. -
Page 9: Setup
Setup 3. Setup AC Power The Strike Array 2 has an auto-ranging power supply and it can work with an input voltage range of 100 to 240 VAC, 50/60 Hz. To determine the product’s power requirements (circuit breaker, power outlet, and wiring), use the current value listed on the label affixed to the product’s back panel, or refer to the product’s specifications chart. -
Page 10: Mounting
The Strike Array 2 comes with a bracket to which you can attach a mounting clamp directly. Mounting clamps are sold separately. Make sure the clamps are capable of supporting the weight of this product. Use at least two mounting points per product. For the CHAUVET Professional line of mounting clamps, go to http://www.trusst.com/products. -
Page 11: Multi-Product Mounting
Setup Multi-Product Mounting The Strike Array 2 has an interlocking system to connect multiple Strike Array 2 or STRIKE Array 4 products together, vertically or horizontally. Make sure the mounting clamps are capable of supporting the weight of the product. For our Chauvet line of mounting clamps, go to http://trusst.com/productcategory/ truss-clamps/. -
Page 12: Mounting Products Attached In Series
Setup Mounting Products Attached in Series With Omega Bracket Without Omega Bracket Attach the safety cable of the first product to the mounting point Attach the safety cables of the following Up to products to the 8 cells preceding product Each Strike Array 2 product is 2... -
Page 13: Vertical Mounting Stability
Setup Vertical Mounting Stability When mounting products attached in series, use omega brackets in the back position to create a spine. This will prevent any motion which may damage the products. Mounting clamps Omega brackets Pole or pipe for stability Strike Array 2 User Manual Rev. -
Page 14: Operation
Operation 4. Operation Control Panel Description Button Function <MENU> Exits from the current menu or function <UP> Enables the selected menu or sets the selected value in to the current function <DOWN> Navigates upward through the menu list or increases the numeric value when in a function <ENTER>... -
Page 15: Configuration (Dmx)
Operation Main Level Programming Levels Description Turns off display backlight after 10 seconds of inactivity Turns off display backlight after 30 seconds of inactivity Back Light Turns off display backlight after 2 minutes of 2Min inactivity Always On Display backlight always on Locks display (password: <UP>, <DOWN>, Key Lock <UP>, <DOWN>, <ENTER>) -
Page 16: Control Channel Assignments And Values
Operation Control Channel Assignments and Values 8 Ch Channel Function Value Percent/Setting Dimmer 000 255 0–100% Dimmer Fine 000 255 0–100% 000 000 On Red Shift 001 255 Off 000 010 No function Strobe 011 132 Strobe, slow to fast (all pods) 133 ... - Page 17 Operation 4 Ch Channel Function Value Percent/Setting White 1 000 255 0–100% White 2 000 255 0–100% 000 000 On Red Shift 001 255 Off 000 051 Current dimmer speed mode 052 101 Dimmer speed mode off (linear dimmer) Dimmer Speed Mode* 102 ...
-
Page 18: Configuration (Standalone)
Operation Configuration (Standalone) Static Color To run the Strike Array 2 on a static setting: 1. Go to the Static main level. 2. Select from Dimmer or Strobe. 3. Increase or decrease the value from 000–255. Automatic Program To run an automatic program: 1. -
Page 19: Maintenance
Maintenance 5. Maintenance Product Maintenance Dust build-up reduces light output performance and can cause overheating. This can lead to reduction of the light source’s life and/or mechanical wear. To maintain optimum performance and minimize wear, clean your lighting products at least twice a month. However, be aware that usage and environmental conditions could be contributing factors to increase the cleaning frequency. -
Page 20: Technical Specifications
1, 2, 3, 4, 5, or 8 Ordering Product Name Item Name Item Code UPC Number Strike Array 2 STRIKEARRAY2 03051713 78146220617 UL 1573 CSA C22.2 No. 166 E113093 Page 16 of 18 Strike Array 2 User Manual Rev. 2... -
Page 21: Returns
Returns Returns Send the product prepaid, in the original box, and with the original packing and accessories. Chauvet will not issue call tags. Call Chauvet and request a Return Merchandise Authorization (RMA) number before shipping the product. Be prepared to provide the model number, serial number, and a brief description of the cause(s) for the return. -
Page 22: Contact Us
Contact Us Contact Us General Information Technical Support Chauvet World Headquarters Address: 5200 NW 108th Ave. Voice: (844) 393-7575 Sunrise, FL 33351 Fax: (954) 756-8015 Voice: (954) 577-4455 Email: chauvetcs@chauvetlighting.com Fax: (954) 929-5560 Toll Free: (800) 762-1084 Website: www.chauvetprofessional.com Chauvet Europe Ltd Address: Unit 1C Email: UKtech@chauvetlighting.eu...
Need help?
Do you have a question about the STRIKEARRAY2 and is the answer not in the manual?
Questions and answers