Table of Contents
Advertisement
Available languages
Available languages
Quick Links
Advertisement
Chapters
Table of Contents

Related Manuals for Ducati Monster 600 2001


Summary of Contents for Ducati Monster 600 2001
- Page 1 Libretto uso e manutenzione...
- Page 3 Ducati Motor S.p.A. Ti consiglia di seguire attentamente le semplici norme qui riportate, in particolare per quanto concerne il rodaggio. Avrai così la certezza che la tua Ducati sia sempre in grado di regalarti grandi emozioni. Per riparazioni o semplici consigli, rivolgiti ai nostri centri di assistenza autorizzata.
-
Page 4: Table Of Contents
SOMMARIO Elementi e dispositivi principali Posizione sul motociclo 19 Tappo serbatoio carburante 20 Serratura sella e portacasco 21 Cavalletto laterale 22 Registri regolazione ammortizzatore posteriore 23 Registri regolazione forcella anteriore (900S) 24 Indicazioni generali Norme d’uso Garanzia 6 Precauzioni per il primo periodo d’uso del motociclo 26 Simboli 6 Controlli prima dell’avviamento 28 Informazioni utili per viaggiare in sicurezza 7... - Page 5 Pneumatici 47 Promemoria manutenzioni periodiche Controllo livello olio motore 49 Pulizia e sostituzione candele 50 Pulizia generale 51 Lunga inattività 52 Avvertenze importanti Caratteristiche tecniche Ingombri 53 Pesi 53 Rifornimenti 54 Motore 55 Distribuzione 55 Prestazioni 56 Candele d’accensione 56 Freni 57 Trasmissione 58 Telaio 59...
-
Page 6: Indicazioni Generali
In caso di dubbi rivolgersi ad un Concessionario o ad un’Officina Autorizzata. Le nozioni che apprenderai si riveleranno utili durante i viaggi che la Ducati Motor S.p.A. Ti augura siano sereni e divertenti e Ti permetteranno di mantenere inalterate per lungo Garanzia tempo le prestazioni del motociclo. -
Page 7: Informazioni Utili Per Viaggiare In Sicurezza
Informazioni utili per viaggiare in sicurezza cambiamento di corsia. Rendersi ben visibili evitando di viaggiare nelle “aree Attenzione cieche” dei veicoli che precedono. Leggere prima di usare la moto. Fare molta attenzione negli incroci, in corrispondenza delle uscite da aree private o da parcheggi e nelle corsie Molti incidenti sono spesso dovuti all’inesperienza nella d’ingresso in autostrada. -
Page 8: Guida A Pieno Carico
Guida a pieno carico Questo motociclo è stato concepito per percorrere lunghi tratti a pieno carico in assoluta sicurezza. La sistemazione dei pesi sul motociclo è molto importante per mantenere inalterati questi standard di sicurezza e per evitare di trovarsi in difficoltà quando si eseguono manovre repentine o nel percorrere tratti di strada sconnessa. -
Page 9: Dati Per L'identificazione
Dati per l’identificazione 600/750 Ogni motociclo Ducati è contraddistinto da due numeri d’identificazione, rispettivamente per il telaio (fig. 1.1) e per il motore (fig. 1.2). Telaio N. Motore N. Note Questi numeri identificano il modello del motociclo e sono da citare per la richiesta di parti di ricambio. -
Page 10: Comandi Per La Guida
COMANDI PER LA GUIDA Attenzione Questo capitolo illustra il posizionamento e la funzione dei comandi necessari alla guida del motociclo. Leggere attentamente quanto descritto prima di utilizzare ogni comando. Posizione dei comandi per la guida del motociclo (fig. 2) 1) Cruscotto. 2) Interruttore d’accensione e bloccasterzo a chiave. -
Page 11: Cruscotto
6) Spia blu Cruscotto (fig. 3) Si accende per indicare la luce abbagliante accesa. 1) Tachimetro (km/h). 7) Contagiri (min- Indica la velocità di marcia. Indica il numero di giri al minuto del motore. a) Contachilometri (km). Indica la distanza totale percorsa. b) Contachilometri parziale (km). -
Page 12: Chiavi
Chiavi (fig. 4) Interuttore d’accensione e bloccasterzo (fig. 5) Vengono consegnate due chiavi universali per È sistemato davanti al serbatoio ed è a quattro posizioni: avviamento, bloccasterzo e serratura sella ed una A) ON: abilita il funzionamento di luci e motore; piastrina (1) col numero d’identificazione delle chiavi. -
Page 13: Commutatore Sinistro
Commutatore sinistro (fig. 6) 1) Commutatore, comando accensione luce a tre posizioni: in basso = luce spenta; al centro = luce di posizione anteriore e posteriore, luce targa e luce del cruscotto accese; in alto = luce del proiettore, luce di posizione anteriore e posteriore, luce targa e luce del cruscotto accese. -
Page 14: Leva Comando Frizione
Leva comando frizione (fig. 7) La leva (1) che aziona il disinnesto della frizione, è dotata di pomello (2) per la regolazione della distanza tra la leva stessa e la manopola, sul manubrio. Per effettuare la regolazione, mantenere la leva (1) completamente in avanti ed agire sul pomello (2), ruotandolo in corrispondenza di una delle quattro posizioni previste, tenendo conto che:... -
Page 15: Leva Comando Starter
Leva comando starter (fig. 8) Commutatore destro (fig. 9) Il comando starter serve per agevolare la partenza a 1) Interruttore ARRESTO MOTORE, a due posizioni: freddo del motore e innalzare il regime di rotazione posizione (RUN) = marcia; minimo, dopo l’avviamento. posizione (OFF) = arresto del motore. -
Page 16: Manopola Girevole Comando Acceleratore
Manopola girevole comando acceleratore (fig. 9) La manopola girevole (3), sul lato destro del manubrio, comanda l’apertura della ghigliottina dei carburatori (600/750) o delle valvole del corpo farfallato (900). Quando viene rilasciata, la manopola torna automaticamente alla posizione iniziale di minimo. fig. -
Page 17: Pedale Comando Freno Posteriore
Pedale comando cambio (fig. 11.1) Pedale comando freno posteriore (fig. 10) Il pedale comando cambio ha una posizione di riposo Per azionare il freno posteriore, premere il pedale (1) centrale N con ritorno automatico e due movimenti: verso il basso con il piede. in basso = spingere il pedale verso il basso per innestare Il sistema di comando è... - Page 18 Registrazione posizione pedale comando cambio e freno posteriore (fig. 11.2) Per assecondare le esigenze di guida di ogni pilota è possibile modificare la posizione delle leve comando cambio e freno posteriore rispetto all’appoggiapiedi. Per modificare la posizione della leva comando cambio agire nel modo seguente: Bloccare l’asta (1) e allentare i controdadi (2) e (3).
-
Page 19: Elementi E Dispositivi Principali
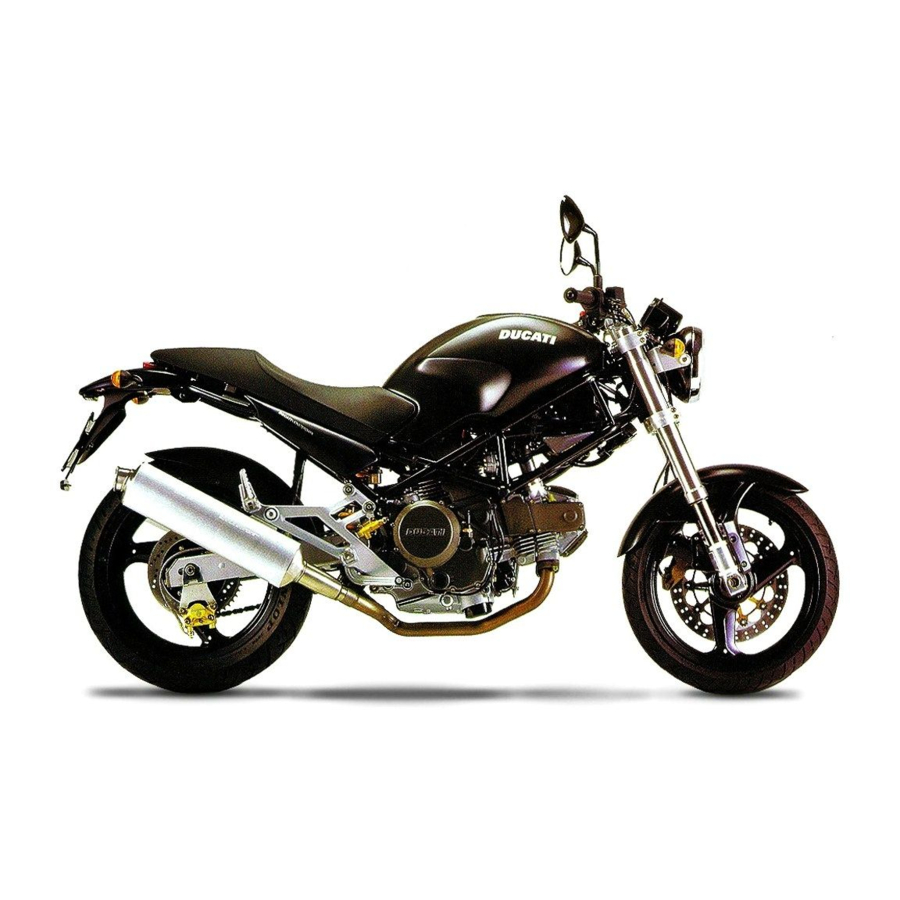
ELEMENTI E DISPOSITIVI PRINCIPALI Posizione sul motociclo (fig. 12) 1) Tappo serbatoio carburante. 2) Serratura sella. 3) Perno per il cavetto portacasco. 4) Impugnatura per passeggero. 5) Cavalletto laterale. 6) Specchi retrovisori. 7) Dispositivi di registro ammortizzatore posteriore. 8) Dispositivi di registro forcella anteriore (900S). 9) Asta sollevamento serbatoio. -
Page 20: Tappo Serbatoio Carburante
Tappo serbatoio carburante (fig. 13) Apertura Sollevare il coperchietto (1) di protezione ed inserire la chiave nella serratura. Ruotare di 1/4 di giro la chiave in senso orario per sbloccare la serratura. Sollevare il tappo. Chiusura Richiudere il tappo con la chiave inserita e premerlo nella sede. -
Page 21: Serratura Sella E Portacasco
Serratura sella e portacasco Apertura Introdurre la chiave nella serratura, ruotarla in senso orario per ottenere lo sganciamento della sella dal telaio. Sfilare la sella dai fermi anteriori tirandola all’indietro. Nella parte posteriore del vano sotto la sella si trova il cavetto portacasco (1) (vedi pag. -
Page 22: Cavalletto Laterale
Cavalletto laterale (fig. 15) Note È consigliabile verificare periodicamente il corretto Importante funzionamento del sistema di trattenuta (costituito da Prima d’azionare il cavalletto laterale accertarsi due molle a trazione una all’interno dell’altra) e del dell’adeguata consistenza e planarità della superficie sensore di sicurezza (2). -
Page 23: Registri Regolazione Ammortizzatore Posteriore
Registri regolazione ammortizzatore posteriore Se si intende trasportare passeggero e bagaglio, (fig. 16) precaricare al massimo la molla dell’ammortizzatore L’ammortizzatore posteriore è dotato di registri esterni che posteriore per migliorare il comportamento dinamico del permettono d’adeguare l’assetto della moto alle condizioni motociclo ed evitare possibili interferenze col suolo. -
Page 24: Registri Regolazione Forcella Anteriore (900S)
Registri di regolazione forcella anteriore La forcella del motociclo 900S è regolabile sia nella fase di estensione (ritorno) sia nella compressione degli steli. La regolazione avviene per mezzo dei registri esterni a vite: 1) (fig.17) per modificare il freno idraulico in estensione;... - Page 25 Per modificare il precarico della molla interna ad ogni stelo ruotate il registro ad estremità esagonale (2) con una chiave esagonale di 22 mm. Il valore del precarico (A) può variare tra 25 e 10 mm. La taratura originale corrisponde a 18 mm. Importante Regolare i registri di entrambi gli steli sulle medesime posizioni.
-
Page 26: Norme D'uso
L’inosservanza variare continuamente il carico ed il regime di giri del di tali norme esonera la Ducati Motor S.p.A. da qualsiasi motore, pur rimanendo sempre entro il limite indicato. responsabilità su eventuali danni al motore e sulla sua A questo scopo risultano adattissime le strade ricche di durata. - Page 27 Dopo 2500 Km Nel normale uso del motociclo, a fine rodaggio, si 5ª consiglia di non superare mai: la velocità massima ottenibile nelle singole marce 4ª (600/750) (pag. 56); i 9.000 min (900) (fig.20). 3ª Attenendosi alle raccomandazioni si favorisce una maggiore durata del motore, riducendo la necessità...
-
Page 28: Controlli Prima Dell'avviamento
Controlli prima dell’avviamento Attenzione In caso di anomalie rinunciare alla partenza e Attenzione rivolgersi ad un Concessionario o ad un’Officina La mancata esecuzione delle ispezioni prima della Autorizzata. partenza può causare danni al veicolo e procurare lesioni gravi al conducente e al passeggero. Prima di mettersi in viaggio controllare i seguenti punti: Carburante nel serbatoio Controllare il livello del carburante nel serbatoio. -
Page 29: Avviamento Motore
Avviamento motore 3) Accertarsi che l’interruttore d’arresto (1, fig. 21.3) sia nella posizione (RUN), premere quindi il pulsante Note avviamento (2). Per avviare il motore già caldo seguite la procedura Lasciare che il motore si avvii spontaneamente, senza descritta per “Temperatura ambiente alta”. azionare il comando dell’accelleratore. - Page 30 Temperatura ambiente alta (oltre i 35 °C): Eseguire la stessa procedura senza utilizzare il comando starter. Temperatura ambiente fredda (inferiore a 10 °C): Eseguire la procedura descritta per “Temperatura esterna normale” prolungando il tempo di riscaldamento del motore (punto 5) fino a 5 minuti. Nella versione 600/750 é...
-
Page 31: Avviamento E Marcia Del Motociclo
Avviamento e marcia del motociclo Frenata 1) Disinserire la frizione agendo sulla leva comando. Rallentare per tempo, scalare per utilizzare il freno 2) Con la punta del piede abbassare con decisione la leva motore e poi frenare agendo su entrambi i freni. Prima selezione marce in modo da innestare la prima marcia. -
Page 32: Arresto Del Motociclo
Arresto del motociclo Rifornimento carburante Ridurre la velocità, scalare di marcia e rilasciare la Durante il rifornimento non riempire eccessivamente il manopola dell’acceleratore. Scalare fino ad inserire la serbatoio. Il livello del carburante deve rimanere prima e successivamente la folle. Frenare ed arrestare il al di sotto del foro d’immissione nel pozzetto del tappo motociclo. -
Page 33: Parcheggio
Parcheggio Parcheggiare il motociclo fermo sul cavalletto laterale (vedi pag. 22 ). Ruotare il manubrio completamente a sinistra e portare la chiave nella posizione LOCK per prevenire i furti. Se si parcheggia in un garage o in altre strutture, fare attenzione che sia ben ventilato e che il motociclo non risulti vicino a fonti di calore. -
Page 34: Accessori In Dotazione
Accessori in dotazione (fig. 25.1) Nel vano sottosella sono alloggiati: un libretto uso e manutenzione; un cavetto portacasco; una busta attrezzi per le normali operazioni di manutenzione e verifica. Per accedere al vano è necessario rimuovere la sella (pag.21) e togliete il coperchio di protezione (1) svitando la vite speciale (2) con una moneta. -
Page 35: Operazioni D'uso E Manutenzione Principali
OPERAZIONI D’USO E MANUTENZIONE PRINCIPALI Sollevamento serbatoio carburante (fig. 26.1) Attenzione Per evitare fuoriuscite di benzina dallo sfiato del tappo carburante, il contenuto di benzina deve essere minore di 5 litri. fig. 26.1 Rimuovere la sella (pag. 21), sollevare il gancio (1). Sollevare il serbatoio e sganciare l’astina (2, fig.26.2) di servizio dal supporto. -
Page 36: Sostituzione Filtro Aria
Sostituzione del filtro aria (fig. 27.1) Il filtro aria deve essere sostituito agli intervalli prescritti nella tabella di manutenzione periodica (vedi Libretto di Garanzia). Per accedere alla scatola filtro sollevare il serbatoio carburante (pag. 35). Per rimuovere il filtro, sganciare le linguette (1) di fissaggio del coperchio su entrambi i lati della scatola filtro e rimuovere il coperchio (2). -
Page 37: Controllo Livello Fluido Freni E Frizione
Controllo livello fluido freni e frizione (fig. 28) Il livello non deve scendere al di sotto della tacca di MIN evidenziata sui rispettivi serbatoi. Un livello insufficiente facilita l’ingresso di aria nel circuito rendendo il sistema inefficiente. Per il rabbocco o la sostituzione del fluido agli intervalli prescritti nella tabella di manutenzione periodica (vedi Libretto di Garanzia), rivolgersi ad un concessionario o ad un’officina autorizzata. -
Page 38: Verifica Usura Pastiglie Freno
Verifica usura pastiglie freno (fig. 29) Impianto frizione Se il gioco della leva di comando è eccessivo e il Freno anteriore motociclo salta o si arresta all’inserimento della marcia, Per facilitare il controllo delle pastiglie dei freni, senza indica una presenza d’aria nell’impianto. Rivolgersi ad un doverle rimuovere dalla pinza, ogni pastiglia riporta un Concessionario o ad un’Officina Autorizzata per una indicatore di consumo. -
Page 39: Lubrificazione Delle Articolazioni
Lubrificazione delle articolazioni 600/750 Periodicamente è necessario controllare le condizioni delle guaine esterne dei cavi di comando acceleratore e del cavo comando starter. Non devono presentare schiacciamenti o screpolature nel rivestimento plastico esterno. Verificare il funzionamento scorrevole del cavo interno agendo sul comando: se si manifestano attriti o impuntamenti farlo sostituire da un concessionario o una officina autorizzata. -
Page 40: Regolazione Del Cavo Comando Acceleratore
Regolazione del cavo comando acceleratore La manopola di comando acceleratore in tutte le posizioni di sterzata deve avere una corsa a vuoto, misurata sulla periferia del bordino della manopola, di 2÷4 mm. Se necessario regolarla agendo sul/sugli apposito/i registro/i (1, fig. 31) situati in corrispondenza del comando stesso. 600/750 fig. -
Page 41: Carica Della Batteria
Carica della batteria (fig. 57) Per ricaricare la batteria è consigliabile rimuoverla dal motociclo. Staccare per primo, il terminale negativo (-) nero, poi quello positivo (+) rosso. Sganciare i fermi (1) e rimuovere la batteria. Attenzione La batteria produce gas esplosivi: tenerla lontano da fonti di calore. -
Page 42: Tensionamento Della Catena Trasmissione
Tensionamento della catena trasmissione Far girare lentamente la ruota posteriore per trovare la posizione in cui la catena risulta più tesa. Col motociclo sul cavalletto laterale, spingere la catena con un dito verso l’alto in corrispondenza della mezzeria del forcellone. Il ramo inferiore della catena deve poter compiere un’escursione (fig. -
Page 43: Lubrificazione Della Catena Trasmissione
Lubrificazione della catena trasmissione Sostituzione delle lampadine Questo tipo di catena è provvista di anelli o-ring per Prima di procedere alla sostituzione di una lampadina proteggere gli elementi di scorrimento dagli agenti bruciata accertarsi che quella di ricambio abbia i valori di esterni e mantenere più... - Page 44 Note Cruscotto (fig. 35) La parte trasparente della lampadina nuova non Rimuovere il cruscotto svitando le due viti con rondella, deve essere toccata con le mani, ne provocherebbe che lo fissano. l’annerimento riducendone la luminosità. Scollegare il cavo del contachilometri (6) ed il connettore Inserire le linguette della base lampadina, nelle sedi (7) del cablaggio principale.
- Page 45 Indicatori di direzione (fig. 36). Luce arresto (fig. 37) Svitare la vite (1) e separare la coppetta (2) dal supporto Per la sostituzione della lampada luce arresto e posizione indicatore. è necessario svitare le due viti (1) che fissano il La lampadina ha un innesto a baionetta, per estrarla trasparente (2) e rimuoverlo.
-
Page 46: Orientamento Del Proiettore
Orientamento del proiettore (fig. 38.1) Controllare se il proiettore è correttamente orientato mettendo il motociclo, con i pneumatici gonfiati alla giusta pressione e con una persona seduta in sella, perfettamente perpendicolare con il suo asse longitudinale di fronte ad una parete o ad uno schermo, distante da esso 10 metri. -
Page 47: Pneumatici
Pneumatici Riparazione o sostituzione pneumatici Pressione anteriore: I pneumatici senza camera d’aria in presenza di forature 2,1 bar - 2,3 Kg/cm di lieve entità, impiegano molto tempo a sgonfiarsi in Pressione posteriore: quanto hanno un certo grado d’autotenuta. Se un 2,2 bar - 2,4 Kg/cm pneumatico risulta leggermente sgonfio controllare attentamente che non ci siano perdite. - Page 48 Spessore minimo del battistrada Misurare lo spessore minimo (S, fig. 39) del battistrada nel punto di massimo consumo: non deve essere inferiore a 2 mm e comunque non inferiore a quanto prescritto dalla legislazione locale. Importante Controllare periodicamente i pneumatici per individuare eventuali crepe o tagli, soprattutto nelle pareti laterali, rigonfiamenti o macchie estese ed evidenti che indicano danni interni;...
-
Page 49: Controllo Livello Olio Motore
Controllo livello olio motore (fig. 40) 600/750 Il livello dell’olio nel motore è visibile attraverso l’oblò di ispezione (1) posto sul coperchio frizione. Controllare il livello con il motociclo in posizione perfettamente verticale e con motore caldo; attendere qualche minuto dopo lo spegnimento affinchè il livello si stabilizzi. -
Page 50: Pulizia E Sostituzione Candele
Pulizia e sostituzione candele (fig. 41) serraggio a mano, effettuare un’ulteriore rotazione di 1/2 Le candele costituiscono un elemento importante del giro con la chiave in dotazione. motore e sono da controllare periodicamente. Questa operazione è relativamente facile e permette di Importante verificare il buono stato di funzionamento del motore. -
Page 51: Pulizia Generale
Pulizia generale Attenzione Per mantenere nel tempo la brillantezza originale delle I freni talvolta possono non rispondere dopo il superfici metalliche e di quelle verniciate, il motociclo lavaggio del motociclo. Non ingrassare o lubrificare i deve essere lavato e pulito periodicamente a seconda del dischi freno, si perderebbe l’efficacia frenante del servizio e dello stato delle strade che si percorrono. -
Page 52: Lunga Inattività
Effettuare le eventuali verifiche periodiche previste e scarico con guarnizione; sostituire quanto necessario con ricambi originali Ducati introdurre dalle sedi delle candele un po’ d’olio motore specifici e conformi alle norme dei vari paesi. -
Page 53: Caratteristiche Tecniche
CARATTERISTICHE TECNICHE Pesi A secco: 174 kg (600); 178 kg (750); 185 kg (900). A pieno carico: 318 kg (600); 319 kg (750); 331 kg (900). Attenzione Il mancato rispetto dei limiti di carico potrebbe influenzare negativamente la maneggevolezza e la resa Ingombri (mm) (fig. -
Page 54: Rifornimenti
Rifornimenti Tipo (litri) Serbatoio carburante, compresa una Benzina 95-98 RON 16,5 riserva di 3,5 dm (litri) Coppa motore e filtro SHELL Advance Ultra 4 3,1 (600); 3,3 (750); 3,9 (900). Circuito freni ant./post. e frizione SHELL Advance Brake DOT 4 —... -
Page 55: Motore
Distribuzione Motore Desmodromica a due valvole per cilindro comandate da Bicilindrico a 4 tempi a “L” longitudinale di 90°. quattro bilancieri (due di apertura e due di chiusura) e da Alesaggio mm: un albero distribuzione in testa. È comandata dall’albero 80 (600);... -
Page 56: Prestazioni
La figura rappresenta la velocità massima ottenibile nelle singole marce dopo aver effettuato il periodo di rodaggio prescritto. fig. 44 Importante Candele d’accensione L’inosservanza di tali norme esonera la Ducati Marca: Motor S.p.A. da qualsiasi responsabilità su eventuali CHAMPION danni al motore e sulla sua durata. Tipo:... -
Page 57: Freni
Freni Posteriore Tipo: Anteriore a disco fisso forato, in acciaio. Tipo: Diametro disco: a disco forato in acciaio. 245 mm. n° 1 disco, lato sinistro (600); Comando idraulico mediante pedale sul lato destro. n° 2 dischi (750/900). Superficie frenante: Diametro disco: 25 cm 320 mm. -
Page 58: Trasmissione
Se si desidera adattare il motociclo a percorsi speciali o Rapporto pignone/corona: gare, la Ducati Motor S.p.A. è a disposizione per indicare 15/46 (600); 15/41 (750); dei rapporti diversi da quelli di serie; rivolgersi ad un 15/39 (900). -
Page 59: Telaio
Telaio Pneumatici Tubolare a traliccio a gabbia superiore in tubi d’acciaio ad altoresistenziale. Anteriore Angolo di sterzata (per lato): Radiale tipo “tubeless”. 29° Dimensione: Angolo cannotto di sterzo: 120/60-VR17 (600/750); 23° 120/70-ZR17 (900). Avancorsa mm: 94 (600/750); Posteriore 104 (900). Radiale tipo “tubeless”. -
Page 60: Sospensioni
Sospensioni Impianto elettrico Formato dai seguenti particolari principali: Anteriore proiettore anteriore di forma circolare con lampada allo A forcella oleodinamica a steli rovesciati. iodio a doppio filamento 12V-55/60W; La forcella del modello 900S è dotata di sistema di luce di posizione con lampada 12V-5W. regolazione esterna del freno idraulico in estensione, Cruscotto, lampade spia 12V-1,2W e lampade compressione e del precarico delle molle interne agli... - Page 61 Fusibili La scatola porta fusibili principale è posizionata sul lato sinistro della batteria (fig. 45.1). I fusibili utilizzati sono accessibili rimuovendo il coperchio di protezione (1) sulla cui superficie è riportato l’ordine di montaggio e l’amperaggio. Solo sei fusibili sono collegati all’impianto, due sono di riserva.
- Page 62 Legenda schema impianto elettrico/accensione 31) Contachilometri e spie cruscotto. 1) Commutatore chiave. 32) Indicatore direzione anteriore sinistro. 2) Interruttore emergenza. 33) Proiettore. 3) Relè generale. 34) Avvisatore acustico. 4) Scatola fusibili. 35) Indicatore direzione anteriore destro. 5) Fusibile di protezione per regolatore. 36) Relè...
- Page 63 Codice colore cavi Legenda scatola fusibili (30) P Rosa R-Y Rosso-giallo Pos. Utilizzatori Val. Y-G Giallo-Verde G Verde Generale 30 A W-Bk Bianco-Nero W-G Bianco-Verde 2-10 Accensione motore, regolatore 7,5 A B Blu V-Bk Viola-Nero 3-11 Luci anabbagliante e abbagliante 15 A Y Giallo W-B Bianco-Blu 4-12...
- Page 64 Legenda schema impianto elettrico/iniezione 32) Interruttore pressione olio. 1) Commutatore destro. 33) Interruttore posteriore STOP. 2) Commutatore chiave. 34) Interruttore anteriore STOP. 3) Relè accensione. 35) Commutatore sinistro. 4) Scatola fusibili. 36) Sensore temperatura aria. 5) Intermittenza. 37) Strumentazione. 6) Motorino avviamento. 38) Indicatore direzione anteriore sinistro.
- Page 65 Codice colore cavi Legenda scatola fusibili (4) P Rosa R-Y Rosso-Giallo Pos. Utilizzatori Val. Y-G Giallo-Verde G Verde Generale 30 A Bn-Bk Marrone-Nero W-R Bianco-Rosso 2-10 Luci anabbagliante e abbagliante 15 A Bn-W Marrone-Bianco V-Bk Viola-Nero 3-11 Indicatori direzione, spie, luci 7,5 A Y Giallo posizione e cruscotto...
-
Page 66: Versioni Monster
VERSIONI MONSTER 900S Disponibili nei colori: rosso anniversary Ducati cod. 473.101; giallo Ducati cod. 473.201; grigio metallizzato cod. 291.601; nero metallizzato cod. 291.500; blu metallizzato cod. 291.800. 600/750 Disponibili nei colori: rosso anniversary Ducati cod. 473.101; giallo Ducati cod. 473.201;... -
Page 67: Cupolino 900S
Cupolino 900S (fig. 51) Rimozione Svitare le due viti (1) di fissaggio del cupolino ai supporti, sfilare gli innesti a forchetta dai collari in gomma. Rimontaggio Infilare gli innesti a forchetta nei relativi collari in gomma. Controllare, posizionandosi di fronte al motociclo, che il cupolino risulti centrato rispetto alla parabola del proiettore (fig. - Page 68 Promemoria manutenzioni periodiche Nome Chilometraggio Data Ducati Service 1000 10000 20000 30000 40000 50000...
- Page 69 Owner’s manual...
- Page 71 Ducati motorcycle for long information contained herein is valid at the time of going journeys as well as short daily trips. Ducati Motor s.p.a to print. Ducati Motor S.p.A. reserves the right to make wishes you smooth and enjoyable riding.
- Page 72 TABLE OF CONTENTS Main components and devices Location 19 Tank filler plug 20 Seat catch and helmet pin 21 Side stand 22 Shock absorber adjusters 23 Front fork adjusters Directions for use General Running-in recommendations 26 Warranty 6 Pre-ride checks 28 Symbols 6 Starting the engine 29 Useful information for safe riding 7...
- Page 73 Tyres 47 For United States of America version only Checking engine oil level 49 Routine maintenance record Cleaning and replacing the spark plugs 50 Cleaning the motorcycle Storing the bike away Important notes 52 Technical data Overall dimensions 53 Weights 53 Top-ups 54 Engine 55 Timing system 55...
-
Page 74: General
Ducati Motor S.p.A. advises you to read this booklet carefully so as to become familiar with your motorcycle. In case of any doubts, please call a Ducati dealer or authorized workshop. The information contained herein will prove useful on your trips - and Ducati Motor S.p.A. -
Page 75: Useful Information For Safe Riding
Useful information for safe riding lane in good time using the suitable turn indicators. Be sure you are clearly visible and do not ride within the Warning blind spot of vehicles ahead. Read this section before riding your motorcycle. Be very careful when tackling road junctions, or when riding in the areas near exits from private grounds, car Accidents are frequently due to inexperience. - Page 76 Carrying the maximum load allowed Your motorcycle is designed for long-distance riding, carrying the maximum load allowed in full safety. Even weight distribution is critical to preserving these safety features and avoiding trouble when performing sudden manoeuvres or riding on bumpy roads. Information about carrying capacity The total weight of the motorcycle in running order including rider, pillion passenger, luggage and additional...
-
Page 77: Identification Data
Identification data 600/750 All Ducati motorcycles have two identification numbers, for frame (fig. 1.1) and engine (fig. 1.2). Frame number Engine number Note These numbers identify the motorcycle model and should always be indicated when ordering spare parts. fig. 1.2 fig. -
Page 78: Controls
CONTROLS Warning This section details the position and function of all the controls you need to drive your motorcycle. Be sure to read this information carefully before you use the controls. Position of motorcycle controls (fig. 2) 1) Instrument panel. 2) Key-operated ignition switch and steering lock. -
Page 79: Instrument Panel
6) Blue light Instrument panel (fig. 3) Comes on when high beam is on. 1) Speedometer (km/h or mph). 7) Revolution counter. Gives road speed. Shows the engine rotation speed/minute. a) Odometer (km or miles). Gives total distance covered. b) Trip meter (km or miles). Gives distance covered since last resetting. -
Page 80: Keys
Keys (fig. 4) Ignition switch and steering lock (fig. 5) Your Ducati was delivered with two universal keys for It is located in front of the fuel tank and has four ignition, steering lock and seat catch and a key positions: identification plate (1). -
Page 81: Left Switch
Left switch (fig. 6) 1) Switch, light switch, 3 positions: Down = light off; Centre = front and rear parking light, number plate light and panel lights on; = headlamp, front and rear parking light, number plate light and panel lights on. Note This device is not fitted on the Australia and Japan versions. -
Page 82: Clutch Lever
Clutch lever (fig. 7) Lever (1) disengages the clutch. It features a dial adjuster (2) for lever distance from the twistgrip on handlebar. To set lever distance from twistgrip, push lever (1) fully forward and turn the dial adjuster (2) to one of its four positions. -
Page 83: Cold Start Lever
Cold start lever (fig. 8) Right switch (fig. 9) Use this device to start the engine from cold. It will 1) Switch for ENGINE STOP, two positions: increase the engine idling speed after starting. position (RUN) = run. Lever positions: position (OFF) = stop. -
Page 84: Throttle Twistgrip
Throttle twistgrip (fig. 9) The twistgrip (3) on the right handlebar opens carburettor shutter (600/750) or the throttles (900). When released, it will spring back to the initial position (idling speed). fig. 9 Front brake lever (fig. 9) Pull in the lever (4) towards the twistgrip to operate the front brake. - Page 85 Gear change pedal (fig. 11.1) Rear brake pedal (fig. 10) The gear change pedal is at rest when in the central Push down on the pedal (1) to apply the rear brake. position N, is moved up and down to change gears and The system is hydraulically operated.
-
Page 86: Setting The Gear Change And Rear Brake Pedals
Setting the gear change and rear brake pedals (fig. 11.2) The gear change and rear brake pedals can be adjusted to suit the preferred riding position of each rider. To set the gear change pedal, lock linkage (1) and loosen the check nuts (2) and (3). Note Nut (2) has a left-hand thread. -
Page 87: Main Components And Devices
MAIN COMPONENTS AND DEVICES Location (fig. 12) 1) Tank filler plug. 2) Seat catch. 3) Hook for helmet fastening cable. 4) Passenger grab handle. 5) Side stand. 6) Rear view mirrors. 7) Shock absorber adjusters. 8) Front fork adjusters (900S). 9) Fuel tank lifting rod. -
Page 88: Tank Filler Plug
Tank filler plug (fig. 13) Opening Lift the protection lid (1) and fit the ignition key into the lock. Turn the key clockwise 1/4 turn to unlock. Lift the plug. Closing Refit the plug with the key in it and push it down into its seat. -
Page 89: Seat Catch And Helmet Pin
Seat catch and helmet pin Opening Fit the ignition key into the lock. Turn the key clockwise to detach seat from frame. Pull the seat backwards to slide it off its front holders. On the rear end of the compartment underneath the seat, there is the helmet fastening cable (1) (see page 34). -
Page 90: Side Stand
Side stand (fig. 15) Note Check for proper operation of the stand mechanism Important (two springs, one into the other) and the safety sensor Before lowering the side stand, make sure that the (2). bearing surface is hard and flat. Warning Do not park on soft or pebbled ground or on asphalt melt The motorcycle can be started only if the side stand... -
Page 91: Shock Absorber Adjusters
Shock absorber adjusters (fig. 16) The shock absorber has outer adjusters that enable you to adjust your motorcycle to the load. The adjuster (1) located on the right side, on the connection holding the shock absorber to the swingarm, controls rebound damping. Turn the adjuster (1) clockwise to increase damping (H), anticlockwise to reduce it (S). -
Page 92: Front Fork Adjusters
Front fork adjusters The front fork of 900S models has rebound and compression damping adjusters. This adjustment is done using the outer adjusters: 1) (fig. 17) to adjust rebound damping; 2) (fig. 17) to adjust spring preload; 3) (fig. 18) to adjust compression damping. As you turn the adjusting screws (1 and 3), you will hear them click. - Page 93 To change the preload of the spring inside each fork leg, turn the adjusting nut (2) with a 22-mm hexagon wrench. Preload setting range (A) is from 25 to 10 mm Factory setting is 18 mm. Important Adjust both fork legs to same settings. fig.
-
Page 94: Directions For Use
During the first hours of riding, it is advisable to run the for Warranty validity. Failure to comply with these rules engine at varying load and rpm, though still within will release Ducati Motor S.p.A. from any liability recommended limit. whatsoever for resulting engine damage or shorter To this end, roads with plenty of bends and even slightly engine life. - Page 95 After 2500 km After running-in, never exceed the following values during the motorcycle standard use: 5ª 600/750 models – max. speed allowed for each gear (see page 56). 4ª 900 models (fig. 20): 9000 rpm. Strict observance of running-in recommendations will ensure longer engine life and reduce the likelihood of 3ª...
-
Page 96: Pre-Ride Checks
Pre-ride checks Warning In case of malfunctioning, do not start the Warning motorcycle and call a Ducati dealer or authorized Failure to carry out these checks before riding, may workshop. lead to motorcycle damage and injury to rider and passenger. -
Page 97: Starting The Engine
Starting the engine 3) Check that the stop switch (1, fig. 21.3) is positioned (RUN), then press the starter button (2). Note Let the engine start without using the throttle control. Follow the “High ambient temperature” procedure to start the engine when it is warm. Important Never operate the starter more than 5 seconds at a Warning... - Page 98 High ambient temperature (over 35 °C): Follow the same procedure, however, do not use the fast-idle device. Cold ambient temperature (below 10 °C): Follow the procedure for “Regular ambient temperature”, however allow 5 minutes for the engine to warm up (step 5). 600/750 models have an automatic electric heating for float chambers.
-
Page 99: Moving Off
Moving off Braking 1) Disengage the clutch squeezing the control lever. Slow down in time, shift down to engine-brake first and 2) Push down on gear change lever sharply with the tip then brake applying both brakes. Pull the clutch lever of your foot to engage the first gear. -
Page 100: Stopping The Motorcycle
Stopping the motorcycle Refueling Slow down gradually, then shift down and release the Never overfill the tank when refueling. Fuel should never throttle twistgrip. Finally change from first to neutral. be touching the rim of filler recess (fig. 23). Apply brakes and you will bring the motorcycle to a complete stop. -
Page 101: Parking
Parking Stop the motorcycle, then put it on the side stand to park it (see page 22). To avoid theft, turn the handlebar fully left and turn the key to LOCK position. If you park in a garage or other facilities, make sure that there is proper ventilation and that the motorcycle is not near a source of heat or sparks. -
Page 102: Tool Kit And Accessories
Tool kit and accessories (fig. 25.1) The compartment under the seat holds: an Owner’s manual; a helmet fastening cable; a tool bag for normal maintenance and checks to be performed by the user. To reach this compartment, remove the seat first (page 21) then the protective cover (1). -
Page 103: Main Maintenance Operations
MAIN MAINTENANCE OPERATIONS Lifting the fuel tank (fig. 26.1) Warning Make sure the fuel in the tank is less than 5 litres or fuel may leak out through the filler plug breather. fig. 26.1 Remove the seat (page 21) and lift the hook (1). Lift the tank and unhook the service rod (2, fig. -
Page 104: Changing Air Filter
Changing air filter (fig. 27.1) Replace the air filter at the required intervals shown in the routine maintenance chart (see Warranty Card). The air box is accessible after lifting the fuel tank as described on page 35. To remove the filter, release the cover clips (1) on both sides of the air box and take off the cover (2). -
Page 105: Checking Brake And Clutch Fluid Level
Brake system If you find exceeding play on brake lever or pedal and brake pads are still in good condition, contact your Ducati dealer or an authorized workshop to have the system inspected and any air drained out of the circuit. -
Page 106: Checking Brake Pads For Wear
Contact your the calipers, brake pads have a wear mark. If the grooves Ducati dealer or an authorized workshop to have the in the friction material are still visible, the pad is still in system inspected and air drained out. -
Page 107: Lubricating Cables And Joints
Work the controls to make sure the cable slides smoothly inside the sheath: if you feel any friction or hard spots, have the cable replaced by your Ducati dealer or authorized workshop. To prevent these failures, smear the ends of the flexible cables with SHELL Advance Grease or Retinax LX2 at regular intervals. -
Page 108: Throttle Cable Adjustment
Throttle cable adjustment The throttle twistgrip must have a free play of 2 - 4 mm, measured at the edge of the twistgrip and at all positions of the handlebars. If it needs adjusting, use the suitable adjuster(s) (1, fig. 31) provided on the throttle control. 600/750 fig. -
Page 109: Charging The Battery
Charging the battery (fig. 57) Before charging the battery, it is best to remove it from the motorcycle. Always disconnect the black negative terminal (-) first, and then the red positive terminal (+). Undo the straps (1) and remove the battery. Warning Batteries develop explosive gases: keep battery away from heat sources and flames. -
Page 110: Chain Tensioning
Chain tensioning Turn the rear wheel slowly until you find the position where chain tension is highest. With the motorcycle on the side stand, push the chain up pressing with a finger at the point where it intersects with swing arm centerline. The lower portion of the chain should have a slack as follows (fig. -
Page 111: Chain Lubrication
Chain lubrication Replacing bulbs The chain fitted on your motorcycle has OR seals that Before replacing a burnt-out bulb, make sure that the keep dirt out of and lubricant inside the sliding parts. The new one complies with voltage and wattage as specified seals might be irreparably damaged if the chain is on page 62 and 64 - “Electric System”. - Page 112 Note Instrument panel (fig. 35) Never touch the transparent body of the new bulb Disassemble the instrument panel by unscrewing the with your fingers or it will blacken resulting in reduced two fastening screws with washer. bulb brilliancy. Disconnect the odometer cable (6) and the main wiring Insert the locating pegs of the bulb base into their seats connector (7).
- Page 113 Turn indicators (fig. 36) Stop light (fig. 37) Remove the screw (1) and detach the glass (2) from the To replace the stop and parking light bulb, unscrew the body. two screws (1) that secure the glass (2). Remove the The bulb is of the bayonet-type: press and rotate anti- glass.
-
Page 114: Headlamp Alignment
Headlamp alignment (fig. 38.1) When checking headlamp alignment, put the motorcycle upright. Tyres should be inflated at the correct pressure and one person should be sitting astride the motorcycle, keeping it at right angles to its longitudinal axis and opposite a wall or a screen, 10 meters apart from it. Then draw a horizontal line dictated by headlamp center and a vertical one in line with the longitudinal axis of motorcycle. -
Page 115: Tyres
After replacing a tyre, the wheel should be balanced. bar. Important Do not remove or shift the wheel balancing weights. Note If tyres need replacing, contact a Ducati Dealer or authorized workshop to make sure wheels are removed and refitted correctly. - Page 116 Minimum tread depth Measure tread depth (S, fig. 39) at the point where tread is most worn down. It should not be less than 2 mm and anyway not below the legal limit. Important Visually inspect the tyres at regular intervals for detecting cracks or cuts, on the side walls especially, bulges or large spots that are indicative of internal damage.
-
Page 117: Checking Engine Oil Level
Undo the filler plug (2) and top up to correct level. Refit the plug. Important Engine oil and oil filters must be changed by a Ducati dealer or authorized workshop at regular intervals, as specified in the routine maintenance chart (see Warranty Card). Viscosity fig. -
Page 118: Cleaning And Replacing The Spark Plugs
If color has altered or you find any dark deposits, change the spark plug and report this to a Ducati dealer or authorized workshop. Check wear on the central electrode. If it looks worn out or has a vitreous appearance, change the spark plug. -
Page 119: Cleaning The Motorcycle
Cleaning the motorcycle Warning To preserve the finish of metal parts and paintwork, wash Braking performance may be impaired immediately and clean your motorcycle at regular intervals, anyway after washing the motorcycle. according to the road conditions you ride in. Never grease or lubricate the brake discs. -
Page 120: Storing The Bike Away
Carry out any required inspection at regular intervals and plug with its seal and empty the fuel tank; replace any parts using Ducati original spare parts pour a few drops of engine oil into the cylinders through complying with local law. -
Page 121: Technical Data
TECHNICAL DATA Weights Dry weight: 174 Kg (600); 178 Kg (750); 185 Kg (900). Carrying full load: 318 Kg (600); 319 Kg (750); 331 Kg (900). Warning Failure to observe weight limits could result in poor Overall dimensions (mm) (fig. 42) handling and impair the performance of your motorcycle, and you may lose control of the motorcycle. -
Page 122: Top-Ups
Top-ups Type of fluid cu. dm. (liters) Fuel tank, including a reserve Gasoline 95-98 RON 16.5 of 3.5 cu dm (liters) Oil sump and oil filter SHELL Advance Ultra 4 3.1 (600) 3.3 (750) 3.9 (900) Front/Rear brake and clutch circuits SHELL-Advance Brake DOT 4 –... -
Page 123: Engine
Timing system Engine Desmodromic (type) with two valves per cylinder, Twin cylinder, four-stroke, 90° “L” type, longitudinal. operated by four rockers (2 opening rockers and 2 closing Bore mm: rockers) and an overhead camshaft. It is operated by the 80 (600); 88 (750); 92 (900). crankshaft through spur gears, belt rollers and toothed Stroke mm: belts. -
Page 124: Performance Data
The figure shows the maximum speed limits that can be reached in each individual gear after the running-in period. fig. 44 Important Failure to comply with these limits releases Ducati Spark plugs Motor S.p.A. from any liability whatsoever for resulting Make: engine malfunction. -
Page 125: Brakes
Brakes Rear brake Type: Front brake fixed drilled steel disc Type: Disc diameter: drilled steel disc. 245 mm 1 disc, left side (600). Hydraulically operated by a pedal on R.H. side 2 discs (750/900). Braking surface: Disc diameter: 25 sq cm 320 mm Brake caliper: Hydraulically operated by a control lever on right... -
Page 126: Transmission
However, if you wish to tune up your motorcycle for Front/rear sprocket ratio: competitive trials, you may refer to Ducati Motor S.p.A. 15/46 (600); 15/41 (750); who will be glad to provide information about the special 15/39 (900). -
Page 127: Frame
Frame Tyres Tubular trellis frame with upper section made of high- strength steel. Front tyre Steering angle (on each side): Tubeless, radial tyre. 29° Size: Steering head angle: 120/60-VR17 (600/750); 23° 120/70-ZR17 (900). Trail mm: 94 (600/750); Rear tyre 104 (900). Tubeless, radial tyre. -
Page 128: Suspensions
Suspensions Electric system Basic electric items are: Front suspension Round headlamp with iodine double filament bulb, 12V- Hydraulic upside-down fork. 55/60W bulb. On 900S models, the fork is provided with outer adjuster Parking light with 12V-5W bulb. for rebound, compression, and preload (for inner springs Instrument panel, 12V-1.2W bulbs for warning lights of fork legs). - Page 129 Fuses The main fuse box is located on the left side of the battery (fig. 45.1) . To expose the fuses, take off the box protective cover (1). Mounting position and ampere capacity are marked on it. Only 6 of the fuses are connected. There are two spare fuses.
- Page 130 Legend of the wiring diagram of electric 30) L.H. light switch system/ignition 31) Odometer and instrument panel warning lights 1) Key-operated switch 32) Front left-turn indicator 2) Emergency switch 33) Headlamp 3) Main relay 34) Horn 4) Fuse box 35) Front right-turn indicator 5) Regulator protection fuse 36) Safety relay 6) Fuel level indicator...
- Page 131 Wire color coding Legend of fuse box (30) P Pink R-Y Red-Yellow Pos. Description Rat. Y-G Yellow-Green G Green Main switch 30 A W-Bk White-Black W-G White-Green 2-10 Ignition, regulator 7.5 A B Blue V-Bk Violet-Black 3-11 High and low beams 15 A Y Yellow W-B White-Blue...
- Page 132 Legend of the wiring diagram of electric system/ 31) Neutral light switch injection 32) Oil pressure sensor 1) R.H. switch 33) Rear STOP light switch 2) Key-operated switch 34) Front STOP light switch 3) Ignition relay 35) L.H. switch 4) Fuse box 36) Air temperature sensor 5) Flasher 37) Instruments...
- Page 133 Wire color coding Legend of fuse box (4) P Pink R-Y Red-Yellow Pos. Description Rat. Y-G Yellow-Green G Green Main switch 30 A Bn-Bk Brown-Black W-R White-Red 2-10 High and low beams 15 A Bn-W Brown-White V-Bk Violet-Black 3-11 Turn indicators, warning lights, tail 7.5 A Y Yellow lights and instrument panel lights...
-
Page 134: Monster Versions
MONSTER VERSIONS 900S Available in the following colors: anniversary red part no. 473.101; yellow part no. 473.201; metallized grey part no. 291.601; metallized black part no. 291.500; metallized blue part no. 291.800. 600/750 Available in the following colors: anniversary red part no. 473.101; yellow part no. -
Page 135: Windproof Cover 900S
Windproof cover 900S (fig. 51) Removal Undo the two screws (1) securing the windproof cover to its supports. Remove the fork-type couplings from the rubber collars. Refitting Insert the fork-type couplings into the relevant rubber collars. Stand before your motorcycle and make sure that the windproof cover is centered with the headlamp (fig. - Page 136 Such use could lead to upset or other accident. Noise emission warranty Ducati Motor S.p.A. warrants that this exhaust system, at Reporting of safety defects the time of sale, meets all applicable U.S. EPA Federal If you believe that your vehicle has a defect which could noise standards.
- Page 137 Tampering with Noise Control System Prohibited. Federal If you are aware of any of the following symptoms, have Law prohibits the following acts or causing thereof: the vehicle inspected and repaired by your local Ducati (1) the removal or rendering inoperative by any person, dealer.
- Page 138 Riding safety When the roadway is wet, rely more on the throttle to The points given below are applicable for every day control vehicle speed and less on the front and rear motorcycle use and shoud be carefully observed for safe brakes.
- Page 139 Do not inhale exhaust gases and never run the Vehicle identification number (V.I.N.); engine in a closed garage or confined area. Every Ducati motorcycle is identified by two identification Use only Ducati approved parts and accessories. numbers (see page 9). Figure A specifically shows the This motorcycle was not intended to be equipped with a identification numbers.
- Page 140 Label location (fig. B) fig. B...
- Page 141 Manufactured by DATE: 07/97 WARNING YOUR DUCATI MOTORCYCLE IS EQUIP- OBJECT IN MIRROR ARE PED WITH A WARNING LIGHT FLASHING WHEN THE CLOSER THAN THEY APPEAR SIDE STAND IS LOWERED (ON) GVWR: 925.9 (420 HEWEVER, IT IS THE RIDER'S RESPONSIBILITY TO Cod.
- Page 142 California evaporation emission system Ducati limited warranty on emission control (fig. C): system Ducati North America, Inc., 237 West Parkway, Pompton Important Plains, New Jersey 07444-1028 warrants that each new In the event of fuel system malfunction, contact 1998 and later Ducati motorcycle, that includes as Ducati’s authorized Service Centres.
- Page 143 30 days. Any replacement part can defects in material or workmanship by an authorized be used in an emergency repair. Ducati will reimburse the Ducati motorcycle dealer at its place of business during owner for the expenses, including diagnosis, not to customary business hours.
- Page 144 Ducati maintenance or repairs. However, Ducati is not liable for dealer. Ducati shall not be liable for any other expenses, these parts. The owner is responsible for the loss or damage, whether direct, incidental, consequential performance of all required maintenance.
- Page 145 Routine maintenance record km/miles Ducati Mileage Date Service Name 1,000 10,000 20,000 30,000 40,000 50,000...
- Page 147 Manuel d'utilisation et d'entretien...
- Page 149 évolutif de ces produits puisse entraîner. Pour améliorer sans cesse le service que nous vous offrons, Ducati S.p.A. vous conseille de suivre de près les simples règles énoncées dans ce Manuel, tout particulièrement pour le Rodage: vous serez ainsi sûrs que votre moto sera toujours en mesure de vous faire éprouver de sensations fortes.
- Page 150 SOMMAIRE Principaux éléments et dispositifs Leur position sur le motocycle 19 Bouchon réservoir carburant 20 Serrure de selle et élément porte-casque 21 Béquille latérale 22 Eléments de réglage amortisseur arrière 23 Eléments de réglage fourche avant (900S) 24 Indications générales Mode d'emploi Garantie 6 Précautions pour la première période...
- Page 151 Remplacement des ampoules d’éclairage 43 900S 66 Assiette du phare 46 Bulle (900S) 67 Pneus 47 Contrôle niveau d’huile moteur 49 Aide-mémoire pour l’entretien périodique 68 Nettoyage et remplacement des bougies 50 Nettoyage général 51 Inactivité prolongée 52 Coinsignes importantes 52 Caractéristiques techniques Encombrement 53 Poids 53...
-
Page 152: Indications Générales
INDICATIONS GENERALES Symboles Ducati Motor S.p.A. vous invite à lire très attentivement le livret suivant, qui vous permettra de vous familiariser avec votre motocycle. De toute manière, si vous avez un doute n’hésitez pas à faire appel à un Concessionnaire ou Atelier Agréé. -
Page 153: Informations Utiles Pour Rouler En Sécurité
Informations utiles pour rouler en sécurité la vitesse que les conditions de visibilité, de la chaussée ainsi que de la circulation vous permettent d’atteindre. Attention Signalez toujours et suffisamment à l’avance, avec les Lire avant d’utiliser la moto. clignotants de direction, tout virage ou changement de voie. -
Page 154: Conduite À Pleine Charge
Conduite à pleine charge Votre motocycle a été conçu pour parcourir de longues distances à pleine charge, en toute sécurité. La répartition des poids sur la moto est très importante afin de maintenir inaltérés ces niveaux de sécurité et d’éviter de se trouver en difficulté lors de manoeuvres rapides et soudaines ou en parcourant des chaussées déformées. -
Page 155: Données D'identification
Données d’identification 600/750 Deux chiffres, identifiant respectivement le cadre (fig.1.1) et le moteur (fig.1.2), sont indiqués sur chaque motocycle Ducati. Cadre N° Moteur N° Notes Ces chiffres identifient le modèle de votre motocycle et doivent être rappelés sur la commande de pièces détachées. -
Page 156: Commandes Pour La Conduite
COMMANDES POUR LA CONDUITE Attention Ce chapitre nous renseigne sur le positionnement et la fonction des commandes nécessaires à la conduite du motocycle. Lire soigneusement cette description avant d’utiliser quelque commande que ce soit. Position des commandes pour la conduite du motocycle (fig. -
Page 157: Tableau De Bord
6) Avertisseur lumineux bleu Tableau de bord (fig. 3) S’allume pour indiquer que le feu de route est allumé. 1) Indicateur de vitesse (km/h). 7) Compte-tours (min Indique la vitesse de marche. Indique le nombre de tours la minute du moteur. a) Compteur kilométrique (km). -
Page 158: Les Clés
Les clés (fig. 4) Commutateur d’allumage et antivol de direction La dotation comprend deux clés universelles de (fig. 5) démarrage, antivol de direction et serrure de selle avec Placé devant le réservoir, il a quatre positions. une plaquette (1) comportant le chiffre d’identification A) ON: met en circuit l'éclairage et le moteur;... -
Page 159: Commutateur Gauche
Commutateur gauche (fig. 6) 1) Commutateur, commande système d’éclairage à trois positions: en bas = feu éteint au milieu = feu de position avant et arrière, éclairage plaque à numéro et éclairage instruments de bord allumés en haut = phare, feu de position avant et arrière, éclairage plaque à... -
Page 160: Levier D'embrayage
Levier d'embrayage (fig. 7) Le levier (1) qui commande le débrayage est équipé d’une molette (2) pour régler l'écart entre ce levier et la poignée sur le guidon. Pour réaliser ce réglage, tirez le levier (1) tout en avant et tourner la molette (2) sur l'une de ses quatre positions, compte tenu que: la position n°... -
Page 161: Levier De Starter
Levier de starter (fig. 8) Commutateur droit (fig. 9) La commande de starter favorise le démarrage du 1) Interrupteur, ARRET MOTEUR, à deux positions: moteur à froid et augmente le régime de rotation au position = RUN = marche. ralenti, après démarrage. position = OFF = arrêt du moteur. -
Page 162: Poignée Des Gaz
Poignée des gaz (fig. 9) La poignée des gaz (3), main droite du guidon, commande l’ouverture de la guillotine des carburateurs (600/750) ou des soupapes à papillon (900). Une fois relâchée, la poignée revient automatiquement à sa position initiale de ralenti. fig. -
Page 163: Pédale Du Frein Arrière
Pédale de changement vitesses (fig. 11.1) Pédale du frein arrière (fig. 10) La pédale de changement vitesses a une position de Pour actionner le frein arrière, appuyez votre pied sur la repos centrale N avec retour automatique et deux pédale (1). Le système de commande est de type mouvements: hydraulique. - Page 164 Réglage position de la pédale de changement vitesses et frein arrière (fig. 11.2). Pour seconder toutes exigences de conduite du pilote, on peut modifier la position des pédales de changement vitesses et de frein arrière, face au repose-pied correspondant. Pour modifier la position de la pédale de changement vitesses, procédez comme suit: Immobilisez la tige (1) et desserrez les contre-écrous (2) et (3).
-
Page 165: Principaux Éléments Et Dispositifs
PRINCIPAUX ELEMENTS ET DISPOSITIFS Position sur le motocycle (fig. 12) 1) Bouchon réservoir carburant. 2) Serrure de selle. 3) Ergot d'ancrage pour lacet de casque. 4) Poignée passager. 5) Béquille latérale. 6) Rétroviseurs. 7) Dispositifs de réglage amortisseur arrière. 8) Dispositifs de réglage fourche avant (900S). 9) Béquille de soutien réservoir. - Page 166 Bouchon réservoir carburant (fig. 13) Ouverture Levez le cache (1) de protection et insérez la clé dans la serrure. Tournez la clé de 1/4 de tour dans le sens des aiguilles d’une montre pour déverrouiller la serrure. Levez le bouchon. Fermeture Refermez le bouchon, la clé...
-
Page 167: Serrure De Selle Et Élément Porte-Casque
Serrure de selle et élément porte-casque Ouverture Introduisez la clé dans la serrure et tournez-la dans le sens des aiguilles d’une montre pour dégager la selle depuis le cadre. Sortez la selle de ses arrêtoirs avant en la tirant vers l'arrière. A la partie arrière du dégagement au-dessous de la selle vous trouverez le lacet de fixation du casque (1) (voir page 34). -
Page 168: Béquille Latérale
Béquille latérale (fig. 15) Attention Le démarrage du motocycle se produit uniquement Important si la béquille est en position de “repos” grâce à la Avant d’utiliser la béquille latérale, assurez-vous que dotation d’un dispositif de sécurité, inhibant le démarrage la consistance et la planéité de la surface d’appui soient du moteur. -
Page 169: Eléments De Réglage Amortisseur Arrière
Eléments de réglage amortisseur arrière (fig. 16) En cas de sortie avec passager et bagage, préchargez le L’amortisseur arrière est équipé d’éléments de réglage ressort de l’amortisseur arrière au maximum pour extérieurs, permettant d’adapter l’assiette de la moto aux améliorer le comportement dynamique du motocycle et conditions de charge. -
Page 170: Eléments De Réglage Fourche Avant (900S)
Eléments de réglage fourche avant La fourche du motocycle 900S est réglable tant en phase d’extension (détente) que de compression des tubes. Le réglage s’effectue grâce aux éléments extérieurs à vis: 1) (fig. 17) pour modifier l’action hydraulique de freinage en extension; 2) (fig. - Page 171 Pour modifier la précontrainte du ressort à l’intérieur de chaque tube de fourche, tournez la vis de réglage à tête hexagonale (2) à l’aide d’une cléf à six pans de 22 mm. La valeur de précontrainte (A) peut varier de 25 à 10 mm. Le tarage d’origine correspond à...
-
Page 172: Mode D'emploi
Le non-respect de ces règles dégage Ducati indiqués car le moteur, les freins et les suspensions en Motor S.p.A. de toute responsabilité à l’égard des reçoivent un rodage plus efficace. - Page 173 Au-delà de 2500 km Tout en utilisant normalement le motocycle après 5ª rodage, il est conseillé de ne jamais dépasser: la vitesse maximale que l’on peut atteindre avec chaque 4ª rapport (600/750) (page 56); le régime de 9000 min (900) (fig. 20). 3ª...
-
Page 174: Contrôles Avant La Mise En Route
Contrôles avant la mise en route Verrouillages à clé Contrôlez le verrouillage du bouchon du réservoir de Attention carburant et de la selle. L’inexécution des vérifications avant la mise en Béquille route peut porter préjudice au véhicule ou atteinte à Vérifiez le fonctionnement et la parfaite position de la l’intégrité... -
Page 175: Démarrage Du Moteur
Démarrage du moteur 3) Assurez-vous que le commutateur d’arrêt (1, fig. 21.3) est en position (RUN); appuyez ensuite sur le bouton- Notes poussoir de démarrage (2). Lorsque le moteur est chaud, suivez la procédure Laissez démarrer le moteur spontanément sans décrite pour “Température ambiante élevée”. - Page 176 Température ambiante élevée (supérieure à 35 °C): Suivez la même procédure sans utiliser la commande de starter. Température ambiante froide (inférieure à 10 °C): Suivez la procédure décrite pour “Température extérieure normale”, en prolongeant le temps de mise en température du moteur (point 5) jusqu’à 5 minutes. Les modèles 600/750 sont équipés d’un réchauffement électrique des cuves à...
-
Page 177: Démarrage Et Mise En Route Du Motocycle
Démarrage et mise en route du motocycle Freinage 1) Débrayez en agissant sur le levier de commande. Réduisez progressivement la vitesse en rétrogradant 2) Du bout de votre pied, baissez avec décision la pédale pour ralentir grâce au frein moteur et utilisez seulement de changement vitesses de manière à... -
Page 178: Mise À L'arrêt Du Motocycle
Mise à l’arrêt du motocycle Ravitaillement carburant Réduisez la vitesse, rétrogradez et lâchez la poignée de Quand vous prenez de l’essence, ne remplissez pas trop l’accélérateur. Rétrogradez jusqu’à la première vitesse et le réservoir. Le niveau du carburant doit demeurer au- par la suite mettez au point mort. -
Page 179: Stationnement
Stationnement Après avoir arrêté le motocycle, utilisez la béquille latérale pour le garer (page 22). Braquez tout à gauche et déplacez la clé de contact en position LOCK pour éviter les vols. Si vous garez votre moto dans un garage ou à l’intérieur d’autres structures, veillez à... -
Page 180: Accessoires En Dotation
Accessoires en dotation (fig.25.1) Un dégagement au-dessous de la selle abrite: un manuel d’utilisation et d'entretien; un lacet d’ancrage du casque; un jeu d’outils pour les opérations ordinaires d’entretien et de contrôle. Pour y avoir accès, il faut retirer la selle (page 21) ainsi que le cache de protection (1) en desserrant la vis spéciale (2) à... -
Page 181: D'entretien
PRINCIPALES OPERATIONS D'ENTRETIEN Levage réservoir de carburant (fig. 26.1) Attention Afin d’éviter la sortie d’essence par le reniflard sur le bouchon de remplissage, le contenu en essence doit être inférieur à 5 litres. fig. 26.1 Otez la selle (page 21) et levez le crochet (1). Levez le réservoir et dégagez la béquille (2, fig. -
Page 182: Remplacement Du Filtre À Air
Remplacement du filtre à air (fig. 27.1) Le filtre à air doit être remplacé avec la cadence prescrite au tableau d’entretien périodique (voir Carnet de Garantie). Pour avoir accès à la boîte à filtre, levez le réservoir de carburant (page 35). Pour retirer le filtre, dégagez les languettes (1) de fixation du couvercle, de part et d’autre de la boîte à... -
Page 183: Contrôle Niveau Liquide De Freins Et Embrayage
Contrôle niveau liquide de freins et embrayage (fig. 28) Le niveau ne doit pas descendre au-dessous de la marque MIN indiquée sur les réservoirs respectifs. Un niveau insuffisant favorise l’entrée d’air dans le circuit au détriment de l’efficacité du système. Quant à... -
Page 184: Vérification De L'usure Des Plaquettes De Freins
Vérification de l’usure des plaquettes de freins Système de freinage (fig. 29) Si l’on constate un jeu trop important au levier ou à la pédale de frein, bien que les plaquettes soient en bonnes Frein avant conditions, contactez un Concessionnaire ou Atelier Pour simplifier le contrôle des plaquettes de freins sans Agréé... -
Page 185: Lubrification Des Articulations
Lubrification des articulations 600/750 Périodiquement il est nécessaire de contrôler la condition des gaines extérieures des câbles des gaz et de starter. Ils ne doivent pas présenter d’écrasements ni craquelures sur le revêtement plastique extérieur. Vérifier le coulissement libre du câble intérieur par l'action sur sa commande: si vous constatez du frottement ou des points durs, faites-le remplacer par un Concessionnaire ou Atelier Agréé. -
Page 186: Réglage Du Câble Des Gaz
Réglage du câble des gaz La poignée des gaz, dans toutes les positions de braquage, doit avoir une course à vide de 2÷4 mm, mesurée sur le bord de la poignée. S’il y lieu de la reprendre, agir sur le/s élément/s de réglage correspondant/s (1, fig. -
Page 187: Charge De La Batterie
Charge de la batterie (fig. 32) Pour recharger la batterie il est conseillé de la retirer du motocycle. Débranchez la borne négative (-) noire en premier et celle positive (+) rouge par la suite. Décrochez les arrêtoirs (1) et retirez la batterie. Attention La batterie produit des gaz explosibles;... - Page 188 Mise en tension de la chaîne de transmission Faites tourner doucement la roue arrière pour trouver la position où la chaîne se présente tendue davantage. Motocycle sur sa béquille latérale, poussez la chaîne de votre doigt vers le haut, tout au milieu du bras oscillant. Le brin inférieur de la chaîne doit avoir un mou de (fig.
-
Page 189: Remplacement Des Ampoules D'éclairage
Graissage de la chaîne de transmission Remplacement des ampoules d’éclairage Ce type de chaîne est pourvue de joints toriques à Avant d’effectuer le remplacement d’une ampoule grillée, protection des éléments frottants contre les agents il faut s’assurer que la lampe de rechange a les valeurs extérieurs et pour un maintien prolongé... - Page 190 Notes Tableau de bord (fig. 35) La partie transparente de l’ampoule neuve ne doit Retirez le tableau de bord en desserrant les deux vis de pas être touchée les mains nues, parce que cela en fixation avec rondelle. provoquerait le noircissement, d'où la diminution de sa Débranchez le fil du compteur kilométrique (6) et le luminosité.
- Page 191 Clignotants de direction (fig. 36) Feux stop (fig. 37) Desserrez la vis (1) et séparez la coupelle (2) depuis le Pour remplacer l’ampoule du feu stop et de position, il support du clignotant. faut desserrer les deux vis (1, fig. 37) bloquant l’optique Cette lampe a une douille à...
-
Page 192: Assiette Du Phare
Assiette du phare (fig. 38.1) Pour contrôler si le phare est bien positionné, mettez le motocycle, pneus gonflés à la pression prescrite et une personne assise en selle, parfaitement à l’aplomb de son axe longitudinal et en face d’un mur ou écran, à une distance de 10 m de celui-ci. -
Page 193: Pneus
Pneus Réparation ou remplacement des pneus Pression avant: En cas de perforations légères, les pneus sans chambre 2,1 bar - 2,3 Kg/cm à air se dégonflent très lentement, puisqu’ils ont un Pression arrière: certain degré d’étanchéité autonome. Si vous constatez 2,2 bar - 2,4 Kg/cm qu’un pneu est légèrement dégonflé, contrôlez soigneusement s’il y a des fuites. - Page 194 Epaisseur minimale de la bande de roulement Mesurez l’épaisseur minimale (S, fig. 39) de la bande de roulement dans le point où l’usure est plus importante: elle ne doit pas être inférieure à 2 mm et, quoi qu’il en soit, non inférieure aux dispositions législatives en vigueur.
-
Page 195: Contrôle Niveau D'huile Moteur
Contrôle niveau d’huile moteur (fig. 40) 600/750 Le niveau de l’huile moteur peut être vérifié par le hublot de regard (1), placé sur le couvercle d’embrayage. Contrôlez le niveau de l'huile motocycle parfaitement vertical et moteur en température. Après l’extinction, attendez quelques minutes afin que le niveau se stabilise. -
Page 196: Nettoyage Et Remplacement Des Bougies
Nettoyage et remplacement des bougies (fig.41) bout de son filetage. Serrez au couple de 20 Nm. Les bougies sont un élément important du moteur et Si l’on ne dispose pas de clef dynamométrique, après le doivent donc être systématiquement contrôlées. serrage à... -
Page 197: Nettoyage Général
Nettoyage général Attention Afin de maintenir dans le temps le brillant d’origine des Parfois les freins ne répondent pas après le lavage surfaces métalliques et des éléments peints, il faut laver du motocycle. et essuyer périodiquement le motocycle à raison de son Ne graissez ni lubrifiez aucunement les disques de frein, utilisation et des conditions des routes parcourues. -
Page 198: Inactivité Prolongée
Ducati, qui se dans les cylindres et faites tourner un peu le moteur conforment aux règles des différents pays. -
Page 199: Caractéristiques Techniques
CARACTÉRISTIQUES TECHNIQUES Poids A sec: 174 kg (600); 178 kg (750); 185 kg (900). A pleine charge: 318 kg (600); 319 kg (750); 331 kg (900). Attention Le non-respect des limites de masse totale pourrait Encombrement (mm) (fig. 42) influencer négativement la maniabilité et le rendement de votre motocycle, ainsi que provoquer la perte de contrôle du véhicule. -
Page 200: Ravitaillements
Ravitaillements Type (litres) Réservoir de carburant, y compris Essence 95-98 RON 16,5 une réserve de 3,5 dm (litres) Carter moteur et filtre SHELL Advance Ultra 4 3,1 (600); 3,3 (750); 3,9 (900) Circuits de freins AV/AR et embrayage SHELL Advance Brake DOT 4 —... -
Page 201: Moteur
Schéma de la distribution desmodromique (fig. 43) Moteur 1) Culbuteur d’ouverture (ou supérieur); Bicylindre à quatre temps en “L” longitudinal à 90°. 2) pastille de réglage culbuteur supérieur; Alésage mm: 3) demi-bagues; 80 (600); 88 (750); 92 (900). 4) pastille de réglage culbuteur de fermeture (ou Course mm: inférieur);... -
Page 202: Performances
établie. fig. 44 Important Faute du respect de ces règles, aucune Bougies d’allumage responsabilité ne peut engager Ducati Motor S.p.A. à Marque: l’égard de la durée de vie du moteur et des préjudices CHAMPION éventuellement occasionnés. -
Page 203: Système De Freinage
Système de freinage Frein arrière Type: Frein avant à disque fixe perforé, en acier. Type: Diamètre du disque: à disque perforé en acier. 245 mm N° 1 disque, côté gauche (600). Commande hydraulique par pédale côté droit . N° 2 disques (750/900). Surface de freinage: Diamètre du disque: 25 cm... -
Page 204: Transmission
à conséquent il ne faut pas les modifier. gauche. Rapport pignon/couronne: Toutefois Ducati Motor S.p.A. est à votre disposition pour 15/46 (600); 15/41 (750); toute exigence d’adaptation du motocycle à des parcours 15/39 (900);... -
Page 205: Cadre
Cadre Pneus En treillis tubulaire: cage supérieure en tubes d’acier hyper-résistants Avant Angle de braquage (de chaque côté): Radial, type “tubeless”. 29° Dimensions: Angle de chasse: 120/60-VR17 (600/750); 23° 120/70-ZR17 (900). Chasse mm: 94 (600/750); Arrière 104 (900). Radial, type “tubeless”. Dimensions: 160/60-VR17 (600/750);... -
Page 206: Suspensions
Suspensions Circuit électrique Se compose des principaux éléments qui suivent: Avant phare avant en forme circulaire avec ampoule à iode, Fourche hydraulique inversée. double filament: 12V-55/60W. La fourche du modèle 900S est dotée de réglage Feu de position avec ampoule 12V-5W. extérieur de l'action hydraulique de freinage en Tableau de bord, lampes témoin 12V-1,2W et lampes extension, compression et de la précontrainte des... - Page 207 Fusibles La boîte à fusibles principale est placée côté gauche de la batterie (fig. 45.1). Les fusibles utilisés sont accessibles en retirant le cache de protection (1), comportant l’indication de l’ordre de montage et de l’ampérage. Au circuit ne sont reliés que 6 fusibles, deux étant de réserve.
- Page 208 Légende plan de câblage électrique/allumage 31) Compteur totalisateur et avertisseurs lumineux 1) Commutateur à clé tableau de bord 2) Interrupteur d’urgence 32) Clignotant de direction avant gauche 3) Relais général 33) Phare 4) Boîte à fusibles 34) Avertisseur sonore 5) Fusible de protection du régulateur 35) Clignotant de direction avant droit 6) Indicateur de niveau carburant 36) Relais dispositifs de sécurité...
- Page 209 Code couleur des fils Légende boîte à fusibles (30) P Rose R-Y Rouge-Jaune Pos. Consommateurs Val. Y-G Jaune-Vert G Vert Interrupteur général 30 A W-Bk Blanc-Noir W-G Blanc-Vert 2-10 Allumage moteur, régulateur 7,5 A B Bleu V-Bk Violet-Noir 3-11 Feux de croisement et de route 15 A Y Jaune W-B Blanc-Bleu...
- Page 210 Légende plan de câblage électrique/injection 31) Contacteur avertisseur “sélecteur au point mort” 1) Commutateur main droite 32) Contacteur pression huile 2) Commutateur à clé 33) Contacteur arrière feu STOP 3) Relais allumage 34) Contacteur avant feu STOP 4) Boîte à fusibles 35) Commutateur main gauche.
- Page 211 Code couleur des fils Légende boîte à fusibles (4) P Rose R-Y Rouge-Jaune Pos. Consommateurs Val. Y-G Jaune-Vert G Vert Interrupteur général 30 A Bn-Bk Marron-Noir W-R Blanc-Rouge 2-10 Feux de croisement et de route 15 A Bn-W Marron-Blanc V-Bk Violet-Noir 3-11 Clignotants de direction, 7,5 A...
-
Page 212: Versions Monster
VERSIONS MONSTER 900S Disponibles dans les coloris: rouge anniversary: réf. 473.101; jaune réf. 473.201; gris métallisé réf. 291.601; noir métallisé réf. 291.500; bleu métallisé réf. 291.800. 600/750 Disponibles dans les coloris: rouge anniversary: réf. 473.101; jaune réf. 473.201; gris métallisé réf. 291.601; noir métallisé... - Page 213 Bulle 900S (fig. 51) Dépose Desserrez les deux vis (1) fixant la bulle aux supports. Sortir les crabots à fourchette depuis les collets en caoutchouc. Repose Glissez les crabots à fourchette dans les collets correspondants en caoutchouc. Débout, en regard du motocycle, contrôlez que la bulle est bien centrée par rapport à...
- Page 214 AIDE-MEMOIRE POUR L’ENTRETIEN PERIODIQUE Nom du Ducati Service Kilométrage Date 1000 10000 20000 30000 40000 50000...
- Page 215 Anleitungs- und Instandhaltungsheft...
- Page 217 Informationen verstehen sich als am Tag des Ausdrucks verwenden, sondern auch für kurze und lange Reisen, bei gültig. Ducati Motor S.p.A. behält sich das Recht vor, denen Ihnen Ducati Motor S.p.A viel Spaß und jegliche, durch eine Weiterentwicklung der genannten Vergnügen wünscht.
- Page 218 Hauptbestandteile und -vorrichtungen INHALTSVERZEICHNIS Anordnung am Motorrad 19 Kraftstofftankverschluss 20 Sitzbank- und Helmschloss 21 Seitenständer 22 Einstellvorrichtungen des Zentralfederbeins 23 Einstellvorrichtungen der Vorderradgabel (900S) 24 Gebrauchsnormen Allgemeine Hinweise Vorsichtsmaßnahmen in der Einfahrzeit 26 Garantie 6 Kontrollen vor dem Motoranlass 28 Symbole 6 Motoranlass 29 Nützliche Informationen für eine sichere Fahrt 7...
- Page 219 Austausch der Glühbirnen 43 900S 66 Ausrichten des Scheinwerfers 46 Cockpitverkleidung 900S Reifen 47 Kontrolle des Motorölpegels 49 Merkblatt für regelmäßige Reinigung oder Austausch der Zündkerzen 50 Instandhaltungsarbeiten Allgemeine Reinigung 51 Längere Ausserbetriebsetzung 52 Wichtige Hinweise Technische Daten Maße 53 Gewichte 53 Betriebsstoffe 54 Motor 55...
-
Page 220: Allgemeine Hinweise
Sie, sich an einen Vertragshändler oder eine Vertragswerkstatt zu wenden. Die Informationen, die Ihnen in dieser Weise übermittelt werden, könnten Ihnen während Ihren Fahrten, bei denen Ihnen Ducati Motor Garantie S.p.A. viel Freude und Vergnügen wünscht, nützlich sein Hinsichtlich einer Produktgarantie und -verlässlichkeit, und ermöglichen es Ihnen, die Leistungen Ihres... -
Page 221: Nützliche Informationen Für Eine Sichere Fahrt
Nützliche Informationen für eine sichere Fahrt sind zu beachten. Immer die Geschwindigkeitsbegrenzungen, dort wo Achtung angegeben, einhalten und niemals die Geschwindigkeit, Vor dem Einsatz des Motorrads lesen! welche von den Sichtbedingungen, der Fahrbahn und den Verkehrsverhältnissen gegeben wird, überschreiten. Oftmals werden Unfälle aufgrund der geringen Erfahrung Immer und rechtzeitig durch Einschalten der jeweiligen des jeweiligen Motorradfahrers verursacht. -
Page 222: Fahrten Mit Voller Ladung
Fahrten mit voller Ladung Dieses Motorrad wurde so entworfen, dass man auch auf langen Fahrten mit voller Ladung vollkommen sicher reisen kann. Die Verteilung der Lasten am Motorrad ist sehr wichtig, um diese Sicherheitsstandards aufrecht erhalten und um Schwierigkeiten bei plötzlichen Fahrmanövern oder beim Befahren von unebenen Straßenabschnitten vermeiden zu können. -
Page 223: Erkennungsdaten
Erkennungsdaten 600/750 Jedes Ducati-Motorrad ist mit zwei Erkennungsnummern versehen; eine für den Rahmen (Abb. 1.1) und eine für den Motor (Abb. 1.2). Rahmen-Nr. Motor-Nr. Hinweis Diese Nummern kennzeichnen das jeweilige Motorradmodell und sind bei Ersatzteilbestellungen stets anzugeben. Abb. 1.2 Abb. 1.1... -
Page 224: Fahrsteuerungen
FAHRSTEUERUNGEN Achtung Dieses Kapitel zeigt die Anordnung und die Steuerungen an, die beim Fahren des Motorrads erforderlich sind. Vor einem Verwenden der entsprechenden Steuerungen, müssen daher folgende Beschreibung aufmerksam durchgelesen werden. Anordnung der Motorradsteuerungen (Abb. 2) 1) Instrumentenbrett. 2) Zündschalter und Lenkradschloss. 3) Linker Umschalter. -
Page 225: Instrumentenbrett
Instrumentenbrett (Abb. 3) 6) Blaue Kontrolleuchte 1) Tachometer (km/h). Leuchtet beim Einschalten des Fernlichts auf. Zeigt die Fahrtgeschwindigkeit an. 7) Drehzahlmesser (min a) Kilometerzähler (km). Zeigt die Drehzahl des Motors pro Minute an. Zeigt die insgesamt bereits gefahrene Strecke an. b) Tageskilometerzähler (km). -
Page 226: Schlüssel
Schlüssel (Abb. 4) Zündschlüsselschalter und Lenkradschloss Es werden zwei Universalschlüssel für den Anlass des (Abb. 5) Motorrads, das Lenkerschloss und das Sitzbankschloss, Ist vor dem Tank angebracht und kann auf vier Positionen darüber hinaus ein Anhänger (1) mit der gestellt werden: Identifikationsnummer dieser Schlüssel geliefert. -
Page 227: Linker Umschalter
Linker Umschalter (Abb. 6) 1) Umschalter, Lichtschalter mit 3 Positionen: nach unten = Lichter aus; Mitte = vorderes und hinteres Standlicht, Kennzeichenbeleuchtung und Beleuchtung des Instrumentenbretts eingeschaltet. nach oben = Scheinwerfer, vorderes und hinteres Standlicht, Kennzeichenbeleuchtung und Beleuchtung des Instrumentenbretts eingeschaltet. 2) Wechselschalter, Wahl der Beleuchtungsart, 2 Positionen: Position... -
Page 228: Kupplungshebel
Kupplungshebel (Abb. 7) Dieser Hebel (1) ist für das Auskuppeln zuständig. Er ist mit einem Regulierknopf (2) am Lenker ausgestattet, über den seine Distanz zum Lenkergriff eingestellt werden kann. Für die Regulierung drückt man den Hebel (1) vollständig nach vorne, hält ihn so ausgerichtet, betätigt dabei den Regulierknopf (2) und bringt ihn so in eine der vier vorgesehenen Positionen. -
Page 229: Rechter Umschalter
Starterhebel (Abb. 8) Rechter Umschalter (Abb. 7) Die Steuerung des Starters dient einem schnelleren 1) Schalter für MOTORSTOP, zwei Positionen: Anlass eines noch kalten Motors und, nach dem Anlass, Position (RUN) = Fahrt. der Anhebung der Leerlaufdrehzahl. Position (OFF) = Motorstop. Positionen der Steuerung: A) (senkrecht) = Steuerung nicht aktiviert. - Page 230 Gasdrehgriff (Abb. 9) Der Gasdrehgriff (3), auf der rechten Seite des Lenkers, steuert die Öffnung der Vergaserschieber (600/750) oder der Drosselklappenventile (900). Bei Loslassen des Griffs, kehren diese automatisch wieder in die anfängliche Leerlaufposition zurück. Abb. 9 Vorderradbremshebel (Abb. 9) Durch Ziehen dieses Hebels (4) zum Gasdrehgriff, wird die Vorderradbremse betätigt.
- Page 231 Gangschaltpedal (Abb. 11.1) Pedal der Hinterradbremse (Abb. 10) Die Ruheposition des Gangschaltpedals, in die es beim Das Pedal (1) mit dem Fuß nach unten drücken und so Loslassen automatisch wieder zurückspringt, befindet die Hinterradbremse betätigen. Es handelt sich um ein sich in der Mitte N.
-
Page 232: Einstellung Der Position Des Fußschalthebels Und Des Hinterradbremspedals
Einstellung der Position des Fußschalthebels und des Hinterradbremspedals Zur Anpassung an die Ansprüche der Fahrer besteht die Möglichkeit, die Position des Schalthebels und des Hinterradbremspedals den Fußrasten gegenüber entsprechend einzustellen. Die Position des Schalthebels kann wie folgt geändert werden: den Stab (1) blockieren, dann die Kontermuttern (2) und (3) lockern. -
Page 233: Hauptbestandteile Und -Vorrichtungen
HAUPTBESTANDTEILE UND –VORRICHTUNGEN Anordnung am Motorrad (Abb. 12) 1) Kraftstofftankverschluss. 2) Sitzbankschloss. 3) Helmgurtstift. 4) Haltegriff für Beifahrer. 5) Seitenständer. 6) Rückspiegel. 7) Einstellvorrichtungen für Zentralfederbein. 8) Einstellvorrichtungen für Vorderradgabel (900S). 9) Tankstützstab. 10) Heckverkleidung für Sitzbank (nicht bei DARK). 11) Verankerungshebel für Kraftstofftank. - Page 234 Kraftstofftankverschluss (Abb. 13) Öffnen Den Schutzdeckel (1) anheben, dann den Zündschlüssel einstecken. Nun um 1/4 Drehung im Uhrzeigersinn drehen und so das Schloss aufsperren. Den Verschluss anheben. Schließen Den Verschluss mit eingestecktem Schlüssel wieder in seinen Sitz eindrücken. Den Schlüssel, gegen den Uhrzeigersinn, in seine OPEN Ausgangsstellung zurückdrehen, dann abziehen.
-
Page 235: Sitzbank- Und Helmschloss
Sitzbank- und Helmschloss Öffnen Den Zündschlüssel in das Schloss einstecken und im Uhrzeigersinn drehen bis es zum Ausrasten der Sitzbank aus ihrer Verankerung am Rahmen kommt. Diese nun durch Ziehen nach hinten aus den vorderen Feststellvorrichtungen lösen. Im Hohlraum unter dem hinteren Sitzbankbereich befindet sich der Helmbefestigungsgurt (1) (siehe Seite 34), den man durch den Helm führt und dessen Enden man am Stift (2) -
Page 236: Seitenständer
Seitenständer (Abb. 15) Hinweis Es wird empfohlen, die Funktionstüchtigkeit des Wichtig Haltesystems (zwei ineinander geschobene Spannfedern) Vor dem Betätigen des Seitenständers muss man und des Sicherheitssensors (2) zu prüfen. sich darüber vergewissern, dass die Abstellfläche fest und eben genug ist. Achtung Ein Anlassen des Motorrads ist nur bei einem sich Weicher Boden, Kies, von der Sonne aufgeweichter... - Page 237 Einstellvorrichtungen für das Zentralfederbein baut wird, schwere Schäden verursachen. (Abb. 16) Hat man vor, einen Beifahrer und Gepäck zu befördern, Das Zentralfederbein ist mit außen liegenden Einstell- muss die Feder des Zentralfederbeins auf die maximale schrauben ausgestattet, die eine Anpassung der Motor- Vorspannung gebracht werden, damit das dynamische radlage, den jeweiligen Lasten entsprechend, ermög- Verhalten des Motorrads verbessert und mögliche Inter-...
-
Page 238: Einstellvorrichtungen Der Vorderradgabel (900S)
Einstellvorrichtungen der Vorderradgabel Die Gabel der 900S ist sowohl in der Zugstufe (Rückzug) als auch in der Druckstufe der Holme möglich. Die Einstellung erfolgt über die äußeren Einstellschrauben: 1) (Abb. 17) zur Änderung der hydraulischen Dämpfung in der Zugstufe; 2) (Abb. 17) zur Änderung der Vorspannung der innen liegenden Federn;... - Page 239 Um die Vorspannung der Innenfeder jedes Holms ändern zu können, muss die Sechskant-Einstellschraube (1) unter Anwendung eines 22mm-Sechskantschlüssels betätigt werden. Der Vorspannungswert (2) kann zwischen 25 und 10 mm variieren. Die Originaleinstellung entspricht 18 mm. Wichtig Die Einstellschrauben beider Holme müssen auf die gleichen Positionen eingestellt werden.
-
Page 240: Gebrauchsnormen
Inspektionscoupons empfohlenen Kontrollen am Drehzahlgrenze bleiben. Hierzu eignen sich besonders Motorrad strikt eingehalten bzw. vorgenommen werden. kurvenreiche Strecken und möglichst auch Straßen in Eine Nichtbeachtung dieser Vorschriften entbindet Ducati hügeligem Gelände, wo Motor, Bremse und Motor Holding S.p.A. von jeder und jeglicher... - Page 241 Verantwortung hinsichtlich eventueller Motorschäden oder einer verminderten Lebensdauer desselben. 5ª Nach 2500 km 4ª Während des normalen Einsatzes des Motorrads, nach der Einlaufzeit, wird empfohlen, folgende Werte nicht zu überschreiten: 3ª die in bezug auf die in den einzelnen Gänge erreichbare Höchstgeschwindigkeit (600/750) (Seite 56);...
-
Page 242: Kontrollen Vor Dem Motoranlass
Kontrollen vor dem Motoranlass Verschlüsse Den korrekten Sitz des Tankverschlusses und der Achtung Sitzbank kontrollieren. Werden diese erforderlichen Kontrollen vor dem Ständer Losfahren nicht vorgenommen, kann es zu Schäden am Die Funktionalität und die korrekte Ausrichtung des Motorrad und zu schweren Verletzungen des Fahrers Seitenständers prüfen (Seite 22). -
Page 243: Motoranlass
Motoranlass 2) Den Starterhebel waagrecht (Abb. 21.2) ausrichten. 3) Sich überzeugen, dass der Stoppschalter (1, Abb. 21.3) Hinweis (RUN) steht, dann die Startertaste (2) drücken. Zum Starten eines warmen Motors der Das Motorrad spontan anspringen lassen, ohne dabei Beschreibung „Hohe Umgebungstemperatur“ gemäß Gas zu geben. - Page 244 Hohe Umgebungstemperatur (über 35 °C) So wie bereits beschrieben vorgehen, ohne jedoch die Startersteuerung zu betätigen. Kalte Umgebungstemperatur (unter 10 °C) So wie unter Punkt “Normale Umgebungstemperatur” beschrieben vorgehen, dabei die Aufwärmzeit (Punkt 5) für den Motor bis auf 5 Minuten hinausziehen. Bei der Version 600/750 ist eine elektrische Vorwärmung der Vergaserbecken mit automatischer Einschaltung vorgesehen.
-
Page 245: Start Und Fahrt Des Motorrads
Start und Fahrt des Motorrads Gangs länger als erforderlich ausgekuppelt zu belassen, 1) Den Motor durch Ziehen des Kupplungshebels da dies zur Erwärmung und zu übermäßigem Verschleiß uskuppeln. des Reibungsmaterials führt. 2) Den Fußschalthebel kräftig mit der Fußspitze herunterdrücken und den ersten Gang einlegen. Bremsen 3) Durch Drehen des Gasdrehgriffs den Motor Die Geschwindigkeit vorzeitig herabsetzen, anhand der... -
Page 246: Anhalten
Anhalten Tanken Die Geschwindigkeit mindern, herunter schalten und das Den Tank nicht übermäßig füllen. Der Kraftstoffpegel Gas zurücklassen. Die Gänge so lange herunter schalten, muss unterhalb der Einfüllöffnung der Aufnahme des bis man vom ersten Gang in den Leerlauf schalten kann. Tankverschlusses bleiben (Abb. -
Page 247: Parken
Parken Zum Abparken des stehenden Motorrads, den Seiten- ständer (Seite 22) verwenden. Den Lenker vollständig nach links drehen und, zur Diebstahlsicherung, den Schlüssel auf LOCK stellen. Falls das Motorrad in einer Garage oder in anderen Gebäuden geparkt wird, darauf achten, dass diese gut belüftet sind und dass das Motorrad nicht in der Nähe von Wärmequellen abgestellt wird. -
Page 248: Mitgeliefertes Zubehör
Mitgeliefertes Zubehör ( Abb. 25.1) Im Werkzeugfach unter der Sitzbank befinden sich: das Anleitungs- und Instandhaltungsheft; der Helmsicherungsgurt; die Werkzeugtasche für die normalen Instand- und Kontrollarbeiten. Um an dieses Fach gelangen zu können, muss man die Sitzbank (Seite 21) entfernen und die Schutzabdeckung (1) nach dem Lösen der Spezialschraube (2), unter Anwendung einer Geldmünze, entfernen. -
Page 249: Hauptsächliche Betriebs- Und Instandhaltungsarbeiten
HAUPTSÄCHLICHE BETRIEBS- UND INSTANDHALTUNGSARBEITEN Anheben des Kraftstofftanks (Abb. 26.1) Achtung Um zu verhindern, dass Benzin aus der Entlüftungsöffnung des Tankverschlusses ausfließen kann, muss man sich davon überzeugen, dass weniger Abb. 26.1 als 5 Liter Benzin im Tank vorhanden sind. Die Sitzbank (Seite 21) abnehmen und den Haken (1) anheben. -
Page 250: Austausch Des Luftfilters
Austausch des Luftfilters (Abb. 27.1) Der Luftfilter muss in den von der Tabelle für die regelmäßigen Instandhaltungsarbeiten (siehe Garantieheft) vorgeschriebenen Zeiten ausgetauscht werden. Um an den Filterkasten gelangen zu können, muss man den Kraftstofftank anheben (Seite 35). Die Befestigungsklammern (1) des Deckels an beiden Seiten des Filterkasten aushaken, dann den Deckel (2) abnehmen. -
Page 251: Pegelkontrolle Des Brems- Und
Pegelkontrolle der Brems- und Kupplungsflüssigkeit (Abb. 28) Der Pegel darf nicht unter die MIN-Kerbe der jeweiligen Behälter sinken. Ein unzureichender Pegel erleichtert den Einlass von Luft in den Kreislauf, wodurch das System seine Wirkung verliert. Zum Nachfüllen oder Wechseln der Flüssigkeiten zu den in den in der Tabelle der regelmäßigen Instandhaltungsarbeiten (siehe Garantieheft) angegebenen Zeiten, muss man sich an einen Vertragshändler oder eine Vertragswerkstatt... -
Page 252: Verschleißkontrolle An Den Bremsbelägen
Bremsanlage Verschleißkontrolle an den Bremsbelägen (Abb.29) Wird ein übermäßiges Spiel des Bremshebels oder des Bremspedals festgestellt, obwohl die Bremsbeläge sich Vorderradbremse noch in einem guten Zustand befinden, muss man sich Für eine einfachere Bremsbelagkontrolle, ohne die an einen Vertragshändler oder eine Vertragswerkstatt Beläge erst vom Bremssattel abnehmen zu müssen, wenden, um dort eine Kontrolle des Systems und eine wurden Verbrauchsanzeigen vorgesehen. -
Page 253: Schmieren Der Gelenke
Schmieren der Gelenke 600/750 In regelmäßigen Zeitabständen ist eine Kontrolle der äußeren Ummantelungen der Gas- und des Starterzugs durchzuführen. Es dürfen keine Quetschungen oder Risse an den äußeren Kunststoffumhüllungen erkennbar sein. Durch Betätigen der Steuerung die gleitende Funktionsweise des inneren Zugs prüfen. Falls sich hier Reibungen oder Verklemmungen ergeben sollten, muss man den Austausch von einem Vertragshändler oder einer Vertragswerkstatt vornehmen lassen. - Page 254 Regulierungen des Gaszugs Der Gasdrehgriff muss, an der Außenseite des Griffrands gemessen, in allen Lenkpositionen, einen Leerhub von 2÷4 mm aufweisen. Falls sich hier eine Einstellung als erforderlich erweist, muss dazu die entsprechende Einstellvorrichtung (1, Abb. 31), die sich an der jeweiligen Steuerung befindet, verwendet werden.
-
Page 255: Aufladen Der Batterie
Aufladen der Batterie (Abb. 57) Zum Aufladen der Batterie wird empfohlen, diese vom Motorrad zu nehmen. Zuerst den negativen, schwarzen Anschlusskontakt (-), dann den roten, positiven (+) abnehmen. Die Haltegummis (1) aushaken und die Batterie entfernen. Achtung Die Batterie produziert explosive Gase: von Wärmequellen entfernt halten. -
Page 256: Spannen Der Antriebskette
Spannen der Antriebskette Das hintere Rad langsam vorwärts drehen. In dieser Weise ist es möglich, die Position zu erreichen, in der die Kette am meisten gespannt ist. Bei einem auf dem Seitenständer abgestellten Motorrad die Kette in der Mitte der Schwinge mit einem Finger nach oben drücken. -
Page 257: Schmieren Der Antriebskette
Schmieren der Antriebskette Austausch der Glühbirnen Dieser Kettentyp ist mit O-Ringen ausgestattet, wodurch Bevor man den Austausch einer durchgebrannten die Gleitelemente vor äußeren Einflüssen geschützt Glühbirne vornimmt, muss man sich davon überzeugen, werden und die Schmierung so lange wie möglich dass die Ersatzbirne die gleichen Spannungswerte und aufrecht erhalten werden kann. - Page 258 Hinweis Instrumentenbrett (Abb. 35) Das Glas der neuen Birne nicht mit den Händen Das Instrumentenbrett nach dem Lösen der beiden berühren, da es sonst zu Schwärzungen kommt, die die Befestigungsschrauben mit Unterlegscheibe abnehmen. Leuchtfähigkeit einschränken. Die Führungslasche der Das Kabel des Kilometerzählers (6) und den Stecker (7) Glühbirnenbase in die Sitze einführen und so exakt aus- vom Hauptkabelbaum abstecken.
- Page 259 Blinker (Abb. 36) Bremslicht (Abb. 37) Durch Lösen der Schraube (1), den Napf (2) vom Für den Austausch der Brems- und Standlichtbirne, Blinkerhalter trennen. Die Glühbirne hat einen müssen die beiden Schrauben (1, Abb. 37), die das Bajonettenanschluss. Für ihre Entnahme, muss man sie Rücklichtglas (2) feststellen, gelöst werden, dann das in ihrem Sitz eindrücken und dabei gegen den Uhrzeiger- Glas abnehmen.
-
Page 260: Ausrichten Des Scheinwerfers
Ausrichten des Scheinwerfers (Abb. 38.1) Kontrollieren, ob der Scheinwerfer korrekt ausgerichtet ist. Dazu das Motorrad, mit auf den richtigen Druck aufgepumpten Reifen und mit einer darauf sitzenden Person, in einem Abstand von 10 Metern vor eine Wand oder einen Schirm, gänzlich auf seiner Längsachse senkrecht aufgerichtet, ausrichten. -
Page 261: Reifen
Reifen Reparatur oder Austausch der Reifen Reifendruck vorne: Reifen ohne Luftkammer, die kleine Löcher aufweisen, 2,1 bar - 2,3 kg/cm brauchen recht viel Zeit bis sie Luftverluste zeigen, da sie Reifendruck hinten: über einen gewissen Grad an Eigenabdichtung verfügen. 2,2 bar - 2,4 kg/cm Sollte sich ein Reifen als leicht platt erweisen, muss man genau kontrollieren, ob Luftverluste vorhanden sind. - Page 262 Mindestprofiltiefe der Radlauffläche Die Profiltiefe der Radlauffläche (S, Abb. 39) an der jeweils am stärksten abgefahrenen Stelle des Reifens messen. Die abgemessene Tiefe darf niemals unter 2 mm liegen bzw. nie unter den, seitens der sich in Kraft befindlichen Gesetzen bestimmten Werten. Wichtig Die Reifen regelmäßig auf eventuelle Risse oder Einschnitte hin kontrollieren, besonders an deren...
-
Page 263: Kontrolle Des Motorölpegels
Kontrolle des Motorölpegels (Abb. 40) 600/750 Der Pegel des Motoröls ist über das im Kupplungsdeckel angebrachte Schauglas (1) ersichtlich. Den Pegelstand bei einem perfekt senkrecht stehenden Motorrad und bei warmem Motor kontrollieren. Einige Minuten nach dem Ausschalten des Motors abwarten, bis sich der Pegel stabilisiert hat. - Page 264 Reinigung und Austausch der Zündkerzen und den Zustand der Dichtung prüfen. Den Sitz am (Abb. 41) Zylinderkopf sorgfältig reinigen und dabei darauf achten, Die Zündkerzen stellen ein wichtiges Element des dass keine Fremdkörper in die Verbrennungskammer Motors dar und müssen regelmäßig kontrolliert werden. fallen.
-
Page 265: Allgemeine Reinigung
Allgemeine Reinigung Achtung Um den ursprünglichen Glanz der Metallflächen und der Es kann vorkommen, dass die Bremsen nach einer lackierten Teile auf Dauer aufrecht erhalten zu können, Motorradwäsche nicht reagieren. muss das Motorrad, je nach Einsatz und Straßenzustand, Die Bremsscheiben niemals schmieren oder einfetten, da regelmäßig gereinigt werden. -
Page 266: Längere Ausserbetriebsetzung
Schutzfilm auf dessen erforderlichen Teile nur durch die spezifischen Innenwänden verteilen; Originalersatzteile der Ducati zu ersetzen, welche den das Motorrad auf den mitgelieferten Ständer abstellen; Normen der verschiedenen Länder entsprechen. die Batterie abstecken und abnehmen. Befand sich das Motorrad länger als einen Monat im Stillstand, ist die... -
Page 267: Technische Daten
TECHNISCHE DATEN Gewichte Trockengewicht: 174 kg (600); 178 kg (750); 185 kg (900). Voll beladen: 318 kg (600); 319 kg (750); 331 kg (900). Achtung Ein mangelndes Beachten der Beladungsgrenzen Maße (mm) (Abb. 42) könnte die Wendigkeit und die Leistung des Motorrads in negativer Weise beeinflussen und zum Verlust der Motorradkontrolle führen. -
Page 268: Betriebsstoffe
Betriebsstoffe (Liter) Kraftstofftank, einschl. Reserve Benzin 95-98 RON 16,5 von 3,5 dm (Ltr.) Ölwanne und Filter SHELL – Advance Ultra 4 3,1 (600); 3,3 (750); 3,9 (900). Vorderer/hinterer Brems- und SHELL – Advance Brake DOT 4 — Kupplungskreislauf Schutzmittel für elektrische Kontakte SHELL –... -
Page 269: Motor
Desmodromische Ventilssteuerung (Abb. 43) Motor 1) Öffnungsschlepphebel (oder oberer Zweizylinder Viertaktmotor, in V-Anordnung auf 90°. Kipphebel). Bohrung mm: 2) Einstellscheibe des Öffnungschlepphebels. 80 (600); 88 (750); 92 (900). 3) Halbringe. Hub mm: 4) Einstellscheibe des Schließkipphebels (oder 58 (600); 61,5 (750); 68 (900). unterer Kipphebel). -
Page 270: Leistungen
Auf der Abbildung werden die Höchstgeschwindigkeiten Abb. 44 dargestellt, die nach vorschriftsgemäßer Einfahrzeit erreicht werden können. Zündkerzen Fabrikat: Wichtig CHAMPION Eine Nichtbeachtung dieser Normen entbindet die Typ: Ducati Motor S.p.A. von jeglicher Verantwortung RA 6 HC. hinsichtlich eventueller Motorschäden oder in bezug auf dessen Lebensdauer. -
Page 271: Bremsen
Bremsen Fabrikat und Typ: BREMBO P 2.I05N Vorderradbremse Bremsbeläge: Typ: FERIT I/D 450 FF Gelochte Stahlscheiben. Bremszylindertyp: 1 Scheibe auf der linken Seite (600); PS 11 2 Scheiben (750/900). Scheibendurchmesser: Achtung 320 mm Die in der Bremsanlage verwendete Flüssigkeit Hydraulische Steuerung über Bremshebel an der rechten kann nicht nur die Lackierung beschädigen, sondern ist Lenkerseite. -
Page 272: Antrieb
Seite. Um es dennoch zu ermöglichen, das Motorrad an besondere Strecken anpassen oder für Rennen Zähnezahl Ritzel/Kettenblatt: vorbereiten zu können, steht die Ducati Motor S.p.A. 15/46 (600); 15/41 (750); gerne zur Verfügung, um die von der Serienproduktion 15/39 (900). -
Page 273: Rahmen
Rahmen Reifen Gitterrohrrahmen mit oberer Käfigverzweigung aus hochwiderstandsfähigem Stahl. Vorne Einschlagwinkel (je Seite): Radial, Typ „tubeless“ (schlauchlos). 29° Maße: Lenkrohrwinkel: 120/60-VR17 (600/750); 23° 120/70-ZR17 (900). Nachlauf in mm: 94 (600/750); Hinten 104 (900). Radial, Typ „tubeless“ (schlauchlos). Maße: 160/60-VR17 (600/750); Räder 170/60-ZR17 (900). -
Page 274: Radaufhängungen
Radaufhängungen Elektrische Anlage Hauptbestandteile der elektrischen Anlage: Vorne Vorderer Scheinwerfer, rund, mit Jod-Doppeldrahtbirne: Öldynamische Up-Side-Down Gabel. Beim Modell 900S 12V-55/60W ist die Gabel mit einem außen liegenden Einstellsystem Standlicht mit 12V-5W-Glühbirne. für die hydraulische Dämpfung in der Zug- und Instrumentenbrett, Kontrolleuchten 12V-1,2W bzw. Druckstufe und für die Vorspannung der in den Holmen 12V-2W-Glühbirnen für Instrumentenbeleuchtung. - Page 275 Sicherungen Der Hauptsicherungskasten befindet auf der linken Seite der Batterie (Abb. 45.1). Die verwendeten Sicherungen sind nach dem Abnehmen des Schutzdeckels (1) zugänglich. Auf diesem Deckel sind die Einbauordnung und der jeweilige Sicherungswert in Ampere angegeben. Nur sechs Sicherungen sind an die Anlage geschlossen, zwei sind Ersatzsicherungen.
- Page 276 Schemaverzeichnis der elektrischen 30) Lichterschalter (links). Anlage/Zündsystem 31) Kilometerzähler und Instrumentenbrettleuchten. 1) Zündschlüselschalter. 32) Blinker, vorne links. 2) Notschalter. 33) Scheinwerfer. 3) Allgemeines Relais. 34) Hupe. 4) Sicherungskasten. 35) Blinker, vorne rechts. 5) Schutzrealis für Regler. 36 Sicherheitsrelais. 6) Kraftstoffpegelsensor. 7) Batterie.
- Page 277 Farbkennzeichnung der Kabel Erläuterung des Sicherungskastens (30) P Rosa R-Y Rot-Gelb Pos. Verbraucher Wert Y-G Gelb-Grün G Grün Allgemein 30 A W-Bk Weiss-Schwarz W-G Weiss-Grün 2-10 Motorzündung, Regler 7,5 A B Blau V-Bk Viola-Schwarz 3-11 Fern- und Abblendlichter 15 A Y Gelb W-B Weiss-Blau 4-12...
- Page 278 Schemaverzeichnis der elektrischen 30) Lichtmaschine. Anlage/Zündsystem 31) Leerlaufkontrollschalter. 1) Rechter Lenkerumschalter. 32) Öldruckschalter. 2) Zündschlüsselschalter. 33) Hinterer Bremslichtschalter. 3) Zündrelais. 34) Vorderer Bremslichtschalter. 4) Sicherungskasten. 35) Linker Umschalter. 5) Schrittschaltung. 36) Lufttemperatursensor. 6) Anlassmotor. 37) Instrumente. 7) Fernschalter. 38) Blinker, vorne links. 8) Batterie.
- Page 279 Farbkennzeichnung der Kabel Erläuterung des Sicherungskastens (4) P Rosa R-Y Rot-Gelb Pos. Verbraucher Wert Y-G Gelb-Grün G Grün Allgemein 30 A Bn-Bk Braun-Schwarz W-R Weiss-Rot 2-10 Fern- und Abblendlichter 15 A Bn-W Braun-Weiss V-Bk Viola-Schwarz 3-11 Blinker, Kontrolleuchten, 7,5 A Y Gelb Standlicht und Instrumenten- W-Bk Weiss-Schwarz...
-
Page 280: Metallic (600/750/900 I.e.)
VERSIONEN DER MONSTER 900S In folgenden Farben verfügbar: “Anniversary”-Rot: Ducati: 473.101. Gelb, Ducati: 473.201. Metallic Grau: 291.601. Metallic Schwarz: 291.500. Metallic Blau: 291.800. 600/750 In folgenden Farben verfügbar: “Anniversary”-Rot: Ducati: 473.101. Gelb, Ducati: 473.201. Metallic Grau: 291.601. Metallic Schwarz: 291.500. -
Page 281: Cockpitverkleidung 900S
Cockpitverkleidung 900S (Abb. 51) Abnahme Die beiden Schrauben (1) für die Befestigung der Ver- kleidung an den Haltern lösen, dann die gabelförmigen Steckanschlüsse aus den Gummiaufnahmen ziehen. Erneute Montage Die Gabelsteckanschlüsse in die Gummiaufnahmen einfügen, dann indem man sich vor das Motorrad stellt, kontrollieren, ob die Cockpitverkleidung der Schein- werferparabole (Abb. -
Page 282: Instandhaltungsarbeiten
MERKBLATT FÜR DIE REGELMÄSSIGEN INSTANDHALTUNGSARBEITEN Namen: Ducati-Kundendienst Kilometerstand Datum 1000 10000 20000 30000 40000 50000... - Page 283 Notes Note Hinweis Note...
- Page 284 Note Notes Note Hinweis...
- Page 285 Notes Note Hinweis Note...
- Page 286 Note Notes Note Hinweis...
- Page 287 Notes Note Hinweis Note...
- Page 288 913.7.060.1H DUCATIMOTOR spa Stampato 06/2000 Via Cavalieri Ducati, 3 40132 Bologna, Italy Tel 39.051.6413111 Fax 39.051.406580 Internet: www.ducati.com...
- Page 289 G/Bk LOCK PARK R/BK 40 A Bn/Bk B/Bk R/BK 1 4 3 6 2 DIODO 1N4007 10 W 10 W W/Bn B/Bk V/BK Gr/R 5/21 W Y/BK W/BK W/BK 10 W W/BK 10 W B/Bk W/BK Y/BK G/BN Bn/Bk B/Bk MODULO A G H B/Bk...
- Page 290 G/Bk LOCK PARK Bn/Bk B/Bk V/Bk R/Bk B/Bk 4 3 6 2 10 W R/Bk R/Bk Gr/R 10 W 5/21 W W/Bk Y/Bk 10 W W/BK W/Bk 10 W R/Bk 4 3 1 2 W/Bn B/Bk Bn/W Bk/G P/Bk B/Bk Bn/W W/Bk W/Bn...