Table of Contents
Advertisement
Advertisement
Table of Contents

Subscribe to Our Youtube Channel
Summary of Contents for Mistral MPRC601B
- Page 1 6 Litre Multi-function Pressure Cooker Instruction Manual Model: MPRC601B...
- Page 3 Important Safeguards • Operate on a dry level surface; sinks, drainboards or uneven surfaces must be avoided. When using electrical appliances, in order to reduce the risk of fire, electric • The use of attachments or accessories not recommended or sold by the manufacturer shock, and/or injury to persons, basic can cause fire, electric shock or injury. safety precautions should always be followed, including: • Allow to cool before cleaning. • Do not use with an extension power cord. For Your Safety • Store the unit indoors in a dry location.
- Page 4 splatter, and clog the pressure release • This appliance is intended to be used in devices. These foods should not be cooked in household and similar applications such as: a pressure cooker unless following the recipe – staff kitchen areas in shops, offices and other on the manual. working environments; – farm houses; • Always check the pressure release devices for – by clients in hotels, motels and other clogging before use. residential type environments; • Do not use this pressure cooker for frying oil. • WARNING: To avoid spillage on the connector. The heating element surface is • Do not move the seal ring in the lid with any subject to residual heat after use. tools or external forces. If the ring breaks off • CAUTION: To prevent damage to the the lid, stop using the cooker and replace the whole lid with a new one. appliance do not use alkaline cleaning agents when cleaning, use a soft cloth and a • Clean the filter regularly to keep the cooker mild detergen. clean. Compulsory Warning • Do not open the lid with external force when the floating valve has not sunk.
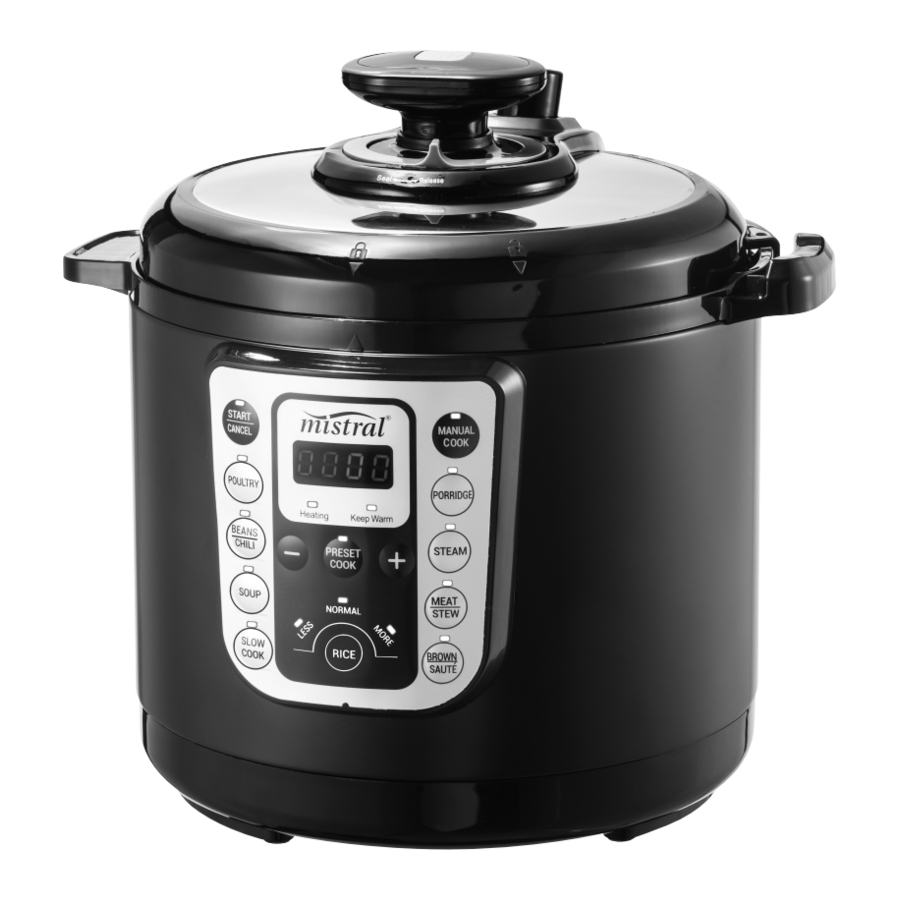
- Page 5 Features of Your Multi-function Pressure Cooker Float Valve (Pressure Lid Handle Indicator) Handle Outer Body Control Panel Base Measuring cup Spatula...
- Page 6 Control Panel Note : This function cannot be activated in conjunction with the dedicated Slow cook mode, the reason be, that some 1. START/CANCEL Button ingredients cannot be left for extended This button serves two functions: periods of time in the delayed cooking a. Press it to start a selected cooking mode. start time.
- Page 7 Before First Use Remove any packaging materials and promotional labels from your electric pressure cooker. Be sure all parts have been included before discarding any packaging materials. You may want to keep the box and packing materials for use at a later date. Please tear off the protective film on cover the control panel in before first time use. Before using your Electric Pressure Cooker for the first time, remove any dust from shipping by wiping clean with a damp cloth. Thoroughly clean the lid and the cooking pot. The cooking Indicator Lights pot can be cleaned in the dishwasher or with warm soapy water. 1.Heating indicator light The indicator light illuminating means the Rinse with clean water, towel or air dry, and appliance is in heating status. place into the pressure cooker. 2.Keep Warm indicator light 1. Place the pressure cooker on a clean, flat The indicator light illuminating means the surface where you intend to cook. appliance is in Keep warm mode after the cooking mode is completed. 2. Place the condensation collector in rear of the unit until it clicks into place.(Fig1). 3.Less,Normal,More indicator light The corresponding indicator light illuminates depending on your selection and volume of rice to be cooked, e.g less cooking time required for...
- Page 8 Instructions For Use Once the pressure cooker is assembled properly, you are ready to begin pressure cooking. Clean cover, internal surface of external lid and Middle of 2/5 and rim of cooking pot before first use and after each 3/5 marking or 9 cup cooking session to maintain proper sealing at all Figure 6 Figure 7 times with lid locked in position. 1. To remove lid, grasp lid handle, turn it in Note: The cup supplied with the pressure clockwise direction, the ‘Unlock’ mark on cooker is NOT Standard Australian 250 the lid to point to the ‘Arrow’ mark on the ml, but actually 160 ml full to the rim. The appliance housing above the control panel, corresponding level marking inside the then lift the lid. (Fig.3 & 4) cooking pot reflects 160 ml cups, e.g.
- Page 9 Operating Instructions Note: The Pressure Limit Valve should be correctly positioned, This valve may Prepare ingredients / liquid quantities to fill the appear loose and wobbly but this is pressure cooker cooking pot. normal. It is secured when it sits right Refer to recipes and cooking time tables further down. in the booklet. The Red float Valve(Pressure Indicator) Place and close the pressure cooker lid. adjacent to the Pressure Limit Valve must be fully down (Black dot in Figure 10) Connect appliance power supply cord to the and level with the lid surface to properly...
- Page 10 “+,-” Button To Open Lid Pressing these buttons allows you to : When pressure cooking cycle is finished, the a. Manually set any cooking time between 2 and unit will automatically switch to the Keep Warm 99 minutes at 1 minute intervals after having mode. At this point you may choose to release pressed Manual cook button. pressure in 1 of 3 ways – Natural Pressure Release, b. Decrease or Increase dedicated cook modes Quick Pressure Release, or a Interrupt Pressure default cooking times to suit your liking (Under Release . The choice will be dictated by the cook or over cook). particular food being cooked and indicated c. Set timer (After pressing Preset cook button) in the recipe. If adapting your own recipe for for delay cooking start. pressure cooking, find a similar recipe in our recipe booklet and use that as a guide. Note: you can either continuously press 1. Natural Pressure Release – Following pressure buttons to increase or decrease time at 1 cooking, allow the unit to remain on Keep minute intervals or hold buttons to speed Warm. The pressure will begin to drop – time...
- Page 11 Pressure Cooking Lid Rest (Stand) For your convenience and after the lid has The appliance will start cooking after the been unlocked and removed, the lid can selected time has been entered and pressed be placed in the upright position on the the “START/CANCEL” button. It will start slowly appliance when serving the contents of the heating up (the time digits (00:MM) will continue cooking pot. to flash during this period), and progressively Hold the lid by the handle and angle the lid pressurising the cooking pot until it reaches peak locking tab underneath the the slot on the pressure. Depending on how full this cooking pot appliance and tilt upright to stand in position. is and the type of food being cooked, reaching (Fig.13) the top food temperature/peak pressure can take 8 to 45 minutes. When the pressure seals the cooking pot, the floating valve is pushed/raised upwards. When reaching top temperature a single beep will sound, stopping flashing of the hour digits, appliance will maintain peak pressure in this state and the set cooking time will now start to count down. Rice Fig.13 Plug cord into to wall power outlet and switch Power outlet On, appliance is now in Stand By Mode. • Press “RICE“ Button, 12 appears on LED Note: Do not push or pull lid in that Display, this reflects the Default cooking time position as it does not act as a hinged of 12 minutes, it will flash for approximately 20...
- Page 12 Soup Meat/Stew • Plug cord into to wall power outlet and switch • Plug cord into to wall power outlet and switch Power outlet On, appliance is now in Stand By Power outlet On, appliance is now in Stand By Mode. Mode. • Press “SOUP” Button, 06 appears on LED • Press “MEAT/STEW” Button, 20 appears on LED Display, this reflects the Default cooking time Display, this reflects the Default cooking time of 6 minutes, it will flash for approximately 20 of 20 minutes, it will flash for approximately 20 seconds. seconds. • Within the 20 second flash time you can either • Within the 20 second flash time you can either increase to your preferred cooking time by increase to your preferred cooking time by pressing “+” Buttons (The adjustment time pressing “+” Buttons (The adjustment time range is 06-40 minutes. range is 01-50 minutes. • The cooking process will start by pressing the • The cooking process will start by pressing the “START/CANCEL” button. “START/CANCEL” Button. • The appliance will beep 5 times when • The appliance will beep 5 times when selected cooking time has lapsed and will selected cooking time has lapsed and will automatically switch to Keep Warm Mode at...
- Page 13 Steam Slow Cook • Plug cord into to wall power outlet and switch • Plug cord into to wall power outlet and switch Power outlet On, appliance is now in Stand By Power outlet On, appliance is now in Stand By Mode. Mode. • Press “STEAM” Button, 05 appears on LED • In order to maintain food freshness and Display, this reflects the Default cooking time adhere to safe food handling practices, of 05 minutes, it will flash for approximately 20 with the appliance in “Slow cook” cooking seconds. mode, you are unable to use this function in conjunction with the delayed cooking start • Within the 20 second flash time you can either “Preset Cook “ mode. increase to your preferred cooking time by pressing “+” Buttons (The adjustment time • Press “SLOW COOK” Button, 04:00 appears on range is 05-40 minutes. LED Display, this reflects the Default cooking time of 4 hours, it will flash for approximately • The cooking process will start by pressing the 20 seconds. “START/CANCEL” Button. • Within the 20 second flash time you can either • The appliance will beep 5 times when increase to your preferred cooking time by selected cooking time has lapsed and will pressing “+” Buttons (The adjustment time...
- Page 14 Manual Cook Brown/Saute • This cooking mode allows you to manually This cooking mode is special function, the select any cooking time for all types of food, cooking mode can proceed without closing the specifically useful for ingredients that require lid. longer cook time than 60 minutes or don’t have dedicated default cooking times. Note: Do not close the lid when using this cooking mode, when completing • In this cooking mode you can choose to have browning /saute can you then add other the actual cooking time set anywhere from 2 to 99 minutes. ingredients/liquids to close the lid to start pressure cooking and adhere to the • Plug cord into to wall power outlet and switch normal pressure cooking process and...
- Page 15 The dedicated cooking function set time as below: Cooking Preset Time and Time Length Table Cooking mode Default time Min cooking time Max cooking time (inminutes) (in minutes) (in minutes) Rice Soup Poultry Slow cook 4 hours 4 hours 10 hours Porridge Steam Meat/Stew Brown/Saute Manual cook Preset cook 12 hours Bean/Chili...
- Page 16 Safety Devices Cleaning There are seven safety devices installed in the 1. Unplug the appliance power cord before pressure cooker to assure its reliability and safety. cleaning. 1. Open-and-Close Lid Safety Device 2. Clean the outer body with a soft cloth such as a paper towel or fibre cloth. Do not immerse The appliance will not start pressurizing until the outer body in water or pour water into it. the lid is closed and locked properly. 3. Rinse with warm water the underside of the lid The lid cannot be opened when the including the sealing ring, pressure limit valve, appliance pressurizing. anti-block cover, air escape and float valve. Dry completely. 2. Pressure Control Device The correct pressure level is automatically 4. Clean area under upper ring with dampened maintained during the cooking cycle. cloth or micro fibre cloth. Do not use chemical cleaners. 3. Pressure Limit Valve The pressure limit valve will release steam 5. Cooking pot is dishwasher-safe. To hand- pressure automatically when the pressure clean the cooking pot, use a soft cloth or...
- Page 17 Troubleshooting Symptom Probable Cause Action Lid does not lock Lid not correctly positioned Reposition Lid Floating valve is stuck in raised Push floating valve down position manually. Cannot open lid after cooking Floating valve is stuck in raised Press the float down with chamber is depressurized position chopsticks Air / Steam escaping from Sealing ring not put back in Install the sealing ring around the rim of the lid place after cleaning Food residue remaining on Clean sealing ring sealing ring Sealing ring damaged or worn Replace sealing ring Lid not locked properly Reposition lid Air / Steam escaping from Food deposits stuck on float Clean float valve seal around the floating valve valve seal Floating valve seal damaged or Replace valve seal worn out Float valve will not rise The pressure limit valve is not Set pressure limit valve in place sitting in place or the pressure and rotate pressure release release control ring under...
- Page 18 Note: These time specifications are for reference only and may vary depending on the circumstances. Pressure Cooking Timetable for Rice and Grains Rice & Grain Water Quantity (Grain : Water ratios) Cooking Time (in Minutes) Barley, pearl 25 – 30 Barley, pot 1:3 ~ 1:4 25 – 30 Porridge, thick 1:4 ~ 1:5 15 – 20 Porridge, thin 1:6 ~ 1:7 15 – 20 Couscous 5 – 8 Corn, dried, half 25 – 30 Kamut, whole 10 – 12 Oats, quick cooking 1:1 2/3 Oats, steel-cut 1:1 2/3 Quinoa, quick cooking Rice, basmati 1: 1.5...
- Page 19 Pressure Cooking Timetable for Dried Beans, Legume and Lentils Dried Beans & Legume Dry, Cooking Time Soaked, Cooking Time (in Minutes) (in Minutes) Adzuki 25-40 15-20 Anasazi 20-25 15-20 Black beans 25-40 15-20 Black-eyed peas 25-40 15-20 Chickpeas (chick peas, 35-40 20-25 garbanzo bean or kabuli) Cannellini beans 35-40 20-25 Soy beans 25 – 30 20-25 Scarlet runner 20-25 10-15 Peas 15-20 10-15 Pinto beans 25-30 20-25 Navy beans 25-30 20-25 Kidney beans, white 35-40...
- Page 20 Pressure Cooking Timetable for Meat (Poultry,Beef,Pork and Lamb) Meat Dry, Cooking Time (in Minutes) Beef, stew meat 15-20 Beef, meat ball 10-15 Beef, dressed 20-25 Beef, pot roast, steak, rump, round, chuck, blade or brisket, 35-40 large Beef, pot roast, steak, rump, round, chuck, blade or brisket, 25-30 small chunks Beef, ribs 25-30 Beef, shanks 25-30 Beef, oxtail 40-50 Chicken, breasts 8-10 Chicken, whole 20-25 Chicken, cut up with bones 10-15 Chicken, drumsticks, legs or thighs 10-15 Cornish Hen, whole 20-30 Duck, cut up with bones 15-20 Duck, whole 25-30 Ham slice 9-12 Ham picnic shoulder 25-30 Lamb, cubes, 10-15 Lamb, stew meat...
- Page 21 Pressure Cooking Timetable for Seafood and Fish Seafood and Fish Fresh, Cooking Time (in Minutes) Frozen, Cooking Time (in Minutes) Crab 3 – 4 5 – 6 Shrimp or Prawn 1 – 2 2 – 3 Seafood soup or stock 6 – 7 7 – 9 Mussels 2 – 3 4 – 5 Lobster 3 – 4 4 – 6 Fish steak 3 – 4 4 – 6 Fish fillet 2 – 3 3 – 4 Fish, whole 5 – 6 7 – 10 (trout, snapper, etc.) Fresh or Frozen Vegetable Pressure Cooking Timetable Vegetable Fresh Cooking Time Frozen, Cooking Time (in Minutes) (in Minutes) Artichoke, whole, trimmed without leaves 9 – 11 11 –...
- Page 22 Escarole, chopped 1 – 2 2 – 3 Green beans, whole 2 – 3 3 – 4 Greens (beet greens, collards, kale, 3 – 6 4 – 7 spinach, swiss chard, turnip greens), chopped Leeks 2 – 4 3 – 5 Mixed vegetables 2 – 3 3 – 4 Okra 2 – 3 3 – 4 Onions, sliced 2 – 3 3 – 4 Parsnips, sliced 1 – 2 2 – 3 Parsnips, chunks 2 – 4 4 – 6 Peas, in the pod 1 – 2 2 – 3 Peas, green 1 – 2 2 – 3 Potatoes, in cubes 7 – 9 9 – 11 Potatoes, whole, baby 10 – 12 12 – 14...
- Page 23 Pressure Cooking Time Table for Fruits Fruits Fresh Cooking Time (in Minutes) Dried, Cooking Time (in Minutes) Apples, in slices or pieces 2 – 3 3 – 4 Apples, whole 3 – 4 4 – 6 Apricots, whole or halves 2 – 3 3 – 4 Peaches 2 – 3 4 – 5 Pears, whole 3 – 4 4 – 6 Pears, slices or halves 2 – 3 4 – 5 Prunes 2 – 3 4 – 5 Raisins 4 – 5 Specifications of product Power: ........220-240V~ 50Hz 1000W Capacity: ............6.0L Pressure: .............40-70Kpa. NOTE: As a result of continual improvements, the design and specifications of the product within may differ slightly to the unit illustrated on the packaging.
- Page 24 GSM Retail Group has a policy of continual improvement throughout the product range. As such the unit contained within may differ slightly from the unit illustrated on the pack. MADE IN CHINA for GSM Retail Group Mistral is a registered trademark of GSM Retail Group Cat. No. MPRC601B December 2020...
Need help?
Do you have a question about the MPRC601B and is the answer not in the manual?
Questions and answers