Witschi ChronoMaster Manual
Precision measuring device
Hide thumbs
Also See for ChronoMaster:
- Operating instructions manual (36 pages) ,
- Operating instructions manual (37 pages)

Subscribe to Our Youtube Channel
Related Manuals for Witschi ChronoMaster


Summary of Contents for Witschi ChronoMaster
- Page 1 Precision measuring device ChronoMaster / ChronoMaster Air Read the instructions prior to performing any task!
- Page 2 3294 Büren a.A. Switzerland Telephone: +41 32 352 05 00 Fax: +41 32 351 32 92 Email: welcome@witschi.com Internet: www.witschi.com Translation of the original Wits-55131-CH, 3, en_GB © 2021 Witschi Electronic AG Precision measuring device ChronoMaster / ChronoMaster Air 24.03.2021...
- Page 3 This document is valid for ChronoMaster und ChronoMaster Air. If the content is only valid for ChronoMaster Air, this is indi- cated accordingly. Personnel must have carefully read through and understood this document before commencing work.
-
Page 4: Table Of Contents
Product description..............6 1.1 Overview................. 6 1.2 Scope of delivery............9 1.3 Software................9 1.4 Modes................9 1.5 Slide switch (ChronoMaster Air only)....... 11 1.6 Bluetooth connection (ChronoMaster Air only)..11 1.7 Technical data.............. 12 1.8 Signal LED..............14 Safety..................16 2.1 Symbols in this document.......... - Page 5 Disposal................. 42 8.1 Device disposal............42 8.2 Rechargeable battery disposal (ChronoMaster Air only)................42 Index..................43 Appendix................46 Declaration of conformity ..........47 Declaration of conformity for ChronoMaster Air ... 24.03.2021 Precision measuring device ChronoMaster / ChronoMaster Air...
-
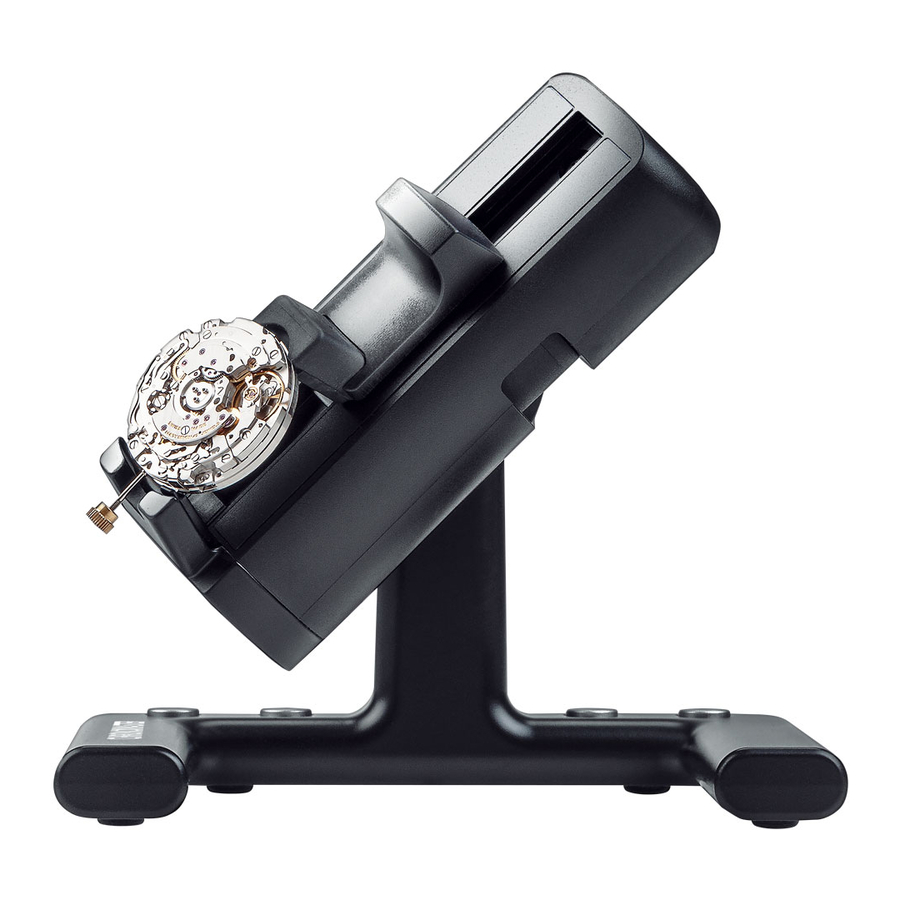
Page 6: Product Description
Chapter 4.3 “Controlling the measurement using control keys” on page 33 USB-C port (ChronoMaster Air only) ON/OFF slide switch (on bottom) (ChronoMaster Air only) • Ä Chapter 1.5 “Slide switch (ChronoMaster Air only)” on page 11 Precision measuring device ChronoMaster / ChronoMaster Air 24.03.2021... - Page 7 Description 2 × 2 AAA rechargeable batteries (on bottom) (ChronoMaster Air only) • Ä Chapter 1.7 “Technical data” on page 12 LED signal lamp for visual indication of the device status and watch signal • Ä Chapter 4.2 “Positioning the watch and starting a measurement automatically”...
- Page 8 Witschi Token Installer (for Chrono- The “Witschi Token Installer” software can be used to install Master only) what is known as a token on the ChronoMaster to upgrade the ChronoMaster to the PRO version. Ordering a token The token is created specifically for the Chrono- Master to be upgraded.
-
Page 9: Scope Of Delivery
1.2 Scope of delivery The scope of delivery includes the ChronoMaster and a USB flash drive with the following contents: • “Chronoscope Service” display software • Software manual in German, French, English, Spanish and Italian as PDF files Information on the display software... - Page 10 The following display modes are also available for the Chrono- Master PRO version: • Trace • Sequence • Polar • Scope 1, Scope 2 All display modes are available when ChronoMaster Air is used. Precision measuring device ChronoMaster / ChronoMaster Air 24.03.2021...
-
Page 11: Slide Switch (Chronomaster Air Only)
There is a slide switch on the bottom of the device. Before a measurement can be performed, the slide switch must be moved to the “ON” position. When the ChronoMaster Air is connected to a USB power adapter or to a PC, the integrated rechargeable batteries are charged, regardless of which posi- tion the slide switch is set to. -
Page 12: Technical Data
Sufficient signal strength Weak signal strength, insufficient Faults affecting the Bluetooth connection If more than one ChronoMaster Air is con- nected to the PC or tablet computer by Blue- tooth, or faults or interruptions occur, using the external Bluetooth dongle “Laird” (item no. - Page 13 Brand Panasonic Type Eneloop Technology Nickel metal hybrid (NiMh) Capacity 750 mAh Charging time 4 – 5 hours Device autonomy > 20 hours Dimensions and weight Data Value Unit Width 130 mm 24.03.2021 Precision measuring device ChronoMaster / ChronoMaster Air...
-
Page 14: Signal Led
ChronoMaster Air is not Flashes in blue Bluetooth is in ‘advertising mode’, connected by Bluetooth. ChronoMaster Air can be found and paired by the PC. Lights up in blue for approx. Connecting Bluetooth. 4 seconds Precision measuring device ChronoMaster / ChronoMaster Air 24.03.2021... - Page 15 (< 10%). From this moment on, only approx. 1 hour of ChronoMaster Air operation remains. Device is performing Flashes in yellow Display of the beat noises of the measurement. watch placed on the device. 24.03.2021 Precision measuring device ChronoMaster / ChronoMaster Air...
-
Page 16: Safety
Label Explanation Step-by-step instructions 1., 2., 3..ð Results of actions References to sections of this document and other applicable documents Lists without a fixed order Precision measuring device ChronoMaster / ChronoMaster Air 24.03.2021... -
Page 17: Risk Of Material Damage
NOTICE! noMaster Air only) Material damage due to use of non-recharge- able batteries! If non-rechargeable batteries are used in the ChronoMaster Air, it could be damaged or destroyed. – Only use rechargeable NiMh batteries in size AAA. 24.03.2021 Precision measuring device ChronoMaster / ChronoMaster Air... -
Page 18: Rechargeable Batteries
– To recharge the rechargeable batteries, con- nect the ChronoMaster Air to the charger provided, or to a PC. – The rechargeable batteries can remain in the ChronoMaster Air when being recharged from a PC or laptop. -
Page 19: Owner's Responsibilities
The operator may only perform tasks that go beyond normal operation where this is provided for in the operating instructions and the owner has specifically entrusted the operator with such tasks. 24.03.2021 Precision measuring device ChronoMaster / ChronoMaster Air... -
Page 20: Commissioning The Device
Unpacking the device Take the device out of its packaging. Keep the original packaging for any later transport or storage ( Ä Chapter 5 “Device transport and storage” on page 35). Precision measuring device ChronoMaster / ChronoMaster Air 24.03.2021... -
Page 21: Requirements For The Location
– Install the USB cable so that it cannot be damaged by external influences. – Never operate the device in an environment with a high level of humidity. 24.03.2021 Precision measuring device ChronoMaster / ChronoMaster Air... -
Page 22: Installing The Software
Run the installation file cs_setup.exe as the administrator. Fig. 2: Connecting the USB flash drive Select the installation directory for the software on the PC or tablet computer (Fig. 3). Fig. 3: Selecting the file location Precision measuring device ChronoMaster / ChronoMaster Air 24.03.2021... - Page 23 Start the installation (Fig. 4). ð After successful installation, the software can be started: Fig. 4: Installing the software Software updates Information on potential software updates is provided on the manufacturer’s website. 24.03.2021 Precision measuring device ChronoMaster / ChronoMaster Air...
-
Page 24: Connecting The Device
The device is connected to the PC or tablet com- puter. • The device is identified by the display software and executed there (Fig. 7). Fig. 7: Identification of the device by the display software Precision measuring device ChronoMaster / ChronoMaster Air 24.03.2021... -
Page 25: Assigning The Device To A Channel
There is the option of using the USB cable for communication between the device and a PC or tablet computer, or of using Bluetooth for wireless communication (ChronoMaster Air only). Choosing between “manual” and “automatic” There is the option of choosing between “automatic”... - Page 26 Configuring the device in “manual” Personnel: Operator mode Prerequisite: • The “Chronoscope Service” display software is installed on the PC or tablet computer. Click the configuration symbol Click the [Yes] button in the “Configuration” dialog window. Precision measuring device ChronoMaster / ChronoMaster Air 24.03.2021...
- Page 27 The USB connection is then only used to charge the rechargeable batteries. Auto: • The device selected is assigned either by using a USB or a Bluetooth connection. The USB connec- tion is given priority when this is done. 24.03.2021 Precision measuring device ChronoMaster / ChronoMaster Air...
-
Page 28: Charging The Rechargeable Batteries (Chronomaster Air Only)
The rechargeable batteries are partly charged upon delivery, and are already installed in the device. Use the USB cable or the battery charger provided to connect the ChronoMaster Air to a power supply for approx. 4 hours. Depending on the application, the runtime of the rechargeable batteries totals between 20 and 45 hours. -
Page 29: Performing A Measurement
There is a risk of the distortion of measurement results if the watch or the clockwork is not clamped correctly. – Make sure that the watch or the clockwork is clamped correctly. 24.03.2021 Precision measuring device ChronoMaster / ChronoMaster Air... - Page 30 Clamping the complete watch or watch movement with cup Personnel: Operator Prerequisites: • The slide switch is in the “ON” position (ChronoMaster Air only). • The device is connected to the PC or tablet computer. • The “Chronoscope Service” display software has been started.
- Page 31 Fig. 13: Releasing the clamping jaw Fig. 14: The measuring process starts automatically Information in the software manual Information on the measuring process and on controlling the measurement is to be found in the corresponding software manual. 24.03.2021 Precision measuring device ChronoMaster / ChronoMaster Air...
- Page 32 Clamping the watch movement without housing Personnel: Operator Prerequisites: • The slide switch is in the “ON” position (ChronoMaster Air only). • The device is connected to the PC or tablet computer. • The “Chronoscope Service” display software has been started.
-
Page 33: Controlling The Measurement Using Control Keys
Program selection, select next higher program. Restart current measurement. Pause/continue current measurement. Information in the software manual Information on the individual functions can be found in the corresponding software manual. Fig. 19: Control keys 24.03.2021 Precision measuring device ChronoMaster / ChronoMaster Air... -
Page 34: Monitoring And Configuring The Measurement
Printing the measurement results • Creating screenshots • Restarting a measurement Information in the software manual Information on monitoring and configuring the measurements is to be found in the corre- sponding software manual. Precision measuring device ChronoMaster / ChronoMaster Air 24.03.2021... -
Page 35: Device Transport And Storage
Disconnect the USB cable (Fig. 20/1) at the USB plug from the USB port of the PC or tablet computer (Fig. 20/2). ChronoMaster Air only: move the slide switch to the “OFF” position. Fig. 20: Device shutdown 5.2 Device transport and storage... - Page 36 10 % and 80 % (non-condensing). Prerequisite: • The device has been shut down ( Ä Chapter 5.1 “Device shutdown” on page 35). Pack the device in its original packaging. Transport and/or store the device. Precision measuring device ChronoMaster / ChronoMaster Air 24.03.2021...
-
Page 37: Device Maintenance And Cleaning
When the runtime of the rechargeable batteries decreases, this is due to ageing of the rechargeable batteries that are installed. The ChronoMaster Air features a design that allows the operator to replace the rechargeable batteries. Ensure that the rechargeable batteries are replaced correctly! –... - Page 38 Operator Prerequisite: • New rechargeable batteries have been inserted. Switch on the ChronoMaster Air and connect it to the PC or tablet computer using Bluetooth. Perform the long-term measurement until the recharge- able batteries have been discharged completely. ð The rechargeable batteries have discharged com- pletely after 20 –24 hours.
-
Page 39: Maintenance Schedule
Customer Service Calibration instruction Regular calibration of the device ensures that measurement results are reliable. We recommend having the device calibrated and its functionality checked once a year. Fig. 22: Calibration label 24.03.2021 Precision measuring device ChronoMaster / ChronoMaster Air... -
Page 40: Troubleshooting
The LED in the base of the The slide switch is not Move the slide switch to the “ON” position. device does not light up/ in the “ON” position. flash (ChronoMaster Air only) Precision measuring device ChronoMaster / ChronoMaster Air 24.03.2021... - Page 41 • Ensure that the device is connected to the right PC or tablet computer. The Bluetooth connection Unstable Bluetooth • Place the ChronoMaster Air closer to the is interrupted (Chrono- connection. PC or tablet computer. Master Air only) • Use the external Bluetooth dongle “Laird”...
-
Page 42: Disposal
– If in doubt about environmentally sound dis- posal, contact your local authority or a spe- cialist waste disposal company. 8.2 Rechargeable battery disposal (ChronoMaster Air only) Rechargeable batteries can contain substances that can be recycled and/or substances that are hazardous to health and the environment. -
Page 43: Index
......20 ChronoMaster PRO ..... . . 7 Versions . - Page 44 Symbols in this document ....16 Owner’s obligations ..... 19 Precision measuring device ChronoMaster / ChronoMaster Air 24.03.2021...
- Page 45 USB flash drive ......9 Witschi Token Installer ....7 USB port .
-
Page 46: Appendix
Appendix Precision measuring device ChronoMaster / ChronoMaster Air 24.03.2021... -
Page 47: A Declaration Of Conformity
A Declaration of conformity 24.03.2021 Precision measuring device ChronoMaster / ChronoMaster Air... -
Page 49: B Declaration Of Conformity For Chronomaster Air
B Declaration of conformity for ChronoMaster Air 24.03.2021 Precision measuring device ChronoMaster / ChronoMaster Air...
Need help?
Do you have a question about the ChronoMaster and is the answer not in the manual?
Questions and answers