
Related Manuals for Witschi ChronoMaster


Summary of Contents for Witschi ChronoMaster
- Page 1 Operating instructions Precision measuring device ChronoMaster Read the instructions prior to performing any task!
- Page 2 Bahnhofstrasse 26 3294 Büren a.A. Switzerland Telephone: +41 32 352 05 00 Fax: +41 32 351 32 92 Email: welcome@witschi.com Internet: www.witschi.com Translation of the original operating instructions Wits-39771-CH, 1, en_GB © 2017 Witschi Electronic AG Precision measuring device ChronoMaster 12.04.2018...
- Page 3 In addition, the local health and safety regulations and general safety rules for the area in which the ChronoMaster is used apply. Illustrations in this manual are for a basic understanding and may deviate from the actual design.
-
Page 4: Table Of Contents
4.4 Monitoring and configuring the measurement.... 25 Transportation and storage of the ChronoMaster..26 5.1 Shutting down the ChronoMaster....... 26 5.2 Transportation and storage of the ChronoMaster..26 Maintenance and cleaning of the ChronoMaster... 28 6.1 Safety during maintenance......... 28 6.2 Maintenance schedule.......... -
Page 5: Product Description
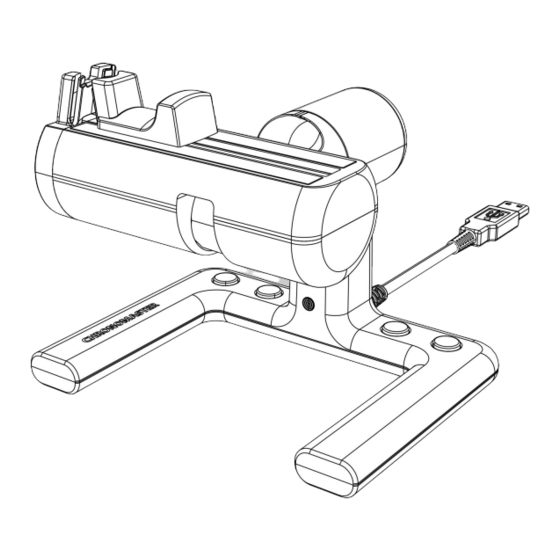
Clamping jaw made of neoprene for clamping the watch or the clockwork Ä Chapter 4.2 “Positioning the watch and starting a measurement automatically” on page 20 USB cable for connecting the ChronoMaster to the PC or tablet computer Ä Chapter 3.4 “Connecting the ChronoMaster” on page 19... - Page 6 Two ChronoMaster software versions are available: ChronoMaster ChronoMaster PRO The “Witschi Token Installer” software can be used to install a token on the device to extend the device to the PRO version. Ordering the token The token is created exactly for the device to be extended.
-
Page 7: Scope Of Delivery
Product description Software Controlling the measurements A USB cable is used to connect the ChronoMaster to the PC or tablet computer. The measurements are controlled using the corre- sponding “Chronoscope Service” display software. In the “Chronoscope Service” display software, you can choose between the “Diagram”... -
Page 8: Modes
“Installing the software” on page 17 and in the corresponding software manual. 1.4 Modes Measuring modes The ChronoMaster provides various measuring modes that can be set in accordance with the escapement type of the watch to be tested. Measuring Information... -
Page 9: Technical Data
Product description Technical data Display modes The “Chronoscope Service” display software provides two different display modes for the ChronoMaster and ChronoMaster PRO ver- sions: Continuous diagram recording Vario The following display modes are also available for the Chrono- Master PRO version:... - Page 10 4 GB USB interface 2.0, type A Display Minimum resolution: 1366 x 768 pixels Operating conditions Data Value Unit 10 - 50 °C Temperature range 10 - 80 %, non- Relative humidity, maximum con- densing Precision measuring device ChronoMaster 12.04.2018...
-
Page 11: Safety
This section provides an overview of all the important safety aspects that ensure personal protection and safe and trouble-free operation of the ChronoMaster. There are additional, task-specific warnings in the sections on the individual life cycle phases. 2.1 Symbols in this manual... -
Page 12: Risk Of Material Damage
(repère). With the aid of the clamping jaws, the ChronoMaster is capable of testing mechanical wrist watches of all sizes. Its intended use includes compliance with all the information in this manual. -
Page 13: Owner's Responsibilities
Any use beyond or other than the intended use shall be considered misuse. NOTICE! Material damage due to misuse! Misuse of the ChronoMaster can result in material damage. – Never immerse the device in water or other liq- uids. Always keep the device away from rain and wet conditions. - Page 14 The operator may only perform tasks that go beyond normal operation where this is provided for in the manual and the owner has specifi- cally entrusted the operator with such tasks. Precision measuring device ChronoMaster 12.04.2018...
-
Page 15: Commissioning The Chronomaster
Unpacking the ChronoMaster Commissioning the ChronoMaster 3.1 Unpacking the ChronoMaster Delivery The ChronoMaster is delivered by a local logistics company. All the components included in the scope of delivery are delivered together in a single package. Transport inspection Upon receipt of the delivery, check it immediately to ensure that it is complete and undamaged. -
Page 16: Requirements For The Location
– Install the USB cable so that it cannot be dam- aged by external influences. – Never operate the device in an environment with a high level of humidity. Precision measuring device ChronoMaster 12.04.2018... -
Page 17: Installing The Software
Notes on installation – The “Chronoscope Service” display software must be installed on the PC or tablet computer before the ChronoMaster is connected. – To install the “Chronoscope Service” display software, administrator rights are required for the PC or tablet computer. - Page 18 Commissioning the ChronoMaster Installing the software Start the installation (Fig. 4). Fig. 4: Installing the software Software updates Information on possible software updates is pro- vided on the manufacturer’s website. Precision measuring device ChronoMaster 12.04.2018...
-
Page 19: Connecting The Chronomaster
PC or tablet computer (Fig. 6/2). Fig. 5: Starting “Chronoscope Service” Fig. 6: Connecting the ChronoMaster The ChronoMaster is connected to the PC or tablet ð computer. The ChronoMaster is identified by the display soft- ware and executed there (Fig. 7). -
Page 20: Performing A Measurement
Distortion of measurement results! There is a risk of the distortion of measurement results if the watch or the clockwork is not clamped correctly. – Make sure that the watch or the clockwork is clamped correctly. Precision measuring device ChronoMaster 12.04.2018... - Page 21 Personnel: Operator Prerequisites: The ChronoMaster is connected to the PC or tablet computer. The “Chronoscope Service” display software has been started. Pull the clamping jaw (Fig. 8/1) outwards and hold it. Fig. 8: Tightening the clamping jaws...
- Page 22 The complete watch or the clockwork with cup is ð clamped. The LED on the ChronoMaster (Fig. 11/2) flashes at the same frequency as the watch beats. The measuring process starts automatically (Fig. 12). Alternatively, the measurement can be started via the “Restart”...
- Page 23 Personnel: Operator Prerequisites: The ChronoMaster is connected to the PC or tablet computer. The “Chronoscope Service” display software has been started. Pull the clamping jaw (Fig. 13/1) outwards and hold it. Fig. 13: Tightening the clamping jaws Place the clockwork on the clamping area so that the plate is positioned above the signal sensor (Fig.
-
Page 24: Controlling The Measurement Using Control Keys
4.3 Controlling the measurement using control keys To operate the software, the ChronoMaster has 4 control keys (Fig. 17). The following functions are assigned to the control keys: Function Program selection, select next lower program. -
Page 25: Monitoring And Configuring The Measurement
Pausing and resuming the measurement Printing the measurement results Creating screenshots Restarting a measurement Information in the software manual Information on monitoring and configuring the measurements is to be found in the corresponding software manual. 12.04.2018 Precision measuring device ChronoMaster... -
Page 26: Transportation And Storage Of The Chronomaster
Disconnect the USB cable (Fig. 18/1) at the USB plug from the USB port of the PC or tablet computer (Fig. 18/2). Fig. 18: Shutting down the Chrono- Master 5.2 Transportation and storage of the ChronoMaster Improper transport NOTICE! Risk of material damage due to improper trans-... - Page 27 Transportation and storage of the... Transportation and storage of the ChronoMaster Improper storage NOTICE! Risk of material damage due to improper storage! Improper storage can cause significant material damage to the device. – Store the device in its original packaging only.
-
Page 28: Maintenance And Cleaning Of The Chronomaster
Keep moisture away from live parts. 6.2 Maintenance schedule Interval Maintenance work Personnel Daily Clean the ChronoMaster with a microfibre cloth. Operator Calibration as per the cali- Have the ChronoMaster recalibrated. Contact Customer Customer Ä “Customer Service” on page 3). -
Page 29: Troubleshooting
Improper rectification of damage NOTICE! Damage due to improper rectification of mate- rial damage! The improper rectification of material damage to the ChronoMaster can result in additional material damage. – Stop operating the device in the event of mate- rial damage. -
Page 30: Chronomaster Disposal
– Only have authorised specialists dispose of the device. – If in doubt about environmentally sound dis- posal, contact your local authority or a spe- cialist waste disposal company. Precision measuring device ChronoMaster 12.04.2018... -
Page 31: Index
......26 ChronoMaster PRO ......6 storage . - Page 32 Unsuitable location ..... . . 16 Power supply ......12 Precision measuring device ChronoMaster 12.04.2018...
- Page 33 ......20 Witschi Token Installer ..... 6 Versions .
-
Page 34: Appendix
Appendix Appendix Precision measuring device ChronoMaster 12.04.2018... -
Page 35: A Declaration Of Conformity
Declaration of conformity A Declaration of conformity 12.04.2018 Precision measuring device ChronoMaster...
Need help?
Do you have a question about the ChronoMaster and is the answer not in the manual?
Questions and answers