
Related Manuals for Witschi CHRONOSCOPE X1 G3


Summary of Contents for Witschi CHRONOSCOPE X1 G3
- Page 1 CHRONOSCOPE X1 (G3) INSTRUCTION MANUAL Please read before you work with the device!
- Page 2 Witschi Electronic Ltd. Bahnhofstrasse 26 3294 Büren an der Aare Switzerland Phone: +41 (0)32 - 352 05 00 Fax: +41 (0)32 - 351 32 92 Internet: www.witschi.com E-Mail: welcome@witschi.com Original Manual 11.28D35e Document No. Version 1.1 Last modification: December 2016...
-
Page 3: Table Of Contents
......................... 27 OLAR ......................28 OLERANCES 7 SYSTEM PARAMETERS ....................29 ........................ 29 YSTEM ........................31 ......................32 ROGRAM ......................32 ECURITY ..................... 33 EASUREMENT ...................... 33 EITER IAGRAMM ...................... 34 RACE ARIO Witschi Electronic Ltd Chronoscope X1 (G3) Page 3/39... - Page 4 RACE AND ETWORK 8 MAINTENANCE AND CUSTOMER SERVICE ..............36 ........................ 36 UARANTEE ......................36 AINTENANCE ....................... 36 ALIBRATION 9 TECHNICAL DATA ...................... 37 ..................39 ECLARATION OF ONFORMITY 10 ACCESSORIES ......................39 Page 4/39 Chronoscope X1 (G3) Witschi Electronic Ltd...
-
Page 5: Safety Reference
The Manufacturer, Witschi Electronic AG in CH - 3294 Büren a.A. Switzerland takes no responsibility and offers no warranty for damages that may follow from the non-observance of these... -
Page 6: Description
In display mode time and date is also the moon phase symbolically presented, with following information’s: number of days since last new moon, last new moon, full moon and next new moon. Page 6/39 Chronoscope X1 (G3) Witschi Electronic Ltd... -
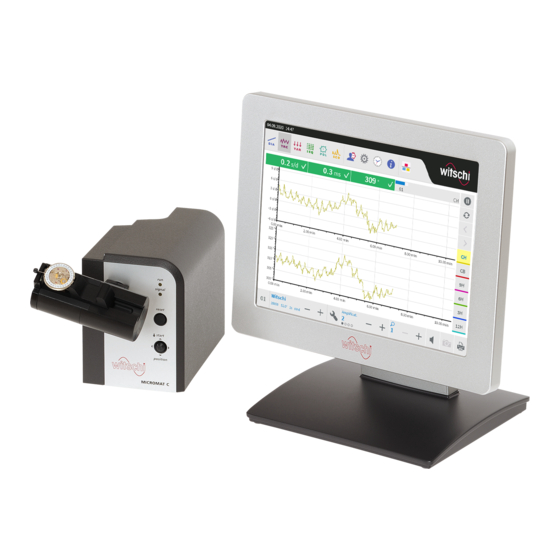
Page 7: Installation
X1 (G3) Terminal with colour Touchscreen Pen for Touchscreen Universal AC-Adapter 100 – 240 V~ for Terminal X1 (G3) Printer cable for Witschi printer Microfiber cloth 23x23 cm Dust proof cover for Terminal X1 (G3) ... -
Page 8: Connections Terminal X1 (G3) - Micromatc
Connection socket for mains adapter, 230 V~ or 120 V~ USB Interface for X1 (G3) Terminal Connection socket for earphone (accessory) microphone Connection socket for stand microphone (accessory) Main switch for switching the equipment on / off Page 8/39 Chronoscope X1 (G3) Witschi Electronic Ltd... -
Page 9: Operating
When it is switched on, the Chronoscope X1 (G3) goes back to the same measuring mode it was in before being switched off. The large buttons on the touch screen are activated by touching them with a finger or the pen. Witschi Electronic Ltd Chronoscope X1 (G3) Page 9/39... -
Page 10: Menu Bars And Buttons
For input of customer and watch data, comments etc. System parameter Time, Date and Moon phase Diverse information’s Access to the WiCoTrace data base, when the device is connected to the network Page 10/39 Chronoscope X1 (G3) Witschi Electronic Ltd... - Page 11 “Witschi\Chronoscope_X1\Capture” under the file name “Snapshot_NN.png”. NN is incremented from 01 to 99. Print button: The current view can be printed on the Witschi thermal printer while the measurement process is running. Amplificat The current amplification value is indicated in the sector .
-
Page 12: Lateral Toolbar
Switching from one test position to another can also be carried out with the joystick on the MMC. Remark In the test mode “Sequence” only 6 positions are displayed, if the measuring cycle contains no intermediate test positions. Page 12/39 Chronoscope X1 (G3) Witschi Electronic Ltd... - Page 13 Indication of the test positions in accordance with NIHS 95-10/ISO 3158 Current indication of the test positions Witschi Electronic Ltd Chronoscope X1 (G3) Page 13/39...
-
Page 14: Display Modes
Measured values for rate deviation, ampli- tude and beat error are displayed numeri- cally. The last measured result remains displayed when measurements are paused. The means are numerically displayed at the end of the measurement time. Page 14/39 Chronoscope X1 (G3) Witschi Electronic Ltd... -
Page 15: Vario Display Mode
DVH: Only for rate and amplitude. Difference between the mean of all vertical test positions and the mean of all horizontal test positions. Di: Only for rate. Difference between the 6H and CH test positions. Witschi Electronic Ltd Chronoscope X1 (G3) Page 15/39... - Page 16 270°, in the two vertical positions where the unbalance is down or above on the vertical. Φ: Watch is in vertical position. Shows the place of the unbalanced point on the balance wheel (flash) I.e. The rotation angle of the stem refers to the 3H position. Page 16/39 Chronoscope X1 (G3) Witschi Electronic Ltd...
-
Page 17: Polar Display Mode
(i.e. 30 seconds stabilisation at a rotation time of 60 seconds= half turn of the Tourbillon cage). Then start the cycle with: start - button on the MMC or button on the X1 Witschi Electronic Ltd Chronoscope X1 (G3) Page 17/39... - Page 18 Average value of the results after a 270° rotation of the tourbillon cage Average value of the four results P000, P090, P180 and P270 Average value of all results of the total measurement time Page 18/39 Chronoscope X1 (G3) Witschi Electronic Ltd...
-
Page 19: Scope Display Mode
The Averaging of the signal is a process, by which the noise can be reduced in repetitive signals. By additive superposition the signal is thereby increased, while the superposition of random noise leads to no gain. Overall, the signal-to-noise ratio is improved. Witschi Electronic Ltd Chronoscope X1 (G3) Page 19/39... -
Page 20: Input Of Client Address And Piece Informations
"Load Client Address" or the “Load Piece information’s” window. Select from the list the desired Client Address or Piece information’s (01: to 99:) and press Take over The loaded Client Address with the associated Piece information can also be edited. Page 20/39 Chronoscope X1 (G3) Witschi Electronic Ltd... -
Page 21: Time, Date And Moon Phase
Firmware version and serial number of the Micromat C (must be connected and switched on). Calibration date and value of the Micromat C (must be connected and switched on). Version for connected Bluetooth Dongle Witschi Electronic Ltd Chronoscope X1 (G3) Page 21/39... -
Page 22: Export Screen Content
This message appears when, for example, the signal of the movement is outside of the preset Beat number tolerances or beat numbers. In this case, adjust mode to "Automatic" and select the tolerances in accordance to manufacturer’s specifications. Page 22/39 Chronoscope X1 (G3) Witschi Electronic Ltd... - Page 23 This message appears when the microphone of the Micromat C, don’t receive any signal from the Watch movement Measurement stopped: This message appears when the measurement has been stopped by the pause button , or if the start-and position knob on the Micromat C is interrupted. Witschi Electronic Ltd Chronoscope X1 (G3) Page 23/39...
-
Page 24: Display/Edit Measurement Programs
The next or previous program can be selected with the buttons. The editing possibilities related to the available tabs are described below. The desired tab and the entry fields are also accessed by touching them. Page 24/39 Chronoscope X1 (G3) Witschi Electronic Ltd... -
Page 25: Tab Program
Swiss lever escapement. It is better to use this mode when amplitudes of 360° are measured in the standard mode. Special 6: Mode for Chronograph “Foudroyante”. Caution! The other test modes are not yet active, they are reserve modes. Witschi Electronic Ltd Chronoscope X1 (G3) Page 25/39... -
Page 26: Tab Diagram
4 s to maximal 99 h : 59 min : 58 s. For the integration time: from 4 s to a maximum of 8 min. Suggestion: The use of integration time 4A should be limited to lab measurements. Page 26/39 Chronoscope X1 (G3) Witschi Electronic Ltd... -
Page 27: Tab Sequence
Measuring time: You can enter a measuring time 4 seconds up to a maximum of 1 hour Important! The measuring time must correspond to the tourbillon rotation time, or a multiple thereof. Witschi Electronic Ltd Chronoscope X1 (G3) Page 27/39... -
Page 28: Tab Tolerances
The tolerances for all display modes are used for the numerical representation of the results. The tolerances for the mean (X) and delta (D) are only used in the Sequence display mode. Page 28/39 Chronoscope X1 (G3) Witschi Electronic Ltd... -
Page 29: System Parameters
'Silent' or 'Click'. Show mouse pointer: The mouse pointer can be shown provided a mouse is connected. Keyboard: You can choose the keyboard layout: ABCDEF (universal), QWERTZ (German), QWERTY (English USA) and AQUERY (French). Witschi Electronic Ltd Chronoscope X1 (G3) Page 29/39... - Page 30 The system parameters can be loaded from the USB stick. Export The system parameters stored on the USB stick can be copied into another Chronoscope X1 (G3). This saves both time and work. Page 30/39 Chronoscope X1 (G3) Witschi Electronic Ltd...
-
Page 31: Tab Time
Internet by a timeserver (NTP). An alternative address of a time server can also be set (standard value: pool.ntp.org or a numeric IP-address). Should only be enabled if the timeserver is available! Witschi Electronic Ltd Chronoscope X1 (G3) Page 31/39... -
Page 32: Tab Program
4-digit (numerical) password has been entered. The device is delivered with the following password: 1234. Change password: Password The current password must be typed into the dialog box before the new password can be entered and confirmed. Page 32/39 Chronoscope X1 (G3) Witschi Electronic Ltd... -
Page 33: Tab Measurement
8.3 Calibration See Chapter , page 35. Calibrations: List of the most recent calibrations. Tab Diagram Line width: You can set the line width for the diagram recording: 1 or 2 Witschi Electronic Ltd Chronoscope X1 (G3) Page 33/39... -
Page 34: Tab Trace / Vario
Selection of the time interval during which the measurement cycle will be started, from 1 min to 99 min. The measurement is immediately restarted if a measurement cycle is longer than the preset time. Page 34/39 Chronoscope X1 (G3) Witschi Electronic Ltd... -
Page 35: Tab Scope
The two tabs are used to install a network connection. You will need the WiCoTrace PC software (optionally available) and experience in network installations. Supported are WiCoTrace 2009 and WiCoTrace 2. The software installation is described in detail in the manual, which is part of the delivery. Witschi Electronic Ltd Chronoscope X1 (G3) Page 35/39... -
Page 36: Maintenance And Customer Service
To keep measurements accurate we recommend contacting our customer service in order to have your instrument calibrated and its functionality checked yearly. If the Micromat C is connected to the Witschi GPS receiver, it is possible to test the calibration and, if necessary, to re-calibrate the device. -
Page 37: Technical Data
20, 200, 400 ms. –– Scope2 Display Mode Fix time deviation: 20 ms. Averaging of the beat noises –– Screensaver / Illuminating Switched on and off, switch after: 1 to 30 min Witschi Electronic Ltd Chronoscope X1 (G3) Page 37/39... - Page 38 Dimensions: 266 x 213 x 43 mm (w x h x d) Weight: 2.1 Kg Mains connection Terminal X1 (G3): universal adapter for 100 to 240 V~, 1.5 A, 50-60Hz Page 38/39 Chronoscope X1 (G3) Witschi Electronic Ltd...
-
Page 39: Declaration Of Conformity
Cond. Immunity IEC 1000-4-8 50Hz Magn. Puls IEC 1000-4-11 Dips 10 ACCESSORIES Item Order Nr. Thermal printer with paper cutter, 100 V~ - 240 V~ JB01-SLK-TE25-S Thermal paper for JB01-SLK-TE25-S, roll JB01-MM60-740RS Witschi Electronic Ltd Chronoscope X1 (G3) Page 39/39...
Need help?
Do you have a question about the CHRONOSCOPE X1 G3 and is the answer not in the manual?
Questions and answers