
Related Manuals for Witschi Watch Expert


Summary of Contents for Witschi Watch Expert
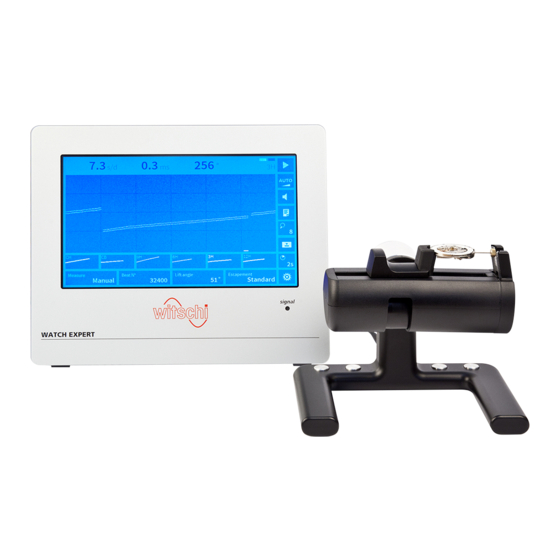
- Page 1 Operating instructions Precision measuring device Watch Expert Read the instructions prior to performing any task!
- Page 2 3294 Büren a.A. Switzerland Telephone: +41 32 352 05 00 Fax: +41 32 351 32 92 Email: welcome@witschi.com Internet: www.witschi.com Translation of the original operating instructions Wits-35286-CH, 3, en_GB © 2016 Witschi Electronic AG Precision measuring device Watch ... 27.02.2018...
- Page 3 In addition, the local health and safety regulations and general safety rules for the area in which the Watch Expert is used apply. Illustrations in this manual are intended to aid basic understanding and may deviate from the actual design.
-
Page 4: Table Of Contents
4.3 Connecting the power supply unit....... 32 4.4 Connecting the microphone........33 4.5 Connecting the printer..........33 4.6 Switching the Watch Expert on/off......34 Setting measuring parameters........36 5.1 Setting the beat number..........36 5.2 Setting the lift angle............ 39 5.3 Setting test mode............ - Page 5 9.1 Registering Watch Expert........... 66 9.2 Updating firmware............66 Troubleshooting..............68 10.1 Error messages on the touchscreen......68 10.2 Troubleshooting............68 Shutting down and disposing of the Watch Expert..69 Index................... 71 Appendix................74 Declaration of conformity ..........75 27.02.2018...
-
Page 6: Product Description
Displays for test progress Navigating through the menus Changing parameters [Signal] LED display LED flashes to the rhythm of the escapement noises. Stand Adjustable stand for the Watch Expert (can be set to 6 incli- nation angles) Precision measuring device Watch ... 27.02.2018... - Page 7 In addition to the “Diagram display mode” , which shows the meas- urement in the form of a diagram, the Watch Expert also features the “VARIO display mode” , which shows rate accuracy and ampli- tude measurements and displays the smallest, largest and resulting mean values, in each case.
- Page 8 Connections for USB sticks tions Power supply Connection socket for the power supply unit [I/O] switch Switches the Watch Expert on/off Openings for the Openings for inserting the stand, in 6 stand different positions Precision measuring device Watch ... 27.02.2018...
-
Page 9: Microphone
Product description Microphone 1.2 Microphone Microphone Fig. 3: Microphone Pivoting microphone Switching screw for left/right-handed user Clamping jaws adjustment Programmable keys The pivoting microphone (Fig. 3/1) provides 12 different test posi- tions for measuring mechanical watches. The neoprene clamping jaw (Fig. 3/2) can be adjusted in accordance with the size of the watch. -
Page 10: User Interface
Product description User interface 1.3 User interface Quick guide to the user interface The symbols and touch buttons on the software user interface have the following functions: Symbol Function Starting/pausing the measuring procedure. Deleting the current measured values and restarting the measuring procedure. Automatic recognition/manual control of the signal strength. - Page 11 Product description User interface Touch button Function Provides 3 different options for setting the beat number: Automatic: The beat number is recognised automatically. Manual: The beat number (value between 3,600 b/h and 86,400 b/h) can be entered manually. Frequency: The beat number is calculated automatically to obtain a rate deviation of 0 s/d.
-
Page 12: Modes
1.4 Modes Overview of test modes The Watch Expert provides 4 test modes that can be set in accord- ance with the escapement type of the watch to be tested. Precision measuring device Watch ... - Page 13 You can find out the escapement type of the watch that is to be tested by consulting the watch manu- facturer. Overview of display modes The Watch Expert provides two different display modes in which various parameters are measured and displayed. Appearance Function...
-
Page 14: Scope Of Delivery And Accessories
Power supply unit (12 V Connection to electricity supply DC, 1.5 A) Ä page 16 Dust cover Protects the Watch Expert against build-up of dust Ä page 17 Stand For supporting the Watch Expert with 6 different inclination angles. Not shown in Fig. 4 but included in the scope of delivery:... - Page 15 Scope of delivery and accessories > Scope of delivery Power supply unit Fig. 5: Power supply unit The power supply unit (Fig. 5) is used to connect the Watch Expert to the power supply. Input values 100 – 240 V AC (inde-...
- Page 16 Scope of delivery and accessories > Scope of delivery Dust cover Fig. 6: Dust cover The dust cover (Fig. 6) protects the Watch Expert against build-up of dust when it is not being used. Precision measuring device Watch ... 27.02.2018...
-
Page 17: Optional Accessories
Product description Scope of delivery and accessories > Optional accessories Stand Fig. 7: Stand Using the stand (Fig. 7), the Watch Expert can be positioned at 6 different angles. Ordering contact To order accessories or spare parts, contact your Ä page 3). -
Page 18: Technical Data
19.91PK1 (230 V~) 19.91PK2 (120 V~) 1.6 Technical data Configuration Device Type no. Notes Watch Expert measuring device 11.2710 Pilot microphone signal sensor 13.1310 Portable power supply JA01-GT-41082-1812 Portable power supply, 100 – 240 V AC, 12 V DC, 18 W... - Page 19 Parameterisa- tion, Print Screen Print via Blue- tooth Ethernet for future applications 1 pps ±90 ns Printer / cali- Calibration Witschi CTB /GPS receiver bration Printer Sewoo printer MARTEL 19200/8/none/1 Item no. JB01-SLK-TE25-S MARTEL Item no. JB01-740RS232 printer Dimensions and weight...
- Page 20 10 – 50 °C Relative humidity, maximum 10 – 80 %, non- con- densing Watch Expert rating plate The Watch Expert’s rating plate is located on the rear side of the device and contains the following information: Manufacturer Device designation Type Serial number Year of manufacture Fig.
- Page 21 Product description Technical data Power supply unit rating plate The power supply unit’s rating plate contains the following informa- tion: Manufacturer Type Specification Fig. 9: Power supply unit rating plate 27.02.2018 Precision measuring device Watch ...
- Page 22 Product description Technical data Precision measuring device Watch ... 27.02.2018...
-
Page 23: Safety
Safety Symbols in this manual Safety This section provides an overview of all the important safety aspects that ensure personal protection and safe and trouble-free operation. There are additional, task-specific warnings in the sec- tions on the individual lifecycle phases. 2.1 Symbols in this manual Safety indications and warnings Safety indications and warnings are identified by symbols in this... -
Page 24: Intended Use
Screen elements (e.g. names of windows, touch buttons) 2.2 Intended use The Watch Expert precision measuring device is intended solely for measuring mechanical watches with the aid of a microphone to determine rate deviation, amplitude and beat errors (repère). With the aid of the clamping jaws on the microphone, the Watch Expert is capable of testing mechanical wrist watches of all sizes. -
Page 25: Labels On The Device
– Only operate the device on a stable and hori- zontal surface. – Never set up or operate the Watch Expert in an explosive atmosphere. – Do not expose the device to direct sunlight or extreme temperatures. -
Page 26: Risk Of Material Damage
Material damage due to short-circuit! Damage to the insulation on the power supply unit cable or the power supply unit can result in a short- circuit and damage to the Watch Expert. – Only allow customer service to perform work on the Watch Expert’s electronics. -
Page 27: Owner's Responsibilities
Safety Personnel qualifications Opening the housing results in a loss of warranty. 2.4 Owner’s responsibilities Owner’s obligations The device is intended for commercial use. The owner of the device is subject to the statutory obligations of occupational health and safety. In addition to the safety indications and warnings in this manual, you must comply with the safety, occupational health and safety and environmental protection requirements that apply to the devi-... - Page 28 Safety Personnel qualifications Operator The operator of the device has all the necessary knowledge and training to handle watches. In addition, the operator has been instructed by the owner about the tasks entrusted to him or her and about possible hazards in the event of improper behaviour. The operator may only perform tasks that go beyond normal operation where this is provided for in the manual and the owner has specifi- cally entrusted the operator with such tasks.
-
Page 29: Storing The Watch Expert
– Always use both hands when transporting the device. 3.2 Delivery The Watch Expert is delivered by a local logistics company. All the components included in the scope of delivery are delivered together in a single package. 3.3 Transport inspection Upon receipt of the delivery, check it immediately to ensure that it is complete and undamaged. -
Page 30: Storage
Storage 3.4 Storage Store the device and packages under the following conditions: Ä page 69). Watch Expert is shut down ( Do not store outdoors. Store in a dry and dust-free condition. Do not expose to any aggressive media. Protect against sunlight. -
Page 31: Commissioning The Watch Expert
Do not position the Watch Expert and test object in the vicinity of radiators or open win- dows. – Do not place the Watch Expert and test object in direct sunlight. – Operate the Watch Expert on a level, horizontal surface. -
Page 32: Connecting The Power Supply Unit
Commissioning the Watch Expert Connecting the power supply unit 4.3 Connecting the power supply unit Use of a suitable power supply unit NOTICE! Risk of material damage if an unsuitable power supply unit is used! Using an unsuitable or damaged power supply unit can result in a short-circuit. -
Page 33: Connecting The Microphone
4.5 Connecting the printer Thermal printer The thermal printer is used to print out test results. The thermal printer is connected to the Watch Expert via the printer port Ä page 34). The test results can be printed out in the following ways: Connect the Witschi thermal printer directly to the Watch Expert and begin using it. -
Page 34: Switching The Watch Expert On/Off
The Watch Expert has been commissioned correctly ( Ä page 31). Switch on the Watch Expert by setting the [I/O] switch (Fig. 13/1) to [I]. ð The welcome screen is displayed. If the wrong language is set, set the language Ä... - Page 35 Switch off the Watch Expert by setting the [I/O] switch (Fig. 14/1) to [O]. Cover the Watch Expert with the dust cover. If you are not planning to use the Watch Expert for a longer period, shut it down ( Ä page 69).
-
Page 36: Setting Measuring Parameters
Modus (Mode) Function Automatic The most common beat num- bers are pre-programmed into the Watch Expert (between 12,000 b/h and 72,000 b/h), allowing for the beat number to be recognised automatically as soon as the watch is placed against the microphone. - Page 37 To find out the beat number to be entered for the test watch, contact the watch manufacturer. Other- wise, a manufacturer list with parameter data can be downloaded from http://www.witschi.com/assets/files/sheets/Scope Schlagzahlen def 2-3.pdf. 27.02.2018 Precision measuring device Watch ...
- Page 38 Setting measuring parameters Setting the beat number Selecting a beat number manually As an alternative to automatic recognition, the beat number can also be selected manually from the touch button selection list. Requirement: The “Manual” mode is set. Adding a beat number to the selection list Under “Settings >...
-
Page 39: Setting The Lift Angle
To find out which lift angle should be entered for the watch that is to be tested, contact the clockwork manufacturer. Other- wise, a manufacturer list with parameter data can be downloaded from the Witschi website at: www.witschi.com/de/service/downloads/ technische-infos.html. 27.02.2018... - Page 40 Setting measuring parameters Setting the lift angle Adding a lift angle to the selection list Under “Settings > Parameters > Lift angle”, it is possible to set the lift angles that are shown in the main display under the “Lift angle” touch button. Lifting angles between 10°...
- Page 41 Setting measuring parameters Setting the lift angle Fig. 18: Entering a lift angle manually Confirm by pressing the “Enter” touch button. ð Measurements will then be carried out using the set lift angle. 27.02.2018 Precision measuring device Watch ...
-
Page 42: Setting Test Mode
Setting measuring parameters Setting test mode 5.3 Setting test mode The “Test mode” touch button provides a list of options for setting the type of escapement that is to be measured. Press the “Test mode” touch button. ð A submenu with four options appears ( Ä... -
Page 43: Setting The Integration Time
Setting measuring parameters Setting the integration time 5.4 Setting the integration time The mean values of the measured results are calculated with the aid of the integration time. The integration time applies both to the Diagram view and the Vario view. Under “Settings >... -
Page 44: Zooming In And Out Of The Diagram
ð The selected zoom factor is highlighted green. 5.6 Changing the display mode The Watch Expert provides two different display modes. Both show the most current measured rate deviation, amplitude and beat error (repère). The display modes differ in the following ways: In the diagram display mode, the rate deviation and beat error (repère) are measured and shown in the form of a diagram... -
Page 45: Performing A Measurement
Personnel: Operator Requirement: Ä page 34 ). The Watch Expert is switch on ( Positioning the watch correctly If the watch is not positioned correctly, the test results may be distorted. Pull the clamping jaw (Fig. 22/2) outwards. - Page 46 Performing a measurement Positioning the watch and starting a measurement automatically Fig. 24: Clockwork clamped in cup Clamping clockwork (without a housing) Place the clockwork onto the clamping area so that the plate is positioned above the signal sensor (Fig. 22/1). Carefully close the clamping jaw.
-
Page 47: Monitoring The Measured Results
Performing a measurement Monitoring the measured results 6.2 Monitoring the measured results Diagram display mode Fig. 26: Diagram display mode In the diagram display mode, the rate deviation and the beat error (repère) are shown in diagram form (Fig. 26/6). Rate (Fig. - Page 48 Performing a measurement Monitoring the measured results VARIO display mode Fig. 27: VARIO display mode In the VARIO display mode, the rate (Fig. 27/1), beat error (repère) (Fig. 27/2) and amplitude (Fig. 27/3) are illustrated numerically. The flashing rectangles (Fig. 27/4) show that a signal is being received.
-
Page 49: Setting The Signal Strength
Using the “Signal amplifier” touch button, the signal strength of the microphone can be set. If the signal strength is set to “Auto” , the Watch Expert automati- cally recognises and controls the signal for most watches. If the signal is too weak or too strong, an “unclean” diagram appears in the diagram display mode. -
Page 50: Switching The Speaker On/Off
Performing a measurement Pausing and resuming the measuring procedure 6.4 Switching the speaker on/off The speaker can be switched on and off by pressing the speaker symbol. With the loudspeaker activated, watch irregularities can be heard. Speaker switched on Press the “Speaker” touch button. ð... -
Page 51: Printing Measured Results
Watch Expert via Bluetooth or a printer cable. Requirement: A printer is connected to the Watch Expert. Printing measured results Press the “Play/Pause” touch button. ð The measuring procedure is paused. -
Page 52: Generating Screenshots
Using the screenshot function, images of the current view can be generated. Requirement: A USB stick is connected to the Watch Expert Press the “Print” touch button. ð A screenshot of the current view is saved to the USB stick. -
Page 53: Configuring The User Interface
Configuring the user interface Configuring the user interface In the settings menu, you can configure the main display, touch buttons, microphone buttons and printer. Opening the settings menu Press the “Settings” touch button. ð The settings menu is shown. Fig. 28: Settings menu Exiting the settings menu Press the “Measurement”... - Page 54 Configuring the user interface Saving settings Settings are saved automatically and remain active after a restart. Precision measuring device Watch ... 27.02.2018...
-
Page 55: Configuring Touch Buttons
Configuring the user interface Configuring touch buttons 7.1 Configuring touch buttons Adding parameters to the selection Using the “Parameters” tab, it is possible to set which parameters list are to be displayed in the selection lists of the touch buttons in the main display. -
Page 56: Configuring The Main Display
Configuring the user interface Configuring the main display Highlighting parameters The selected parameters are highlighted green and displayed in the touch button selection lists in the main display. 7.2 Configuring the main display Customising the appearance of the main display The main display can be configured using the “Screen”... - Page 57 Configuring the user interface Configuring the main display Positions Fig. 31: Setting test position designation types There are two test position designation types available CH/CB/9H/6H/3H/12H ZO/ZU/KU/KL/KO/KR Watch position Fig. 32: Setting the watch position There are two watch positions available: CH (Dial side up) CB (Dial side down) This function defines the position in which the watch has been...
-
Page 58: Configuring Microphone Buttons
Configuring the user interface Configuring microphone buttons Position windows Fig. 33: Hiding/displaying the position windows of the measured test positions in the main display (only in the diagram display mode) The position windows of the measured test positions can be dis- played/hidden in the main display. - Page 59 Configuring the user interface Configuring microphone buttons Use the microphone buttons as navigation buttons in the dis- play mode. Assign a function to both left microphone buttons. Assign a function to both right microphone buttons. Switch off the microphone buttons. Use as navigation buttons Fig.
- Page 60 Configuring the user interface Configuring microphone buttons The following functions can be assigned to the microphone but- tons: Beat no. -/+ Lift angle -/+ Integr. time -/+ Speaker On/Off Restart/Start/Pause Switching off the microphone but- tons Fig. 37: Switching off the microphone buttons If the microphone is held by hand during adjustment, then the microphone buttons can be switched off.
-
Page 61: Configuring A Printer
The following settings can be adjusted: Function Additional information Displaying the connected printer. A printer that is connected to the Watch Expert via the printer port (RS232) is displayed. If a Bluetooth connection is selected, then all Witschi Bluetooth printers within range are listed. -
Page 62: Configuring System Settings
Configuring the user interface Configuring system settings 7.5 Configuring system settings General system settings The following settings can be adjusted using the “System” tab: Appearance Additional information Language The following languages are available: German English Spanish French Italian Russian Chinese (simplified) Chinese (traditional) Date &... - Page 63 Configuration Using a USB stick, settings can be imported/exported. The settings can be reset to factory settings. Calibrate Recalibration and testing the Watch Expert. Calibration and testing can only be performed by Customer Service. 27.02.2018 Precision measuring device Watch ...
-
Page 64: Displaying Device Information
Fig. 39: Displaying system information System information Additional information Serial number Shows the serial number of the Watch Expert and the pilot microphone. Firmware release Shows the current firmware software version: Release display (GUI) // Measuring module // Microphone Calibration... -
Page 65: Servicing The Watch Expert
Clean the device with a microfibre cloth. Operator Clean the microphone with a microfibre cloth. Calibration as per the cali- Have the Watch Expert recalibrated. To do so, contact your Customer Ä page 3). bration instructions on the point of sale (... -
Page 66: Performing Firmware Update
After successful registration, the most up-to-date firmware can be accessed under “Firmware” “Product overview”. 9.2 Updating firmware The pilot microphone is connected to the Watch Expert. The file “Update_WE4.zip” is downloaded from the Witschi Support page onto an empty USB stick. Unpack “Update_WE4.zip”. - Page 67 Updating firmware Fig. 40: Firmware update If the update has been completed successfully, the message “Firmware Update finished!” appears. Switch off the Watch Expert. Remove the USB stick. ð The update is complete. The most up-to-date firmware is installed. Checking the firmware The new firmware versions can be checked under Parameters“Info”.
-
Page 68: Troubleshooting
Troubleshooting Troubleshooting Troubleshooting 10.1 Error messages on the touchscreen Error messages appear when there is a malfunc- tion in the device. The following table provides information about possible causes of an error mes- sage and information about possible remedies. Display/reaction Description of error Cause Remedy... -
Page 69: Shutting Down And Disposing Of The Watch Expert
Shutting down and disposing of th... Shutting down and disposing of the Watch Expert Shutdown Set the switch (Fig. 41/1) to the [O] position. Fig. 41: Pressing the switch Remove the microphone cable from the microphone socket (Fig. 42/1). Fig. 42: Removing the microphone... - Page 70 Shutting down and disposing of th... Disposal If no return or disposal agreement has been made, take the device to a recycling facility. ENVIRONMENT! Incorrect disposal poses an environmental hazard! Incorrect disposal may result in hazards to the environment. – Only have authorised specialists dispose of the device.
-
Page 71: Index
Index Index Displaying device information Calibration ......64 Adjusting the screw ......9 Firmware release . - Page 72 Time ....... . 62 Watch Expert ......20 Rear .
- Page 73 Warnings ....... 68 Thermal printer Watch Expert Connecting ......34 Commissioning .
-
Page 74: Appendix
Appendix Appendix Precision measuring device Watch ... 27.02.2018... -
Page 75: A Declaration Of Conformity
Declaration of conformity A Declaration of conformity 27.02.2018 Precision measuring device Watch ...
Need help?
Do you have a question about the Watch Expert and is the answer not in the manual?
Questions and answers