Table of Contents
Advertisement
Quick Links
Item #
Model # SRPH78
USE AND CARE GUIDE
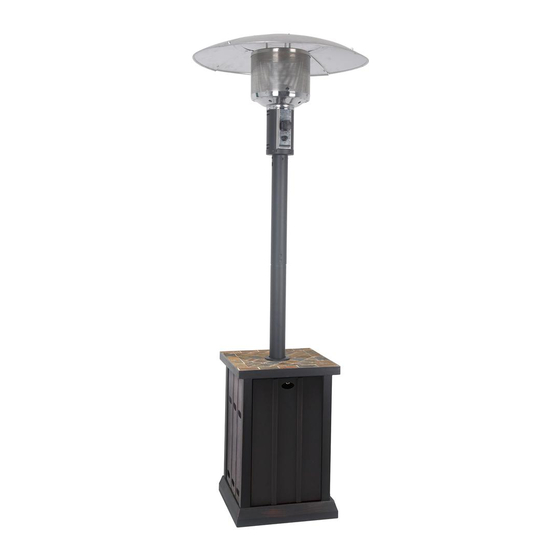
Devonport tile top Patio Heater
Questions, problems, missing parts? Before returning to the store, call Hampton Bay Customer
Service8 a.m. – 7 p.m., EST, Monday – Friday, 9 a.m. – 6 p.m., EST, Saturday
1-855-HD-HAMPTON
HAMPTONBAY.COM
THANK YOU
We strive to continually create quality products designed to enhance your home. Visit us online to see our full line of products available
for your home improvement needs. Thank you for choosing Hampton Bay !
Advertisement
Table of Contents

Related Manuals for HAMPTON BAY SRPH78


Summary of Contents for HAMPTON BAY SRPH78
- Page 1 Model # SRPH78 USE AND CARE GUIDE Devonport tile top Patio Heater Questions, problems, missing parts? Before returning to the store, call Hampton Bay Customer Service8 a.m. – 7 p.m., EST, Monday – Friday, 9 a.m. – 6 p.m., EST, Saturday 1-855-HD-HAMPTON HAMPTONBAY.COM...
-
Page 2: Table Of Contents
Table of Contents Table of Contents ............2 Assembly ..............6 Safety Information ............2 Cylinder Installation ........... 9 Warranty ................. 4 Operation ............... 10 Maintenance ..............11 What is Covered ...............4 Care and Cleaning ............11 What is Not Covered ..............4 Trouble Shooting ............ - Page 3 Safety Information (Continued) 1. The installation must conform with local codes or, in the absence of CEILING/OVERHANG local codes, with the National Fuel Gas Code, ANSI Z223.1/NFPA 54, NFPA58 Natural Gas and Propane Installation Code, CSA B149.1, or Propane Storage and Handling Code, B149.2 2.
-
Page 4: Warranty
Warranty ONE-YEAR LIMITED WARRANTY WHAT IS COVERED We warrant to the original consumer/purchaser that all aspects of this product will be free of defects in material and workmanship for one year from the date of purchase. A replacement for any defective part will be supplied free of charge for installation by the customer. The warranty shall be effective from the date of purchase as shown in the purchaser’s receipt. -
Page 5: Package Contents
Pre-Assembly (continued) PACKAGE CONTENTS Part Description Quantity Center Re ector Cap Re ector Shields Burner Head Upper Pole Lower Pole Decorative Cap Base Cylinder Locking Bar Wheel Knob... -
Page 6: Assembly
Assembly Install Wheel Install Burner Head Assembly Attach wheel (I) to the base (G) by with (4) M6x14 scres Insert the hose & regulator of burner head (C) into upper (GG) & (4) M6 locking nuts (HH). pole (D), then tighten the burner head (C) to the upper pole (D) with (4) M6 x 14 bolts (EE). - Page 7 Assembly (continued) head (C) and tighten with (3) 6mm washers (BB) and (3) M6 nuts (CC). (AA), (12) 6mm washers (BB) and (12) M6 nuts (CC). Place Bolt Open the Door Thread (3) 6mm washers (BB) and (3) M6 x 70 double pointed bolts (DD) into the burner head (C).
- Page 8 Assembly (continued) Place Gas Cylinder Close the Door Place the gas cylinder (not included) into the base (G) and secure with the cylinder locking bar (H). Install Regulator Install Battery Attach the regulator to the cylinder and turn Unscrew the battery compartment cap on the control clockwise to securely tighten the valve.
-
Page 9: Cylinder Installation
Safety Check WARNING : ONLY AN AUTHORIZED GAS TECHNICIAN SHOULD INSTALL THIS PRODUCT. Check for leaks All connection on the patio heater have been checked for leakage at the factory. In transportation and handling some connections may have loosened. Follow these steps to check the gas hose/regulator/cylinder connections: 1) Make leakage solution by mixing 1 part liquid dish soap and 3 parts water. -
Page 10: Operation
Operation LIGHTING INSTRUCTION 1. Turn the control knob to “OFF” position. 2. Turn LP cylinder gas valve to fully open position. 3. Push in gas control knob and turn counter-clockwise to "PILOT" position, at the same time push in the ignition button and keep the button depressing until light the pilot. -
Page 11: Maintenance
Maintenance Turn the control knob to "OFF" position. Turn LP cylinder to "OFF" position. Store heater upright in an area sheltered from direct contact with inclement weather (such as rain, sleet, hail, snow, dust and debris). If desired, cover heater to protect exterior surfaces and to help prevent build up in air passages. During periods of extended inactivity or when transporting;... -
Page 12: Service Parts
Service Parts MODEL TYPE Part Description Quantity Burner Head Upper Pole Lower Pole Decorative Cap Base Cylinder Locking Bar Wheel Knob... - Page 13 Questions, problems, missing parts? Before returning to your retailer,call our customer service department 8 a.m. - 6 p.m., EST, Monday - Friday, 9 a.m. - 6 p.m., EST, Saturday. 855-HD-HAMPTON HAMPTONBAY.COM Retain this manual for future use.
Need help?
Do you have a question about the SRPH78 and is the answer not in the manual?
Questions and answers