Advertisement
Quick Links
Printmaster-Digi60 17/04/14
PRINTMASTER
HOT FOIL PRINTER
WITH
DIGI-60 CONTROLLER
OPERATOR INSTRUCTIONS
PARTS LISTING
CIRCUIT DIAGRAMS
INSTALLATION DETAILS
Covering the following models;
PRINTMASTER 400
PRINTMASTER 1000
PRINTMASTER PLUS
Designed and manufactured by:
OPEN DATE EQUIPMENT LIMITED
PUMA TRADE PARK
145 MORDEN ROAD
MITCHAM
SURREY, CR4 4DG.
UNITED KINGDOM.
Tel:
+44 (0)20 8655-4999
Email: sales@opendate.co.uk
Web site: www.opendate.co.uk
Advertisement

Subscribe to Our Youtube Channel
Related Manuals for Open Date PRINTMASTER 400


Summary of Contents for Open Date PRINTMASTER 400
- Page 1 PARTS LISTING CIRCUIT DIAGRAMS INSTALLATION DETAILS Covering the following models; PRINTMASTER 400 PRINTMASTER 1000 PRINTMASTER PLUS Designed and manufactured by: OPEN DATE EQUIPMENT LIMITED PUMA TRADE PARK 145 MORDEN ROAD MITCHAM SURREY, CR4 4DG. UNITED KINGDOM. Tel: +44 (0)20 8655-4999 Email: sales@opendate.co.uk...
- Page 2 Recommended Spares Kit Foil Magazine Assembly Drawing Foil Magazine Parts Lists 29 & 30 Body Assembly Drawing Body Parts Lists 32 & 33 Printmaster Dimensions Datasheet. Frame Installation Datasheet. Airborne Noise Emissions. Warranty Open Date Group Companies, Agents & Distributors.
-
Page 3: Declaration Of Conformity
Printmaster-Digi60 17/04/14 DECLARATION OF CONFORMITY... -
Page 4: Important Safety Instructions
(see page 7). The controller to printer cable must only be connected to an Open Date printer. It is not a sig- nal or data cable. Connecting the cable to anything other than the specified printer may risk electric shock or damage. - Page 5 Printmaster-Digi60 17/04/14 Digi-60 Controller Operating Instructions Temperature button To adjust the temperature setting, press and hold down the temperature button and use the up/down arrow buttons to the left of the display to increase or decrease the set point. (Required Temperature) Set point range:- Minimum 70ºC (158ºF), Maximum 240ºC (464ºF).
- Page 6 Printmaster-Digi60 17/04/14 Digi-60 Front Panel Layout TEMP/DWELL VALUE SET TEMP. ON/OFF LINE VALUE UP/DOWN SET DWELL TEST PRINT DOOR OPEN ON LINE FOIL FAULT / E.O.F. AIR PRESSURE WARNING HEATER FAULT THERMISTOR FAULT Page 6...
- Page 7 Printmaster-Digi60 17/04/14 Digi-60 Controller Rear Panel Layout For clarity cabling is not shown. PRODUCT IDENTIFICATION LABEL Showing model number, serial number and mains supply requirements for the controller PRINTER CABLE POWER SWITCH OUTLET MAINS INLET USER CABLE CONNECTOR ENTRY Page 7 Page 7...
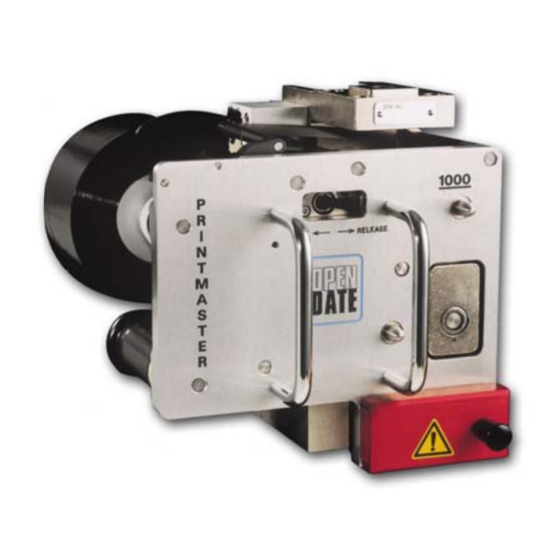
- Page 8 Printmaster-Digi60 17/04/14 Operating Instructions - Printer MAGAZINE REMOVAL (see Diagram A. below) To remove the foil magazine, slide the black catch, hold in place and withdraw the magazine using the black handle. If the printer is on-line (Print LED on) the alarm will sound. Press the PRINT switch to silence this.
-
Page 9: Initial Setting Procedure
Printmaster-Digi60 17/04/14 INITIAL SETTING PROCEDURE Ensure that printing foil and substrate are compatible. If in doubt, contact foil supplier for assistance. Remove Type Holder from printhead. Ensure that rubber print base is clean, undamaged and securely retained in position under printer. Set air pressure regulator. - Page 10 Printmaster-Digi60 17/04/14 Air Flow Controls The airflow restrictors are usually attached to the solenoid valve exhaust ports. They work by regulating the speed at which air is exhausted from the air cylinder. Turning the adjusting screws will alter the exhaust airflow and consequently the print ram velocity, it will also affect noise levels.
- Page 11 Printmaster-Digi60 17/04/14 PRINTMASTER CONNECTION DETAILS (R/H VERSION SHOWN) 5mm Black Nylon Tubing 5mm Red Nylon Tubing Note In order to achieve optimum speed performance, the solenoid valve assembly should be positioned very close to the printer so that the 6mm air pipes can be as short as possible.
- Page 12 Printmaster-Digi60 17/04/14 SETTING UP DIGI-60 CONTROLLER See page 14 See page 13 See page 15 Page 12...
- Page 13 Printmaster-Digi60 17/04/14 DIGI-60 MODE SETTINGS FOR TEMPERATURE TOLERANCE RANGES Page 13...
- Page 14 Printmaster-Digi60 17/04/14 DIGI-60 DIP SWITCH SETTINGS Page 14...
- Page 15 Printmaster-Digi60 17/04/14 Thermistor & ON-LINE DIP Switch Settings (SW1) Page 15...
- Page 16 Printmaster-Digi60 17/04/14 Digi-60 Basic Connections (See page 17 for details) KEY TO COLOUR CODES: BK = black, BN = brown, RE = red, YE = yellow, GN = green, BU = blue, PU = purple, WH = white, PK= pink, SC = screen or braid of cable IMPORTANT—TO AVOID SHOCK RISK THE PRINTER IS EARTHED VIA THE CONNECTOR AND BRAIDED SCREEN OF THE CONTROLLER CABLE.
- Page 17 Printmaster-Digi60 17/04/14 Digi-60 Connection Details PRINT TRIG PRINTER TRIGGER SIGNAL - grey 2 core screened cable. See page 14 print trigger selection for details of input print signals. External trigger input + volts connection. Black/Blue External trigger input - volts connection. AIR VALVE PRINTER AIR SOLENOID VALVE - black 2 core unscreened cable.
- Page 18 Printmaster-Digi60 17/04/14 DIGI-60 Fault and Print Relay Connections There are two relays for indicating printer system status to external equipment. The relays may be used independently or linked in series to obtain full warning status on a single connection. Each relay has COM, N/C and N/O contacts rated 24V @ 1A maximum Using the N/O contact of each relay gives a positive indication only when the printer is in normal/ ready condition and the control voltage is present.
- Page 19 Printmaster-Digi60 17/04/14 Digi-60 Low Air Pressure Warning (optional) The printer will not operate without a compressed air supply. An air pressure sensor switch (optional, not supplied) may be fitted to provide a low air fault condition to the Digi-60 controller and operate the fault relay.
- Page 20 Printmaster-Digi60 17/04/14 DIGI-60 CALIBRATION METHOD Note: Calibration Temperature Range = 70ºC to 220ºC (158ºF to 428ºF) The control unit is factory calibrated at 130ºC, and is set up in “MODE 1”supplied as standard. See page 13 for a list of the different modes available. Unless you are running temperatures outside the range 70ºC to 180ºC (158ºF to 356ºF), the default calibration should not be altered.
- Page 21 Printmaster-Digi60 17/04/14 STATIC TEMPERATURE RESULTS CALIBRATED AT 130°C Page 21...
- Page 22 Printmaster-Digi60 17/04/14 DIGI-60 System Fault Indications Thermistor - Short circuit Red thermistor fault LED lit. Internal beeper sounding. Display shows “265” (or similar value). Heater disabled. Thermistor - Open circuit Red thermistor fault LED lit. ...
- Page 23 Printmaster-Digi60 17/04/14 Digi-60 Alarm System Faults connections see If no LEDs are on, check the mains supply and the fuses on the PCB. For wiring Page 23 Page 23...
-
Page 24: Thermistor Faults
Printmaster-Digi60 17/04/14 THERMISTOR FAULTS Digi60 controller utilising the Open Date printer range and a standard thermistor. Re-calibrate controller as detailed on page 20 NOTE. Results may vary, depending on type of Thermistor and actual temperature. Page 24... -
Page 25: Mechanical Faults
Printmaster-Digi60 17/04/14 MECHANICAL FAULTS FAULT POSSIBLE CAUSE Insufficient foil pull. Foil adjusting screw wound in too far. Pinch roller not engaged. Broken torsion Spring in body. Grub screw loose in cam or lever. Rubber drive roller damaged or dirty. ... - Page 26 Always quote the model and serial number when ordering spare parts. Company Logo CE mark Type of machine MODEL EUROCODE 300 SERIAL NO. 123456 Serial number Open Date Equipment Ltd. Puma Trade Park, MANUFACTURED Mitcham, Surrey CR4 4DG. UK 2016 TEL: (020) 8655 4999 FAX: (020) 8655 4990 Manufacturer...
-
Page 27: Recommended Spares List
Printmaster-Digi60 17/04/14 RECOMMENDED SPARES LIST Covering R/H & L/H Versions of: PRINTMASTER 400 PRINTMASTER 1000 PRINTMASTER PLUS MECHANICAL STOCK REF Spring Set (PM1000 & Plus) SPR129505 Spring Set (PM400) SPR129502 Drive Belt (PM1000 & Plus & “S”) DRI121014 Drive Belt (PM400) - Page 28 Printmaster-Digi60 17/04/14 PRINTMASTER 1000 MAGAZINE ASSEMBLY Page 28...
- Page 29 Printmaster-Digi60 17/04/14 PRINTMASTER 1000 FOIL MAGAZINE PARTS LIST (1 of 2) When ordering spare parts please use the Stock Reference. Item numbers refer to those on assembly drawing MHD4762 issue 8 (see page 28). List refers to machines from serial number 249101 onwards. ITEM DESCRIPTION STOCK REF.
- Page 30 Printmaster-Digi60 17/04/14 PRINTMASTER 1000 FOIL MAGAZINE PARTS LIST (2 of 2) When ordering spare parts please use the Stock Reference. Item numbers refer to those on assembly drawing MHD4762 issue 8 (see page 31). List refers to machines from serial number 249101 onwards. ITEM DESCRIPTION STOCK REF.
- Page 31 Printmaster-Digi60 17/04/14 PRINTMASTER BODY ASSEMBLY Page 31...
- Page 32 Printmaster-Digi60 17/04/14 PRINTMASTER BODY PARTS LIST (1 of 2) When ordering spare parts please use the Stock Reference. Item numbers refer to those on assembly drawing on page 31. List refers to machines from serial number 249101 onwards. ITEM DESCRIPTION STOCK REF.
- Page 33 Printmaster-Digi60 17/04/14 PRINTMASTER BODY PARTS LIST (2 of 2) When ordering spare parts please use the Stock Reference. Item numbers refer to those on assembly drawing on page 31. List refers to machines from serial number 249101 onwards. ITEM DESCRIPTION STOCK REF.
- Page 34 Printmaster-Digi60 17/04/14 PRINTMASTER SERIES DIMENSIONAL DRAWING Page 34...
- Page 35 Printmaster-Digi60 17/04/14 PRINTMASTER - STANDARD FRAME INSTALLATION Page 35...
- Page 36 Printmaster-Digi60 17/04/14 PRINTMASTER AIRBOURNE NOISE EMISSIONS Comprehensive tests have been carried out with the Printmaster fitted in a standard printer frame and mounted onto a typical label applicator. Measurements were taken at 1.6 metres above floor level and approximately 1 metre away from the printer in all directions. The measuring equipment used for conducting the tests was a Digital Sound Level Meter, type d-1405E supplied by Lucas CEL.
- Page 37 STANDARD WARRANTY TERMS & CONDITIONS FOR HOT FOIL PRINTERS All Open Date Hot Foil Printers Carry a twelve (12) month return to base (at our discretion) warranty. Open Date printers should be installed and operated according to the instructions given in the operating manual. No liability will be accepted for faults caused by incorrect installation or operation of the equipment or if the product has been altered or subjected to unreasonable use.
- Page 38 Printmaster-Digi60 17/04/14 OPEN DATE GROUPS COMPANIES AND DISTRIBUTORS FRANCE OPEN DATE FRANCE Z.I. D’Attichy No.8, voie Industrielle 60350 Attichy. Tel:- +33 (0)3 44 42 94 43 Email:- info@opendatefrance.com GERMANY OPEN DATE GmbH Mittler Stämmig 4 D - 97292 Üttingen Tel:-...
Need help?
Do you have a question about the PRINTMASTER 400 and is the answer not in the manual?
Questions and answers