Table of Contents
Advertisement
Available languages
Available languages
OWNER'S MANUAL / MANUAL DEL PROPIETARIO
GUARDE ESTE MANUAL PARA REFERENCIA FUTURA
NOTICE TO INSTALLER:
LEAVE THESE INSTRUCTIONS
WITH THE GRILL OWNER FOR
FUTURE REFERENCE.
AVISO PARA EL
INSTALADOR:
ENTREGUE ESTAS
INSTRUCCIONES AL
PROPIETARIO DE LA PARRILLA
PARA REFERENCIA FUTURA.
8445
ASSEMBLY AND OPERATING INSTRUCTIONS
INSTRUCCIONES DE ARMADO Y OPERACIÓN
SAVE THIS MANUAL FOR FUTURE REFERENCE
HAZARDOUS EXPLOSION MAY RESULT IF THESE WARNINGS AND INSTRUCTIONS
ARE IGNORED. READ AND FOLLOW ALL WARNINGS AND INSTRUCTIONS IN THIS
MANUAL TO AVOID PERSONAL INJURY, INCLUDING DEATH OR PROPERTY DAMAGE.
SE PUEDE PRODUCIR UNA EXPLOSIÓN PELIGROSA SI SE HACE CASO OMISO A
ESTAS ADVERTENCIAS E INSTRUCCIONES. LEA Y SIGA TODAS LAS ADVERTENCIAS
E INSTRUCCIONES EN ESTE MANUAL PARA EVITAR LESIONES PERSONALES,
Heavy-Duty Gas Grill
Parrilla de Gas de
Alta Resistencia
WARNING/ADVERTENCIA
INCLUSO LA MUERTE, O LOS DAÑOS MATERIALES.
Advertisement
Chapters
Table of Contents

Subscribe to Our Youtube Channel
Related Manuals for Brinkmann ProSeries 8445


Summary of Contents for Brinkmann ProSeries 8445
- Page 1 AVISO PARA EL INSTALADOR: ENTREGUE ESTAS INSTRUCCIONES AL PROPIETARIO DE LA PARRILLA PARA REFERENCIA FUTURA. Heavy-Duty Gas Grill 8445 Parrilla de Gas de Alta Resistencia WARNING/ADVERTENCIA HAZARDOUS EXPLOSION MAY RESULT IF THESE WARNINGS AND INSTRUCTIONS ARE IGNORED. READ AND FOLLOW ALL WARNINGS AND INSTRUCTIONS IN THIS MANUAL TO AVOID PERSONAL INJURY, INCLUDING DEATH OR PROPERTY DAMAGE.
-
Page 2: Important Safety
IMPORTANT SAFETY WE WANT YOU TO ASSEMBLE AND USE YOUR GRILL AS SAFELY AS POSSIBLE. THE PURPOSE OF THIS SAFETY ALERT SYMBOL ATTENTION TO POSSIBLE HAZARDS AS YOU ASSEMBLE AND USE YOUR GRILL. WHEN YOU SEE THE SAFETY ALERT SYMBOL PAY CLOSE ATTENTION TO THE INFORMATION WHICH FOLLOWS! READ ALL SAFETY WARNINGS AND INSTRUCTIONS CAREFULLY BEFORE ASSEMBLING AND OPERATING YOUR GRILL. -
Page 3: Table Of Contents
CAUTION: Indicates a potentially hazardous situation which, if not avoided, may result in minor or moderate injury. FOR COVERS, ACCESSORIES AND OTHER PRODUCTS, PLEASE VISIT US ONLINE AT: FOR GRILL WARRANTY REPLACEMENT PARTS, PLEASE VISIT US AT: www.brinkmann.net www.grillpartsonline.com... -
Page 4: General Warnings
Never use natural gas in a unit designed for liquid propane gas. • Never use charcoal or wood briquets in a gas grill. Flavoring chips must be contained in a metal smoking box to contain ash and prevent fires. •... -
Page 5: Installation Information
• FOR OUTDOOR USE ONLY. DO NOT operate indoors or in an enclosed area such as a garage, shed or breezeway. • Use your grill OUTDOORS in a well ventilated space away from dwellings or other buildings to prevent dangers associated with gas accumulation and toxic vapors. We recommend your grill be situated at least 10 feet (3.1 m) from buildings. - Page 6 CYLINDER SPECIFICATIONS: When purchasing or exchanging a cylinder for your gas grill, it must be constructed and marked in accordance with the specifications for LP gas cylinders of the U.S. Department of Transportation (DOT) or the National Standard of Canada, CAN/CSA-B339 Cylinders, Spheres and Tubes for Transportation of Dangerous Goods;...
-
Page 7: Filling The Lp Gas Cylinder
FILLING THE LP GAS CYLINDER: • Allow only qualified LP gas dealers to properly fill or repair your LP gas cylinder. • New tanks should be purged prior to filling; inform LP gas dealer if you are using a new tank. •... - Page 8 Never use your grill without leak testing all gas connections and hoses. See the section on "Leak Testing" in this manual for proper procedures. The pressure regulator and hose assembly supplied with your gas grill must be used. • DO NOT attempt to connect it to any other fuel supply source such as a natural gas line.
-
Page 9: Leak Testing
LEAK TESTING: To prevent fire or explosion hazard: • DO NOT smoke or permit ignition sources in the area while conducting a leak test. • Perform test OUTDOORS only in a well ventilated area. • Never perform a leak test with a match or open flame. •... -
Page 10: Leak Testing
6. Check each place listed (A–K) for growing bubbles which indicates a leak. 7. Turn off gas supply at cylinder valve. 8. Turn on control knobs to release gas pressure in hose. 9. Turn control knobs to "OFF" position. 10. Tighten any leaking connections. 11. -
Page 11: Lighting Instructions
Read, understand and follow all warnings and instructions contained in this manual. DO NOT skip any of the warnings and instructions contained in the preceding sections of this manual. LIGHTING INSTRUCTIONS: Follow the instructions exactly. 1. OPEN THE GRILL LID before attempting to light a burner so that fumes do not accumulate inside the grill. -
Page 12: Lighting The Side Burner
LIGHTING THE SIDE BURNER: 1. Open lid before lighting side burner. 2. Make sure control knob is in the "OFF" position. 3. Push and turn side burner control knob to HIGH. 4. Press the electronic igniter and hold for 3-5 seconds to light burner. -
Page 13: Operating The Grill
CONTROLLING FLARE-UPS: • Flare-ups are a part of cooking meats on a gas grill. This adds to the unique flavor of cooking on a gas grill. Excessive flare-ups can over-cook your food and cause a dangerous situation for you and your grill. -
Page 14: Using Other Features Of The Grill
ROTISSERIE COOKING: • Your grill was pre-drilled from factory to include mounting holes for a rotisserie (sold separately). Do not use a rotisserie not specifically manufactured for this grill. • Read and follow all instructions provided with the rotisserie. Save instructions for future reference. •... -
Page 15: Helpful Hints
• To protect your grill from excessive rust, the unit must be kept clean and covered at all times when not in use. A grill cover may be ordered directly from Brinkmann by calling 800-468-5252 or 800-527-0717. • Wash cooking grills and heat distribution plates with hot, soapy water, rinse well and dry. Lightly coat cooking grill with vegetable oil or vegetable oil spray. -
Page 16: Cleaning And Maintenance
CLEANING AND MAINTENANCE: • Keep the appliance free and clear of combustible materials, gasoline and other flammable vapors and liquids. • Keep the ventilation openings of the cylinder enclosure free and clear of debris. • Visually check burner flames for proper operation (see pictorial in "Burner Assembly/Maintenance" under Proper Care and Maintenance). -
Page 17: Proper Care And Maintenance
BURNER ASSEMBLY/MAINTENANCE CONTINUED Note: Follow the "Gas Leak Testing" section of this manual. Relight burners to verify proper operation. 12. Replace heat distribution plates and cooking grills. COOKING GRILLS • Clean with mild soap detergent and water. A brass bristled brush or a nylon cleaning pad can be used to remove residue from the stainless steel surfaces. -
Page 18: Trouble Shooting
BEFORE STORING YOUR GRILL: • Ensure that the cylinder valve is fully closed. • Clean all surfaces. • Lightly coat the burners with cooking oil to prevent excess rusting. • If storing the grill indoors, disconnect the LP tank and leave the LP tank OUTDOORS. •... -
Page 19: Frequently Asked Questions
If the fuel line is blocked, replace with a new hose / regulator assembly. • If an obstruction is suspected in the hose / regulator assembly, orifice or gas valves call Brinkmann Customer Service at 800-527-0717. Question: Why does my LP gas grill have a low flame or a flame with orange / yellow color? Answer: You need to purge air from the gas line or reset the regulator's flow limiting device. -
Page 20: Frequently Asked Questions
Regulator Resetting Procedure under Connecting LP Cylinder and Hose/Regulator to Grill. This procedure should be done every time a new LP gas tank is connected to your grill. For help, refer to your owner’s manual or call Brinkmann Customer Service at 800-527-0717. -
Page 21: Parts Bag Contents
PARTS BAG CONTENTS Make sure you have all items listed under PARTS LIST and PARTS BAG CONTENTS before you begin the installation process. PARTS BAG CONTAINS: Qty. Screwdriver Hex Nut Wrench 35 M6 X 12mm Bolts (Black) AA/1.5V Alkaline Battery Screwdriver AA /1.5V Alkaline Battery M6 X 12mm Hex Bolts... -
Page 22: Assembly Instructions
Electronic Igniter Button Electronic Igniter Spring Side Burner Control Knob Side Burner Bezel Side Burner Grate Warming Rack ™ 8445 Gas Grill: Cooking Grills Heat Distribution Plates Grease Tray with Heat Shield Grease Cup Tank Holder Left Side Cart Panel... - Page 23 FOR COVERS, ACCESSORIES AND OTHER PRODUCTS, PLEASE VISIT US ONLINE AT: www.brinkmann.net FOR GRILL WARRANTY REPLACEMENT PARTS, PLEASE VISIT US AT: www.grillpartsonline.com (Proof of purchase will be required.) Inspect contents of the box to ensure all parts are included and undamaged.
- Page 24 Choose a good, cleared assembly area and get a friend to help you put your grill together. Lay cardboard down to protect grill finish and assembly area. CAUTION: Some parts may contain sharp edges. Wear protective gloves if necessary. Step 1 Attach cart base to side panels.
- Page 25 Front Back Step 3 Attach two tank block bars to the bottom cart shelf and the side cart panel using four M6 x 12mm bolts (black). Step 4 Attach door bracket to left and right leg of cart using four M6 X 12mm bolts (black) and star washers (black).
- Page 26 Step 6 Attach locking casters to the bottom of the cart. Tighten caster bolts securely using hex nut wrench provided in parts pack. Note: With the help of a friend, turn the cart to its upright position. Lock the Casters to stabilize the grill before performing Step 7.
- Page 27 Alignment Note: When performing Step 8, lift grill body from front and rear panels to avoid injury to hands and fingers. Step 8 With the help of a friend, place grill body assembly on cart frame. Grill body will rest on angled top of vertical supports.
- Page 28 Step 9 Attach hooks to side table towel rack bar. Then attach towel rack bar to side table using two M6 X 12mm hexagonal bolts (silver) and spring washers (silver). Attach side table front panel using one M6 X 12mm bolt (black) and two M6 nuts and star washers (black).
- Page 29 Hose Heat Shield Side Burner Valve Valve Nozzle Burner Venturi Assembly Bracket Burner Venturi Step 12 Attach side burner to right side of cart frame assembly. Insert two M6 X 12mm bolts (black) into both right legs halfway. Place side burner over bolts and slide toward back of grill, then tighten securely.
- Page 30 Step 16 Place the bezel over the control knob mounting stem and position over holes in side burner base and side burner valve assembly. Attach with two M4 X 10mm bolts with washers which come with valve. Install the side burner control knob onto valve stem, then tighten up the burner assembly / bracket screws...
- Page 31 Warming Rack Cooking Grills Heat Distribution Plates Grooves Electronic Igniter Button Battery Step 19 Place the heat distribution plates on lower level of grill body assembly directly above burners. Step 20 Place cooking grills on support ribs directly above heat distribution plates.
- Page 32 Step 23 Insert grease tray into opening on backside of grill. Make sure to slide tray onto tracks. Step 24 Insert grease cup into the grease tray. Make sure to slide cup onto tracks as illustrated. Grease Tray Grease Cup...
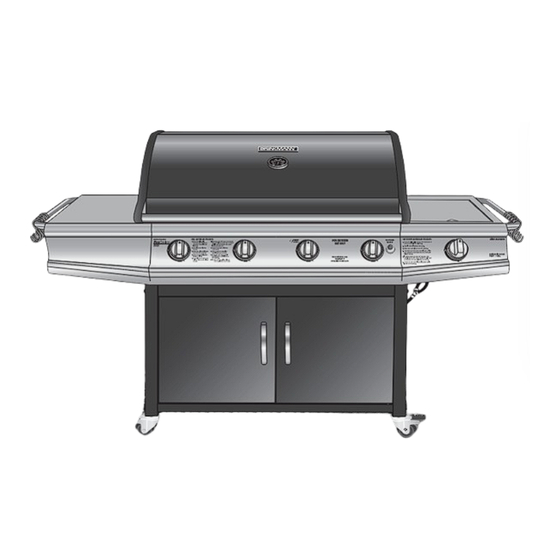
- Page 33 ™ ProSeries 8445 (Assembled)
-
Page 34: Importantes Advertencias De Seguridad
IMPORTANTES ADVERTENCIAS ES NUESTRO DESEO QUE ARME Y UTILICE SU PARRILLA EN LA FORMA MÁS SEGURA POSIBLE. EL PROPÓSITO DE ESTE SÍMBOLO DE ALERTA DE SEGURIDAD ES QUE USTED PRESTE ATENCIÓN A LOS POSIBLES PELIGROS CUANDO ARME ¡CUÁNDO VEA ESTE SÍMBOLO DE ALERTA DE SEGURIDAD ATENCIÓN A LA INFORMACIÓN A CONTINUACIÓN! LEA DETENIDAMENTE TODAS LAS ADVER TENCIAS DE SEGURIDAD E INSTRUCCIONES ANTES DE ARMAR Y USAR LA PARRILLA. - Page 35 Advertencias generales ............35 Instalación, especificaciones y uso seguro del cilindro de propano líquido .
-
Page 36: Advertencias Generales
ADVERTENCIAS GENERALES • Nunca use gas natural en una unidad diseñada para gas de propano líquido. • Nunca use briquetas de carbón en una parrilla de gas. Los pedacitos de madera para dar sabor se deben colocar en una cajita de fumar de metal para contener la ceniza y para prevenir fuegos. •... -
Page 37: Información De Instalación
PARA USO EXTERIOR ÚNICAMENTE. NO opere la parrilla en áreas interiores o en un área cerrada • como un garaje, cobertizo o pasadizo. Use la parrilla AL AIRE LIBRE en un espacio bien ventilado alejado de viviendas u otros edificios para •... - Page 38 ESPECIFICACIONES DEL CILINDRO Cuando compre o cambie un cilindro para la parrilla de gas, debe estar construido y marcado de acuerdo con las especificaciones para cilindros de gas de propano líquido del Departamento de Transporte (DOT) de EE.UU. o la Norma Nacional de Canadá, CAN/CSA-B339: Cilindros, esferas y tubos para el transporte de artículos peligrosos;...
-
Page 39: Conexión Del Cilindro De Propano Líquido Y De La Manguera / Regulador A La Parrilla
LLENADO DEL CILINDRO DE GAS DE PROPANO LÍQUIDO: • Sólo los distribuidores de gas de propano líquido capacitados deben llenar o reparar su cilindro. • Los tanques nuevos deben ser purgados antes de llenarlos; dígale al distribuidor de gas si está usando un tanque nuevo. - Page 40 NO use ningún otro conjunto de regulador de presión/manguera que no sea el suministrado con la parrilla. El número de parte del conjunto de regulador de presión/manguera de repuesto debe ser Brinkmann Nº 155-8445-S y puede obtenerse comunicándose con Brinkmann al 800-527-0717.
-
Page 41: Pruebas De Detección De Fugas
PRUEBAS DE DETECCIÓN DE FUGAS: Para impedir los peligros de incendio o explosión: • NO fume ni permita que haya fuentes de encendido en el área mientras realiza la prueba de detección de fugas. • Realice la prueba AL AIRE LIBRE únicamente, en un área bien ventilada. •... -
Page 42: Lista De Verificación Preliminar Al Encendido
6. Inspeccione cada uno de los elementos indicados (A-K) para ver si hay burbujas, lo cual indica una fuga. 7. Cierre el suministro de gas en la válvula del cilindro. 8. Gire las perillas de control para descargar la presión de gas en la manguera. 9. -
Page 43: Instrucciones De Encendido
Lea, entienda y siga todas las advertencias e instrucciones indicadas en este manual. NO pase por alto ninguna de las advertencias o instrucciones indicadas en las secciones anteriores de este manual. INSTRUCCIONES DE ENCENDIDO: Siga las instrucciones al pie de la letra. ABRA LA TAPA DE LA PARRILLA antes de tratar de encender una hornilla para que no se acumulen vapores dentro de la parrilla. -
Page 44: Apagado De La Parrilla
ENCENDIDO DE LA HORNILLA LATERAL: 1. Abra la tapa antes de encender la hornilla lateral. 2. Verifique que la perilla de control esté en la posición "OFF" (apagado). 3. Empuje y de vuelta al botón de control de la hornilla lateral a “HIGH” (llama fuerte). Oprima el encendedor electrónico y manténgalo oprimido 3 a 5 segundos para encender la hornilla. -
Page 45: Control De Las Llamaradas
OPERACIÓN DE LA PARRILLA: Nunca use briquetas de carbón en una parrilla de gas. Los pedacitos de madera para dar sabor se deben colocar en una cajita de fumar de metal para contener la ceniza y para prevenir fuegos. Lea y siga todas las advertencias e instrucciones indicadas en las secciones anteriores de este manual. - Page 46 COCCIÓN ESTILO ROTISSERIE: • La parrilla viene preparada de la fábrica con agujeros de montaje para instalar un asador estilo rotisserie (vendido aparte). No use un asador estilo rotisserie que no haya sido fabricado especialmente para esta parrilla. • Lea y siga todas las instrucciones incluidas con el asador estilo rotisserie. Guarde las instrucciones para referencia futura.
-
Page 47: Cuidado Y Mantenimiento Apropiados
Utilice un termómetro para carne para verificar que haya alcanzado una temperatura interna segura. Puede ordenar un termómetro de calidad comercial de Brinkmann. Para obtener más información sobre este producto y otros accesorios Brinkmann, consulte las páginas de accesorios al final de este manual. •... -
Page 48: Limpieza Y Mantenimiento
LIMPIEZA Y MANTENIMIENTO: • Mantenga el artefacto alejado de materiales combustibles, gasolina u otros vapores o líquidos inflamables. • Mantenga los orificios de ventilación del gabinete del cilindro sin residuos. • Observe las llamas de las hornillas para verificar que estén funcionando bien (consulte el dibujo en "Instalación/Mantenimiento de las Hornillas"... -
Page 49: Transporte Y Almacenaje
CONTINUACION DE INSTALACIÓN/MANTENIMIENTO DE LAS HORNILLAS Nota: Siga la sección “Verificación de Ausencia de Fugas” de este manual. Vuelva a encender las hornillas para verificar la operación apropiada) 12. Reinstale las placas de distribución del calor y las rejillas para cocinar. REJILLAS PARA COCINAR •... -
Page 50: Identificación Y Corrección De Problemas
ANTES DE GUARDAR LA PARRILLA: • Verifique que la válvula del cilindro está bien cerrada. • Limpie todas las superficies. • Aplique una capa ligera de aceite para cocinar a las hornillas para evitar la oxidación excesiva. • Si va a guardar la parrilla en un área interior, desconecte el tanque de propano líquido y déjelo AFUERA. -
Page 51: Preguntas Frecuentes
Si sospecha una obstrucción en el conjunto de la manguera / regulador, en el orificio o en las válvulas de gas, llame al Servicio de atención al cliente de Brinkmann al 800-527-0717. Respuesta: Es necesario purgar el aire de la línea de gas o reposicionar el dispositivo limitador de flujo del regulador. Si se abre la válvula por completo o demasiado rápido, se activa el dispositivo limitador de flujo del regulador para que... - Page 52 "Conexión del cilindro de propano líquido y de la manguera / regulador a la parrilla. Se debe seguir este procedimiento cada vez que se conecte un nuevo tanque de gas de propano líquido a la parrilla. Si necesita ayuda, consulte el manual del propietario o llame al Servicio de atención del cliente de Brinkmann al 800-527-0717. PREGUNTAS FRECUENTES...
-
Page 53: Lista De Partes E Instrucciones De Armado
CONTENIDO DE LA BOLSA DE PARTES Verifique que tiene todos los artículos indicados en la LISTA DE PARTES y en el CONTENIDO DE LA BOLSA DE PARTES antes de comenzar con el proceso de instalación. La bolsa de partes incluirá lo siguiente: Cant. - Page 54 INSTRUCCIONES DE ARMADO LEA DETENIDAMENTE TODAS LAS ADVERTENCIAS DE SEGURIDAD E INSTRUCCIONES ANTES DE ARMAR Y USAR LA PARRILLA RECOMENDAMOS QUE ESTA UNIDAD SEA ARMADA POR DOS PERSONAS Se necesitan las siguientes herramientas incluidas para armar esta Parrilla de Gas ProSeries ™...
- Page 55 PARA CUBIERTAS, ACCESORIOS Y OTROS PRODUCTOS, FAVOR DE VISITARNOS POR LA RED MUNDIAL EN: www.brinkmann.net PARA PARTES DE REEMPLAZO DE PARRILLA BAJO GARANTIA, FAVOR DE VISITARNOS POR LA RED MUNDIAL EN: www.grillpartsonline.com (Se requerirá el comprobante de compra.) Inspeccione el contenido de la caja para verificar que todas las partes estén incluidas e intactas.
- Page 56 Elija un lugar adecuado y despejado para armar la parrilla y pídale a un amigo que le ayude. Tienda cartón sobre el suelo para proteger el acabado de la parrilla y el área de armado. PRECAUCIÓN: Algunas partes pueden tener bordes afilados.
- Page 57 Delantero posterior Paso 3 Ate las barras para detener el tanque a la base del carro y el panel lateral con cuatro pernos M6 x 12mm (negros). Paso 4 Ate el soporte para la puerta con las piernas derecha e izquierda del carro usando cuatro pernos M6 X 12 mm (negros) y arandelas de estrella (negras).
- Page 58 Paso 6 Instale las ruedas trabables en el extremo inferior de las piernas. Apriete bien los pernos de las ruedas con la llave para tuercas hexagonales incluida en el paquete de partes. Nota: Voltee el conjunto del carro para que este de pie con la ayuda de un amigo.
- Page 59 Alinee Nota: Cuando ejecute el Paso 8, levante la caja de la parrilla desde los paneles frontales y traseros para prevenir lesiones a las manos y dedos. Paso 8 Con la ayuda de un amigo, coloque la caja de la parrilla sobre el bastidor del carro.
- Page 60 Paso 9 Conecte los ganchos al toallero de la mesa lateral. Ahora conecte la barra del toallero a la mesa lateral utilizando dos pernos hexagonales M6 X 12mm (plateados) y arandelas de resorte (plateados). Instale el panel frontal de la mesa lateral con un perno M6 X 12mm (negro) y dos tuercas M6 y arandelas de estrella (negras).
- Page 61 Soporte de Ensamblaje para el Quemador Venturi Escudo Contra Calor para Manguera Válvula de la Hornilla Lateral Boquilla de la Válvula Paso 12 Instale el conjunto de la hornilla lateral al lado derecho del asamblaje del carro. Inserte dos pernos M6 X 12mm (negros) en ambas piernas derechas a la mitad.
- Page 62 ADVERTENCIA: Nunca use la parrilla sin haber verificado que no hay fugas en las conexiones y mangueras de gas. Consulte los procedimientos apropiados en la sección de "Pruebas de detección de fugas" en este manual. Paso 16 Coloque el bisel sobre el vástago de montaje de la perilla de control y sitúelo sobre los agujeros en la base y válvula de la hornilla...
- Page 63 Rejilla para Calentar Rejillas para Cocinar Cubiertas Térmicas Revestidas Soportes Tapa del Encendedor Pila Paso 19 Coloque las placas de distribución de calor en el nivel inferior de la caja de la parrilla, directamente sobre las hornillas. Paso 20 Coloque las rejillas para cocinar sobre las costillas de apoyo directamente sobre las placas de distribución de calor.
- Page 64 Paso 23 Inserte la bandeja de grasa en la abertura en el lado trasero de la parrilla. Asegúrese de deslizar la bandeja sobre los rieles. Paso 24 Inserte gaveta para grasa dentro de la bandeja de grasa. Resbale la gaveta en los vestigios como ilustrado.
- Page 65 ™ ProSeries 8445 (Armada)
-
Page 66: Warranty
This warranty extends to the original purchaser only and is not transferable or assignable to subsequent purchasers. The Brinkmann Corporation requires reasonable proof of purchase. Therefore, we strongly recommend that you retain your sales receipt or invoice. To obtain replacement parts for your Brinkmann ProSeries 800-527-0717.
Need help?
Do you have a question about the ProSeries 8445 and is the answer not in the manual?
Questions and answers