Table of Contents
Advertisement
MODEL 17-935 & MODEL 17-924
The 17-924 Mortising Attachment converts your drill press into an accurate mortising machine and can be used with
the following units:
11-980 Drill Press (10")
14-070 Drill Press (14")
17-925 Drill Press (16-1/2")
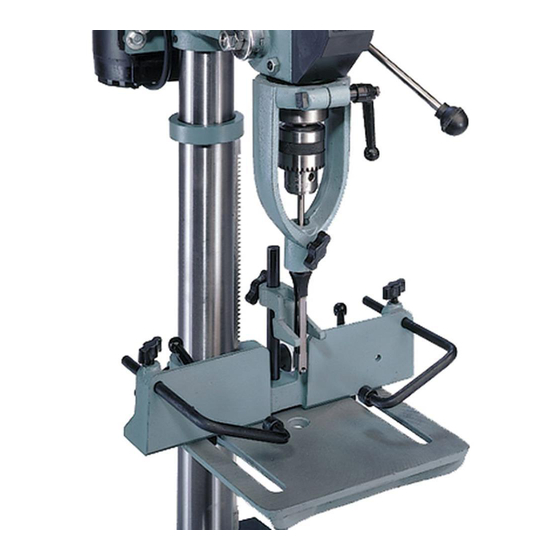
Mortising Attachment Assembled
1. Fence
2. Locking Levers (2)
3. Flat washers (2)
4. T-Nuts
5. Guides
11. Small ID Split-Ring Bushings - for 10", 12", and 32" Radial Drill Presses
12. Intermediate Split-Ring Bushings - for 14" Drill Presses
13. Large ID Split-Ring Bushings - for 15" and 16-1/2" Drill Presses
14. Carrying Case (For Model 17-924 Mortising Attachment ONLY)
15. Set of Chisels and Bits (4) - 1/4", 5/16", 3/8", and 1/2"
IMPORTANT:
Use the correct bushings as indicated in the carton contents for your machine. Any others will not
work. The 16-1/2" drill press (Model 17-900) does not require bushings.
DELTA ACCESSORY
MORTISING ATTACHMENT
INTRODUCTION
11-990 Drill Press (12")
11-090 Radial Drill Press (32")
Delta Utility Drill Presses (15")
CARTON CONTENTS
(Furnished with Model 17-924 Mortising Attachment ONLY)
INSTALLATION
Part No. 1343761 - 12-16-04
14-040 Drill Press (14")
17-900 Drill Press (16-1/2")
6. Hold-Down Assembly
7. Hold-Down Shaft
8. 5/32" Hex Wrench
9. Quill Alignment Pin
10. Chisel Holder
61962
RTD10000125AA
Advertisement
Table of Contents

Related Manuals for Delta 17-935


Summary of Contents for Delta 17-935
- Page 1 61962 Part No. 1343761 - 12-16-04 DELTA ACCESSORY MODEL 17-935 & MODEL 17-924 MORTISING ATTACHMENT INTRODUCTION The 17-924 Mortising Attachment converts your drill press into an accurate mortising machine and can be used with the following units: 11-980 Drill Press (10") 11-990 Drill Press (12")
- Page 2 ASSEMBLING THE CHISEL HOLDER 1. Loosely thread the knob (A) Fig. 1 into the bottom of the hole of the chisel holder (B) (See Fig. 2). 2. Install the special screw (C) in either side of the chisel holder (B). 3.
- Page 3 Fig. 7 Fig. 8 Fig. 9 THE FOLLOWING INSTRUCTIONS ARE FOR THE DELTA 15" UTILITY DRILL PRESSES AND DELTA 16-1/2" VARIABLE SPEED DRILL PRESS. Disconnect the machine from the power source. 1. Install and lock the smaller diameter end of the alignment pin (H) in the spindle (A) Fig. 10.
- Page 4 THE FOLLOWING INSTRUCTIONS ARE FOR THE DELTA 17-900 16-1/2" DRILL PRESS. Disconnect the machine from the power source. NOTE: This unit requires NO bushings for attaching the chisel holder to the quill. 1. Insert and lock the smaller diameter end of the alignment pin (A) Fig.
- Page 5 ATTACHING THE WORKPIECE HOLD-DOWN - ALL UNITS Disconnect the machine from the power source. 1. Attach the vertical shaft (X) Fig. 15 to the fence, using the supplied wrench (H). NOTE: Place the flat on the shaft (X) toward the rear of the drill press. 2.
- Page 6 SPINDLE SPEEDS The correct spindle speed depends on the size of the bit and the hardness of the wood. Your best cuts are generally in the range of 650 to 1800 RPM. Use a slower speed for larger bits and harder woods and faster speeds for smaller bits and softer woods.
- Page 7 MORTISING CHISELS WITH 5/8" X 1-1/2" SHANK Depth Capacity Size Cat. No. 17-912 1/4" x 1/4" 1-7/8" 17-913 5/16" x 5/16" 1-7/8" 17-914 3/8" x 3/8" 3" 17-915 1/2" x 1/2" 3" Fig. 22 SHARPENING CHISELS AND MORTISING BITS Sharpening these chisels requires considerable skill and practice. An improperly-sharpened hollow chisel can easily split in operation, and an old bit will cause excessive strain on the hollow chisel, causing breakage.
- Page 8 NOTES...
Need help?
Do you have a question about the 17-935 and is the answer not in the manual?
Questions and answers