Inner Range inception Quick Start Manual
Hide thumbs
Also See for inception:
- Installation manual (24 pages) ,
- Quick start manual (4 pages) ,
- Quick start manual
Table of Contents
Advertisement
Quick Links
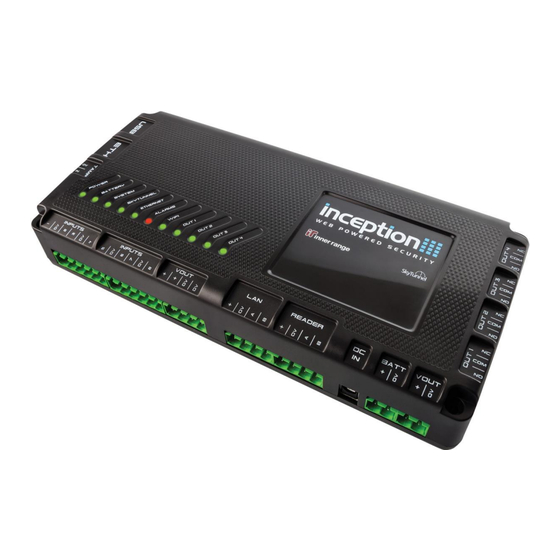
Simple & Easy Installation
Integrated Security - Access Control
1
Connect and plug in the power cord
2
Wait for the Inception Controller to start up
•
Initially, the POWER LED will turn on indicating power is being supplied
to the controller
•
During startup, the LEDs will light up in order from left to right to show progress
•
The controller is ready when the SYSTEM LED is flashing
240V AC
Advertisement
Table of Contents

Related Manuals for Inner Range inception


Summary of Contents for Inner Range inception
- Page 1 Simple & Easy Installation Integrated Security - Access Control Connect and plug in the power cord 240V AC Wait for the Inception Controller to start up • Initially, the POWER LED will turn on indicating power is being supplied to the controller •...
- Page 2 Connecting to the web interface There are a number of options available to connect to your Inception’s web interface. WiFi Access Point • If you have purchased the Inception WiFi Expansion Module (available separately), your Inception can host an access point •...
- Page 3 Local Network • Once connected, the ETHERNET LED will turn on • To connect to the Inception web interface, the Inception’s IP address is required. There are two different ways to find it the IP address: LCD Terminal • If using an LCD Terminal (available separately, see the...
- Page 4 There you will find installation guides and videos to help you get the most out of your Inception System. Inception, SkyTunnel and SIFER are registered trademarks of Inner Range Pty Ltd. Product specifications subject to change without notice. Pictures shown may vary from actual product.
Need help?
Do you have a question about the inception and is the answer not in the manual?
Questions and answers