Table of Contents
Advertisement
C
USER'S MANUAL
▶ Thank you for purchasing the AIR CONDITIONER
Before operation please read this user's manual carefully.
▶ Keep this manual on hand for reference.
▶ AIR CONDITIONER is specified for use on the rated
voltage power supply. For use outside the local electricity
supply should be checked by a qualified electrician.
AIR CONDITIONER
▶ It is ESSENTIAL that you read 'NOTES ON SAFETY' carefully
before use and follow them at all times.
▶ The Warranty form is on Page 20. Please complete it now and
keep it in a safe place.
▶ We have a policy of continual improving on our products.
The contents (features and specifications) in this manual are
therefore subject to change without notice.
MODEL:
HWC-19
Advertisement
Table of Contents

Subscribe to Our Youtube Channel
Related Manuals for Airrex HWC-19


Summary of Contents for Airrex HWC-19
- Page 1 AIR CONDITIONER MODEL: HWC-19 USER'S MANUAL ▶ Thank you for purchasing the AIR CONDITIONER ▶ It is ESSENTIAL that you read ‘NOTES ON SAFETY’ carefully Before operation please read this user’s manual carefully. before use and follow them at all times.
-
Page 2: Table Of Contents
TABLE OF CONTENTS ■ SAFETY INSTRUCTIONS ■ PRECAUTIONS FOR USE ■ EXTERIOR DESCRIPTION ■ SPECIFICATION ■ CONTROL PANEL FUNCTIONS ■ MODE CHANGING METHOD ■ HOW TO SET THE 'OFF' TIMER ■ TEMPERATURE CONTROL OPERATION ■ SELECTION OF LOCK OR UNLOCK ■... -
Page 3: Safety Instructions
SAFETY INSTRUCTIONS These are contents for keeping the safety and preventing the property damage. Please read and use correctly. ● Precautions at this page are for the safe and correct use of the unit and for the preventing a danger and damage of the operator or others. -
Page 4: Precautions For Use
SAFETY INSTRUCTIONS For the damage occurred due to non-keeping of following matters, the manufacturer is not responsible for the compensation. In case of thunder, lightning or no-operation for Do not install the product on a long time, pull the power plug out of the outlet. the uneven or slant place. -
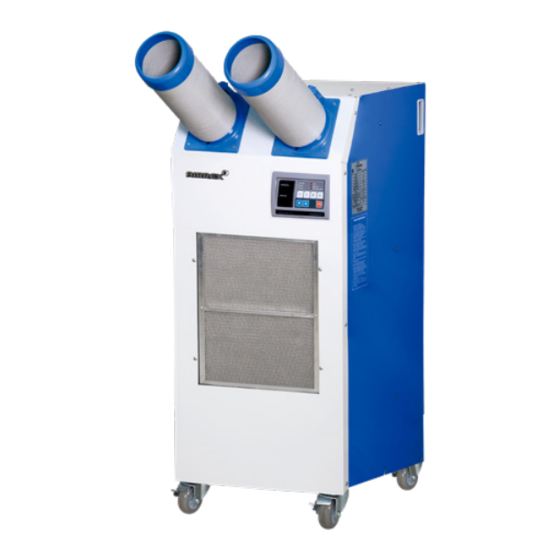
Page 5: Exterior Description
EXTERIOR DESCRIPTION ♣ For the efficient improvement of this product, the specification may be FRONT VIEW changed without prior notice. Discharge Duct (The place where cold air comes out.) Handle Digital controller Air intake hole (Evaporator) Indoor unit/ Filter (The place where indoor air enters.) Casters for moving (This unit can be moved freely anywhere.) BACK VIEW... -
Page 6: Specification
SPECIFICATIONS MODEL HWC-19 Cooling Capacity Btu/h (kW) 18,200(5.3) 115Vac 60Hz 1Ph Power supply inch 17.5x22.5x42 Dimensions (WxDxH) Weight Power Consumption 12.6 Current Consumption 13.3 Moisture Removal gal/day AHAM 1.32 Refrigerant (R-410A) 72˚F DB 60%RH~113˚F DB 40%RH Operating Range LCDI 5-15... -
Page 7: Control Panel Functions
CONTROL PANEL FUNCTIONS ⑧ ⑨ ⑦ ⑩ ⑨ ⑧ ⑪ ③ ④ ⑤ ⑥ ② ① ① Power : Use to power on / off. ② ∨ ∧ Button : Raises or lowers temperature and/ or sleep (off) time. ③ Mode : Use to select cooling mode or Dehumidifier mode or FAN mode ④... -
Page 8: Mode Changing Method
MODE CHANGING METHOD COOLING MODE If you press 'cool' button. 'COOL' is displayed. then LED is on. ⑩ ⑧ ⑥ DEHUMIDIFIER MODE When the cooling is operating, If you press the 'cool' button. 'dEHU' is displayed. then LED is on. FAN MODE When the Dehumidifier is operating. -
Page 9: How To Set The 'Off' Timer
HOW TO SET THE 'OFF' TIMER This function enables you to set the length of time you want the cooler to operate. You can set the time period from 30min. to 24 hours in 30min. and 1 hour increments. 1. When cooler is operating, press the 'Off Timer' button and set the length of time you want by pressing ▲... -
Page 10: Temperature Control Operation
TEMPERATURE CONTROL OPERATION 1. When turn ON, the setting temperature is displayed. 2. When you push either button, the setting temperature is changed. 3. The display showing the set temperature will blink 3 times. 4. Display range & Setting range. Mode Display range Setting range... -
Page 11: Selection Of Lock Or Unlock
SELECTION OF LOCK OR UNLOCK 1. When turn OFF If press '∨' for 5 seconds, 2. You can set 'UNLOCK' or 'LOCK' after pressing you can control 'LOCK, UNLOCK' mode. '∧' button. 3. When You set 'LOCK' there will be '.' below the nember in the screen. -
Page 12: 'Error'and Warning Indicators
‘ERROR’and WARNING INDICATORS The machine’s safety devices will automatically signal any problems via the display window on the control panel. The information below shows how to read these signals. 1. WATER FULL- Display shows "tF" When the water container is full, "tF" is displayed and the LED "Water Full"... -
Page 13: Trouble Shootings
TROUBLE SHOOTINGS Symptom Check Points MMeasures to be Taken ● Is the power plug pulled out? ● Insert the plug. The operation ● Is the operation stopped? ● Press ON/ OFF switch, and confirm is not done. the lamp condition. ●... -
Page 14: Cleaning And Maintenance
CLEANING AND MAINTENANCE Cleaning the Air Filters and Maintenance Cleaning of filter : Detach the filter from the A/C, Cleaning of heat-exchanger : Clean dust attached and clean it with compressed air or water. to the heat-exchanger with compressed air or a vacuum cleaner. -
Page 15: How To Install & Precautions
HOW TO INSTALL & PRECAUTIONS Selection of the Installation Place As the air conditioner should be connected with the tap water tube, its installation near the hydrant is good. Install it on the even and stable place. How to Connect Pipes 1. - Page 16 HOW TO INSTALL & PRECAUTIONS Check Points after Installation After confirming the state of pipe connection, check whether a leakage is at the connection part. Confirm whether the connection of the drain hose is good. Confirm whether the earth line is good. Precautions for Installation 1.
-
Page 17: Accessaries
ACCESSARIES ITEM DRAWING 1 ft ○ Diam. DUCT 5inch 10 ft option DUCT COVER ○ OUTLET DAMPER BASE ○ ALUMINIUM FILTER ○ CASSETTE rev0... - Page 18 MEMO rev0...
- Page 19 MEMO rev0...
-
Page 20: Warranty
WARRANTY (Applicable to first retail purchaser only) AIRREX HEAT PUMP give the more reliable performance, comfort and durability the more they are used. They are built under a strict quality assurance regime which includes inspection both during and after production and exhaustive reliability testing.
Need help?
Do you have a question about the HWC-19 and is the answer not in the manual?
Questions and answers