
Summary of Contents for Vecow DVC-1000
- Page 1 USER USER DVC-1000 Manual Manual Intel ® D435 RealSense™ 3D Camera 1.1.0 Edition 20210108...
- Page 2 Record of Revision Version Date Page Description Remark 1.00 2021/01/07 All Official Release 1.10 2021/01/08 1, 2, 6 Update ©Vecow DVC-1000 User Manual...
- Page 3 This manual is released by Vecow Co., Ltd. for reference purpose only. All product offerings and specifications are subject to change without prior notice. Vecow Co., Ltd. is under no legal commitment to the details of this document. Vecow shall not be liable for direct, indirect, special, incidental, or consequential damages arising out of the use of this document, the products, or any third party infringements, which may result from such use.
- Page 4 Order Information Part Number Description ® DVC-1000 DVC-1000 Intel D435 RealSense™ 3D Camera ©Vecow DVC-1000 User Manual...
-
Page 5: Table Of Contents
CHAPTER 1 GENERAL INTRODUCTION 1.1 Overview 1.2 Features 1.3 DVC-1000 Specification 1.4 Mechanical Dimension CHAPTER 2 GETTING TO KNOW YOUR DVC-1000 2.1 Window Version Utility 2.2 Optional Accessory Kit 2.3 I/O and Indication CHAPTER 3 SYSTEM SETUP 3.1 Installing DVC-1000 CHAPTER 4 DVC-1000 Utility 4.1 Window Version Utility... -
Page 6: Chapter 1 General Introduction
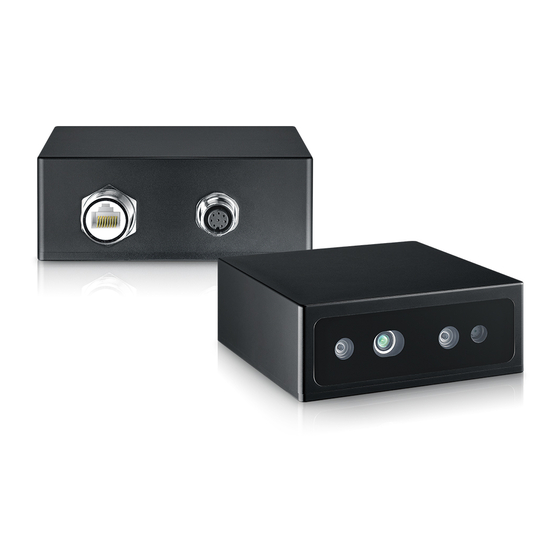
GENERAL INTRODUCTION 1.1 Overview DVC-1000 is an industrial grade IP67 3D Camera include 2D RGB camera ® ® module, Intel D435 camera module, and Intel RealSense™ vision processor module. DVC-1000 provides Lockable PoE Ethernet power input port via 12V@2A or M12 power input connector. DVC-1000 is suitable for using in robotics, logistics, AGV, AMR, 3D monitoring and inspection, real-streaming video, AI surveillance, real-time inspection, and Industry 4.0/IIoT applications. -
Page 7: Dvc-1000 Specification
• Client : Windows 10, Ubuntu 16.04 Intel ® RealSense™ SDK 2.0 Mechanical & Environment Dimensions (mm) 112.6 x 106.6 x 43 Operating Temperature 0°C to 40°C Storage Temperature -40°C to 70°C Mounting Tripod CE, FCC ©Vecow DVC-1000 User Manual GENERAL INTRODUCTION... -
Page 8: Mechanical Dimension
1.4 Mechanical Dimension 112.6 (4.43) Unit : mm (inch) 112.6 (4.43) 106.6 (4.20) 112.6 (4.43) ©Vecow DVC-1000 User Manual GENERAL INTRODUCTION... -
Page 9: Chapter 2 Getting To Know Your Dvc-1000
D435 RealSense™ Camera Accessory box, which contains Vecow Drivers & Utilities DVD 2.2 Optional Accessory Kit Description 61-1C10808-151 DVC-1000 Lockable External PoE/LAN Cable 61-1C20403-001 DVC-1000 M12 to 3Pin terminal block External Power Input Cable 2.3 I/O and Indication ... -
Page 10: Chapter 3 System Setup
SYSTEM SETUP 3.1 Installing DVC-1000 3.1.1 System Requirement We recommend using the following operating systems when accessing DVC-1000. ® • Suggest to use Intel 7th Generations CoreTM i5 processors or above • Ubuntu Linux 16.04 LTS or Microsoft Windows 10 64-bit System •... - Page 11 M12 to 3-Pin terminal Interface. We recommend using PoE as the standard scenario. For power supply/data transmission channel separation, optionally use M12 cable. Note : If customer want to use PoE power input, please use vecow utility to disable DHCP to change to static IP. (Camera default setting is DHCP on) 3.1.3.1 By PoE Power Input...
-
Page 12: Chapter 4 Dvc-1000 Utility
4.1.1 Searching Camera IP Address Please set up your camera and PC/laptop in the same domain during set up hardware environment. Open DVC-1000 Utility and click search device, then it will list all available devices. IP Address : The network IP is automatically assigned. - Page 13 4.1.2 Searching Camera IP Address Step 1 Right click the mouse, Choose "Login Page". Step 2 Enter the default username and password and click "Login". Default Username : admin Default Password : admin ©Vecow DVC-1000 User Manual DVC-1000 Utility...
- Page 14 Step 3 Disable the "USE DHCP", a dialog box will pop up, then click "OK". Step 4 Under the same domain, your IP address can be changed from 2 to 254. If IP is already exist, it will show message to ask for set up another new IP. ©Vecow DVC-1000 User Manual DVC-1000 Utility...
- Page 15 Step 5 Enter the new IP, and click "update config". When the progress bar shows100%, the IP address changed successful, then the device will be restart. Step 6 Close the page and waiting for 30 seconds, in Vecow utility, search device again, make sure the IP address changed successfully. ©Vecow DVC-1000 User Manual...
- Page 16 Step 2 Set your new password and click "Submit", A message indicating that the password has been successfully changed will pop up. Note : User name is not allowed to be changed, only password can be changed. ©Vecow DVC-1000 User Manual DVC-1000 Utility...
- Page 17 4.1.4 Restore Factory Default Setting Step 1 If you want to restore your device to factory setting, you just need to open Vecow utility and choose your device and enter to login page, then choose "restore factory". ©Vecow DVC-1000 User Manual...
- Page 18 Step 2 All of the settings will be restored to factory default, Do you want to continue click "Ok". Step 3 Close the page, waiting for 30 seconds in Vecow utility, Search device, enter to login page, make sure all the items you changed before have been restored to factory settings, and the history logs has also been completely clear.
- Page 19 4.1.5 Camera Firmware Update DVC-1000 camera firmware can be updated manually when Intel releases new firmware. The updating process takes approximately 3~5 minutes depending on your network condition. While updating firmware, make sure the power supply is constant throughout the process. The updating process is an advanced configuration, failure to comply to the instruction below may cause the camera to become unusable.
- Page 20 Step 3 Select the "firmware file and click Open". Step 4 Click start, a dialog box "Do you want to update" will pop up, select "Yes", camera FW update started. ©Vecow DVC-1000 User Manual DVC-1000 Utility...
- Page 21 Step 5 Make sure the camera FW update successful. Step 6 Select "Yes" to restart the system, open VECOW utility, search device, confirm that the camera FW has been updated to the latest version. 4.1.6 System Firmware Update The DVC-1000 system firmware can be updated manually when new FW releases The updating process takes approximately 30 minutes depending on your network condition.
- Page 22 Step 3 Select "Browser" and choose the new version of firmware. ©Vecow DVC-1000 User Manual DVC-1000 Utility...
- Page 23 Step 7 When system firmware update successfully, the system will restart, it will take about 1 minute. Step 8 The system FW Update successfully. Step 9 Open VECOW utility, search device, confirm that the system FW has been updated to the latest version. ©Vecow DVC-1000 User Manual...
- Page 24 In that case, send your camera back to VECOW for customer service. Step 1 Open the VECOW utility, right click your device and select "System FW Recovery".
- Page 25 Step 4 The recovery progress begins. Step 5 When successfully recover system, the system will restart, it will take about 1 minute. Step 6 System restart successful, the system recovery to default system now. ©Vecow DVC-1000 User Manual DVC-1000 Utility...
- Page 26 4.1.8 Shut Down Step 1 Open VECOW utility, click "Search Device". Step 2 Choose your device and right click mouse, select "Shut Down", "Do you want to shut down" choose "Yes". ©Vecow DVC-1000 User Manual DVC-1000 Utility...
- Page 27 Step 3 In the lower left corner of the VECOW utility, it will show "System Shut Down". Step 4 You can shut down the device from the web page too. IMPORTANT : When the device shut down successfully, if you want to use the device again, you need to unplug the power cord and plug it in again, otherwise, it won't find the device.
- Page 28 Step 2 Choose your device and right click mouse, select "Restart", "Do you want to restart" choose "Yes". Step 3 In the lower left corner of the VECOW utility, it will show "System Restart". Step 4 When the device restart successful, wait about 30 seconds, then search device again, the VECOW utility will list your device under the sub network.
- Page 29 Step 1 Start your web browser. In the Search Bar, type in "http://your IP address:8888/" of your DVC-1000 camera. Step 2 Entering from the webpage has the same function as VECOW utility. 4.1.11 Accessing Camera Image Step 1 Before you access the camera image, make sure the SDK has been installed successfully.
- Page 30 Step 2 Choose "Add Network Device". Step 3 Type in the IP Address (Use the VECOW utility to obtain the IP Address) then click "OK". Step 4 On the left menu, select "Infrared1" and "Infrared2", click Stereo Module and RGB Camera.
- Page 31 Step 5 You can see the RGB&Depth&IR camera now. ® Step 6 For details on the remaining functions of Intel RealSense™ viewer, refer to https://www.intel.com/content/dam/support/us/en/documents/ emerging-technologies/intel-realsense-technology/Intel-RealSense- Viewer-User-Guide.pdf ©Vecow DVC-1000 User Manual DVC-1000 Utility...
-
Page 32: Linux Version Utility
Step 1 Before you access the camera image, make sure the SDK has been installed successfully. Start Terminal and type the following command to open the intel realsense-viewer, the "Intel Realsense-Viewer" will pop up. Command : Realsense-viewer ©Vecow DVC-1000 User Manual DVC-1000 Utility... - Page 33 Step 2 Choose "Add Network Device". Step 3 Type in the IP Address (Use the VECOW utility to obtain the IP Address) then click "OK". Step 4 On the left menu, select "Infrared1" and "Infrared2", click Stereo Module and RGB Camera.
- Page 34 Step 5 You can see the RGB&Depth&IR camera now. ® Step 6 For details on the remaining functions of Intel RealSense™ viewer, refer to https://www.intel.com/content/dam/support/us/en/documents/ emerging-technologies/intel-realsense-technology/Intel-RealSense- Viewer-User-Guide.pdf ©Vecow DVC-1000 User Manual DVC-1000 Utility...
-
Page 35: Appendix A : Reset Camera
When searching device, the device is about to reboot, When open the " Intel Realsense viewer 2.37.0" , the device has rebooted. We recommend waiting for 1 minute after the device restarts before searching for the device. ©Vecow DVC-1000 User Manual Appendix A... - Page 36 No part of this publication may be reproduced in any form or by any means, electric, photocopying, or recording, without prior authorization from the publisher. The rights of all the brand names, product names, and trademarks belong to their respective owners. © Vecow Co., Ltd. 2021. All rights reserved.
Need help?
Do you have a question about the DVC-1000 and is the answer not in the manual?
Questions and answers