Table of Contents
Advertisement
Quick Links
Dialogic PCI Linecard Installation and Replacement
Inside this Document:
Before You Begin...........................................................................................................................................2
Technical Specifications of Dialogic PCI Linecards.......................................................................................3
Preparing Dialogic PCI Linecards for Installation ..........................................................................................6
Installing Dialogic PCI Linecards in the Platform .........................................................................................11
Cabling Dialogic Linecards to the Telephone System .................................................................................14
Installing Dialogic System Software.............................................................................................................22
Configuring Dialogic PCI Linecards in Dialogic Configuration Manager......................................................30
Adding a Linecard to the Configured Devices List.......................................................................................38
Configuring Lines in OneBox Configuration ................................................................................................40
Setting the Signaling Protocol Used by D/240PCI-T1 Linecards................................................................41
Testing and Troubleshooting T-1 Equipment ..............................................................................................45
This document explains how to install or replace one or more Dialogic
™
D/120JCT-LS
, or D/240PCI-T1
install Dialogic System Software versions 2, 3.3, and SR5.01. The information in this document
pertains to platforms running version 1.1 or later of OneBox.
We recommend that you read this entire document before disassembling the hardware.
Hardware conflicts and configuration issues can occur between hardware devices installed in a computer
platform. Because Ericsson sells Dialogic PCI linecards as a kit for installation in computer platforms that
we have not tested, we cannot guarantee the compatibility of these cards in your computer platform.
Ericsson will offer troubleshooting advice and assistance to the best of its knowledge and ability. However,
you are ultimately responsible for resolving all hardware conflicts and configuration issues.
Dialogic PCI linecards cannot be used in a computer platform that also contains Dialogic ISA linecards
(includes D/41D, D/41ESC, and D/160SC-LS). If ISA linecards are currently installed in the platform, they must
be removed prior to installing the PCI linecards. Dialogic PCI linecards can be used in conjunction with all
™
Brooktrout
fax cards.
This document does not discuss how to install or configure the Dialogic D/4PCI linecard. Although we sell
this card for use in telephony server platforms, it lacks the telephony bus connections to be fully compatible
with the other linecards that we support. For information on installing and configuring D/4PCI linecards,
please see the spare parts document Dialogic D/4PCI Linecard Installation and Replacement.
OneBox and Ericsson are registered trademarks of Ericsson Enterprise AB. Dialogic is a registered trademark, and D/41EPCI, D/120JCT-LS, D/240PCI-T1,
D/41D, D/160SC-LS, D/240SC-T1, and D/4PCI are trademarks of Dialogic Corporation, an Intel Company. Brooktrout is a trademark of Brooktrout Technology, a
Brooktrout Company.
All other products, brand names, or companies mentioned in this document may be trademarks or registered trademarks of their respective companies.
ã
R3B Copyright
Ericsson Enterprise AB 2000-2001
All rights reserved.
™
linecards in a OneBox
IMPORTANT
®
D/41EPCI
®
platform. It also explains how to
™
,
Advertisement
Table of Contents

Related Manuals for Dialogic D/41EPCI


Summary of Contents for Dialogic D/41EPCI
-
Page 1: Table Of Contents
OneBox and Ericsson are registered trademarks of Ericsson Enterprise AB. Dialogic is a registered trademark, and D/41EPCI, D/120JCT-LS, D/240PCI-T1, D/41D, D/160SC-LS, D/240SC-T1, and D/4PCI are trademarks of Dialogic Corporation, an Intel Company. Brooktrout is a trademark of Brooktrout Technology, a Brooktrout Company. -
Page 2: Before You Begin
• OneBox Telephony Server program CD-ROM • Dialogic System Software program SR5.01 CD-ROM (if applicable) • One or more Dialogic PCI linecards (D/41EPCI, D/120JCT-LS, or D/240PCI-T1) • CTbus cable to connect multiple PCI cards • New feature key diskette (if the total number of ports available after the addition of new linecards exceeds the number of ports for which you are currently licensed) •... -
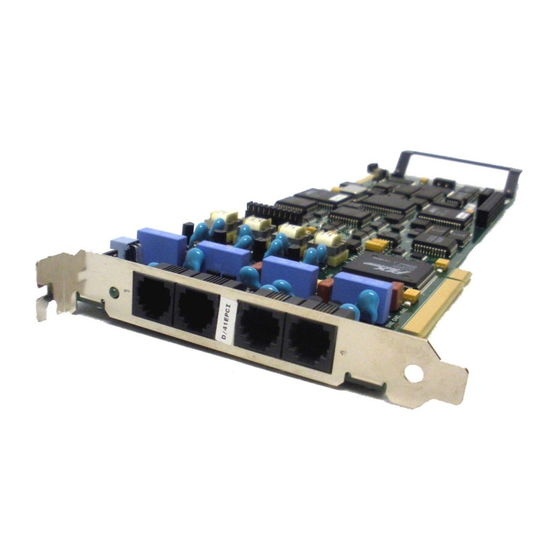
Page 3: Technical Specifications Of Dialogic Pci Linecards
Dialogic PCI Linecard Installation and Replacement Technical Specifications of Dialogic PCI Linecards Tables 1–3 list the technical specifications for the three Dialogic PCI linecards approved for use with OneBox: • D/41EPCI 4-port linecard • D/120JCT-LS 12-port linecard • D/240PCI-T1 24-channel T-1 card Figures 1 through 3 show the general layouts of these linecards. - Page 4 Dialogic PCI Linecard Installation and Replacement Table 2: D/120JCT-LS technical specifications Feature Specification 1–12; the OneBox port assignment is determined by the card’s Number of ports linecard identification number Dialing DTMF FCC registration number EBZUSA-34827-KX-N Analog network interface On board loop-start interface circuits...
- Page 5 Dialogic PCI Linecard Installation and Replacement Table 3: D/240PCI-T1 technical specifications Feature Specification Channelization (channel 1–24; the correlation between channelization and OneBox order) ports is determined by the card’s linecard identification number Dialing DTMF FCC registration number EBZUSA-20078-XD-N Framing type...
-
Page 6: Preparing Dialogic Pci Linecards For Installation
ID 1, the 24 channels it provides will be assigned by OneBox the line numbers 1–24. If you then install a D/41EPCI to which you have assigned linecard ID 2, the four ports it provides will be assigned the line numbers 25–28. - Page 7 Dialogic PCI Linecard Installation and Replacement IMPORTANT Do not configure any Dialogic PCI linecard to linecard identification number 0. We do not support the automatic linecard identification number assignment scheme for PCI linecards (called Geographic Sequencing by Dialogic). To set the linecard identification number: •...
- Page 8 SCbus clock. You configure the CTbus with hardware using jumpers or with software by the Dialogic System Software, depending on the linecard you are installing. • D/41EPCI and D/240PCI-T1 linecards use hardware to configure the CTbus. • D/120JCT-LS linecards are configured automtically by the Dialogic System Software.
- Page 9 D/41EPCI and D/120JCT-LS linecards have a configurable default line state (hook switch state). This setting determines how the linecards will respond to incoming telephone calls when the OneBox platform is turned on, but either OneBox or the Dialogic System Software is not running.
- Page 10 Dialogic PCI Linecard Installation and Replacement Removing the Slot Retainer Bracket Depending on the design of the platform, you may need to remove the slot retainer bracket from the inside edge of the linecard. Refer to Figure 1, Figure 2, or Figure 3 for the location of the slot retainer bracket.
-
Page 11: Installing Dialogic Pci Linecards In The Platform
Dialogic PCI linecards cannot be used in a computer platform that also contains Dialogic ISA linecards (includes D/41D, D/41ESC, and D/160SC-LS). If ISA linecards are currently installed in the platform, they must be removed prior to installing the PCI linecards. Dialogic PCI linecards can be used in conjunction with all Brooktrout fax cards. - Page 12 Dialogic PCI Linecard Installation and Replacement From the Service menu, point to Startup Mode, and select Manual. Select Manual From the File menu, select Exit. Shut down the operating system. Turn off the computer, unplug its power cord, and remove its cover.
- Page 13 Tuck any extra connectors or loose ribbon cable down into the computer so that it does not snag when you replace the platform cover. Replace the cover on the platform and plug in the power cord. Proceed to “Cabling Dialogic Linecards to the Telephone System.” ã Aug 2001 Ericsson Enterprise AB...
-
Page 14: Cabling Dialogic Linecards To The Telephone System
OneBox assigns port numbers in ascending order based on the linecard identification number. For example, a D/41EPCI linecard to which you assigned the linecard ID 1 will be assigned line numbers 1–4; a D/41EPCI linecard to which you assigned the linecard ID 2 will be assigned line numbers 5–8 (as shown in Figure 7). - Page 15 (shown in Figure 8). These adapters allow you to connect the RJ-11 single- channel connectors at the back of the D/41EPCI to a two-channel RJ-14 linecord. If linecord adapters are required and not included with the linecards, please contact your technical service representative.
- Page 16 Dialogic PCI Linecard Installation and Replacement Cabling D/120JCT-LS Linecards to the Telephone System With the D/120JCT-LS linecard(s) installed in the platform, you can now cable the platform to the telephone system. As described in “Assigning the Linecard Identification Number,” OneBox assigns port numbers in ascending order based on the linecard identification number.
- Page 17 Dialogic PCI Linecard Installation and Replacement There are six modified RJ-14 connectors on the rear brackets of D/120JCT-LS linecards. Figure 10 shows how the pins in these modified connectors are arranged. Pin 6: Earth Recall 2 (not used in USA)
- Page 18 Dialogic PCI Linecard Installation and Replacement Cabling D/240PCI-T1 Linecards to the Telephone System With the D/240PCI-T1 linecard(s) installed in the platform, you can now cable the platform to the telephone system. As described in “Assigning the Linecard Identification Number,” OneBox assigns line numbers in ascending order based on the linecard identification number.
- Page 19 Dialogic PCI Linecard Installation and Replacement Channel Service Unit The Channel Service Unit (CSU) is usually the first piece of equipment on the customer premises that connects to the T-1 line. A CSU is required any time metallic T-1 services are ordered from a local exchange (all the Regional Bell Operating Companies) or interexchange carrier (including long-distance carriers like MCI, Sprint, and AT&T).
- Page 20 Dialogic PCI Linecard Installation and Replacement Many PBXs have built-in CSUs or CSU-like functions. The D/240PCI-T1 can connect directly to these devices provided that the PBX has a DSX-1 interface (the D/240PCI-T1 will not respond to loopback commands when connected this way). See your switch or PBX documentation to confirm that your equipment has the necessary features.
- Page 21 Dialogic PCI Linecard Installation and Replacement Connect the cable wires to the proper pinouts on the RJ-48C connector on the D/240PCI- T1 end of the cable. The pinout designation is shown in Figure 13. Consult your CSU documentation for the proper pinout designation and connector type for the CSU.
-
Page 22: Installing Dialogic System Software
On separate CD-ROM provided with OneBox server Removing Existing System Software Before installing upgrading to a new version of Dialogic software, you must remove any existing versions from the platform. To uninstall Dialogic System Software: Start the computer and log on to Windows NT Server with an account that has local Administrator privileges on the OneBox platform. - Page 23 Dialogic PCI Linecard Installation and Replacement If the Dialogic System Service is running, click the red Stop icon on the toolbar or select Stop Service from the Service menu. Red Stop button 5. From the Start menu, point to Programs, point to Dialogic System Software, and select Uninstall.
- Page 24 Dialogic PCI Linecard Installation and Replacement From the C:\Program Files directory, delete the Dialogic folder and its contents. Delete Dialogic Restart the computer. Continue to the following section, “Installing Dialogic System Software.” ã Aug 2001 Ericsson Enterprise AB...
- Page 25 When installing a D/120JCT-LS linecard in a OneBox 2.0 system, the linecard will not function correctly unless DNA version 3.3 is both installed correctly and updated with Dialogic’s DNA 3.3 Service Pack 1. If you are installing one or more D/120JCT-LS linecards in a 2.0 system, be sure to read the section “Installing Service Pack 1 for DNA Version 3.3 (D/120JCT-LS Only),”...
- Page 26 Dialogic PCI Linecard Installation and Replacement In the Setup Options dialog box, click Custom. Select Custom 9. In the Custom Components Selection dialog box, select only the Dialogic Drivers, Firmware & Configuration Files option, then click Next. Select Drivers, Firmware &...
- Page 27 Dialogic PCI Linecard Installation and Replacement 11. In the Setup Options Summary dialog box, verify that the options described in steps 9 and 10 appear in the Current Settings list. If you need to change any of the options, return to the appropriate dialog box by clicking Back;...
- Page 28 Dialogic PCI Linecard Installation and Replacement 13. When the installation is complete, select Yes, I want to restart my computer now, then click OK. 14. Choose one: If you have installed Dialogic System Then… Software… Proceed to “Installing Service Pack 1 DNA 3.3 and are using a D/120JCT-LS...
- Page 29 Installing Service Pack 1 for DNA Version 3.3 (D/120JCT-LS Only) To ensure that the D/120JCT-LS linecard functions appropriately with the telephony server software, you must install Dialogic’s Service Pack 1 for its DNA System Software version 3.3 immediately after you install DNA 3.3 itself. We include a CD-ROM containing Service Pack 1 for DNA version 3.3 with each D/120JCT-LS linecard we ship.
-
Page 30: Configuring Dialogic Pci Linecards In Dialogic Configuration Manager
Configured Devices list. The configuration of the Dialogic System Software can only be changed when the Dialogic system service is stopped. Conversely, the DCM will not apply the changes you make to the settings of the Dialogic System Software until you restart the Dialogic system service. - Page 31 Dialogic PCI Linecard Installation and Replacement If the DCM is running, click the red Stop icon in the toolbar. Red Stop button Highlight one of the cards that appears in the Configured Devices list. If the card you added does not appear in the Configured Devices list, refer to Note the section “Adding a Linecard to the Configured Devices List.”...
- Page 32 Dialogic PCI Linecard Installation and Replacement Click the System tab and verify that the three parameters are set Note appropriately for the card you are configuring. If so, skip to step 12; otherwise, continue with the following step. 6. From the Parameter list, select the PciID parameter.
- Page 33 Dialogic PCI Linecard Installation and Replacement 8. From the Parameter list, select PciSlotNumber. Select PciSlotNumber 9. From the Value list, select the number of the PCI slot in which the card is installed. 10. From the Parameter list, select PciBusNumber.
- Page 34 Dialogic PCI Linecard Installation and Replacement 12. Click the Telephony Bus tab. Then, from the Parameter list, select PCMEncoding. There are two PCM encoding schemes used around the world: µ-Law Note and A-Law. Telephone switches in North America and Japan typically use µ-Law.
- Page 35 14. Click the Country tab; then from the Parameter list, select Country. 15. From the Value list, select your country. The Country tab allows you to configure the Dialogic linecards installed in Note the platform for use in specific countries. Based on the value selected for the...
- Page 36 17. From the Value list, select FREQRES_HIGH. Select Frequency Resolution Select FREQRES_HIGH 18. Click Apply, then OK to apply the changes you have made. 19. Repeat steps 4 through 18 for each Dialogic PCI linecard installed in the platform. ã Aug 2001 Ericsson Enterprise AB...
- Page 37 Dialogic PCI Linecard Installation and Replacement 20. Click the green Start button on the toolbar. Green Start button 21. From the Service menu, point to Startup Mode, then select Automatic. 22. Click Close at the confirmation dialog box. 23. Close the DCM.
-
Page 38: Adding A Linecard To The Configured Devices List
To add a linecard: From the Start menu, point to Programs, point to Dialogic System Software, and select Dialogic Configuration Manager – DCM. If the Dialogic System Service is running, click the red Stop icon in the toolbar. Red Stop button ã... - Page 39 From the Action menu, select Add Device. Select Add Device Follow the DCM Add Hardware Wizard’s on-screen instructions to add the board and refer to the section “Configuring Dialogic PCI Linecards in Dialogic Configuration Manager.” ã Aug 2001 Ericsson Enterprise AB...
-
Page 40: Configuring Lines In Onebox Configuration
Dialogic PCI Linecard Installation and Replacement Configuring Lines in OneBox Configuration After you have installed the linecards in the OneBox platform and configured them with the DCM, there is one parameter for the linecards that you must configure using the OneBox Configuration utility. -
Page 41: Setting The Signaling Protocol Used By D/240Pci-T1 Linecards
Setting the Signaling Protocol Used by D/240PCI-T1 Linecards The default signaling protocol set by the Dialogic System Software for D/240PCI-T1 linecards is E&M wink-start signaling. This section explains how to create and configure a new system environment variable to accommodate T-1 carriers that require different signaling protocols. - Page 42 Dialogic PCI Linecard Installation and Replacement Configure the environment variable by entering the appropriate text in the Value box, as shown in the example below: If protocol you want the D/240PCI-T1 to use is… Then… E&M In the Value box, type PBXINFO\T1EANDM.PRO FXS/FXO In the Value box, type PBXINFO\T1FXS.PRO...
- Page 43 Dialogic PCI Linecard Installation and Replacement To change the signaling type: Log on to Windows NT Server with an account that has local Administrator privileges on the OneBox platform. Shut down OneBox. Start Notepad or the text editor of your choice.
- Page 44 Dialogic PCI Linecard Installation and Replacement 5. Edit the text in the Start = line, as show in the example below. If the start mode used by the signaling protocol is… Then… Wink and you want to use immediate Modify the Start = Wink line to...
-
Page 45: Testing And Troubleshooting T-1 Equipment
Dialogic PCI Linecard Installation and Replacement Testing and Troubleshooting T-1 Equipment If you encounter problems with T-1 equipment, we recommend segmenting the test procedure, which entails disconnecting all components and testing them individually. This section contains procedures for testing or troubleshooting the following components: •... - Page 46 Figure 16. Loopback mode enables you to verify the T-1 connection. The switch overrides any board modes set by the Dialogic System Software. The Remote Loopback Test Indicator above the Remote Loopback Switch will light when the linecard is set to loopback mode.
- Page 47 Dialogic PCI Linecard Installation and Replacement To test the CSU: Consult the documentation that accompanied the CSU or its manufacturer for instructions on testing the CSU. Choose one: If the CSU... Then… Passes the diagnostic tests specified by Continue to the procedure for testing the the manufacturer D/240PCI-T1–CSU or the CSU–D/240PCI-...
- Page 48 Dialogic PCI Linecard Installation and Replacement LED Error Conditions The LEDs at the back of the D/240PCI-T1 will light when an error is encountered. The following section describes what error conditions will cause an LED to light and provides some troubleshooting advice.
- Page 49 Dialogic PCI Linecard Installation and Replacement T-1 Diagnostic Logging Technical Support may ask you to configure the T1eandm.pro or T1fxs.pro file to log (trace) T-1 events to a file for troubleshooting purposes. This file is created in the D:\Cx\Bin directory as T1ctl.log. You can the copy this file and send it to Technical Support, if requested.
Need help?
Do you have a question about the D/41EPCI and is the answer not in the manual?
Questions and answers