Table of Contents
Advertisement
Quick Links
Advertisement
Table of Contents

Subscribe to Our Youtube Channel
Related Manuals for Rhopoint Instruments IQ Flex 20


Summary of Contents for Rhopoint Instruments IQ Flex 20
- Page 1 Operating Instructions Thank you for purchasing this Rhopoint product. Please read these instructions carefully before operating this product and retain them for future reference. The images shown in this manual are for illustrative purposes only. English...
- Page 2 If you have any questions or require additional information about the IQ Flex 20 please contact the Rhopoint Authorised Distributor for your region. The technology and components used in the device are based on state-of-the art optic and electronics.
-
Page 3: Table Of Contents
Maintenance Screen About Screen Disadvantages of standard gloss measurement Gloss % Reflectance Haze Measuring Haze with the Rhopoint IQ Flex 20 Haze Compensation Distinctness Of Image (DOI) Reflected Image Quality (RIQ) RSpec- Peak Specular Reflectance Goniophotometric Profile Calculating Gloss, Haze, RSpec and DOI from a Goniophotometric Profile... -
Page 4: Storage And Handling
Storage and Handling This instrument contains precision optics and electronics. You should avoid knocking or dropping the device as the resulting impact could cause serious damage. In some circumstances the optical components in the instrument could become misted due to temperature change. It is therefore recommended that the instrument is not used until it has stabilised to ambient temperature. - Page 5 This technology allows the instrument to calculate Gloss, Haze, DOI, RIQ and RSpec providing the user with a complete analysis of the reflective quality of the surface. Definitions of each of the parameters measured by the IQ Flex 20 can be found in the section “Appearance Theory” detailed later in this manual.
-
Page 6: Accessories
Accessories The instrument is supplied as a standard package complete with all accessories required to calibrate and recharge the unit including: - Rhopoint IQ Flex 20 Goniophotometer NIST traceable high gloss calibration tile including certificate Cleaning cloth for calibration tile... -
Page 7: Functional Overview
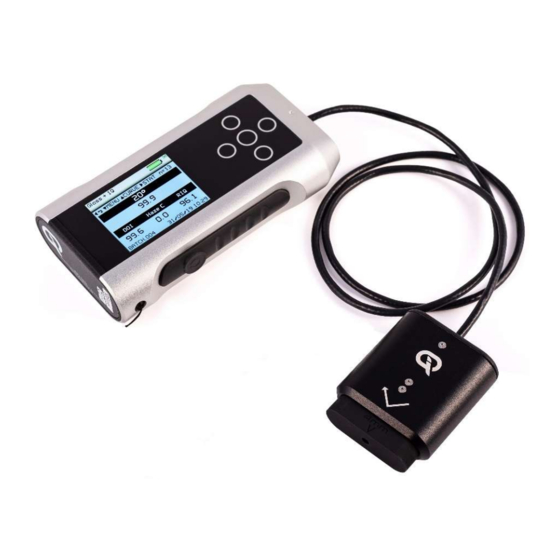
Functional overview Label No. Function Measurement button High Resolution Graphic Display Up/Down/Left/Right Buttons Operate / Enter Button Measurement head The instrument is controlled by pressing the relevant touch sensitive button. Functionality is dependent on whether the instrument is in menu or operate mode as detailed in the operation sections that follow. -
Page 8: Power
Do not operate the instrument whilst it is charging. USB Connectivity Three functions are available when the IQ Flex 20 is connected to a computer using the USB cable supplied – Access Files – Allows access to measurement and configuration files on the instrument. The instrument appears as a USB drive named IQ-METER. -
Page 9: Switching The Unit On
USB Remote Control - Allows control of the IQ Flex 20 remotely by sending ASCII commands from a computer or PLC. In this mode the instrument displays “REMOTE CONTROL ACTIVE” on the main measurement screen. Battery Charge Only – Allows USB charging of the instrument, all instrument functions are available. -
Page 10: Operation
Operation The Rhopoint IQ Flex 20 has the ability to rotate its screens according to its measurement orientation. It automatically displays measurement data in either portrait mode – Or landscape mode - Note- Main measurement screen, statistics and main menu are available in portrait view. - Page 11 With the unit switched on and initialised the instrument will display the home screen as shown below. MEASUREMENT READY BLUETOOTH READY NAVIGATION OPTIONS GLOSS GEOMETRY BATTERY METER GLOSS READING SAMPLE NUMBER IQ READINGS IQ VALUES DATE AND TIME BATCH NAME In this mode, measurements can be made by simply pressing the Measurement button (1) on the side of the instrument or Operate button (4) on the instrument keypad.
- Page 12 Press the Right button in the home screen to display the Gloss statistics screen Measurements can again be taken whilst in this screen and the statistics will be updated. Press the Right button to access the Gloss graph screen, this provides a graphical representation of the statistics data.
- Page 13 In the Home screen press the Left button to display the Stored Data screen. When Memory is set to ON (as detailed later in the Menu Screen section of this manual) measurements can be recalled and displayed from any batch stored in the IQ memory. Press the Left / Right buttons to review the measurement data.
-
Page 14: Menu Screen
Menu Screen The Menu Screen is used to quickly access frequently used options. Press the Up / Down buttons to navigate through the options; press the Enter button to select the option required. Settings in the menu screen are: - Memory –... -
Page 15: Viewing Batch Data
Batching Options The batching feature allows the user to group measurements together in batches. Each batch has associated statistics; the data for each batch can be accessed by connecting the instrument to a PC. The current batch name is displayed on the home screen in the bottom left corner, the sample number within that batch is shown in the top right of the screen indicated with n=(sample number). -
Page 16: Setup Screen
Setup Screen The Setup Screen is used to customise the instrument settings to the user’s preference. Press the Up / Down buttons to navigate through the options, press the Enter button to select the option required. Data and Batch Menu - Batch / Data options (See Data & Batch Menu Screen) Calibration Menu - Calibration options (See Calibration Menu Screen) Measurement Menu - Geometry setup (See Measurement Menu Screen) Control Menu - Bluetooth setup (See Control Menu Screen) -
Page 17: Data & Batch Screen
Data & Batch Screen The Data Screen is similar in functionality to that of the menu screen but also allows the selection and setting of the Auto Batch size. By selecting Auto Batch to ON the batch size can be selected between 1 - 999 by pressing the Left / Right buttons to select the relevant digit and the Up / Down buttons to increment / decrement the value. -
Page 18: Calibration Screen
Calibration Screen The Calibration Screen is used to set the instrument calibration to the user’s preference. Press the Up / Down buttons to navigate through the options, press the Enter button to select the option required. Selectable settings in the Calibration screen are: - Calibrate instrument - Performs an instant calibration of the instrument;... -
Page 19: Calibration
Calibrate the instrument by selecting “Calibrate Instrument” in the calibration menu. The IQ Flex 20 can be used with optional 3D printed adapters- these are used to improve accuracy on curved parts. The adaptors are supplied with a small spot size calibration adapter- the instrument should be calibrated with this in place before use. -
Page 20: Measurement Screen
Measurement Screen The Measurement Screen is used to configure the instruments measurement parameters to the user’s preference. Press the Up / Down buttons to navigate through the options; press the Enter button to select the option required. Selectable settings in the Measurement screen are: - Pass/Fail - Displays the Pass/Fail set up screen. - Page 21 With Reflectance set to % measurement results for each angle are displayed as – With Reflectance set to GU measurement results for each angle are displayed as –...
-
Page 22: Pass/Fail Setup Screen
Pass/Fail Setup Screen The Pass/Fail setup screen is used to enable/disable on-screen pass/fail indication and set min / max tolerancing. Press the down key to select the Pass/Fail option and press the center button to toggle the feature ON or OFF. Press the Right button to edit the min / max limits. Select the Done option to complete the process. -
Page 23: Iq Screen
IQ Screen The IQ screen is used to configure the instruments IQ settings. IQ - Selects IQ information to be either displayed (ON) or not displayed (OFF) on screen. DOI – Selects either standard DOI (Distinctness of Image) or enhanced RIQ (Reflected Image Quality) scale or Rspec (peak specular reflectance), details of which can be found in the Appearance Theory section of this manual. -
Page 24: Control Screen
Control Screen The Control Screen is used to configure the instruments Bluetooth parameters to the user’s preference. Press the Up / Down buttons to navigate through the options, press the Enter button to select the option required. Settings in the Control screen are: ID - Measurement definition header. - Page 25 Bluetooth Communication and Pairing The IQ Flex 20 has a Bluetooth function that allows readings to be instantly transmitted to a compatible PC. 20/60/85° Gloss, Haze + Log Haze, DOI/RIQ, RSPEC, Goniophotometric information, instrument serial number and service/calibration data can be instantly accessed by many PC applications including Excel, Word, Wordpad, OpenOffice or SPC packages.
- Page 26 7: Click "Enter the devices pairing code" in the “Add a device” screen. 8: Enter the pairing code "0000". Make sure the IQ Flex 20 remains switched on throughout this process, to disable or extend auto power off refer to instructions detailed in...
- Page 27 9. The IQ Flex 20 is now installed on your PC and ready for connection to the Bluetooth Data Widget. It is important to wait until windows displays the “Your device is ready to use” message before starting the data widget.
- Page 28 7. Select the instrument required. 8. Click the tick to connect the instrument. 9. The transmitter icon now appears on the IQ Flex 20. All readings will now be automatically transferred to any open windows package. Download example EXCEL spreadsheets from the Rhopoint...
-
Page 29: Instrument Setup Screen
Instrument Setup Screen The Instrument Setup screen is used to configure the instruments basic operating environment to the user’s preference. Press the Up / Down to buttons navigate through the options, press the Enter button to select the option required. Settings in the Instrument Setup screen are: - Language –... - Page 30 In the home screen, press and hold the On/Off button, the display will change as shown below- Press either the Up button to rotate the screen. Only one rotation is possible each time the On/Off button is pressed. Press the Down button to start a new batch, this action is either confirmed or cancelled by selecting the required box when prompted using the Left / Right buttons and pressing the Enter button.
-
Page 31: Maintenance Screen
Maintenance Screen The Maintenance screen is used by Rhopoint Approved Service Centres. It is PIN locked to prevented unauthorised access. There are no user configurable settings available. Press the Enter button to return to the home screen. About Screen The About screen is for information only. It provides information relating to the instrument’s software, the instrument serial number and last date of Factory Calibration. - Page 32 Notes...
- Page 33 Appearance Theory Rhopoint IQ Flex 20 Glossmeter & Goniophotometer Goniophotometer is derived from Greek; Gonio – Angle, Phos – Light, Metron - Measure Gloss describes the perception of a surface appearing “shiny” when light is reflected from When viewing glossy surfaces, it is found that a sudden increase in brightness occurs when the angle of observation equals the angle of incidence of the illuminating light.
- Page 34 As well as assessing the visual impact of a surface, the IQ Flex 20 can also be used to identify problems associated with coating formulation and application.
-
Page 35: Disadvantages Of Standard Gloss Measurement
The IQ Flex 20, with its array of light sensors mimics the effect of reflected light in the human eye. This detailed information allows the user to measure and control surface... -
Page 36: Gloss
The 60 degree angle is best employed on mid gloss samples 10-70 GU. Measuring Gloss with the Rhopoint IQ Flex 20 The Rhopoint IQ Flex 20 is supplied with a certified glass calibration tile traceable to a NIST reference standard. -
Page 37: Reflectance
85 degree - 199GU = 100% reflectance So, 20 degree - 1000GU = 50% reflectance, 500GU =25% etc When the IQ Flex 20 is calibrated in this mode it will calibrate to the GU value but will still display % reflectance. -
Page 38: Haze
Haze Haze describes the milky halo or bloom seen on the surface of high gloss surfaces. Surface haze can be problematic in most coating applications including automotive manufacture, powder coatings and other high gloss coatings. It can be attributed to a number of causes including incompatible materials in a formulation, poor dispersion and problems encountered during drying/curing/stoving. -
Page 39: Measuring Haze With The Rhopoint Iq Flex 20
Yellow pigment in paint film Corrected haze measurement on metallic coatings The Rhopoint IQ Flex 20 compensates for reflection from within the coating for highly reflective pigments, metallic coatings and speciality pigments, allowing the haze of any painted surface to be measured. - Page 40 An advantage of the IQ Flex 20 is that unlike a conventional instrument, compensation is calculated using a region adjacent to the haze angle. This techniques gives compatible...
-
Page 41: Distinctness Of Image (Doi)
The IQ Flex 20 measures the DOI of a surface by quantifying the way a reflected measurement beam is spread and distorted around the specular angle. -
Page 42: Reflected Image Quality (Riq)
Reflected Image Quality (RIQ) Reflected Image Quality is a new measurement developed by Rhopoint Instruments to provide greater sensitivity when evaluating highly reflective coatings and the specular / diffuse element of lower gloss materials. Two highly reflective surfaces that have very small changes in orange peel or texture will show very little or no change in DOI due to the way that it is calculated but will appear quite different visually. -
Page 43: Rspec- Peak Specular Reflectance
Automatic Curvature and Position compensation At 20º the IQ Flex 20 automatically compensates for curved samples or a sample measurement position that is not completely in contact with the base of the instrument. Either of these effects will cause readings errors using a standard glossmeter. -
Page 44: Goniophotometric Profile
Goniophotometric Profile The Gloss, Haze, DOI, RIQ and RSpec values produced by the IQ Flex 20 can be used to assess the visual quality of any surface. Alternatively, if required, the full Goniophotometric curves can be downloaded to PC for a detailed understanding of specular reflectance. -
Page 45: Calculating Gloss, Haze, Rspec And Doi From A Goniophotometric Profile
Calculating Gloss, Haze, RSpec and DOI from a Goniophotometric Profile For the above example at 20º, the IQ Flex 20 calculates the Gloss value by summing the gloss values +/- 0.9º from the specular angle. These methods / tolerances are specified in ASTM D523/ISO 2813.
Need help?
Do you have a question about the IQ Flex 20 and is the answer not in the manual?
Questions and answers