Table of Contents
Advertisement
Quick Links
Advertisement
Table of Contents

Related Manuals for Energizer EZ40VTDE40N


Summary of Contents for Energizer EZ40VTDE40N
- Page 2 Energizer and certain graphic designs are trademarks of Energizer Brands, LLC and related subsidiaries and are used under license by Builder SAS. All other brand names are trademarks of their respective owners. Neither Builder SAS nor Energizer Brands, LLC is affiliated with the respective owners of their trademarks.
-
Page 3: Let's Get Started
Let's get started You're excited to power up, so we'll keep this brief ! -
Page 4: Safety Warning
1. SAFETY WARNING IMPORTANT READ CAREFULLY BEFORE US KEEP FOR FUTURE REFERENCE 1) Read the instructions carefully. Be familiar with the controls and the proper use of the equipment; 2) Never allow children or people unfamiliar with these instructions to use the lawnmower. Local regulations can restrict the age of the operator;... - Page 5 26) Keep all nuts, bolts and screws tight to be sure the equipment is in safe working condition; 27) Check the grass catcher frequently for wear or deterioration; 28) Replace worn or damaged parts for safety; Use only genuine replacement parts and accessories;...
-
Page 6: Child Safety
The battery should be recharged when it fails to produce sufficient power on jobs which were easily done previously. DO NOT CONTINUE using product with its battery in a depleted condition. The battery is not fully charged at the factory. Before attempting to use it, it must be fully charged firstly. - Page 7 2. THE PRODUCT a. Delivery Lawnmower Mulching plug Charger Grass catcher bag Battery 40V 4.0Ah The tool is delivered with screw, nut, cam locks and wrench.
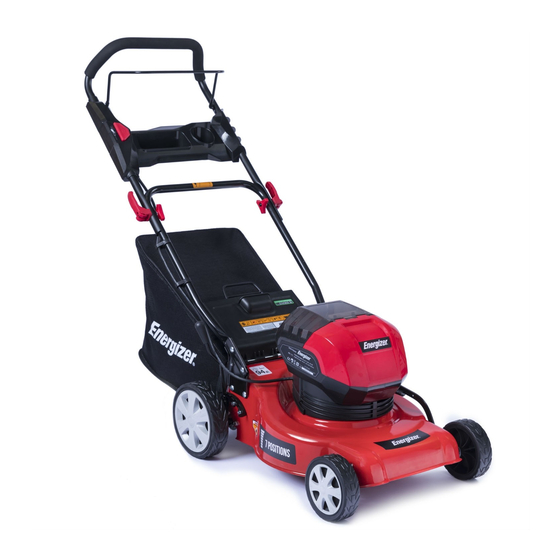
- Page 8 Height adjustment lever Battery door Start button Switch bar Lower handle locks Rear discharge cover Battery release button Cup holder c. Technical data Model EZ40VTDE40N Battery type 40V d.c. Charging time hours (4.0Ah battery) No load speed 3000-3500/min Cutting width...
- Page 9 3. ASSEMBLY a. Unpacking Before beginning assembly of product, make sure all parts are present. Compare parts with package contents list and hardware contents list. If any part is missing or damaged, do not attempt to assemble the product. Carefully remove the product and any accessories from the box. Make sure that all items listed in the packing list are included.
- Page 10 Place the upper handle on the lower handle. The holes must be aligned Insert the cam locks and screw them with the wing nuts. d. Unfolding and adjusting handle assembly To raise handle assembly Pull up and back on the lower handle (F) until it is aligned with the hole position of the arm support and the mower housing.
- Page 11 e. Installing the mulching plug (only for mulching operation) NOTE: When using the mulching plug (B), do not install the grass catcher. Remove battery. Lift and hold the rear discharge door (N). Grasp the mulching plug (B) by its handle and insert it at a slight angle.
-
Page 12: Operation
4. OPERATION a. Starting/stopping Open the battery cover. Install battery. Close the battery cover. Press and hold the start button (K). Pull the bar switch (L) toward the handle and release the button to start the mower. To stop the mower, release the bar switch. NOTE: Power save feature automatically adjusts the cutting speed of the blades to match the application to give the best possible cut while maximizing run... - Page 13 For effective mulching, do not cut wet grass because it tends to stick to the underside of the deck, preventing proper mulching of grass clippings. New or thick grass may require a narrower cut. The ground speed should be adjusted to the condition of the lawn. If mowing has been delayed and the grass has been allowed to grow longer than 4 in.
-
Page 14: Care And Maintenance
5. CARE AND MAINTENANCE a. Replacing the cutting blade WARNING Always protect your hands by wearing heavy gloves and/or wrapping the cutting edges with rags or other materials when performing any maintenance on the blades. ALWAYS remove the battery when servicing or transporting the mower. Wedge a block of wood between the blade and the mower deck in order to prevent the blade from turning when the bolt (1) is being removed. - Page 15 Before cleaning, repairing, or inspecting, verify that the blade and all moving parts have come to a complete stop. Remove the battery when making any adjustments or when any of the four wheels must be lifted off the ground. Keep the handles dry, clean, and free of oil and grease. In order to reduce the risk of fire, keep the motor free of grass, leaves, and debris build-up.
- Page 16 Electrical products should not be discarded with household products. According to the European Directive 2012/19/EU on waste electrical and electronic equipment and its implementation into national law, electrical products used must be collected separately and disposed of at collection points provided for this purpose. Talk with your local authorities or dealer for advice on recycling.
- Page 17 The manufacturer warrants the product against defects in materials and workmanship for a period of 2 years from the date of purchase to the original purchaser. The guarantee applies when the product is used as a home tool. The warranty does not extend for failures due to normal wear and tear.
- Page 18 In order to get help about your lawn mower we invite you to go through this link or to call us by phone +33 (0)8.20.20.22.68: https://services.swap-europe.com/contact You need to create a "ticket" via their platform. • Login or create your account •...
-
Page 19: Ce Declaration Of Conformity
32, rue Aristide Bergès -Z1 31270 Cugnaux - France Tel. +33 (0) 5.34.502.502 Fax: +33 (0) 5.34.502.503 Declares that the machine named below Cordless LAWNMOWER EZ40VTDE40N Serial number: Complies with the following European Directives: Machinery Directive 2006/42/EC EMC Directive 2014/30/EU...
Need help?
Do you have a question about the EZ40VTDE40N and is the answer not in the manual?
Questions and answers