
Related Manuals for Seiler EVOLUTION XR6


Summary of Contents for Seiler EVOLUTION XR6
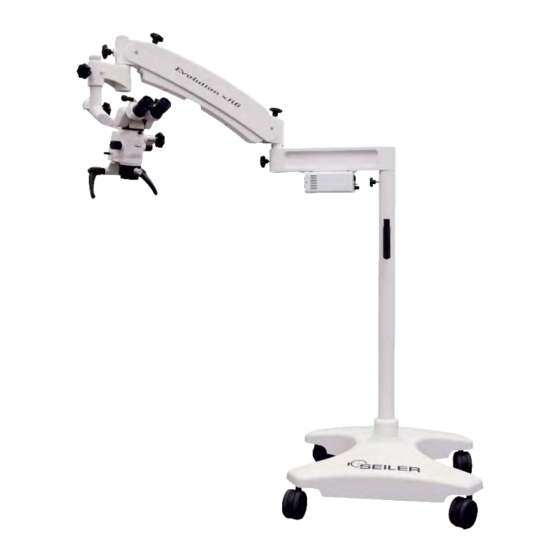
- Page 1 EVOLUTION XR6 LED Dental Microscope Slim Model User’s Manual PRECISION MICROSCOPES...
-
Page 2: Table Of Contents
Table of Contents Table of Contents Installation & Assembly LED Illumination Instructions LED Warranty Interpupillary Distance Adjustment Parfocalizing The Color Filter and Cleaning Dimensions Parts Breakdown... -
Page 3: Installation & Assembly
Installation & Assembly 1. Remove the base from the box and set base bottom up (casters facing up) on the cardboard or foam from the box for cushion. 2. Remove the base weights from the weights box and insert the weights one at a time into the bottom of the base. - Page 4 3. Remove the pole from the packaging and insert pole into the center post hole in the base. Align the two indention marks in the pole to the holes in the base center post hole collar. 4. Once the pole is secured into the base, insert the Light Housing/Light Source portion of the microscope into the top of the pole.
- Page 5 5. Next insert the Pantographic Arm into the light 6. Place the Liquid Light Guide cable through the source arm. bottom cover. Plunger 7. After the Pantographic Arm is inserted and the Liquid Light Guide cable is secure, add the extension piece into the top of the Pantographic Arm on the under side.
- Page 6 9. Insert the Angle Arm into the 45 degree coupler coming off the optic pod. Screw down the white knob. 10. Insert the Liquid Light Guide cable into the light port opening on the Optical Pod. Thumb Screw 11. Secure the Binocular Head onto the Optical Pod by tightening the thumb screw.
- Page 7 PANTOGRAPHIC ARM BALANCING Tension Knob NOTE: Pantographic Arm may need tension adjusted (black knob on top, turn counter- clockwise to add tension, clockwise to release tension). This may need to be done if camera/ video are added to the scope. This will increase or decrease the tension to desired function for user.
-
Page 8: Led Illumination Instructions
LED Illumination Instructions 1. INTRODUCTION Congratulations on the purchase of your new SSL-2000 Light Source! This user-friendly LED light source is a high efficiency light source utilizing state of-the-art superior illumination technology. It offers a variety of features such as: •... - Page 9 3. SPECIFICATIONS Item Specification Light Source Type LED (Light Emitting Diode) Power 50 Watt Color Temperature 6500º K Led life 50,000 hours (typical) Light guide adapter Brightness control PWM (Pulse-width Modulation) – 0-100% Dimming Input voltage 100-240V AC, 50/60 Hz Rated Power 52 watt Regulatory Approvals...
- Page 10 4.2 REAR PANEL Figure 2. LED Light Source Rear Panel Name Function AC main inlet Accepts AC power cord Fuse 2A, 250V (1/4” x 1 ¼”) time delay Grounding Connector For potential equalization Venting grids Allows adequate ventilation and cooling of the light source 4.3 Bottom Panel Figure 3.
- Page 11 5. INSTALLATION 5.1 SETTING UP THE LED LIGHT SOURCE Place the LED light source on a stable surface (cart, counter, stand, etc.). NOTE: Avoid places where the light source may be splashed with liquid. Absolutely DO NOT use in any environment with explosive or flammable gases. DO NOT block the venting grids of the LED light source.
- Page 12 Seiler Instrument. This warranty gives you specific legal rights and you may also have other rights that vary from state to state.
-
Page 13: Led Warranty
LED Warranty Limited Guarantee / Warranty Seiler Instrument warrants this product to be free from defect in material and workmanship for a period of 12 months following original purchase. The warranty excludes lamps, lamp sockets, and any other items that have been misused, neglected, damaged, altered, or used in any manner inconsistent with the instructions in this manual. -
Page 14: Parfocalizing
Look through the scope and focus on the “X” and change the magnification levels to make sure each setting stays in focus. If the scope goes out of focus start the process over again. Once the image is clear in both eyes, this completes the Parfocalizing Process. Evolution xR6 Magnification Chart OBJECTIVE LENS position of... -
Page 15: The Color Filter And Cleaning
The Color Filter and Cleaning There is a lever installed on the side of the microscope body to put in front of the lamp luminous flux an orange and green filter. Filter Lever Cleaning The objective, placed in front of the field under clinical or surgical treatment, is exposed to blood and topical medicine spots, etc. -
Page 16: Dimensions
Dimensions Evolution xR6 Floor Dimensions Extension Arm: Length of Pantographic 6” (150mm) Arm: 26” (660mm) Height: 70” Max Length: 62” (1574.8mm) Height floor to light housing; 52” Depth: 11.8” (300mm) Base Width: 25” (635mm) Caster: 4” (101.6mm) Base Length 27.5 (700mm) -
Page 17: Parts Breakdown
Parts Breakdown Locking Knob Pantographic Arm LED Illumination System Tension Knob 45 Degree Magnification Turret Green/Orange Filter Binocular Head Fine Focus Knob Handles Objective Lens... - Page 18 General Specific Details Evolution xR6 Minimum Possible 175 mm 6.89 in Vertical Optical Working Distance Maximum Possible 400 mm 15.75 in Microfocus vertical adjustment range: 13mm * Microscope Weight (Floor Model): 237 lbs 108 kg *Including Packaging (3 boxes) Electrical Details Power Supply 90 –...
- Page 19 Owner’s Record Model Number _______________________________________________________ Serial Number ________________________________________________________ Date Purchased _______________________________________________________ Location Purchased ____________________________________________________ Notes...
- Page 20 PRECISION MICROSCOPES We are here to serve you! If you have any questions regarding Seiler’s products or services, please feel free to contact us. Toll-Free: 800.489.2282 Local: 314.968.2282 Fax: 314.968.3601 E-mail: micro@seilerinst.com www.seilerinst.com Dane Carlson Microscope Division Manager dcarlson@seilerinst.com or ext. 365...
Need help?
Do you have a question about the EVOLUTION XR6 and is the answer not in the manual?
Questions and answers