Table of Contents
Advertisement
Quick Links
Serial No. / Nº de Série / Serien Nummer
Nº de Serie / N. di Serie
Date installed / Date d'installation / Installationsdatum
Fecha de Instalación / Data installazione
Location of pump / Situation de la pompe / Installationsort
Ubicación de la bomba / Luogo installazione
sales@aspenpumps.com
Aspen Pumps Apex Way Hailsham East Sussex BN27 3WA UK T: +44 (0) 1323 848842 F: +44 (0) 1323 848846
mini blanc pump
GB
Thank you for buying your new
This manual gives instructions on the correct installation, so it is important
that you follow these instructions carefully. Please record the following
information for your future reference:
Merci pour l'achat de votre nouvelle
F
Cette notice donne les instructions pour une installation correcte qu'il est
important de suivre pour un bon fonctionnement de la pompe. Merci de
noter ci-après les références pour vos futurs suivis:
D
Vielen Dank für den Kauf einer neuen
Diese Bedienungsanleitung gibt Ihnen Anweisungen zur korrekten
Installation, lesen Sie bitte diese Anweisungen sorgfältig. Bitte tragen Sie
folgende Informationen für spätere Rückfragen ein:
E
Gracias por haber seleccionado la nueva
Este manual le proporciona las instrucciones para una correcta instalación,
por lo que le recomendamos lo lea atentamente. Cumplimente la siguiente
información para cualquier futura consulta:
I
Vi ringraziamo per l'acquisto della vostra nuova
Questo manuale fornisce le istruzioni per la sua corretta installazione
pertanto è importante che esse vengano seguite attentamente. Vogliate
scrivere i seguenti dati per future esigenze:
www.aspenpumps.com
Mini Blanc Pump.
Pompe Mini Blanche.
Mini Blanc Kondensatpumpe.
Bomba Mini Blanc.
Pompa Mini Blanc.
Advertisement
Table of Contents

Subscribe to Our Youtube Channel
Related Manuals for Aspen Pumps mini blanc


Summary of Contents for Aspen Pumps mini blanc
- Page 1 Fecha de Instalación / Data installazione Location of pump / Situation de la pompe / Installationsort Ubicación de la bomba / Luogo installazione sales@aspenpumps.com www.aspenpumps.com Aspen Pumps Apex Way Hailsham East Sussex BN27 3WA UK T: +44 (0) 1323 848842 F: +44 (0) 1323 848846...
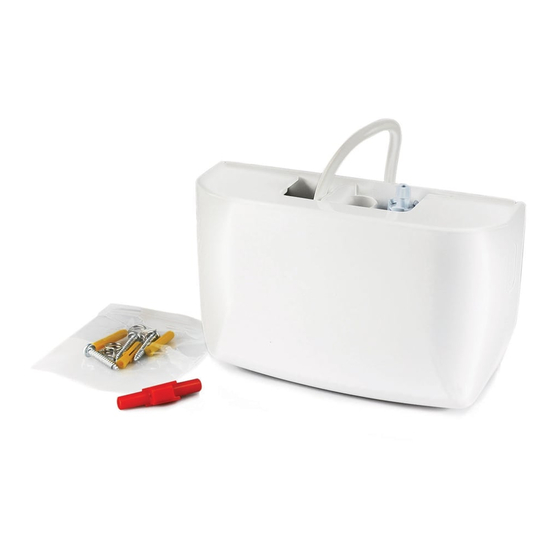
- Page 2 In the box DANS LA BOITE / LIEFERUMFANG / EN LA CAJA / NELLA CONFEZIONE Mini Blanc Kondensatpumpe 9. Stecker 1 m / 3.3 ft 1. Rahmen mit Anti-Vibrationstüllen 10. Befestigungs-Set (3 Schrauben 8 x 25 mm / 2. Pumpe 1”, 1 Schlauchklemme und 3 Dübel)
-
Page 3: Technical Data
Technical Data DONÉES TÉCHNIQUES / TECHNISCHE DATEN / DATOS TÉCNICOS / DATI TECNICI Mini Blanc 120V / 60Hz 230V / 50Hz Mini Blanc 120V / 60Hz 230V / 50Hz • Contactos de alarma N/O N/C 3A • 3A volt-free alarm wires, N.O., Power supply 0.16A / 13.5W... -
Page 4: Typical Performance
Schwimmermagnet nach oben zeigend • WARNUNG: Gefahr eines Stromschlags. eingebaut ist. Die Mini Blanc ist nicht für die Einsatz in • Vergewissern Sie sich, dass das LITRES PER HOUR / LITRES PAR HEURE / oder an Schwimmbädern oder Schwimmergehäuse waagerecht steht. -
Page 5: Installation
INSTALACION / INSTALLAZIONE Benutzen Sie das Befestigungsschema auf Seite 19 um die Befestigungspunkte auf Hold Mini Blanc against wall, under indoor unit. Decide location and check access for der Wand zu markieren. Achten Sie unbedingt auf waagerechten Sitz. Zeichnen Sie drain hose, 6 x 9mm / 1/4 x 3/8”... - Page 6 Installation INSTALACION / INSTALLAZIONE Route 6 x 9mm / 1/4” x 3/8” discharge tube through the indoor unit to an Asegurarse que el cable de alimentación está desconectado, pasar el cable de la appropriate drain, avoiding restrictions. bomba a través de la unidad y conectarlo. Instale un fusible de 1 A en línea. Una alarma de nivel alto puede ser conectada al circuito de control, para desconectar el Prévoir l’itinéraire du tube refoulement en 6 x 9 mm / 1/4”...
- Page 7 Installation INSTALACION / INSTALLAZIONE Push the drain hose at least 30mm / 1.25” into the inlet spigot in the middle of the Slide supplied hose clamp onto (pump end of) 6mm / 1/4” i/d discharge tubing. Frame. Ensure the end of the hose is fully open and not compressed and that the Connect tubing to the outlet barb.
- Page 8 Installation INSTALACION / INSTALLAZIONE Test pump operation by pouring water into evaporator tray. CHECK FOR LEAKS. Check the Float is fitted with the magnet uppermost and the Float retainer is in place. Tester la pompe en mettant de l’eau dans l’évaporateur. Testen Sie den Betrieb indem Sie Wasser in die Auffangwanne der Inneneinheit Vérifier que le flotteur est installé...
-
Page 9: Troubleshooting
Servicing Troubleshooting MAINTENANCE / WARTUNG / PANNES/DEFAILLANCES / SERVICIO / MANUTENZIONE FEHLERBEHEBUNG / LOCALIZACION DE AVERIAS / SOLUZIONE DEI PROBLEMI – FAQ • This Pump, like all mechanical equipment, requires maintenance. • Every six months the cover should be removed, and the reservoir Fault: Pump runs all the time Fault: Pump runs but does not pump should be unclipped from the frame. - Page 10 Troubleshooting PANNES/DEFAILLANCES / FEHLERBEHEBUNG / LOCALIZACION DE AVERIAS / SOLUZIONE DEI PROBLEMI – FAQ ! Die Pumpe schaltet zwar ein, aber es wird ! Die Pumpe arbeitet nicht. kein Kondensat gefördert. 1. Liegt Strom an? Ist die Pumpe richtig 1. Sind Undichtigkeiten saugseitig vorhanden, verkabelt? Ist die Spannung richtig? so dass Luft in die Pumpe gelangt? 2.
- Page 11 ASPEN/4/09 1498 This brochure was produced from sustainable stock.
Need help?
Do you have a question about the mini blanc and is the answer not in the manual?
Questions and answers